

Official MINI DRLs Fitted


4th Gear
Joined: Feb 2003
Posts: 370
Likes: 0
From: Minneapolis
komett155
this thread might help:
https://www.northamericanmotoring.co...m-failure.html
If not, talk with ECS Tuning
this thread might help:
https://www.northamericanmotoring.co...m-failure.html
If not, talk with ECS Tuning
4th Gear
Joined: Feb 2012
Posts: 399
Likes: 0
From: Exit 9
Thanks, but that information is for the R53 washer system. I have an R56.
I'm going to take off the front left wheel and undo the wheel housing liner next weekend and take a peek. Hopefully the 3 lower bolts attaching the bottle are accessible from there. If not, I may have to bite the bullet and plan on removing the front bumper. I'm not looking forward to that since there's a chance it will get scratched in handling off the car.
I'm going to take off the front left wheel and undo the wheel housing liner next weekend and take a peek. Hopefully the 3 lower bolts attaching the bottle are accessible from there. If not, I may have to bite the bullet and plan on removing the front bumper. I'm not looking forward to that since there's a chance it will get scratched in handling off the car.

5th Gear

Joined: Nov 2012
Posts: 645
Likes: 2
Thanks, but that information is for the R53 washer system. I have an R56. I'm going to take off the front left wheel and undo the wheel housing liner next weekend and take a peek. Hopefully the 3 lower bolts attaching the bottle are accessible from there. If not, I may have to bite the bullet and plan on removing the front bumper. I'm not looking forward to that since there's a chance it will get scratched in handling off the car.
Sent from my iPhone using NAMotoring
4th Gear
Joined: Feb 2012
Posts: 399
Likes: 0
From: Exit 9
Thanks KilmerPT!
I've bookmarked the post in question (#395) and will do some scouting next weekend. I like to be prepared. As for the tool you've suggested, I bought a set of "trim removal tools" made of "non marring plastic" and will try those first. If they don't work, I'll get one like what you've pictured.
Thanks again. :-)


Nice box to have show up.  They will look good.
JCW_Coupe - If you don't already have them. We have them here:
MINI Daytime Running Lights LED Part # 63122338554
http://www.ecstuning.com/Search/SiteSearch/63122338554/
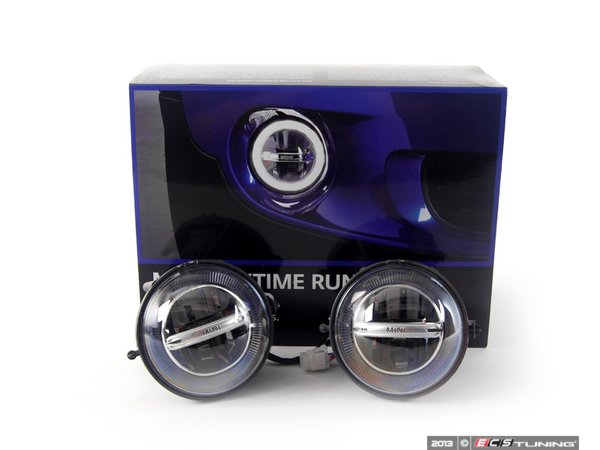
They will look good. JCW_Coupe - If you don't already have them. We have them here:
MINI Daytime Running Lights LED Part # 63122338554
http://www.ecstuning.com/Search/SiteSearch/63122338554/
__________________

MINI Guru/ MINI Owner Since 2004 | NEW Lifetime Part Replacement | Local Pickup
Milltek | Genuine MINI | Forge Motorsport | NM Engineering | ECS Performance | M7 Speed
Customer Service Hours: 8am-8pm EST|Sales Team Hours: 8am-11pm | SAT 10am-7pm 800.924.5172
MINI Guru/ MINI Owner Since 2004 | NEW Lifetime Part Replacement | Local Pickup
Milltek | Genuine MINI | Forge Motorsport | NM Engineering | ECS Performance | M7 Speed
Customer Service Hours: 8am-8pm EST|Sales Team Hours: 8am-11pm | SAT 10am-7pm 800.924.5172

4th Gear
Joined: Dec 2009
Posts: 330
Likes: 2
From: Redmond, Wa
They really are bright, but I think that the LED s that nearly all the car companies are using as DRLs are this bright. I noticed a Lexis the other day, and its array was very bright. These may be brighter than the BMW halos on most of their cars though, Im not sure.
6th Gear
Joined: Jul 2008
Posts: 1,733
Likes: 1
From: Chandler, AZ
they def are brighter than BMW halos

Here's a picture of the drivers side and the washer bottle. You can see the two screws on the upper, the bottom is just held in place by a post in a hole. The very top where you pour in the fluid is fastened by a plastic rivet.
Undoing all these will allow you to massage it out of the way just enough.

Undoing all these will allow you to massage it out of the way just enough.

4th Gear

Joined: Jul 2002
Posts: 495
Likes: 47
From: Dallas, TX
Just installed mine today at the local MINI club's DIY day at MINI of Dallas. My technician friend really did all of the heavy lifting. I ended up strapping the controller box on the outside of wiring harness box and not the fuse box as I could not fit it in the space without bending the brake lines below it. I like this setup pretty well since I didn't put the pull ties over the fuse box. My friend cut two holes in the rear of the cover for the wiring harness plugs and ran the zip ties through there. The controller box is very secure. The bumper removal wasn't a big deal, and my friend did the wire crimp on the inside. Initially, the DRLs would not come on - all the rest of the lights worked. After consulting another club member, we decided the wire wasn't crimped into the connecting piece quite well enough. Once we got that sorted, everything works great. Overall, probably took about 3 hours to get this done, plus my friend needed to help others, say hi to club members, etc. and it was his first install. Pretty straightforward except for the space on the right side of the fuse box in my 2009 fJCW.

4th Gear
Joined: Jul 2002
Posts: 495
Likes: 47
From: Dallas, TX
Yeah - so far, I really like them. And, everybody is correct about these being very bright. And, I noticed that the fogs appeared brighter when I pulled into my parking garage today. Strange that I haven't read about others finding the space way too tight on the right side of the fuse box. We measured and everything, and that thing was just not going to fit over there. Checked it when I got home and it's extremely snug on the other side, so no big deal, but I always like it when the project comes out as advertised.
5th Gear
Joined: Nov 2012
Posts: 645
Likes: 2
Yeah - so far, I really like them. And, everybody is correct about these being very bright. And, I noticed that the fogs appeared brighter when I pulled into my parking garage today. Strange that I haven't read about others finding the space way too tight on the right side of the fuse box. We measured and everything, and that thing was just not going to fit over there. Checked it when I got home and it's extremely snug on the other side, so no big deal, but I always like it when the project comes out as advertised.
With that mentioned, I, too, got mine to fit on the right side if the fuse box. It is a tight fit and there was no need to use the included double sided tape or zip ties. There is no NVH created by the control module just sitting snugly where it is in the pic.

Sent from my iPhone using NAMotoring


2nd Gear
Joined: Aug 2011
Posts: 56
Likes: 0
From: Milwaukee, WI
This talk of 3 hr install time gives me an inferiority complex. 11pm - 2am last night i spent on just the wiring set up. wipers wouldnt come off without a fight and don't get me started on squeezing that control box next to the fuse box.
just too busy to tackle the JCW bumper removal... might bite the bullet and have the mechanic finish it. already removed my rally lights / grill. Hopefully theyll cut me a deal for all that prep. With the money I saved on my group buy, I'll put toward the mechanic. hope i can drive my car with all this stuff removed / loose.
Just not the DIY'er I used to be with all of life's responsibilities! Wish Milwaukee had the Dallas DIY community.
Just installed mine today at the local MINI club's DIY day at MINI of Dallas. My technician friend really did all of the heavy lifting. I ended up strapping the controller box on the outside of wiring harness box and not the fuse box as I could not fit it in the space without bending the brake lines below it. I like this setup pretty well since I didn't put the pull ties over the fuse box. My friend cut two holes in the rear of the cover for the wiring harness plugs and ran the zip ties through there. The controller box is very secure. The bumper removal wasn't a big deal, and my friend did the wire crimp on the inside. Initially, the DRLs would not come on - all the rest of the lights worked. After consulting another club member, we decided the wire wasn't crimped into the connecting piece quite well enough. Once we got that sorted, everything works great. Overall, probably took about 3 hours to get this done, plus my friend needed to help others, say hi to club members, etc. and it was his first install. Pretty straightforward except for the space on the right side of the fuse box in my 2009 fJCW.
5th Gear
Joined: Nov 2012
Posts: 645
Likes: 2
This talk of 3 hr install time gives me an inferiority complex. 11pm - 2am last night i spent on just the wiring set up. wipers wouldnt come off without a fight and don't get me started on squeezing that control box next to the fuse box. just too busy to tackle the JCW bumper removal... might bite the bullet and have the mechanic finish it. already removed my rally lights / grill. Hopefully theyll cut me a deal for all that prep. With the money I saved on my group buy, I'll put toward the mechanic. hope i can drive my car with all this stuff removed / loose. Just not the DIY'er I used to be with all of life's responsibilities! Wish Milwaukee had the Dallas DIY community.
Anyhow, in case you need to take off the wipers again, I found it easiest to use a small pair of channel lock pliers to bust them loose. Here's a pic of the driver side. Goodluck with the rest of install!
Sent from my iPhone using NAMotoring
2nd Gear
Joined: Aug 2011
Posts: 56
Likes: 0
From: Milwaukee, WI
Awesome. Now I can test if my mechanic is overpriced too.
Unfortunately, the plastic bit holding one of my driverside bolts separated so it just spins when you try to unscrew it. I don't think that headlight can ever be removed without surgery. I would def pay $135 to have this headache gone. I get paranoid crawling under the car (IDK how to get the MINI on jack stands).
Unfortunately, the plastic bit holding one of my driverside bolts separated so it just spins when you try to unscrew it. I don't think that headlight can ever be removed without surgery. I would def pay $135 to have this headache gone. I get paranoid crawling under the car (IDK how to get the MINI on jack stands).
2nd Gear
Joined: Aug 2011
Posts: 56
Likes: 0
From: Milwaukee, WI
Haha, I jest. It does make me wonder why this project is taking so long though. Having the right tools goes a long way. My ratchet was too short to remove the ground bolt under the fuse box so that took exorbitantly long. Thanks for the wiper tip. I was worried I'd damage the soft plastic surround so I muscled it out.
It's not like it's a contest mate. You shouldn't feel bad if it takes you longer than a professional mechanic to DIY. As long as you enjoy the process of DIY, that's what matters IMO.
Anyhow, in case you need to take off the wipers again, I found it easiest to use a small pair of channel lock pliers to bust them loose. Here's a pic of the driver side. Goodluck with the rest of install!
Sent from my iPhone using NAMotoring
Anyhow, in case you need to take off the wipers again, I found it easiest to use a small pair of channel lock pliers to bust them loose. Here's a pic of the driver side. Goodluck with the rest of install!
Sent from my iPhone using NAMotoring