General MINI Talk Shared experiences, motoring minutes, and other general MINI-related discussion that applies to all MINIs, regardless of model, year or trim.
Sponsored by:
Sponsored by:

What did you do to your mini today?

Old Feb 17, 2015 | 02:06 PM
  #15051  
808keith's Avatar
808keith
4th Gear
Joined: Dec 2014
Posts: 312
Likes: 7
From: HaWaI'I
Originally Posted by Steffen.Johnson
No way that's legit, how exactly do you do that? Is there a tutorial or link that explains this? I wanna do mine now.
No tutorial or link but i remembered someone whether it was on this forum or on another explained how it was done... I just finally got brave enought to do it.

Originally Posted by ECSTuning
Yea, it looks really cool. Do you have a close up. This can be done to the Euro taillights also as the share the same chrome. Seen the Red Laminx X taillight film almost do the same thing, but this is better.
I'll take a closer pic later today after work.

The only hard part is trying to make the seal whether you use the black silicone adhesive or JB Weld, look smooth. At least with the JB Weld you have the option of sanding it smoother. Main thing is you want to be sure you seal it completely. The nice thing about our taillights is that it kinda sits recessed in the body so it hides the sides where you're sealing it.
 
Reply
Old Feb 17, 2015 | 03:34 PM
  #15052  
Steffen.Johnson's Avatar
Steffen.Johnson
6th Gear
Joined: May 2014
Posts: 1,249
Likes: 2
Originally Posted by 808keith
No tutorial or link but i remembered someone whether it was on this forum or on another explained how it was done... I just finally got brave enought to do it. I'll take a closer pic later today after work. The only hard part is trying to make the seal whether you use the black silicone adhesive or JB Weld, look smooth. At least with the JB Weld you have the option of sanding it smoother. Main thing is you want to be sure you seal it completely. The nice thing about our taillights is that it kinda sits recessed in the body so it hides the sides where you're sealing it.
Yeah please post pics and explain a little better if you don't mind. So how did you actually split it? And then you used alcohol to take the chrome off?
 
Reply
Old Feb 17, 2015 | 04:12 PM
  #15053  
808keith's Avatar
808keith
4th Gear
Joined: Dec 2014
Posts: 312
Likes: 7
From: HaWaI'I
Originally Posted by Steffen.Johnson
Yeah please post pics and explain a little better if you don't mind. So how did you actually split it? And then you used alcohol to take the chrome off?
with a dremel tool with the cut-off wheel attachment. slowly cut between the lens and black housing. You'll want to cut all the way through.

Yes I used rubbing alcohol to wipe the chrome off. It's painted onto the red lens so in actuality it's an all red lens with the edges painted chrome. The alcohol takes off the chrome without any damage to the red lens.
 
Reply
Old Feb 17, 2015 | 04:37 PM
  #15054  
Steffen.Johnson's Avatar
Steffen.Johnson
6th Gear
Joined: May 2014
Posts: 1,249
Likes: 2
Originally Posted by 808keith
with a dremel tool with the cut-off wheel attachment. slowly cut between the lens and black housing. You'll want to cut all the way through. Yes I used rubbing alcohol to wipe the chrome off. It's painted onto the red lens so in actuality it's an all red lens with the edges painted chrome. The alcohol takes off the chrome without any damage to the red lens.
Awesome thanks! I'm going to be doing this for sure can you post a few pics later if you don't mind.
 
Reply
Old Feb 17, 2015 | 04:39 PM
  #15055  
Rckstrgrl21's Avatar
Rckstrgrl21
2nd Gear
Joined: Dec 2014
Posts: 80
Likes: 0
From: San Diego, California (North Park)
Originally Posted by 808keith
Started to remove the Cooper s badge. Still got some cleaning... Enjoy..
How did you go about removing the badge? A fishing line?

Sent from my iPhone using NAMotoring
 
Reply
Old Feb 17, 2015 | 04:46 PM
  #15056  
mishanja's Avatar
mishanja
4th Gear
iTrader: (11)
Joined: Oct 2014
Posts: 388
Likes: 2
From: Houston, TX
Originally Posted by Steffen.Johnson

Yeah please post pics and explain a little better if you don't mind. So how did you actually split it? And then you used alcohol to take the chrome off?
I am not sure if this applies to Mini lights (or can even be done) but I had to "cook" my Infiniti headlights in the oven for about 3-5 minutes at 375F and then just pull them apart. Then cook them again and put together.
 
Reply
Old Feb 17, 2015 | 05:38 PM
  #15057  
808keith's Avatar
808keith
4th Gear
Joined: Dec 2014
Posts: 312
Likes: 7
From: HaWaI'I
Originally Posted by Steffen.Johnson
Awesome thanks! I'm going to be doing this for sure can you post a few pics later if you don't mind.
Here's some pics. Hard to tell without me removing the tail lights again. You'll see what I mean though wen you remove your tail lights where the separation is between the lens and body of the housing. That small gap area is where you want to cut through.

So you don't need to be super **** on the sealing part as its hidden once you put the lens back on the car.
 
Attached Thumbnails What did you do to your mini today?-image-3979061239.jpg   What did you do to your mini today?-image-996828706.jpg   What did you do to your mini today?-image-1830491081.jpg   What did you do to your mini today?-image-3355177469.jpg  
Reply
Old Feb 17, 2015 | 05:39 PM
  #15058  
808keith's Avatar
808keith
4th Gear
Joined: Dec 2014
Posts: 312
Likes: 7
From: HaWaI'I
Originally Posted by Rckstrgrl21
How did you go about removing the badge? A fishing line? Sent from my iPhone using NAMotoring
Yup fishing line. Need to source a steamer to remove the rest of the adhesive.
 
Reply
Old Feb 17, 2015 | 05:43 PM
  #15059  
808keith's Avatar
808keith
4th Gear
Joined: Dec 2014
Posts: 312
Likes: 7
From: HaWaI'I
Originally Posted by mishanja
I am not sure if this applies to Mini lights (or can even be done) but I had to "cook" my Infiniti headlights in the oven for about 3-5 minutes at 375F and then just pull them apart. Then cook them again and put together.
I'm not sure I would attempt to heat these. Seems like the adhesive is a little more permanent unlike the headlights. Converting my f-150 to bi-xenon I could but my choice I wouldn't with these tail lights.
 
Reply
Old Feb 17, 2015 | 09:30 PM
  #15060  
Steffen.Johnson's Avatar
Steffen.Johnson
6th Gear
Joined: May 2014
Posts: 1,249
Likes: 2
Originally Posted by 808keith
Here's some pics. Hard to tell without me removing the tail lights again. You'll see what I mean though wen you remove your tail lights where the separation is between the lens and body of the housing. That small gap area is where you want to cut through.

So you don't need to be super **** on the sealing part as its hidden once you put the lens back on the car.
NICE, thanks for the picks I really appreciate it. Came out awesome. I was looking online and some people actually seperate the chrome part and paint that as well. But I like this look. Thanks again!
 
Reply
Old Feb 18, 2015 | 08:50 AM
  #15061  
walk0080's Avatar
walk0080
6th Gear
Joined: Jun 2010
Posts: 1,800
Likes: 2
--
 

Last edited by walk0080; Jun 5, 2018 at 12:55 PM.
Reply
Old Feb 18, 2015 | 11:01 AM
  #15062  
Centium's Avatar
Centium
3rd Gear
Joined: Feb 2014
Posts: 191
Likes: 2
From: Des Plaines, IL
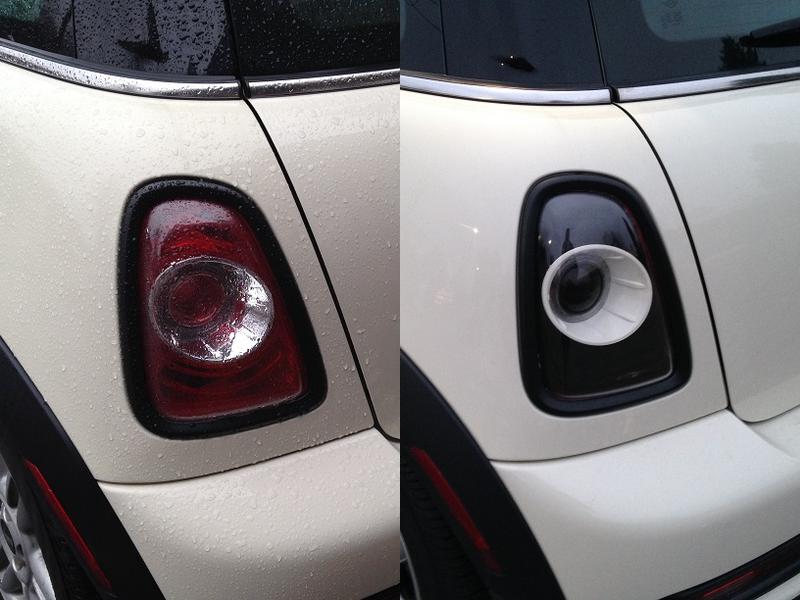
FYI for all of you looking to open your tail lights, it's not as simple as heating them and opening them. The housing is melted to the lens. You will need to use a dremel to cut the lens from the housing to open them. When you reassemble it, just use silicone to re-seal it. I did this on my R56...

 
Reply
Old Feb 18, 2015 | 11:29 AM
  #15063  
Grizld700's Avatar
Grizld700
6th Gear
iTrader: (1)
Joined: Apr 2010
Posts: 2,474
Likes: 7
From: E. Iowa
Those taillights are awesome! What did you color the lenses with?
 
Reply
Old Feb 18, 2015 | 12:01 PM
  #15064  
Centium's Avatar
Centium
3rd Gear
Joined: Feb 2014
Posts: 191
Likes: 2
From: Des Plaines, IL
Originally Posted by Grizld700
Those taillights are awesome! What did you color the lenses with?
2 coats of VHT Nightshades for the red lens tint...

3 coats of Spray on Pepper White (850) for the chrome reflector...

All painted/tinted surfaces were hit with 2-3 coats of spray clear coat.


Reply
Old Feb 18, 2015 | 01:26 PM
  #15065  
Grizld700's Avatar
Grizld700
6th Gear
iTrader: (1)
Joined: Apr 2010
Posts: 2,474
Likes: 7
From: E. Iowa
Where did you cut exactly? Right where the clear lense meets the red plastic and is "welded"? Also when you painted the lenses, did you sand them down and/or remove the chrome prior to painting?
 
Reply
Old Feb 18, 2015 | 01:50 PM
  #15066  
Steffen.Johnson's Avatar
Steffen.Johnson
6th Gear
Joined: May 2014
Posts: 1,249
Likes: 2
Originally Posted by Centium
2 coats of VHT Nightshades for the red lens tint...

3 coats of Spray on Pepper White (850) for the chrome reflector...

All painted/tinted surfaces were hit with 2-3 coats of spray clear coat.


WOW that looks awesome too! Unrelated question: did you use plastidip or vinyl to black out all of your chrome? I am in the same boat and looking for the best options!
 
Reply
Old Feb 18, 2015 | 02:20 PM
  #15067  
thirdraildesignlab's Avatar
thirdraildesignlab
6th Gear
iTrader: (5)
Joined: Apr 2006
Posts: 1,847
Likes: 5
From: San Francisco
Originally Posted by Centium
2 coats of VHT Nightshades for the red lens tint... 3 coats of Spray on Pepper White (850) for the chrome reflector... All painted/tinted surfaces were hit with 2-3 coats of spray clear coat.
Have you, or has anyone else, tried to REMOVE VHT nightshades? In case we go too far into the inky black...
 
Reply
Old Feb 18, 2015 | 02:41 PM
  #15068  
Centium's Avatar
Centium
3rd Gear
Joined: Feb 2014
Posts: 191
Likes: 2
From: Des Plaines, IL
Originally Posted by Grizld700
Where did you cut exactly? Right where the clear lense meets the red plastic and is "welded"? Also when you painted the lenses, did you sand them down and/or remove the chrome prior to painting?
(The picture is of an aftermarket housing that I'm not using... It's the same basic layout as the stock part.

Cut JUST inside the black foam (RED ARROWS). Take your time and feel it out. When you feel like the resistance has gone away, you've cut through the red housing. Be careful not to go so deep that you cut the clear lens. When you're done, carefully disassemble the inner pieces and you should have what is shown in the second picture...

I can upload more detailed pictures tomorrow if you'd like.
 
Attached Thumbnails What did you do to your mini today?-img_1923.jpg   What did you do to your mini today?-1-7.jpg  
Reply
Old Feb 18, 2015 | 02:51 PM
  #15069  
Centium's Avatar
Centium
3rd Gear
Joined: Feb 2014
Posts: 191
Likes: 2
From: Des Plaines, IL
Originally Posted by Steffen.Johnson
WOW that looks awesome too! Unrelated question: did you use plastidip or vinyl to black out all of your chrome? I am in the same boat and looking for the best options!
I used vinyl for most the beltline except the hood portion.
http://www.outmotoring.com/mini-coop...tline-kit.html

The tail light rings, MINI badge, Cooper S, side scuttles, beltline on the hood, and gas cap are all Plastidip.

The head light rings and grill surround are replacement parts from outmotoring.
http://www.outmotoring.com/mini-coop...rill_trim.html
http://www.outmotoring.com/mini-coop...rior_trim.html

The exhaust tips were done with Black Gloss Engine Enamel.
http://www.homedepot.com/p/Rust-Oleu...5yc1vZapz5Z89c

The reverse lamps, and scuttle signals were also done with 2 coats of VHT Nightshades.
 
Reply
Old Feb 18, 2015 | 02:54 PM
  #15070  
Centium's Avatar
Centium
3rd Gear
Joined: Feb 2014
Posts: 191
Likes: 2
From: Des Plaines, IL
Originally Posted by thirdraildesignlab
Have you, or has anyone else, tried to REMOVE VHT nightshades? In case we go too far into the inky black...
This works...

 
Reply
Old Feb 18, 2015 | 02:55 PM
  #15071  
Grizld700's Avatar
Grizld700
6th Gear
iTrader: (1)
Joined: Apr 2010
Posts: 2,474
Likes: 7
From: E. Iowa
Awesome! Thanks a lot! And if you have time feel free to add detailed photos. Maybe even make a separate thread? I'm sure people would love to do this.
 
Reply
Old Feb 18, 2015 | 02:57 PM
  #15072  
Centium's Avatar
Centium
3rd Gear
Joined: Feb 2014
Posts: 191
Likes: 2
From: Des Plaines, IL
Originally Posted by Grizld700
Awesome! Thanks a lot! And if you have time feel free to add detailed photos. Maybe even make a separate thread? I'm sure people would love to do this.
There already is a thread... Someone else did this mod in 2012. That's where I got the idea. I feel that his thread is missing some important details, so I may update it.

https://www.northamericanmotoring.co...aillights.html
 
Reply
Old Feb 19, 2015 | 07:50 AM
  #15073  
BbyDenns's Avatar
BbyDenns
2nd Gear
iTrader: (1)
Joined: Apr 2014
Posts: 81
Likes: 3
From: Montgomery, AL
Originally Posted by walk0080
Last week completed a 2,250 km (1,400 mls)

Oh and I think my brake rotors are getting warped :-( I torque the lugs, but maybe the last service the wheels were removed without me knowing. Still seems rare for JCW rotors to warp. The car is street driven only.

Regarding the rotors:

I thought the same thing about my rear passenger side, it was scraping occasionally and it sounded like it was just one scrape per revolution.
It turned out the top bolt on the caliper mount/bracket was missing and when I braked the force twisted the mount and it was rubbing on the edge of the rotor.
 
Reply
Old Feb 19, 2015 | 07:54 AM
  #15074  
Centium's Avatar
Centium
3rd Gear
Joined: Feb 2014
Posts: 191
Likes: 2
From: Des Plaines, IL
Originally Posted by Grizld700
Awesome! Thanks a lot! And if you have time feel free to add detailed photos. Maybe even make a separate thread? I'm sure people would love to do this.
You've inspired me to do a detailed write-up on both the Gen1 and Gen2 tail lamp mods... All I need are a tail light from each generation.

Anybody know someone willing to part with a tail light? I'll even take broken ones if they have them...
 
Reply
Old Feb 19, 2015 | 07:57 AM
  #15075  
Steffen.Johnson's Avatar
Steffen.Johnson
6th Gear
Joined: May 2014
Posts: 1,249
Likes: 2
Originally Posted by Centium
You've inspired me to do a detailed write-up on both the Gen1 and Gen2 tail lamp mods... All I need are a tail light from each generation.

Anybody know someone willing to part with a tail light? I'll even take broken ones if they have them...
PLEASE post link when you do. I am very interested in this and even have a set of old crappy taillights hanging around i wanna experiment on first
 
Reply

Thread Tools
Search this Thread

All times are GMT -7. The time now is 11:31 PM.