
Drivetrain My build. Teaser photos and updates

3rd Gear
Joined: Dec 2013
Posts: 253
Likes: 0
Nice welds...looks good. Flat on end of tungsten? Hmmm, ran mine pencil-lead sharp. You can change length of protrusion out of the cup too...(hint...weld itself should be flat, not convex or concave, bumpy or dipped) Ones on the three threaded adapters (5th image from 6/27/2014) look a little hot to me at first glance, maybe not...just sayin. Great looking project. I expect to see the auto manufacturers take to your concept...should be awesome!!
Last edited by Gearheadaddy; Jun 30, 2014 at 12:03 AM.

Thread Starter
|
5th Gear
Joined: Aug 2008
Posts: 1,100
Likes: 13
From: Inman, SC
bunch of random boring stuff this weekend, and a few neat things thrown in the mix.
Most of it was plumbing work for the coolant system and torquing everything I took off the car back down (from valve cover to subframe, etc)
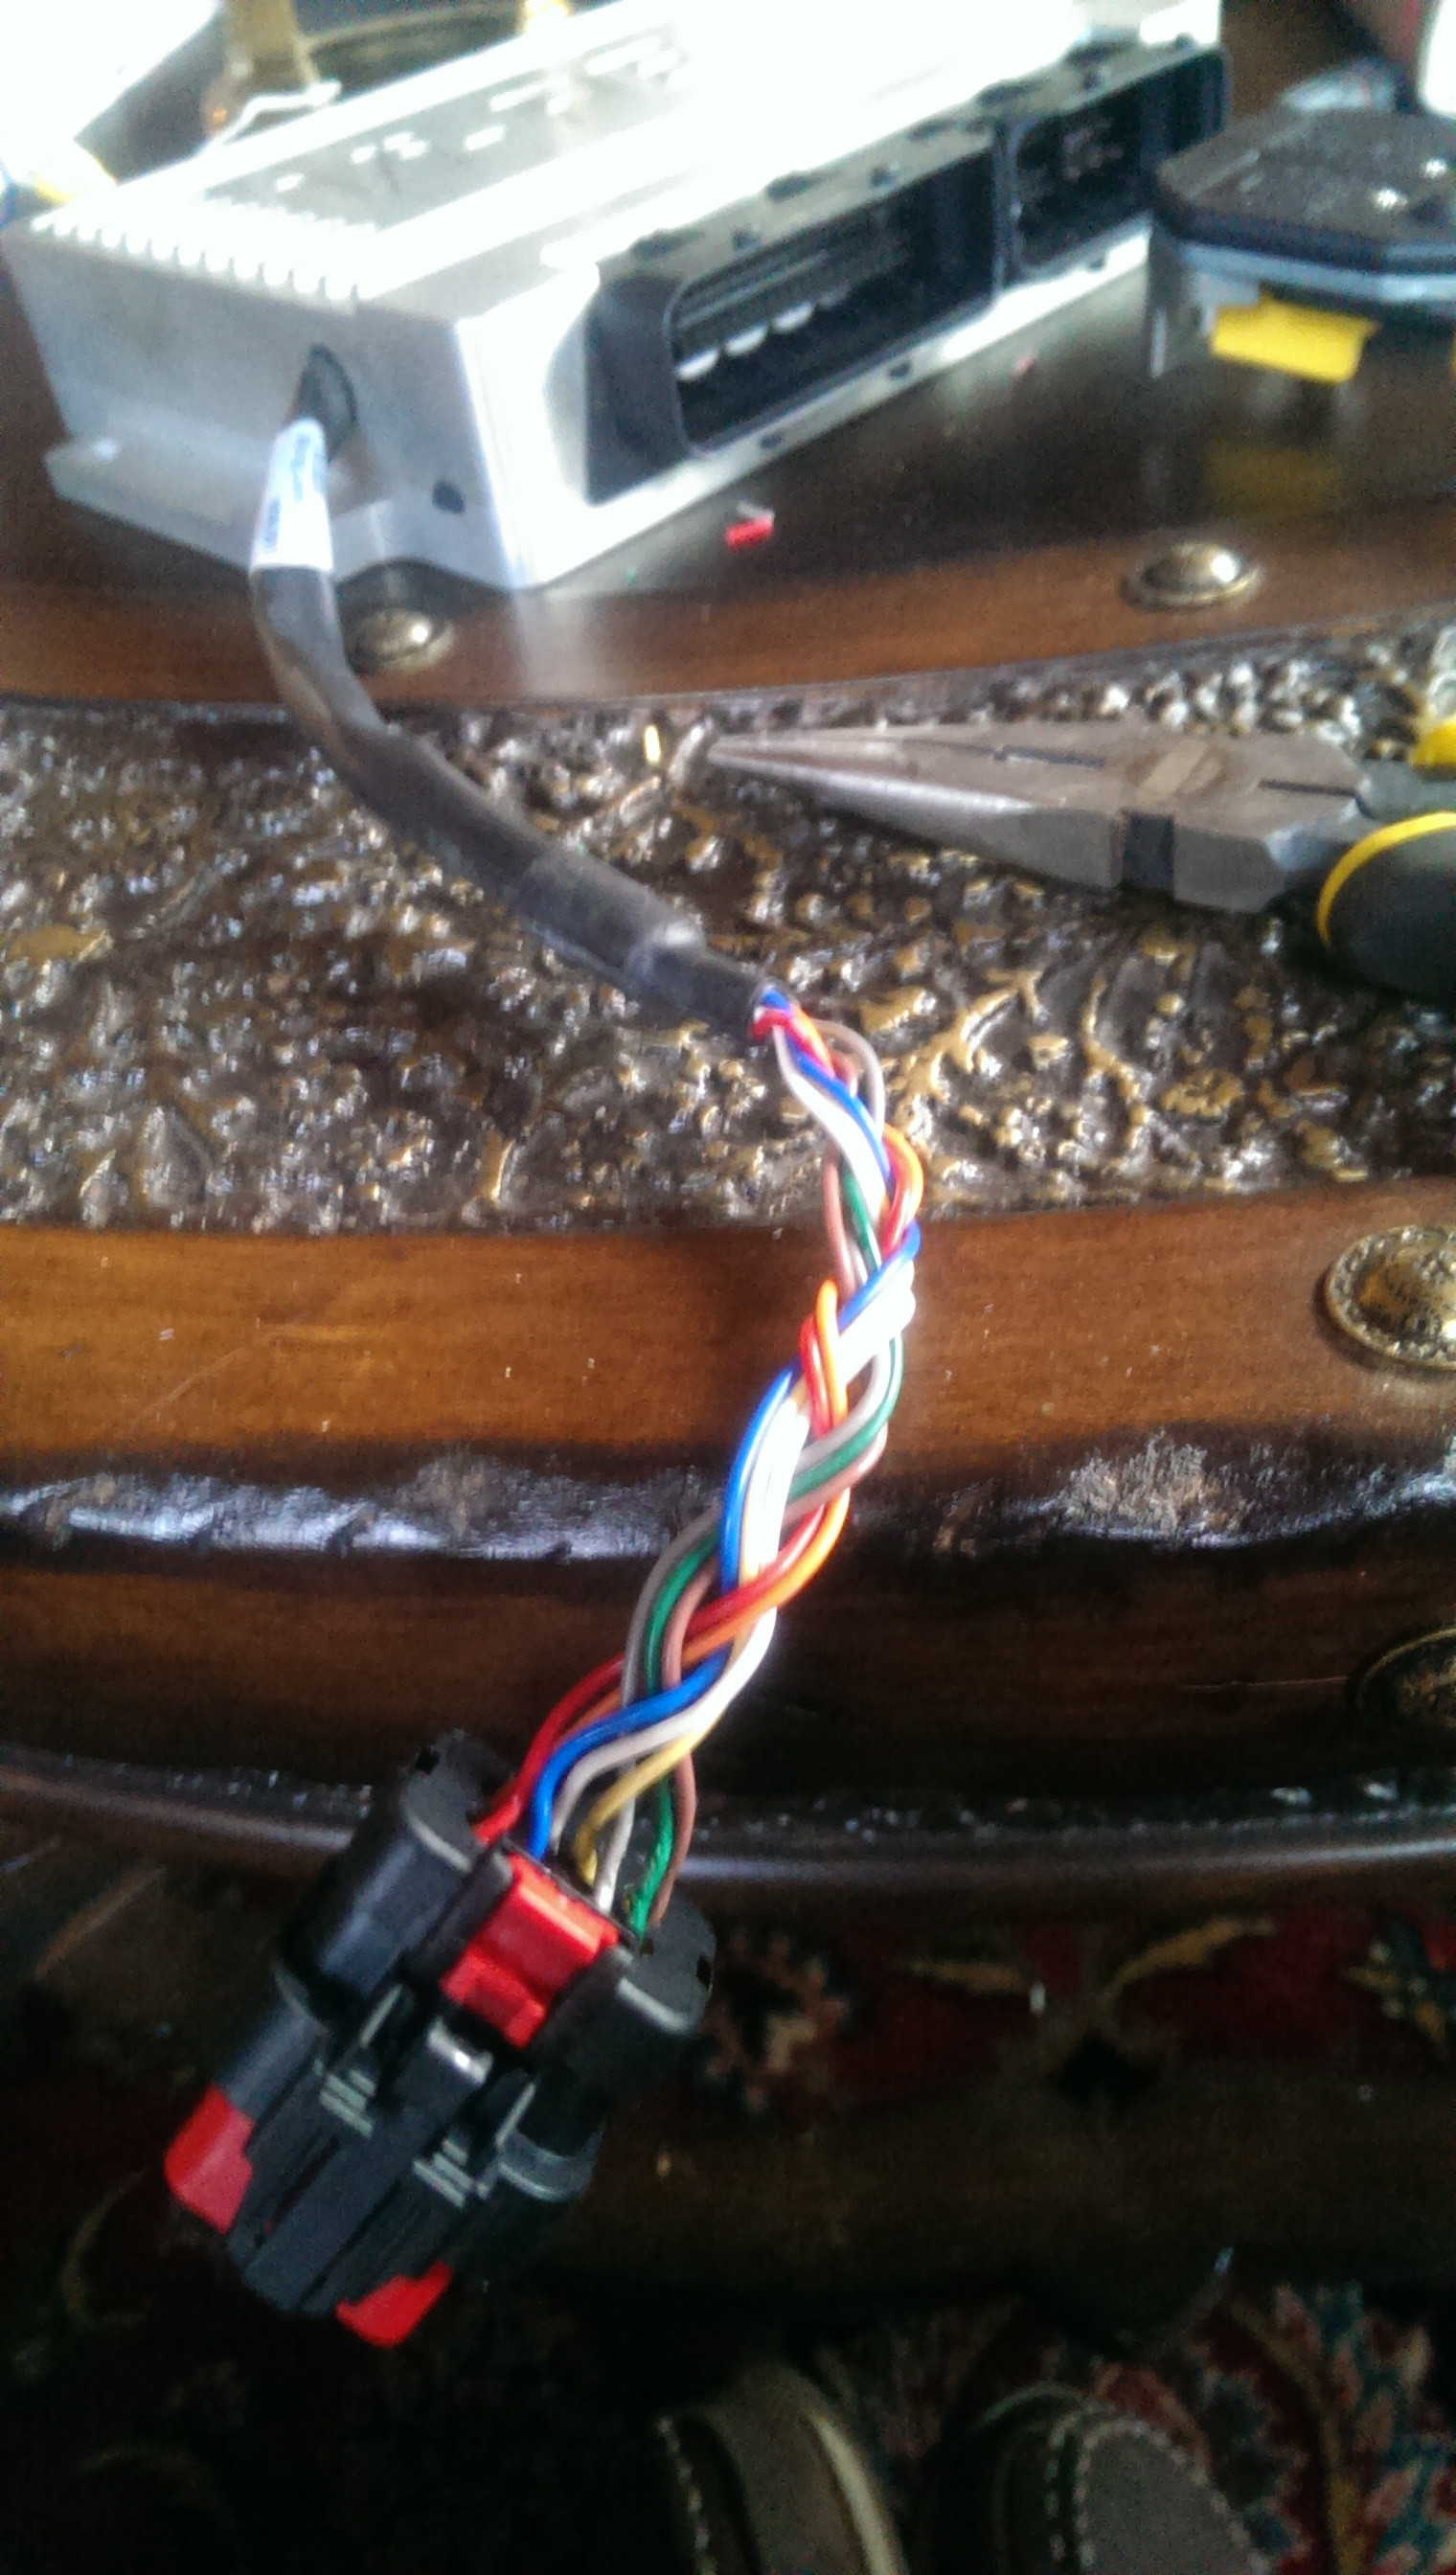
I also finally got around to putting an 8-pin connector on the vipec expansion harness
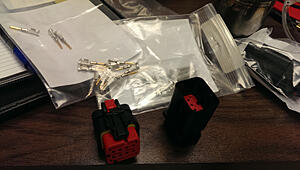
Wiring is one of my least favorite things (easy, boring) but at least it makes things nice and simple to use

Also got in my EGT gauge
So I marked, drilled, and tapped a hole directly into the turbine housing for that
(no money or room for individual cylinder EGT)

went ahead and put a 10.5psi spring set into the wastegate (for starters while I get it running, will get bumped up to an 18psi setup soon enough.

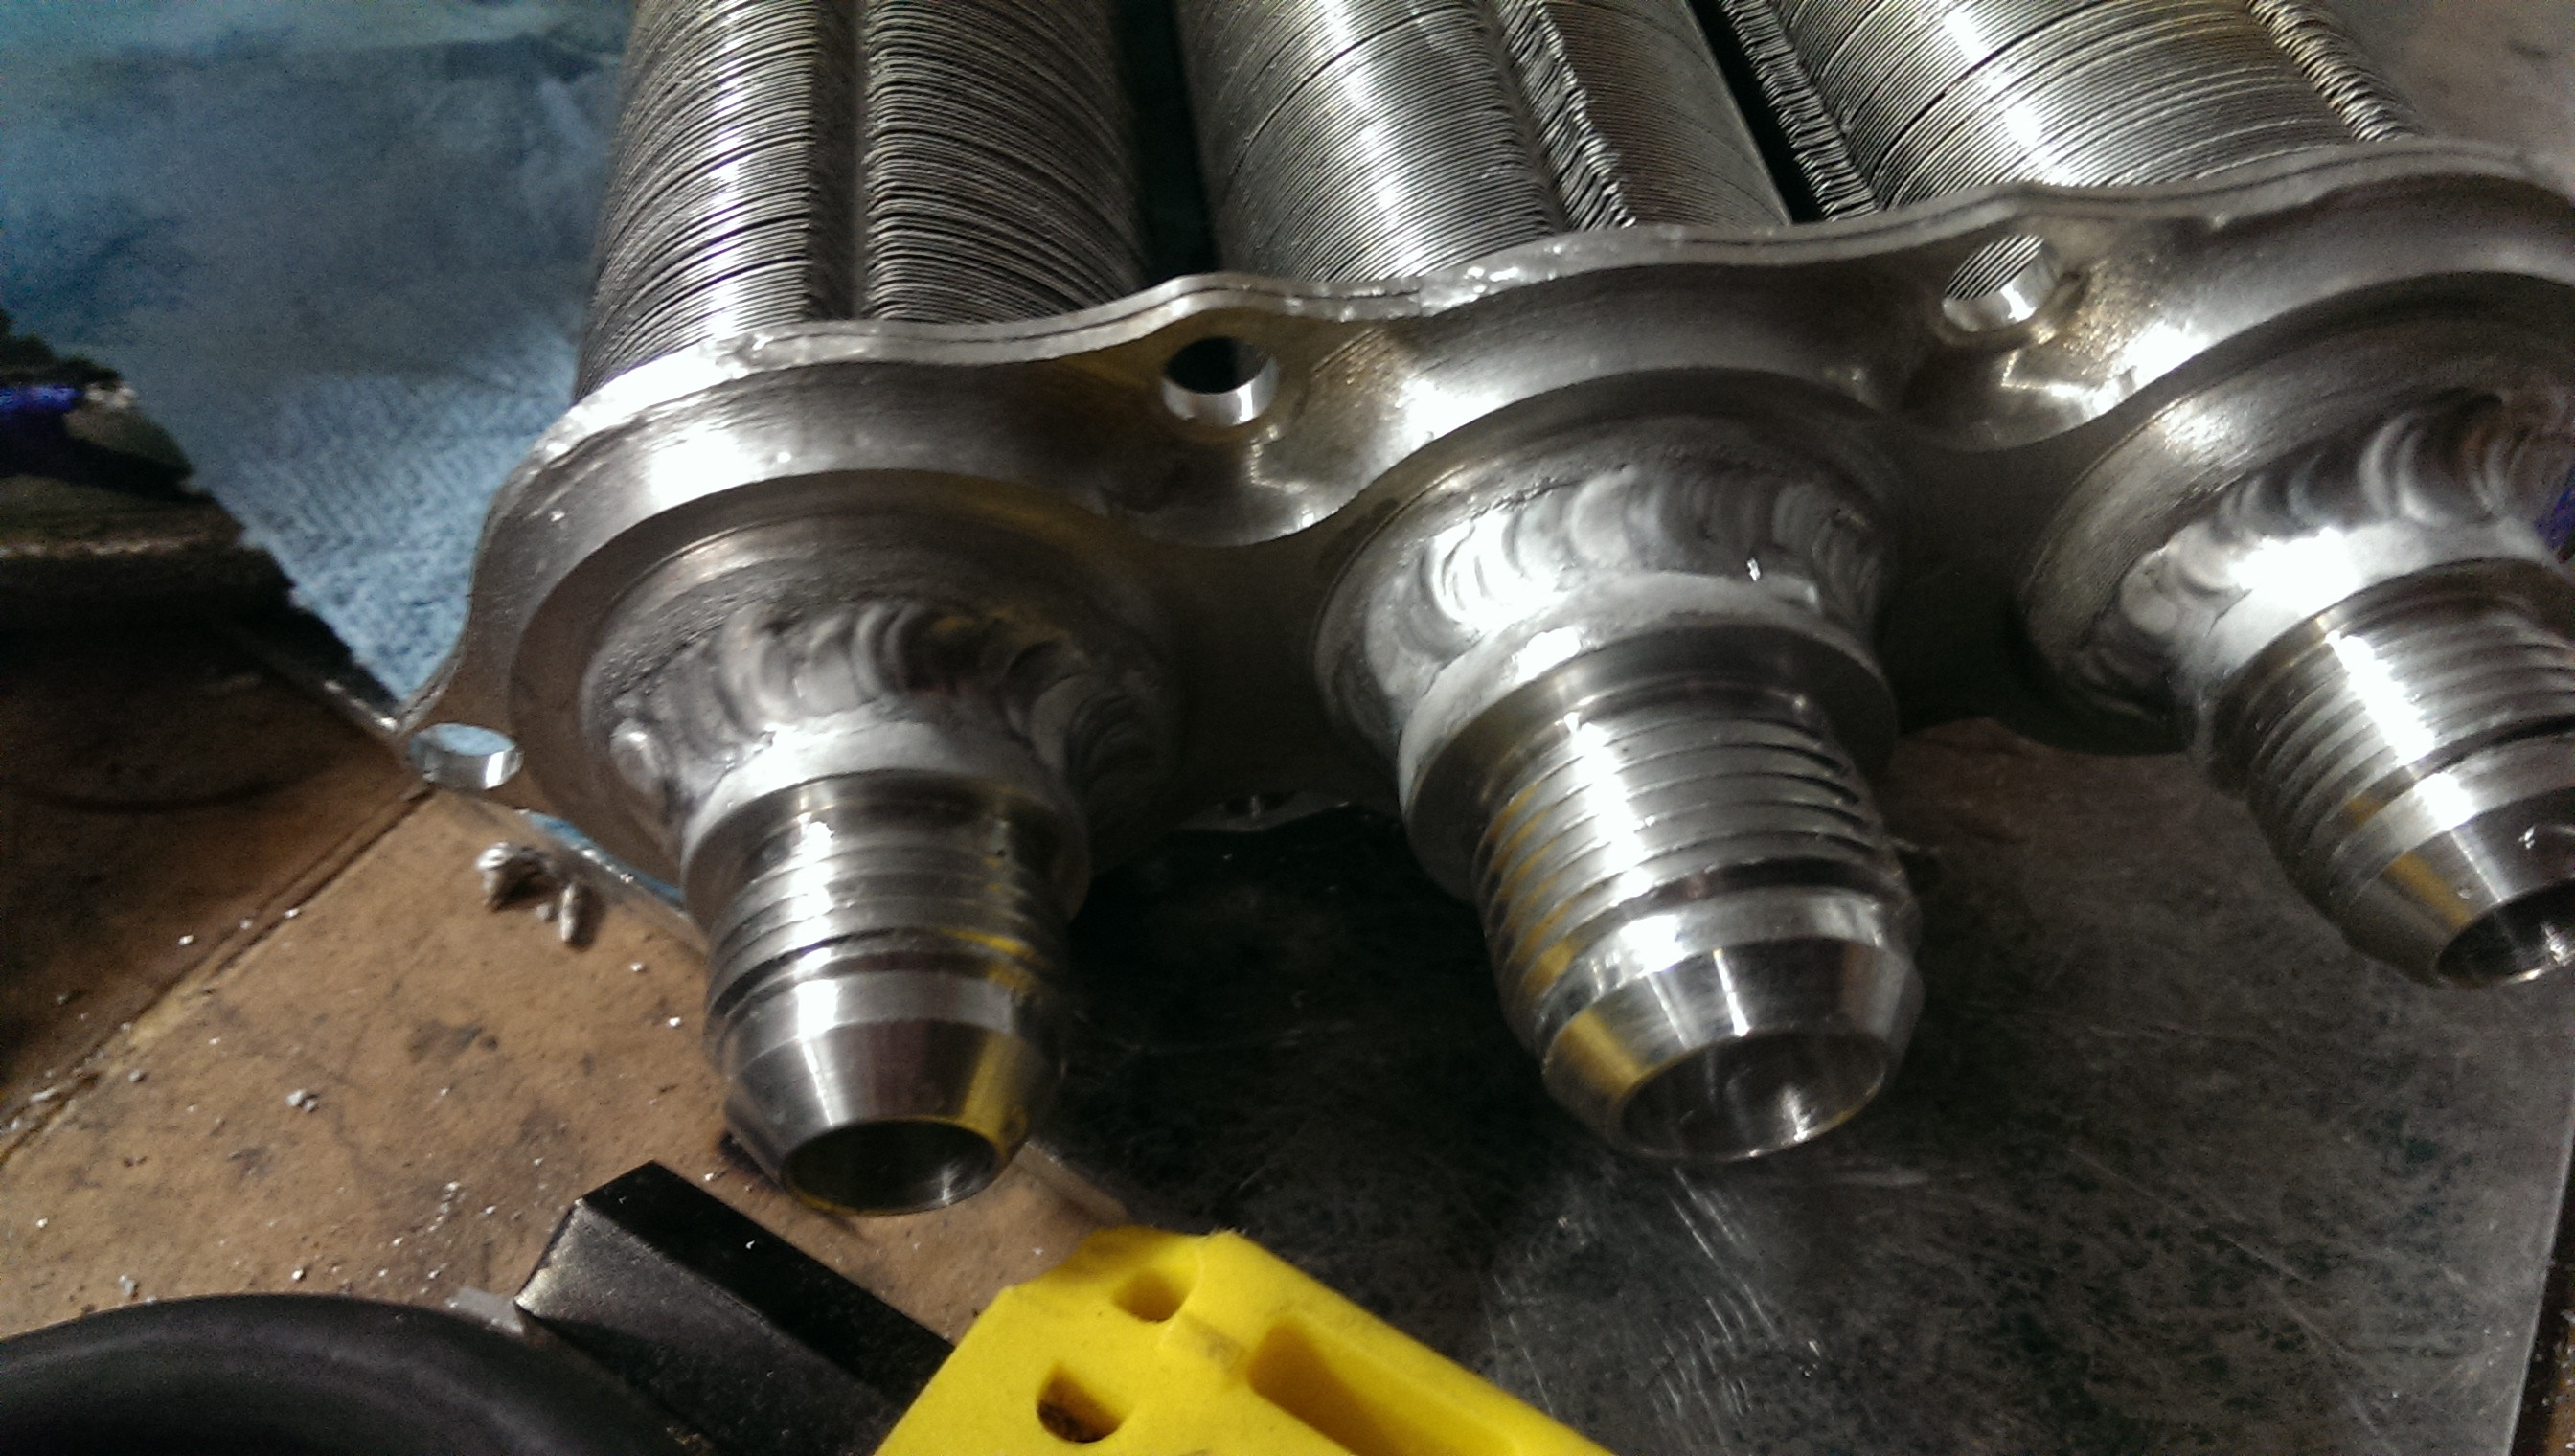
also got the fittings welded on for the a2w setup, and all the o-rings seat well inside of the water path, no leaks!


Most of it was plumbing work for the coolant system and torquing everything I took off the car back down (from valve cover to subframe, etc)
I also finally got around to putting an 8-pin connector on the vipec expansion harness
Wiring is one of my least favorite things (easy, boring) but at least it makes things nice and simple to use
Also got in my EGT gauge
So I marked, drilled, and tapped a hole directly into the turbine housing for that
(no money or room for individual cylinder EGT)

went ahead and put a 10.5psi spring set into the wastegate (for starters while I get it running, will get bumped up to an 18psi setup soon enough.

also got the fittings welded on for the a2w setup, and all the o-rings seat well inside of the water path, no leaks!


Thread Starter
|
5th Gear
Joined: Aug 2008
Posts: 1,100
Likes: 13
From: Inman, SC
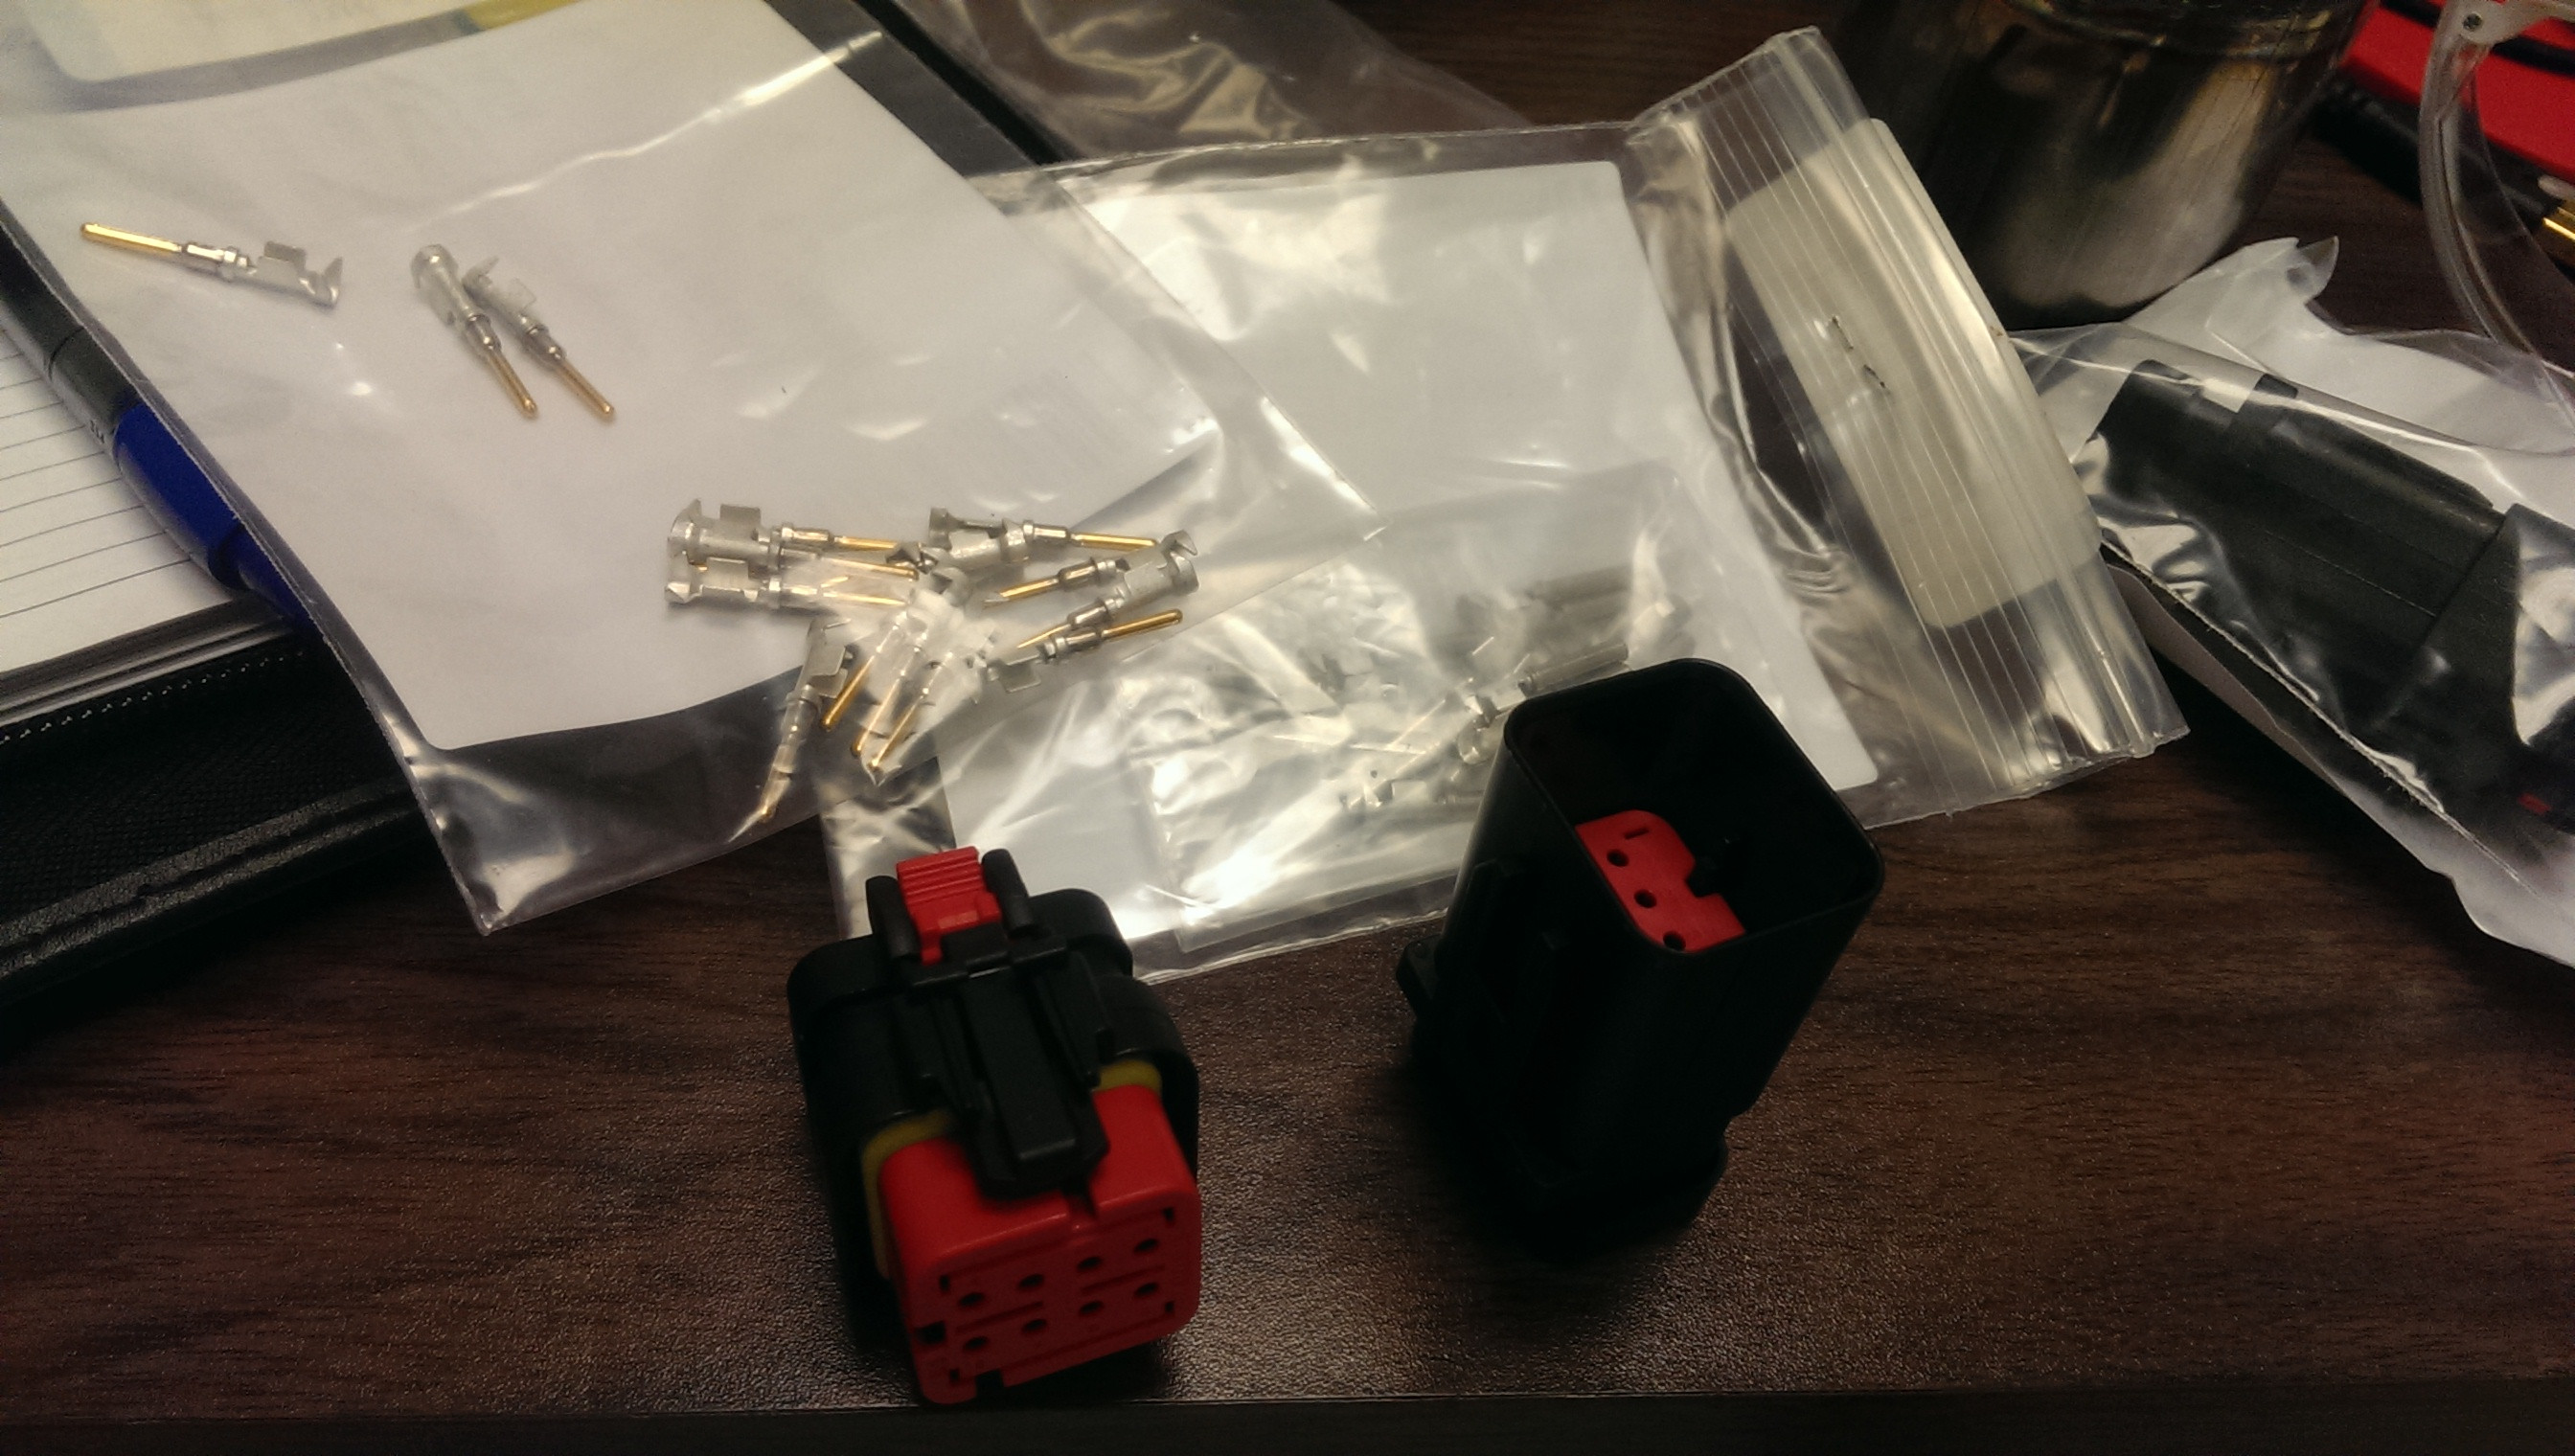
it was the expansion cable from vipec that allows you to add in more digital and analog inputs and some other things.
was an extra $15 i think... not sure... maybe more.
But it came as just a main connector to the vipec motherboard with a pigtail (~4' of wires) that gets messy when I need some to go to the cabin for gauges and others in the bay, so I added in the 8 pin connector so I could easily install and remove the ECU.


Thread Starter
|
5th Gear
Joined: Aug 2008
Posts: 1,100
Likes: 13
From: Inman, SC
new award to most PITA thing I have done recently goes to!
This intercooler!
Turns out I should have just machined a few pieces myself. While the surface finish was better, the bolt holes that I have to bolt the water blocks too are up to .010" out of position. Which may not sound like much, but it makes things not line up, so I have been taking a dremmel with a tunsten carbide router mill bit and slowly opening holes and ovaling and fiddling everywhere to try and get this thing to work and not mess up the o-rings (I currently can get it all bolted together, but it pushes the o-rings to the side and does not seal 100%)
not a huge problem, just annoying and laborious.

Oh, and I have about 200 extreemly tiny metal slivers (metal splinters) in my hands.. everywere...
(stainless from the laser cut retaining washer replacements)
and they are friggin tiny...
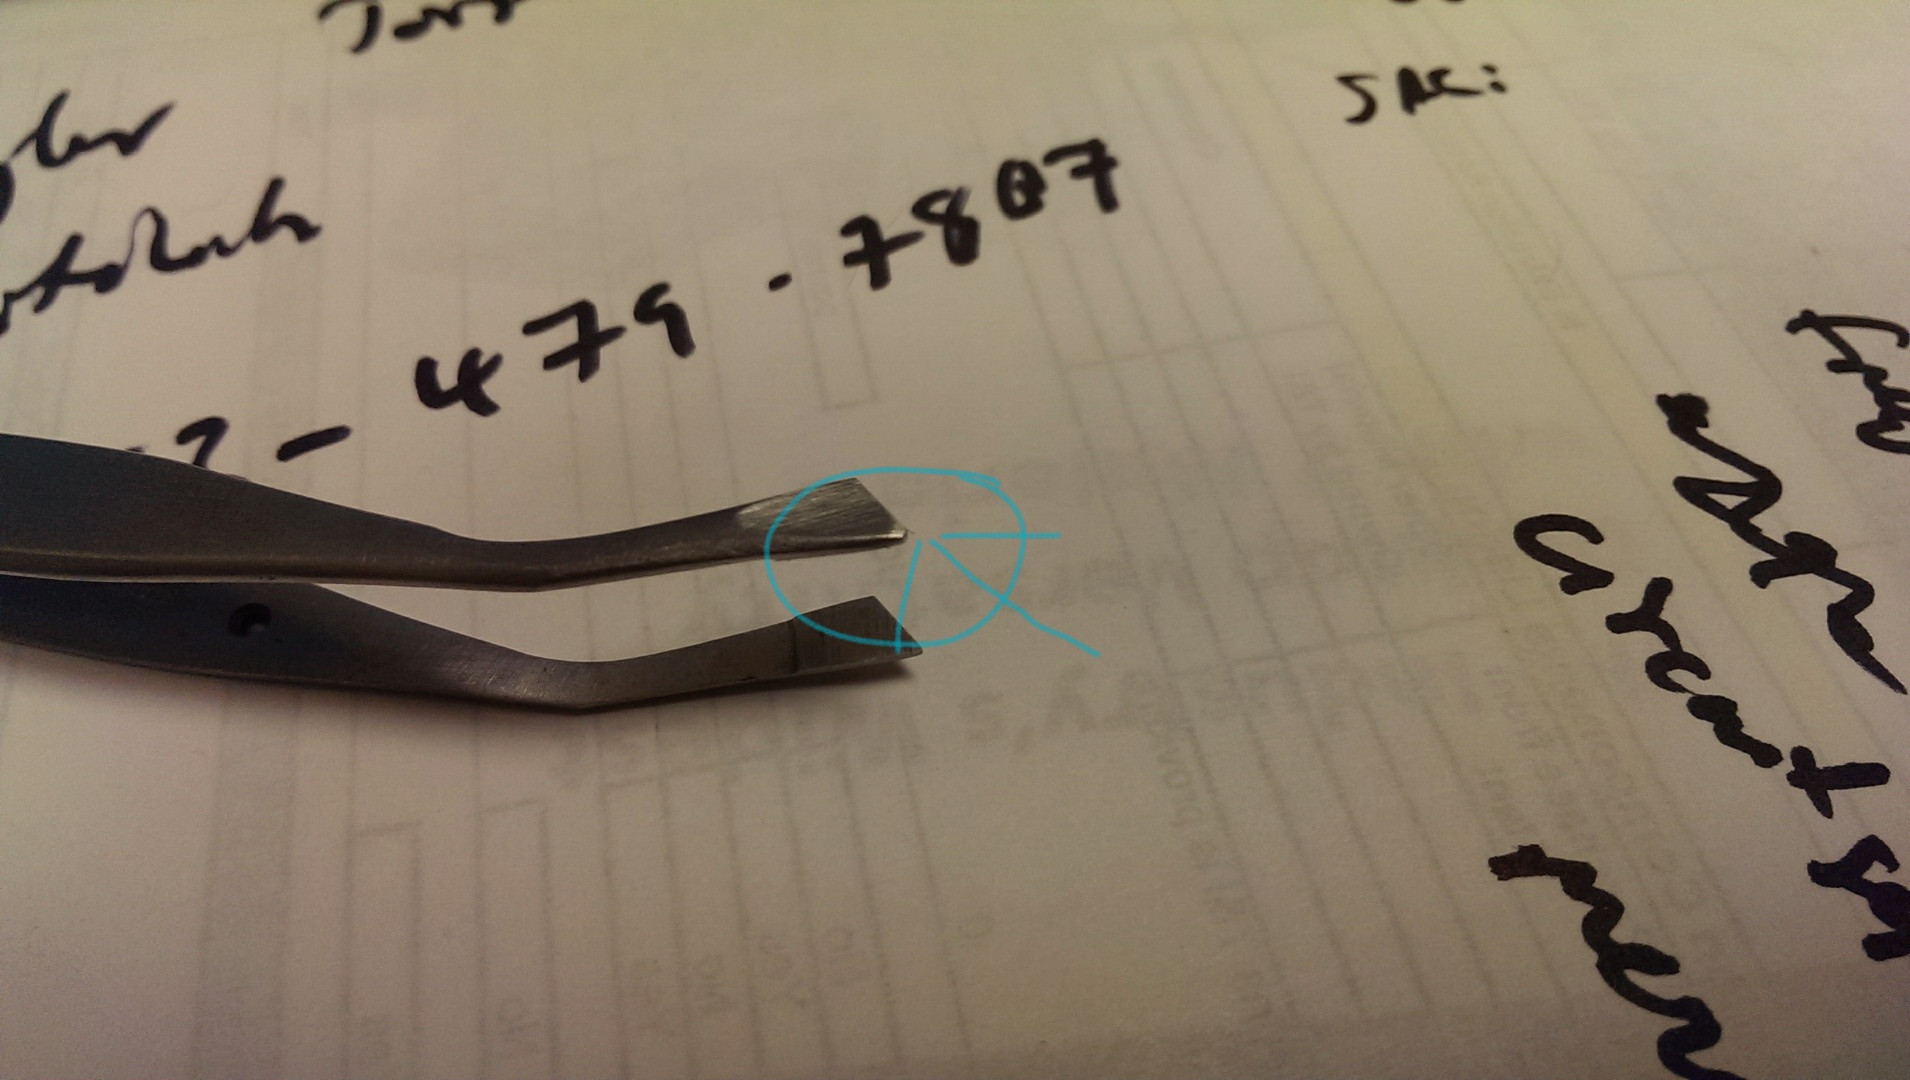
yes, the arrow is pointing at it.
And for scale, that tweezer is pretty small: think what your wife / GF uses to pull eyebrow hairs out.. in fact, these slivers are probably 1/4 the diameter of a hair! if not less... fml...

This intercooler!
Turns out I should have just machined a few pieces myself. While the surface finish was better, the bolt holes that I have to bolt the water blocks too are up to .010" out of position. Which may not sound like much, but it makes things not line up, so I have been taking a dremmel with a tunsten carbide router mill bit and slowly opening holes and ovaling and fiddling everywhere to try and get this thing to work and not mess up the o-rings (I currently can get it all bolted together, but it pushes the o-rings to the side and does not seal 100%)
not a huge problem, just annoying and laborious.

Oh, and I have about 200 extreemly tiny metal slivers (metal splinters) in my hands.. everywere...
(stainless from the laser cut retaining washer replacements)
and they are friggin tiny...
yes, the arrow is pointing at it.
And for scale, that tweezer is pretty small: think what your wife / GF uses to pull eyebrow hairs out.. in fact, these slivers are probably 1/4 the diameter of a hair! if not less... fml...

6th Gear

Joined: Jan 2013
Posts: 2,257
Likes: 15
From: Dover, NH
i love metal spinters, had one the other week, kept feeling it, until i realized something was in my skin, i actually had to dig it out as no tweezers were going to pull it out.
how could the bolts holes be off .010? did they machine to the datums you gave him?
how could the bolts holes be off .010? did they machine to the datums you gave him?
Thread Starter
|
5th Gear
Joined: Aug 2008
Posts: 1,100
Likes: 13
From: Inman, SC
apparently not. The problem really came to a missalignment when he flipped the plate.
He machined the tube pockets from one side, and the bolt holes from the other, I guess he did not touch off quite right, or have things perfectly square (not using a 4th axis machine, but a 3 axis and flipping the plate.)
Things happen I guess. Two options are just to oval some of the holes (what I am doing) or to dimension the holes off of the plates and then adjust the models of the water feed blocks to match and re-machine them on my 4 axis.
oh well...
And yeah.. I am using a surgical needle (from a syringe) to lightly dig most of them out. sharp point and the hollow needle actually helps use it more as a shovel.
(trick from my mother who gave it to me in pity (she is a physician))
3rd Gear
Joined: Dec 2013
Posts: 253
Likes: 0
Can't wait to see and hear you running!! Just got my Mayfair S back with a JCW Tuning Kit installed. Yessir!!! No more flat spots in the pedal. With sport mode off it's faster. With it on...even faster. The tech asked to speak to me when I picked it up. He said he's done a lot of kit upgrades and mine runs better than all the ones he's done to date. I'm Stoked! I heard it's not worth doing. I have to disagree. I got a deal on the $$ I guess because I've brought people in to spend $$ and advertise for them on my BlackBerry Channel "Mini Cooper Gearheads". Maybe not. Anyway I'm happy with it.
Thread Starter
|
5th Gear
Joined: Aug 2008
Posts: 1,100
Likes: 13
From: Inman, SC
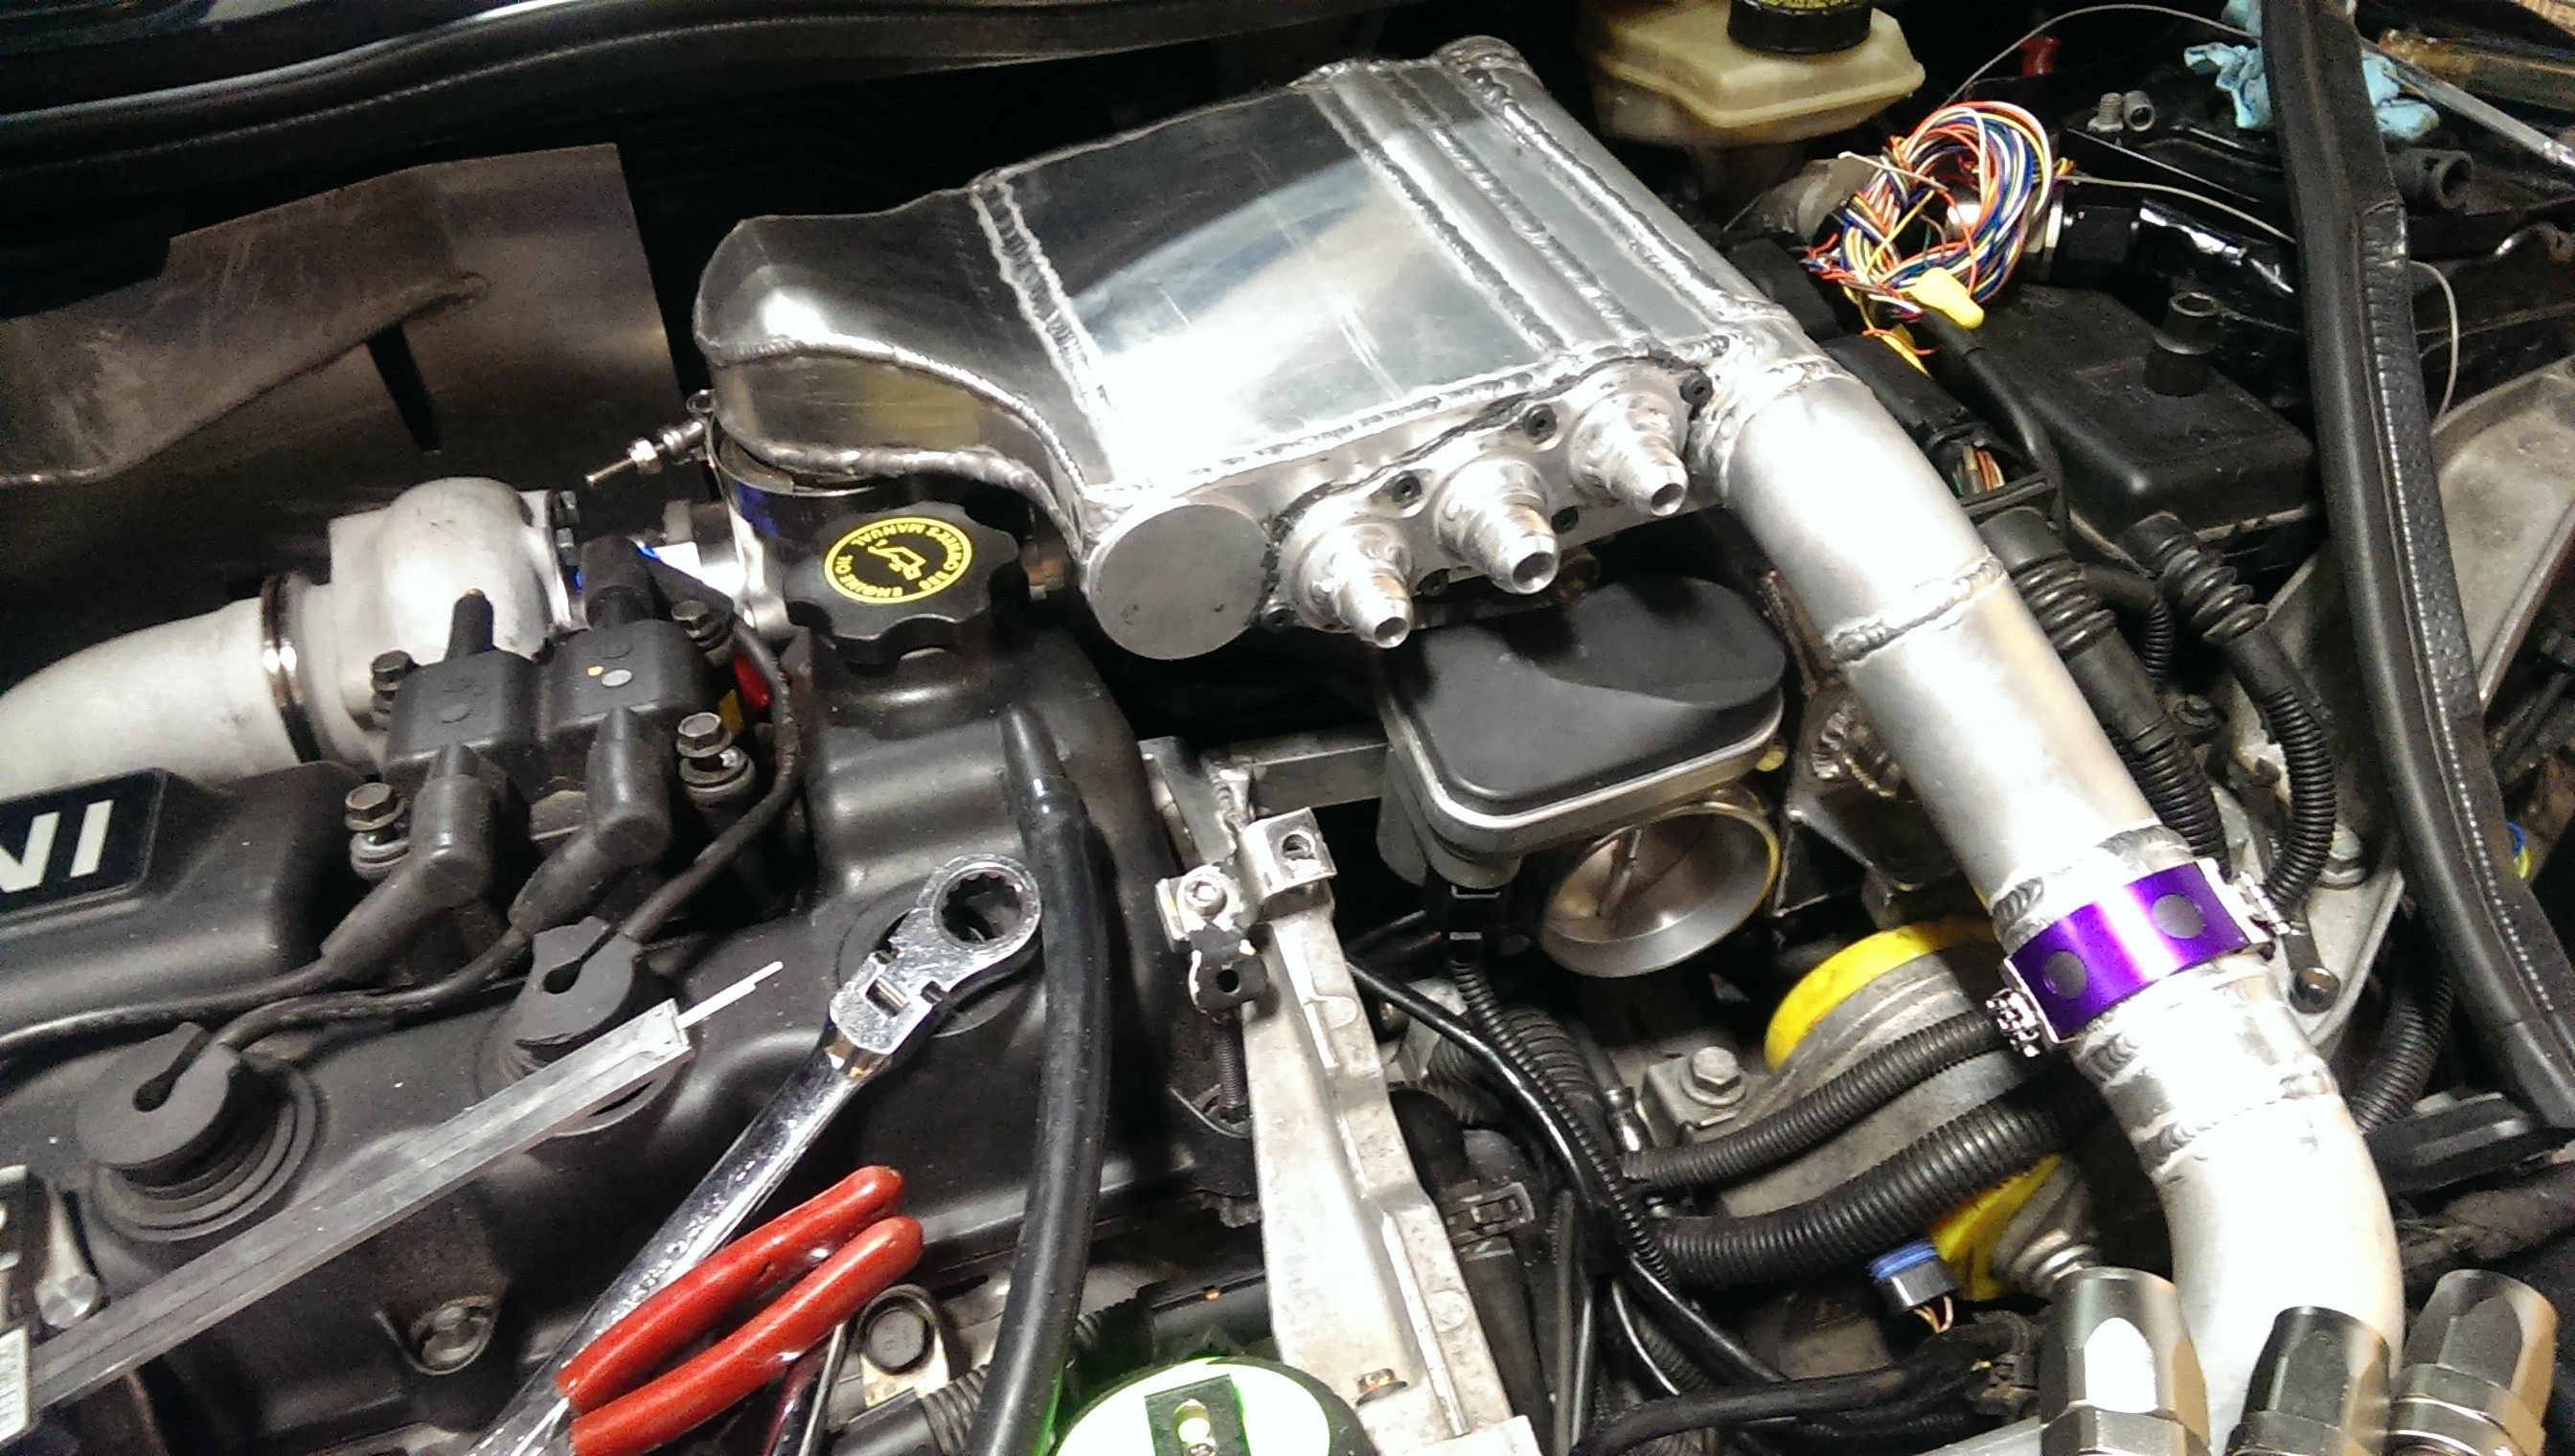
well this post should pretty much write itself with the images,
plus, who here reads my text anyways? jk.
jk.
did this with a hole saw, drill bit, and hand files.
(then welded it on)

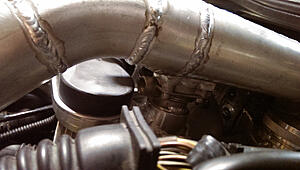
(bpv attachment)
BPV mounted (new o-ring seat shown )
)

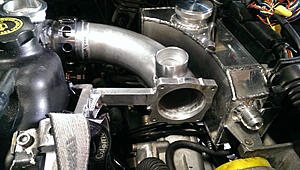
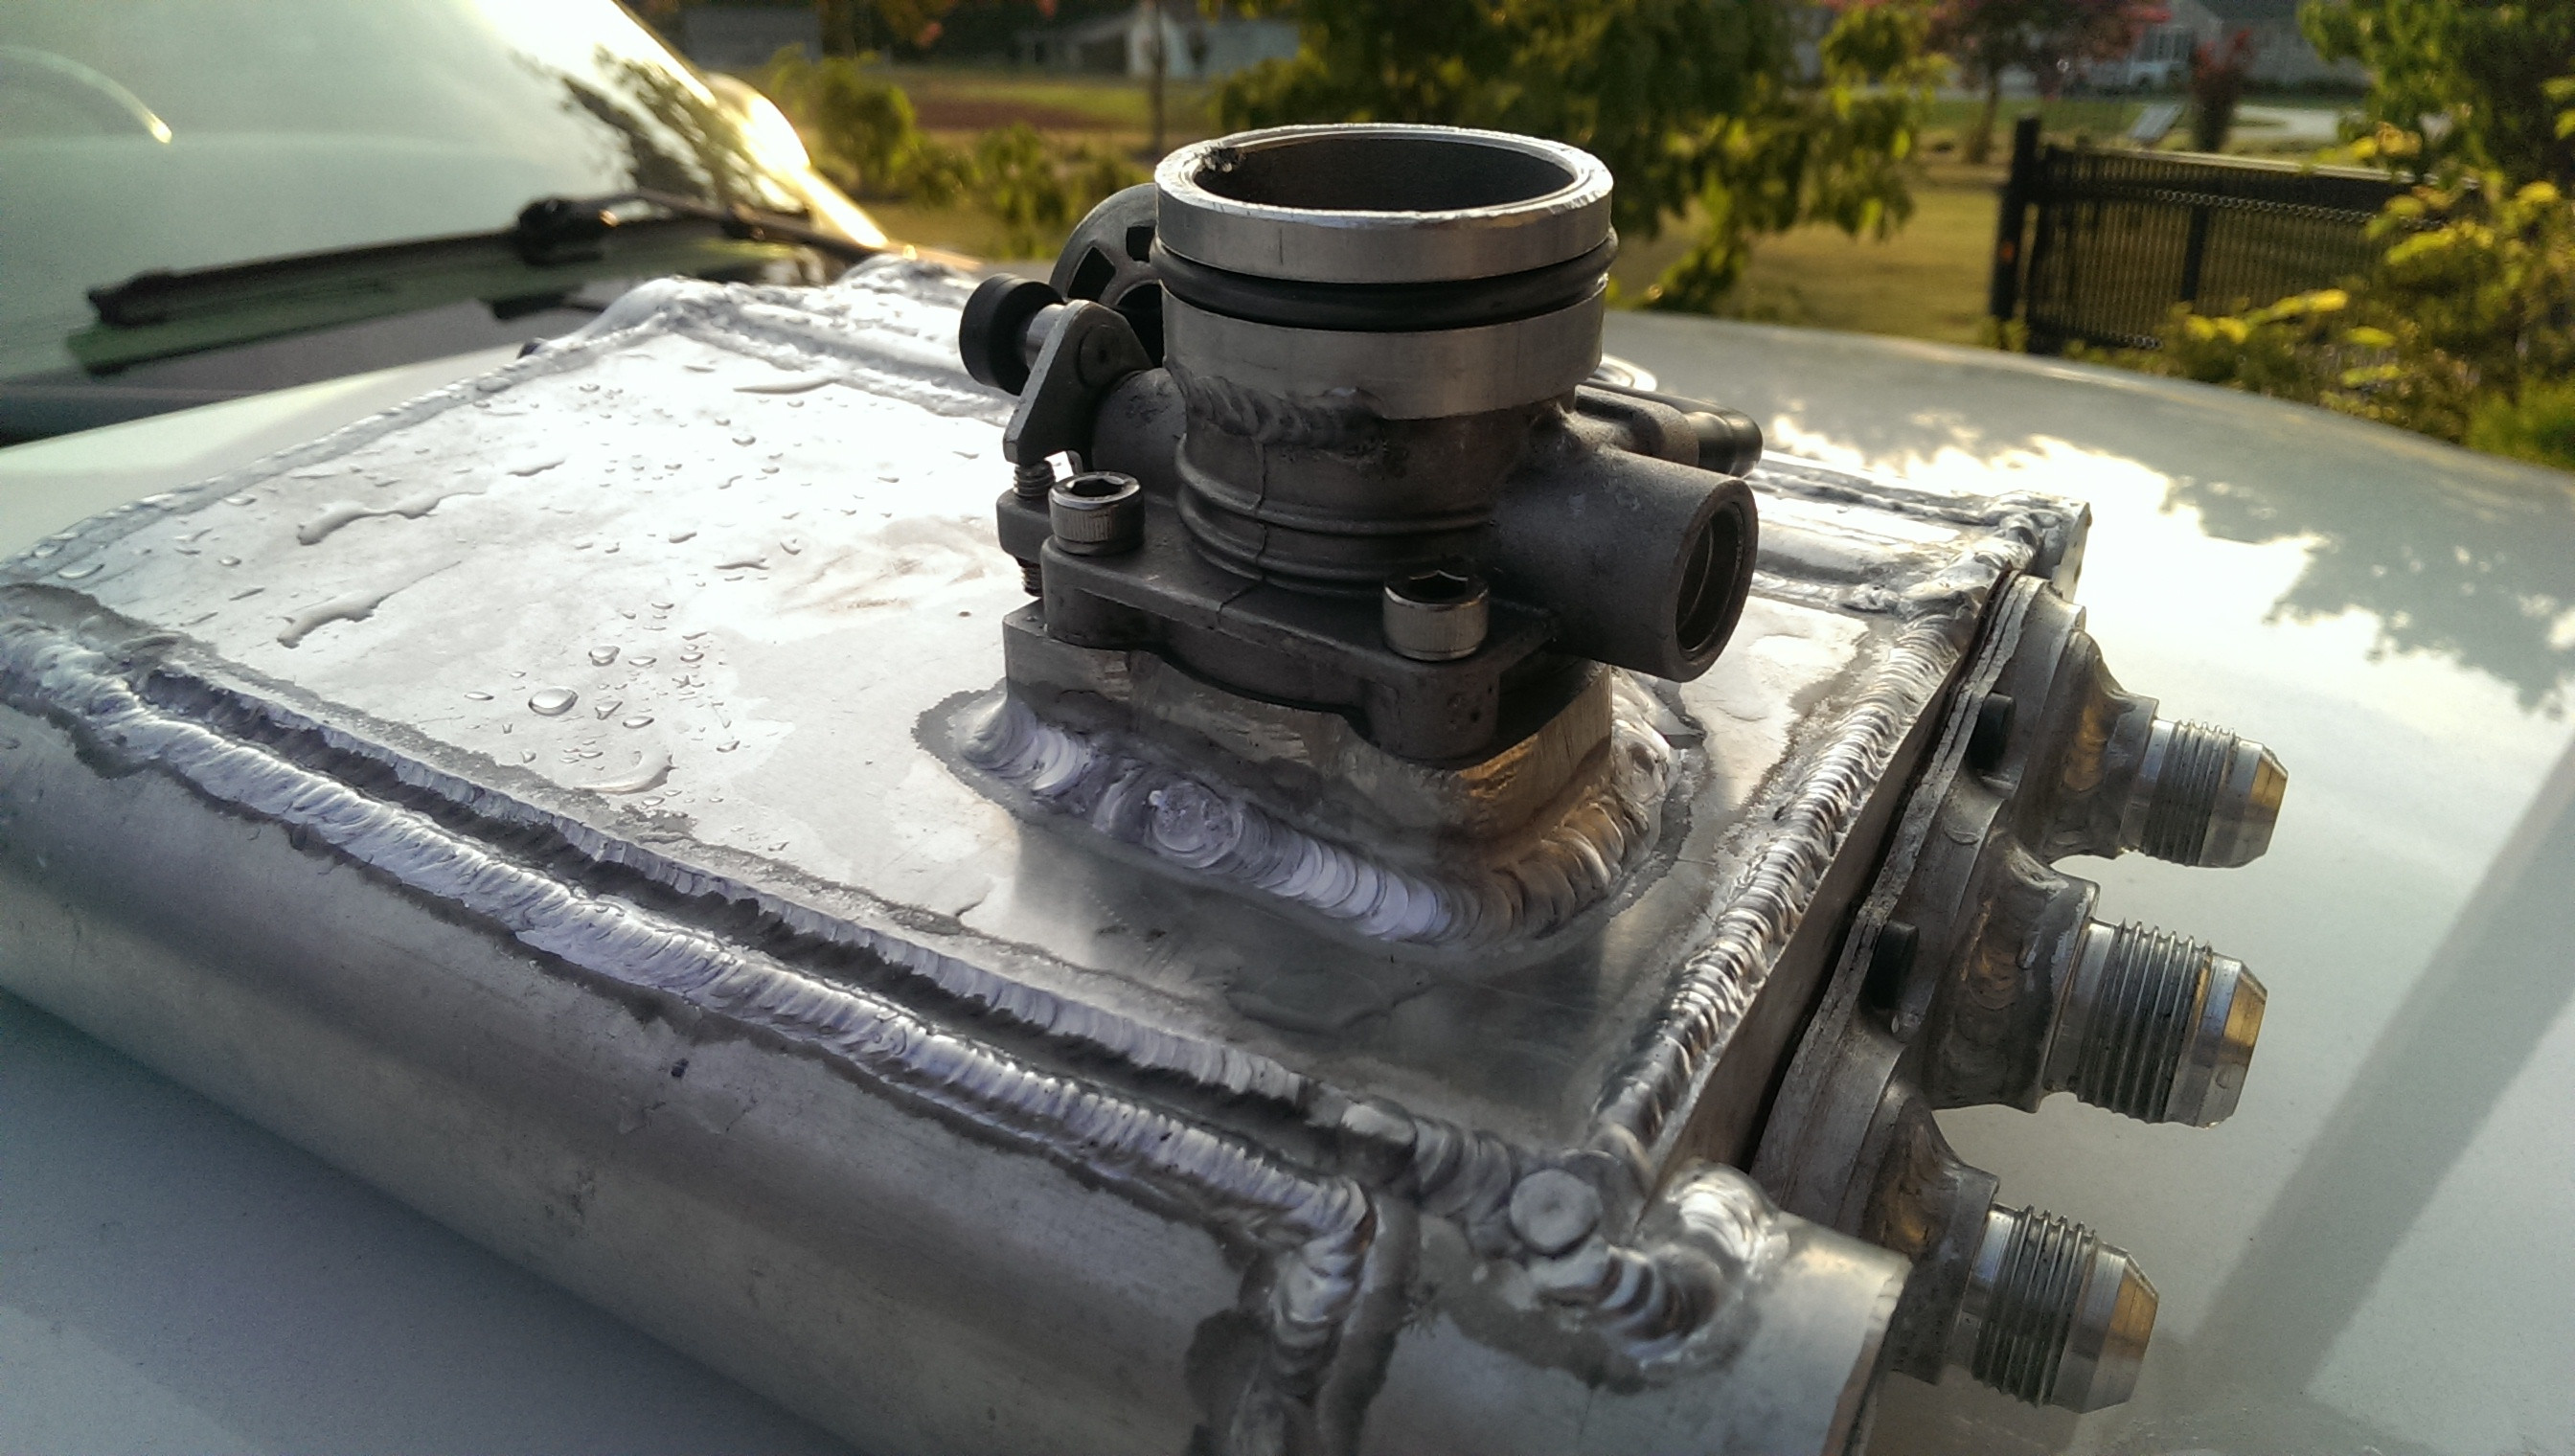
O-ring receptacle on the intake tube tac'd in place (fitment check)
This piece was fun to make,
ended up screwing two 2x2's down to a piece of plywood to hold the sides of the ~1.75" tubing that makes this receptacle , then another on the nose to keep it from moving forward, and then tapered a fourth piece so that I could stick it inside the back of the tube, screw it down, and it clamped it to the base.
Then took a 3" hole saw and cut, took off exactly what i needed and left the proper radius to mount to the tube.
Then took a single layer of 120 grit sand paper, wrapped it around a spare piece of 3" tube, and used that to finish profile the piece to size
test fit 2
welded it together and cut out the inisde with another hole saw


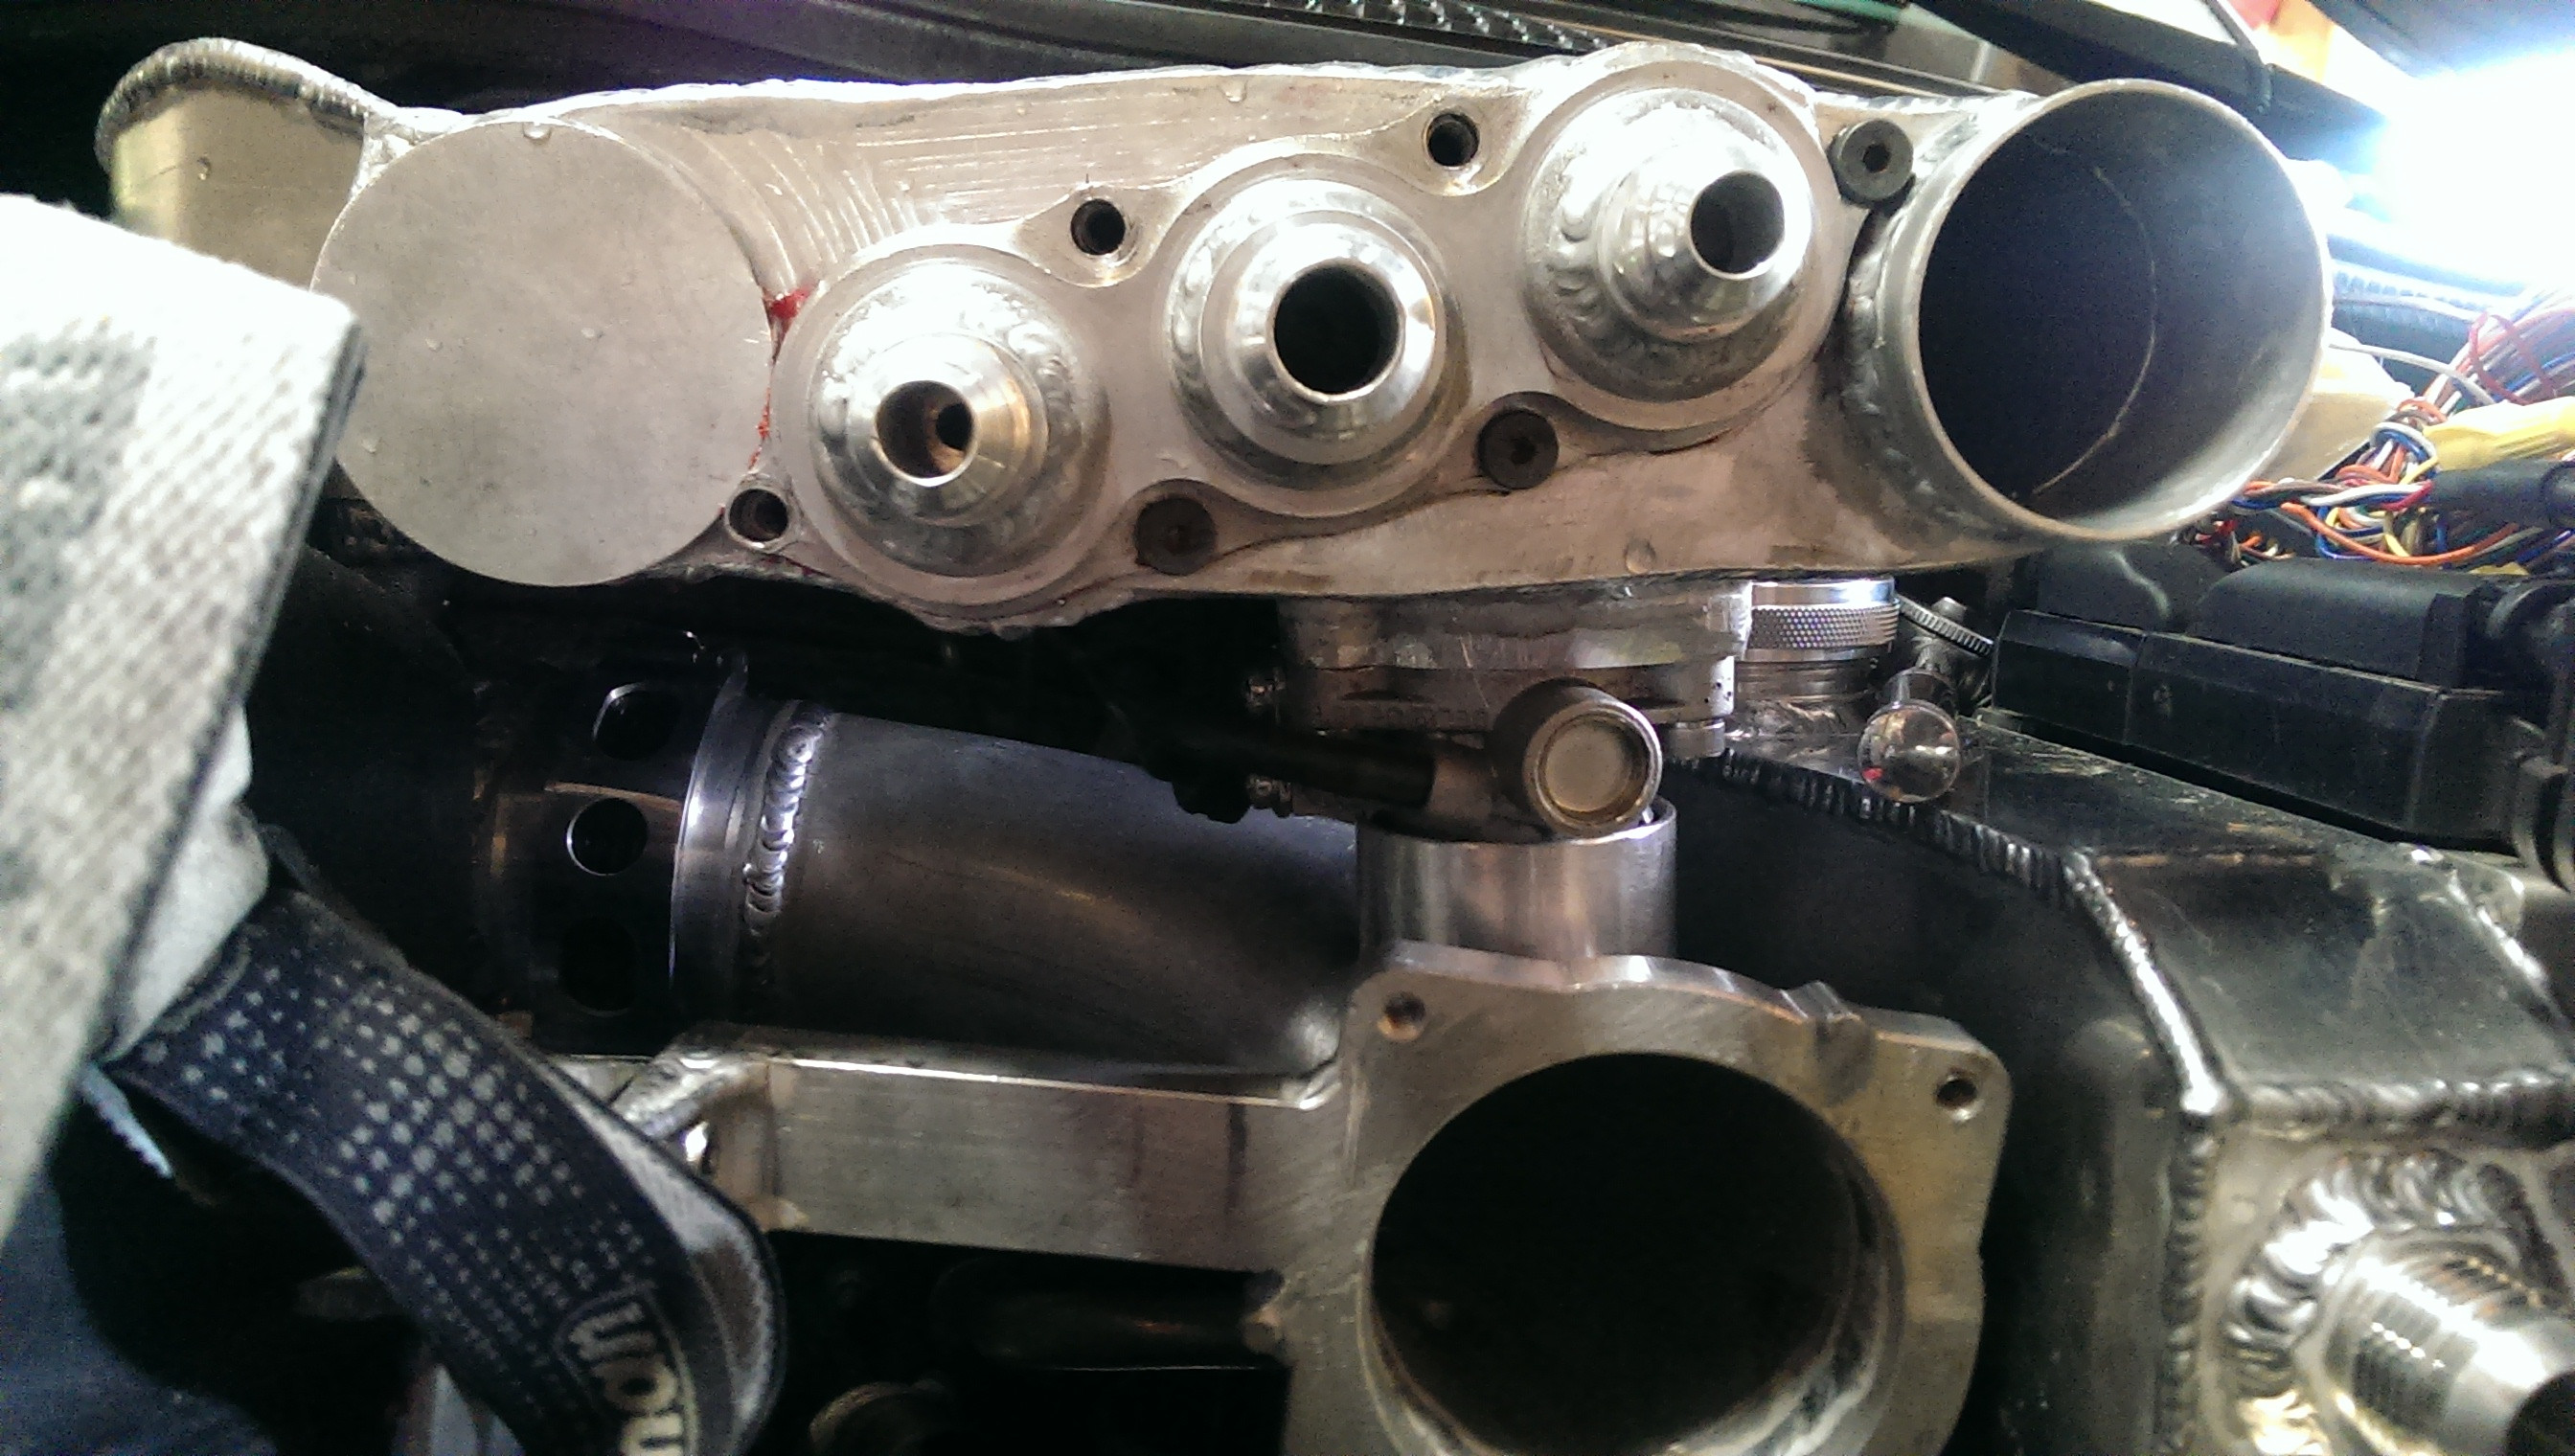
mounted inlet tube.

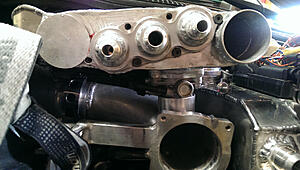
final section of tubing welded onto intercooler

rtv applied and everything mocked up in place!

bpv in its little cubby hole
now I should note, I am still having a few small problems with sealing the ends.
o-rings are not seating correctly on the laminova cores possibly due to an alignment issue.
Worse comes to worse I have to re-make those end plates (annoying) and move the seats from theoretical position to a measured position .
Not sure if the tubes warped slightly during welding or what happened, frankly it doesn't matter as I am leaking a solid vacuum out in ~ 1.5 minutes (so it seals pretty well, but is not perfect. Not sure yet if it would leak water, but if it did it will be at such a small rate that it would not matter much perfectionist inside me still wants it fixed though. )
plus, who here reads my text anyways?
jk.did this with a hole saw, drill bit, and hand files.
(then welded it on)

(bpv attachment)
BPV mounted (new o-ring seat shown
)
O-ring receptacle on the intake tube tac'd in place (fitment check)
This piece was fun to make,
ended up screwing two 2x2's down to a piece of plywood to hold the sides of the ~1.75" tubing that makes this receptacle , then another on the nose to keep it from moving forward, and then tapered a fourth piece so that I could stick it inside the back of the tube, screw it down, and it clamped it to the base.
Then took a 3" hole saw and cut, took off exactly what i needed and left the proper radius to mount to the tube.
Then took a single layer of 120 grit sand paper, wrapped it around a spare piece of 3" tube, and used that to finish profile the piece to size

test fit 2
welded it together and cut out the inisde with another hole saw


mounted inlet tube.
final section of tubing welded onto intercooler

rtv applied and everything mocked up in place!
bpv in its little cubby hole

now I should note, I am still having a few small problems with sealing the ends.
o-rings are not seating correctly on the laminova cores
possibly due to an alignment issue.Worse comes to worse I have to re-make those end plates (annoying) and move the seats from theoretical position to a measured position .
Not sure if the tubes warped slightly during welding or what happened, frankly it doesn't matter as I am leaking a solid vacuum out in ~ 1.5 minutes (so it seals pretty well, but is not perfect. Not sure yet if it would leak water, but if it did it will be at such a small rate that it would not matter much
perfectionist inside me still wants it fixed though. )

Thread Starter
|
5th Gear
Joined: Aug 2008
Posts: 1,100
Likes: 13
From: Inman, SC
rough engineering schematic with a sharpie (could not find a pen on my desk somehow. haha!)
hopefully you are fairly knowledgeable with fluid flow drawing notations. (although I noticed I drew my inlets/outlets on the turbine on the wrong ends... oops...)

hopefully you are fairly knowledgeable with fluid flow drawing notations. (although I noticed I drew my inlets/outlets on the turbine on the wrong ends... oops...)

Thread Starter
|
5th Gear
Joined: Aug 2008
Posts: 1,100
Likes: 13
From: Inman, SC
funny thing is, it is EXACTLY the same diagram as the stock motor, accept that instead of the shaft work coming from a turbine and hooking to a centrifugal compressor, it would come from the engine itself and have a screw compressor.!
this is partly why I semi-sortof want to hook back in the factory injectors and ECU for a little bit to see if it would run, as it really should be much more similar to OEM this way than the other way most people run turbo setups
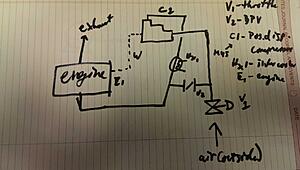
this is partly why I semi-sortof want to hook back in the factory injectors and ECU for a little bit to see if it would run, as it really should be much more similar to OEM this way than the other way most people run turbo setups


Thread Starter
|
5th Gear
Joined: Aug 2008
Posts: 1,100
Likes: 13
From: Inman, SC
cerenkov,
yes, the sc will be going on, eventually.
first stage was turbo only so I didnt have to worry about *as* many parts and make the first level of tuning a bit easier.
Seeing as the SC will really just be a helping hand down low, and the car is mainly a turbo car, I thought it best to do the initial tuning pass turbo only.
That being said... I am now going to fire up a heck of a lot of salivary glands...

and yes.. it is that quiet.. stupid stealthy quiet
yes, the sc will be going on, eventually.
first stage was turbo only so I didnt have to worry about *as* many parts and make the first level of tuning a bit easier.
Seeing as the SC will really just be a helping hand down low, and the car is mainly a turbo car, I thought it best to do the initial tuning pass turbo only.
That being said... I am now going to fire up a heck of a lot of salivary glands...
and yes.. it is that quiet.. stupid stealthy quiet
3rd Gear
Joined: Dec 2013
Posts: 253
Likes: 0
Oh and just so you know...I read every written word so far and will read all the rest...Thanks for the time you took to write this all down for us who appreciate it. you have no idea how lucky we feel to be able to do so.
Hope to meet up with you to shake your hand...(doesn't have to be clean. Grime does not scare me...mountain drop offs, well that's another story)
Hope to meet up with you to shake your hand...(doesn't have to be clean. Grime does not scare me...mountain drop offs, well that's another story)
Thread Starter
|
5th Gear
Joined: Aug 2008
Posts: 1,100
Likes: 13
From: Inman, SC
micro / boring ish update.
Finished the radiator plumbing! now just to finish off the intercooler plumbing this evening
needed a few fittings I did not have though, and I had some bar stock... so I decided just to make what I needed!
(let me know if these do not show up)

all of the individual pieces turned out. Needed a reducing T adapter from the heater core, and needed weld-fittings for the radiator overflow tank to hook to the lines.
"t" roughly assembled (recessed lip on the T fitting lines everything up nicely)

welded!

Probably one of the nicer T fittings you will ever see. haha!
finished off the overflow tank, welded on the fittings and ran the lines.
Probably will have to add a heat shield to this.. kinda close to the hot stuff. (shouldn't melt, just worried about radiant heat xfer )


That is all from yesterday!
(also got all of the lower radiator hoses run and tied together. only took 3 trips to advance and digging around the back to find hoses that would work and run where I needed them to! haha! )
Finished the radiator plumbing! now just to finish off the intercooler plumbing this evening
needed a few fittings I did not have though, and I had some bar stock... so I decided just to make what I needed!
(let me know if these do not show up)
all of the individual pieces turned out. Needed a reducing T adapter from the heater core, and needed weld-fittings for the radiator overflow tank to hook to the lines.
"t" roughly assembled (recessed lip on the T fitting lines everything up nicely)
welded!
Probably one of the nicer T fittings you will ever see. haha!
finished off the overflow tank, welded on the fittings and ran the lines.
Probably will have to add a heat shield to this.. kinda close to the hot stuff. (shouldn't melt, just worried about radiant heat xfer )
That is all from yesterday!
(also got all of the lower radiator hoses run and tied together. only took 3 trips to advance and digging around the back to find hoses that would work and run where I needed them to! haha! )