
Drivetrain My build. Teaser photos and updates


Thread Starter
|
5th Gear
Joined: Aug 2008
Posts: 1,100
Likes: 13
From: Inman, SC
OOOH yes. And much more consistent with the band saw as well.
I dont have a weighted one (not industrial) The ones we have at work would make one of these cuts every 10 seconds or so. My saw clocks in at 4-5 minutes per cut. But that is about the same amount of time it takes me to dip these in acetone, wipe them down, and then file all of the edges down, so it works out nicely
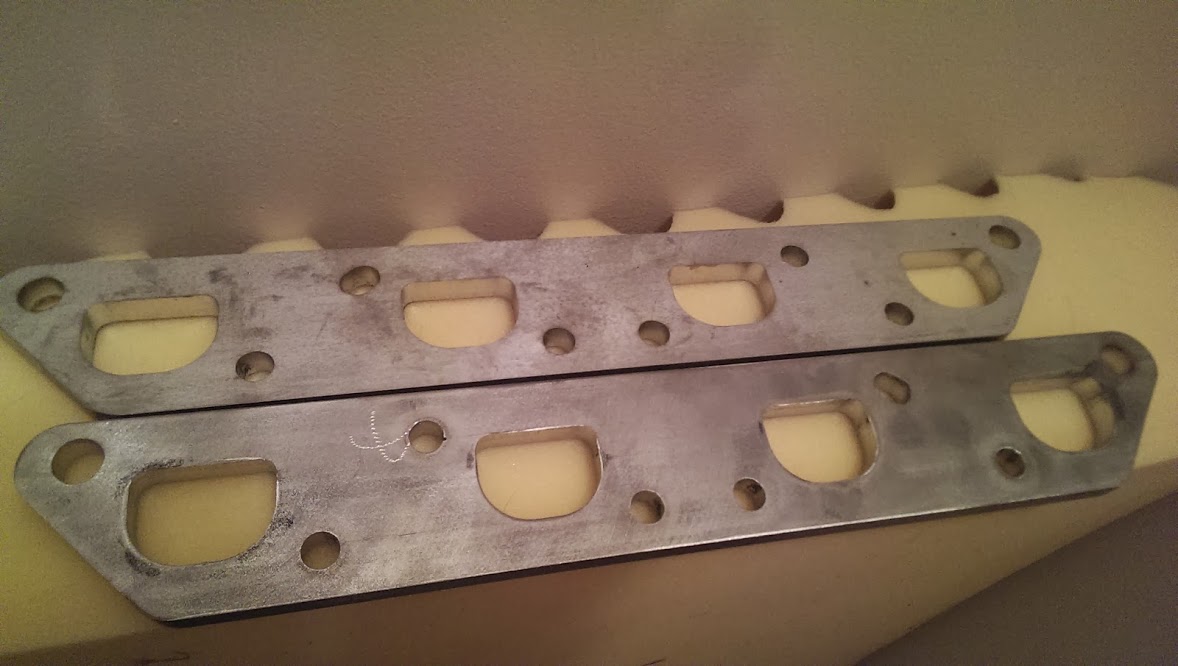
oh! forgot to post these
picked up the header flanges on friday last week!

I dont have a weighted one (not industrial) The ones we have at work would make one of these cuts every 10 seconds or so. My saw clocks in at 4-5 minutes per cut. But that is about the same amount of time it takes me to dip these in acetone, wipe them down, and then file all of the edges down, so it works out nicely
oh! forgot to post these
picked up the header flanges on friday last week!


Thread Starter
|
5th Gear
Joined: Aug 2008
Posts: 1,100
Likes: 13
From: Inman, SC
Daonlyillwiz,
I will PM you the specifics, but I actually had to go out to the car, grab the old header, and pull dimensions off of it and draw it up myself.
Then I sent it out to a local company called Laserflex that does laser cutting. Check google for listings in your area. Chances are if you live close to any sort of industry, there will be a lot of manufacturing support businesses as well. This tends to be one of them (laser cutting)
3/8" 304L is a pretty common material for them as well.
For anyone who is looking to have this done, know that one-offs are ALWAYS more expensive than multiples, as the more parts you make, the more you spread the set up labor out.
With that being said, I am attaching my drawing file.
Ports are to stock head port size.
https://drive.google.com/file/d/0Bz1JqI67Iu5nZ1JVRjZJNl91QUU/edit?usp=sharing
^Should link to my google drive and allow anyone with the link to download it. LMK if it does not work.
Currently in a .dxf format (what most laser and 2d cutting machines use)
If you want to view it, and do not have software, you can get eDrawing Viewer from Dessault (makers of solidworks) and it can view the file
http://www.edrawingsviewer.com/
Thread Starter
|
5th Gear
Joined: Aug 2008
Posts: 1,100
Likes: 13
From: Inman, SC
phew! what a day!
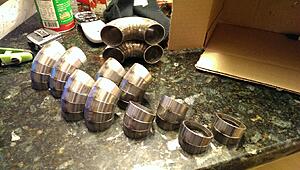
Bends are cut and tac'd together!
They are all within a few degrees of what they should have been, which is all I could ask for.
Nice thing about laying them out in solidworks, is I then measured all of them, wrote their actual angles on them, and then went into the drawing and changed the reference angles for the bends. Auto updated and gives me the new clocking angles between bends and the lengths of the straights!

WIN!
haha!
Bends are cut and tac'd together!
They are all within a few degrees of what they should have been, which is all I could ask for.
Nice thing about laying them out in solidworks, is I then measured all of them, wrote their actual angles on them, and then went into the drawing and changed the reference angles for the bends. Auto updated and gives me the new clocking angles between bends and the lengths of the straights!
WIN!
haha!

Great work, this is the downpipe for my old car (95 eagle talon tsi awd)...check this angle out...the downpipe was literally 1/4" away from the alternator cable hence the extreme bend.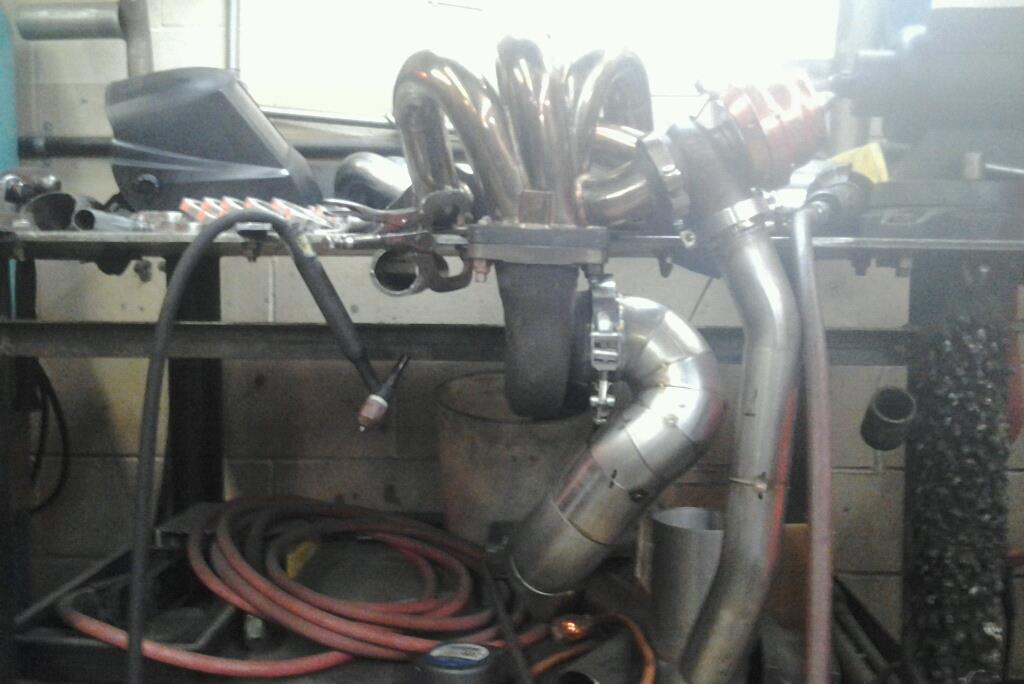

Thread Starter
|
5th Gear
Joined: Aug 2008
Posts: 1,100
Likes: 13
From: Inman, SC
nice!
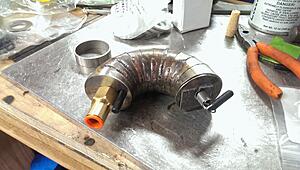
little welding sample for the evening.
Was running low on argon and this was a scrap bend I made. Noticed it was not aligned straight after I tac'd it. (one of the pieces was backwards)
so I decided to fusion weld it for practice. With no argon back purge. Its no a final piece, or one that would be used, so I decided not to waste the argon on doing so.
For the non welding savvy, fusion welding uses no filler.
unlike aluminum, where the weld is much weaker than the metal around it,
Most other alloys (steel, stainless, inconel, titanium, etc) if the weld is good, it can be considered just as strong as the surrounding material with full penetration and proper heat.
I will be using 1/64" 347 filler on the actual pieces for the header, as you do not want full penetration on headers, (dont want any extrenious internal bumps to disrupt air flow) so a small convex bead of filler on the outside is needed. (like an aluminum weld)
not so much for these full penetration fusion welds though.
Haven't done stainless in a few months, but I think by the third ring things smoothed out pretty nicely


Thread Starter
|
5th Gear
Joined: Aug 2008
Posts: 1,100
Likes: 13
From: Inman, SC
mcs_r53, It was not back purged as it was just a test weld, so the inside pics would not look very nice. Non-back-purged stainless looks like black coal build up on the insides. sort of like mold or something was growing. Quite rough, hard, and bleugh looking.
I will be sure and post of some of the final welds inside and out though once the 347 filler comes in!
But they will be 80% penetration welds with a convex outside bead, so it wont be any different than just a tac'd in place inside... :/
In other news!!
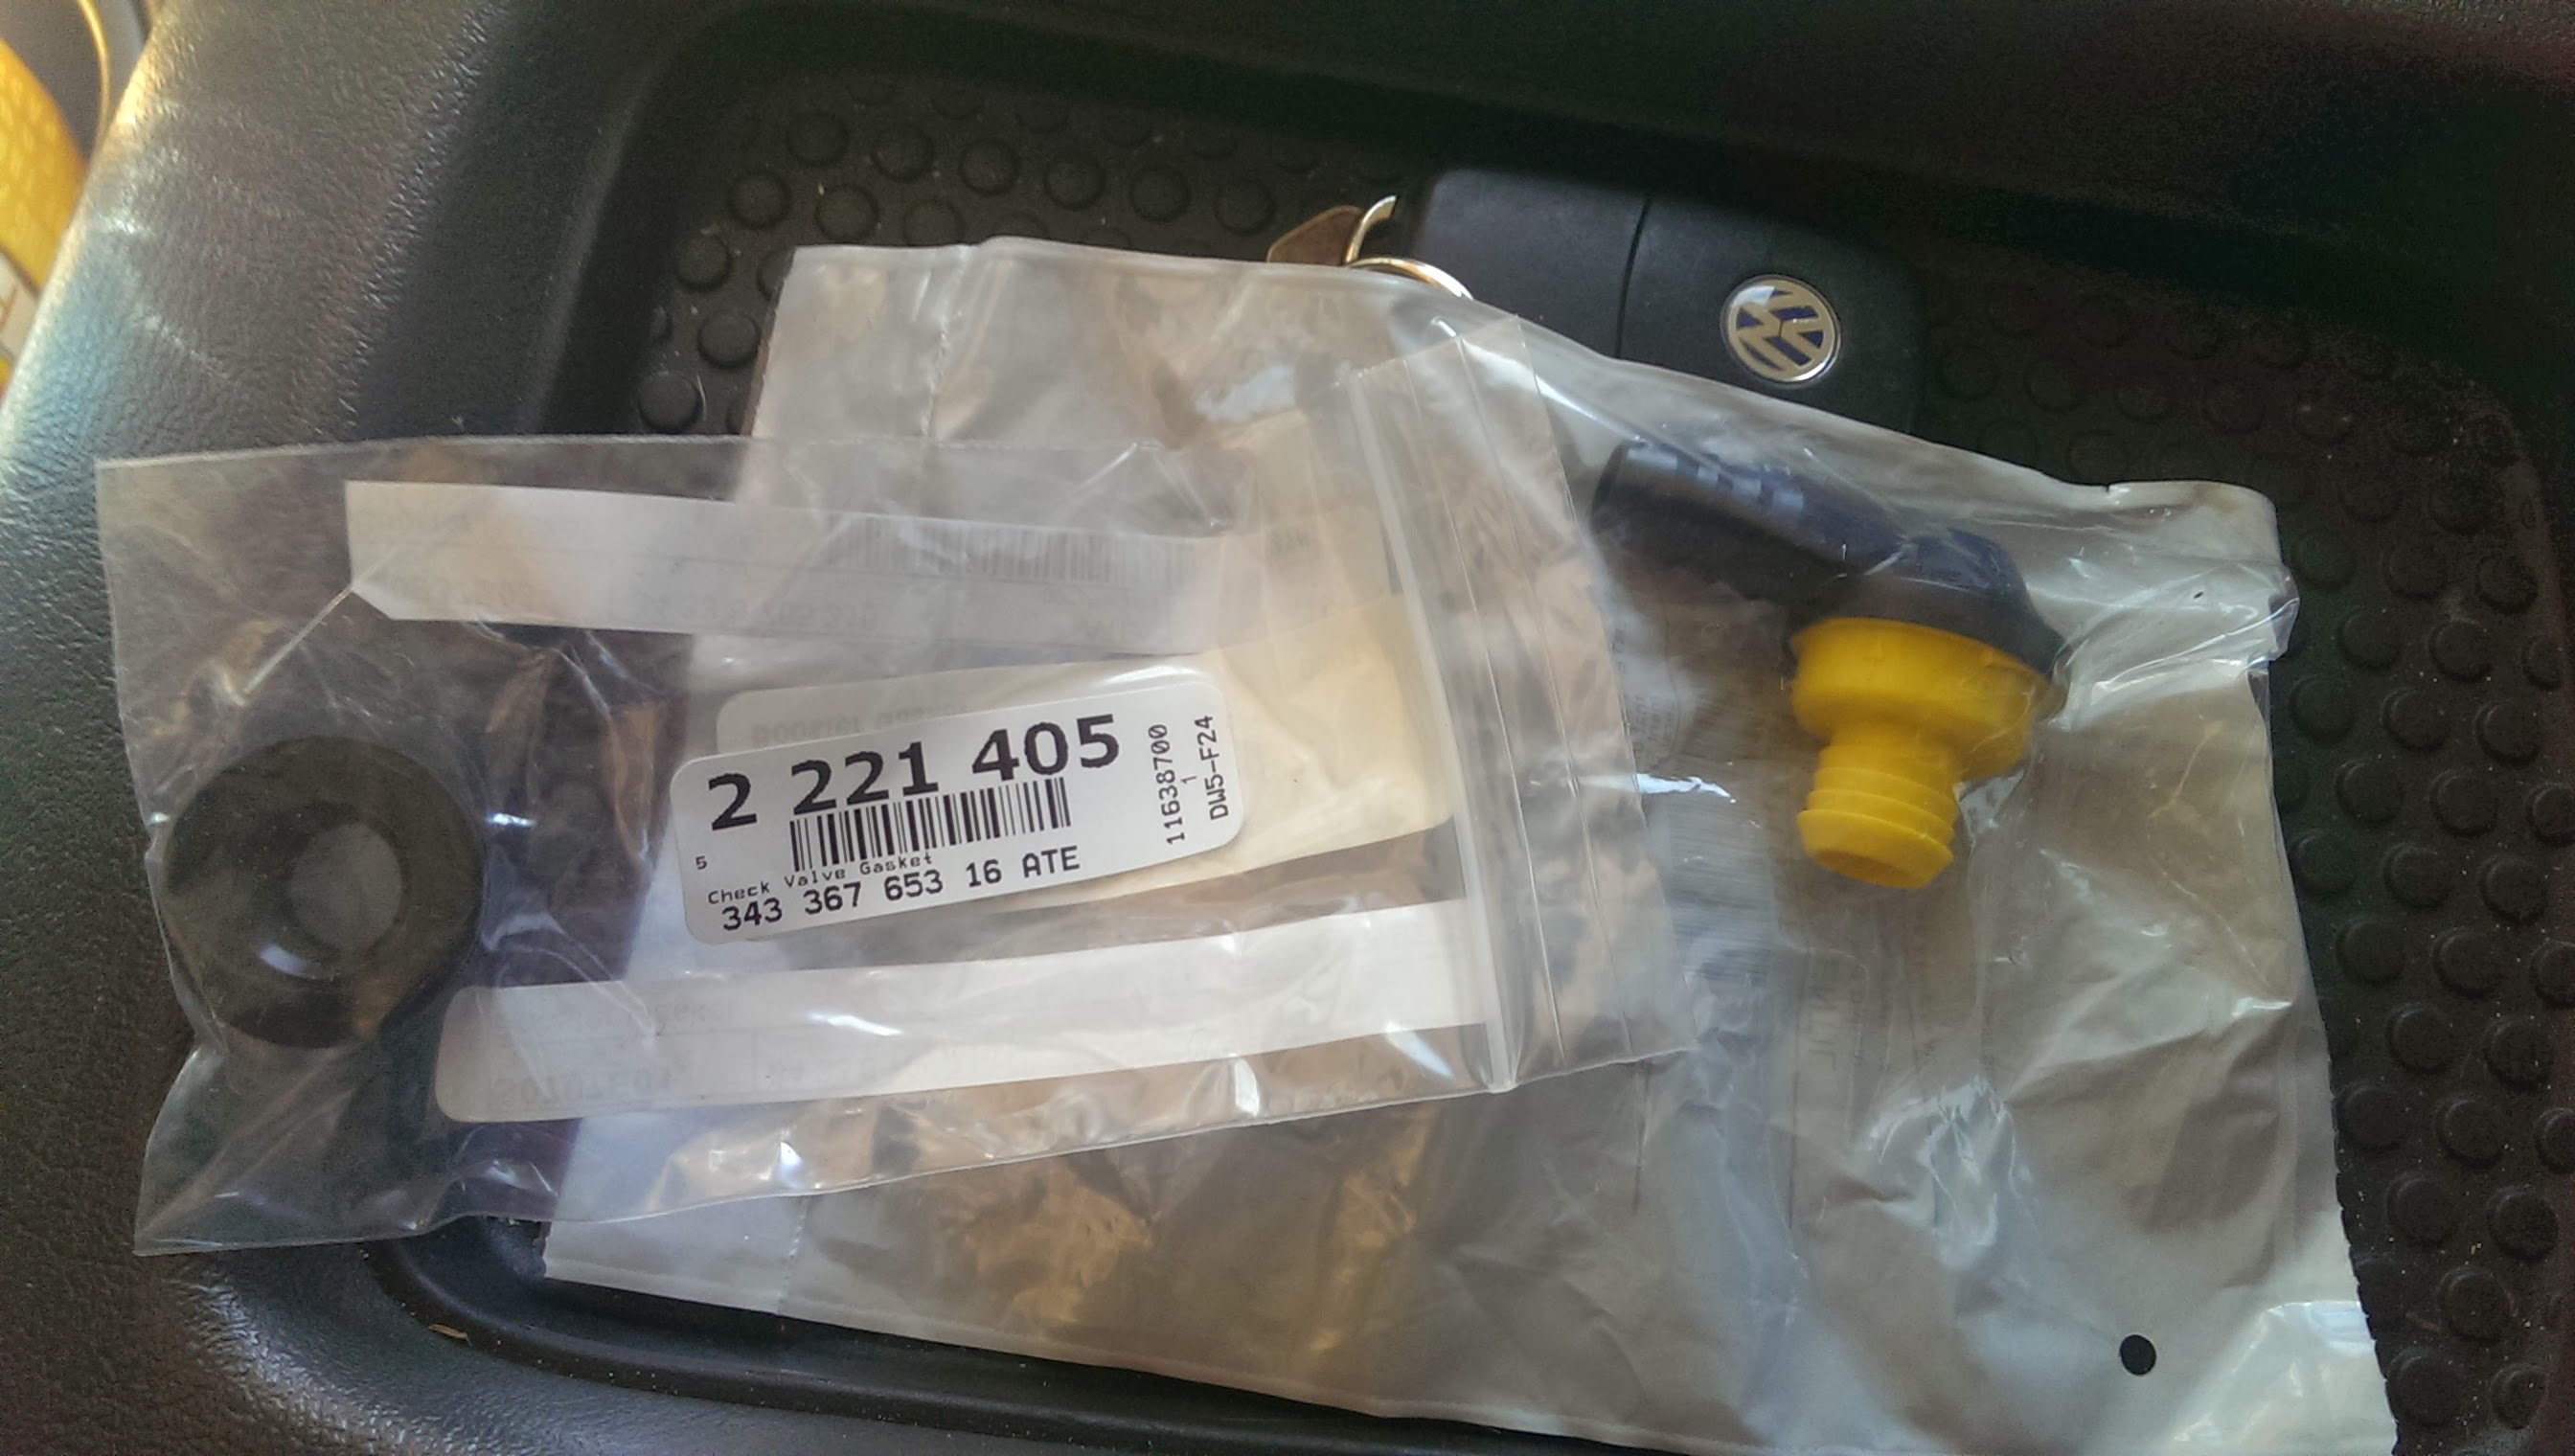
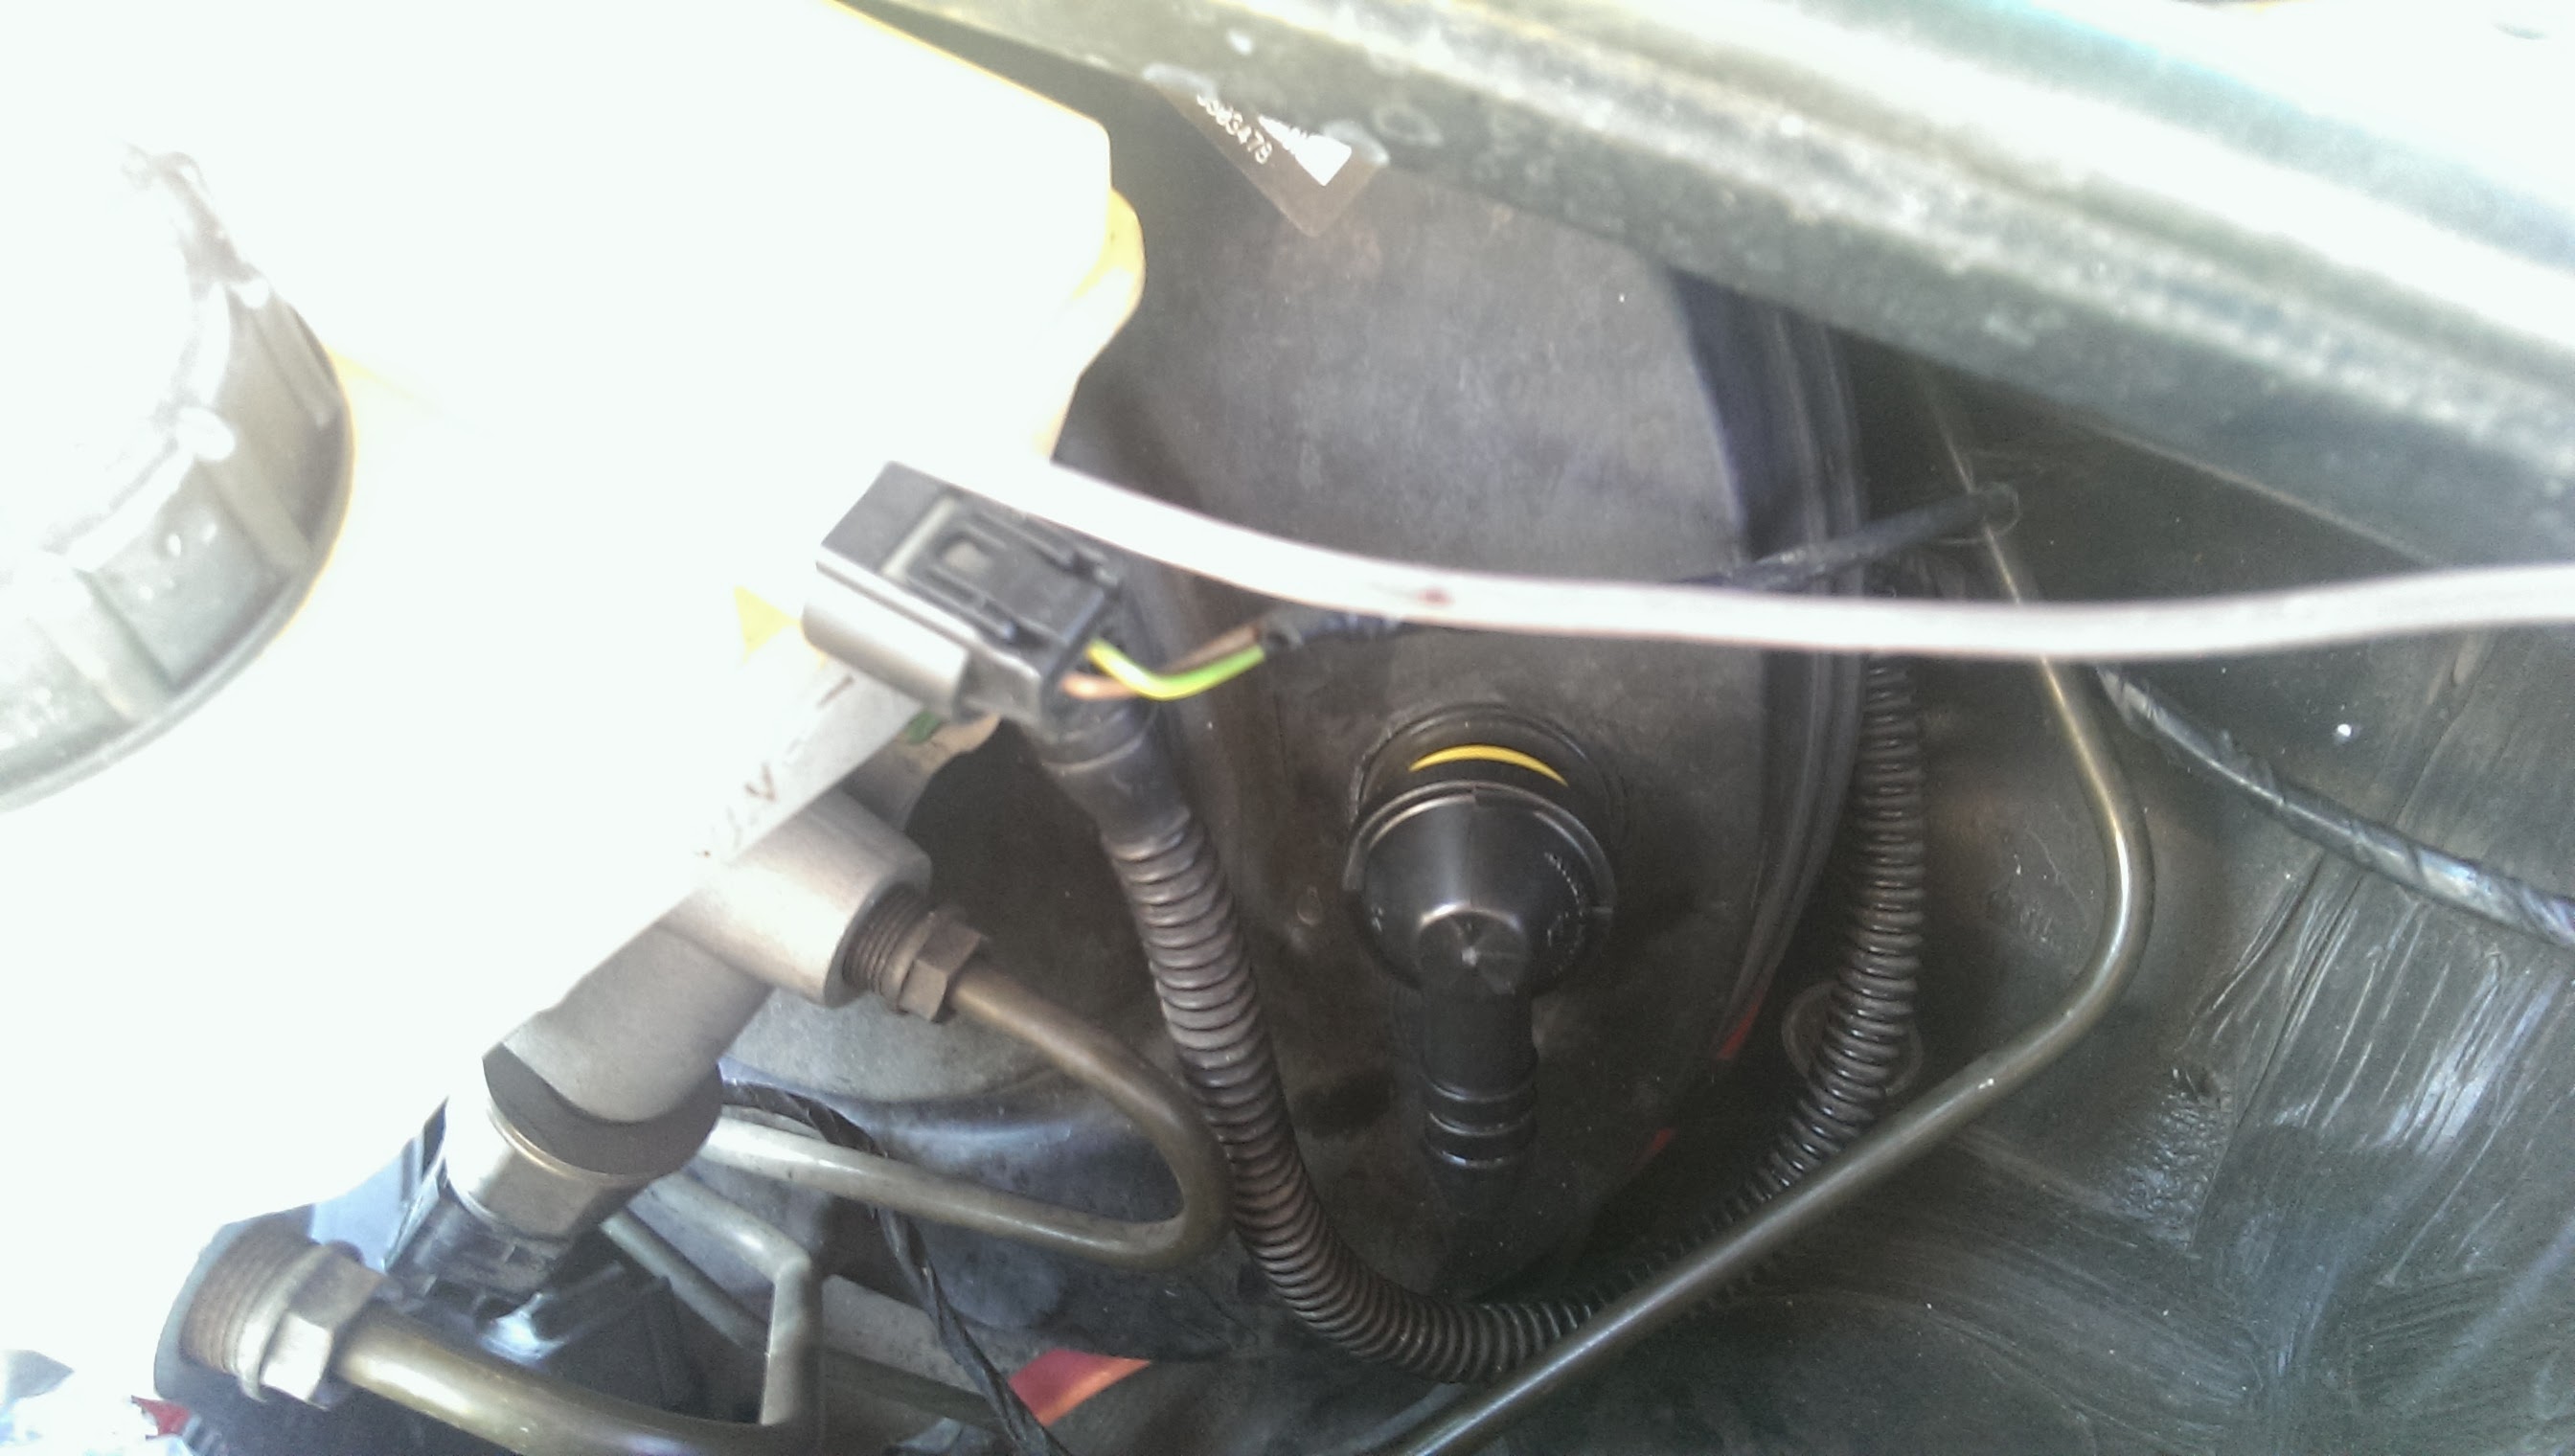
Well... I broke something the other day. I snapped the tube-side part of the vacuum check valve for the brake booster. OOPS.
I was fiddling with turbo positioning and went to move the vacuum line a little and it just snapped off at the valve.
For those that do not know of what I speak.
This fitting (part #5)

Which is sort of okay. I needed to ditch that line since it was in the way, and was not sure how I was going to remove the line cleanly. I figured I would just cut the line somewhere since it was a hard line and secure a soft line that was vacuum rated to it. Not clean.. but it would work.
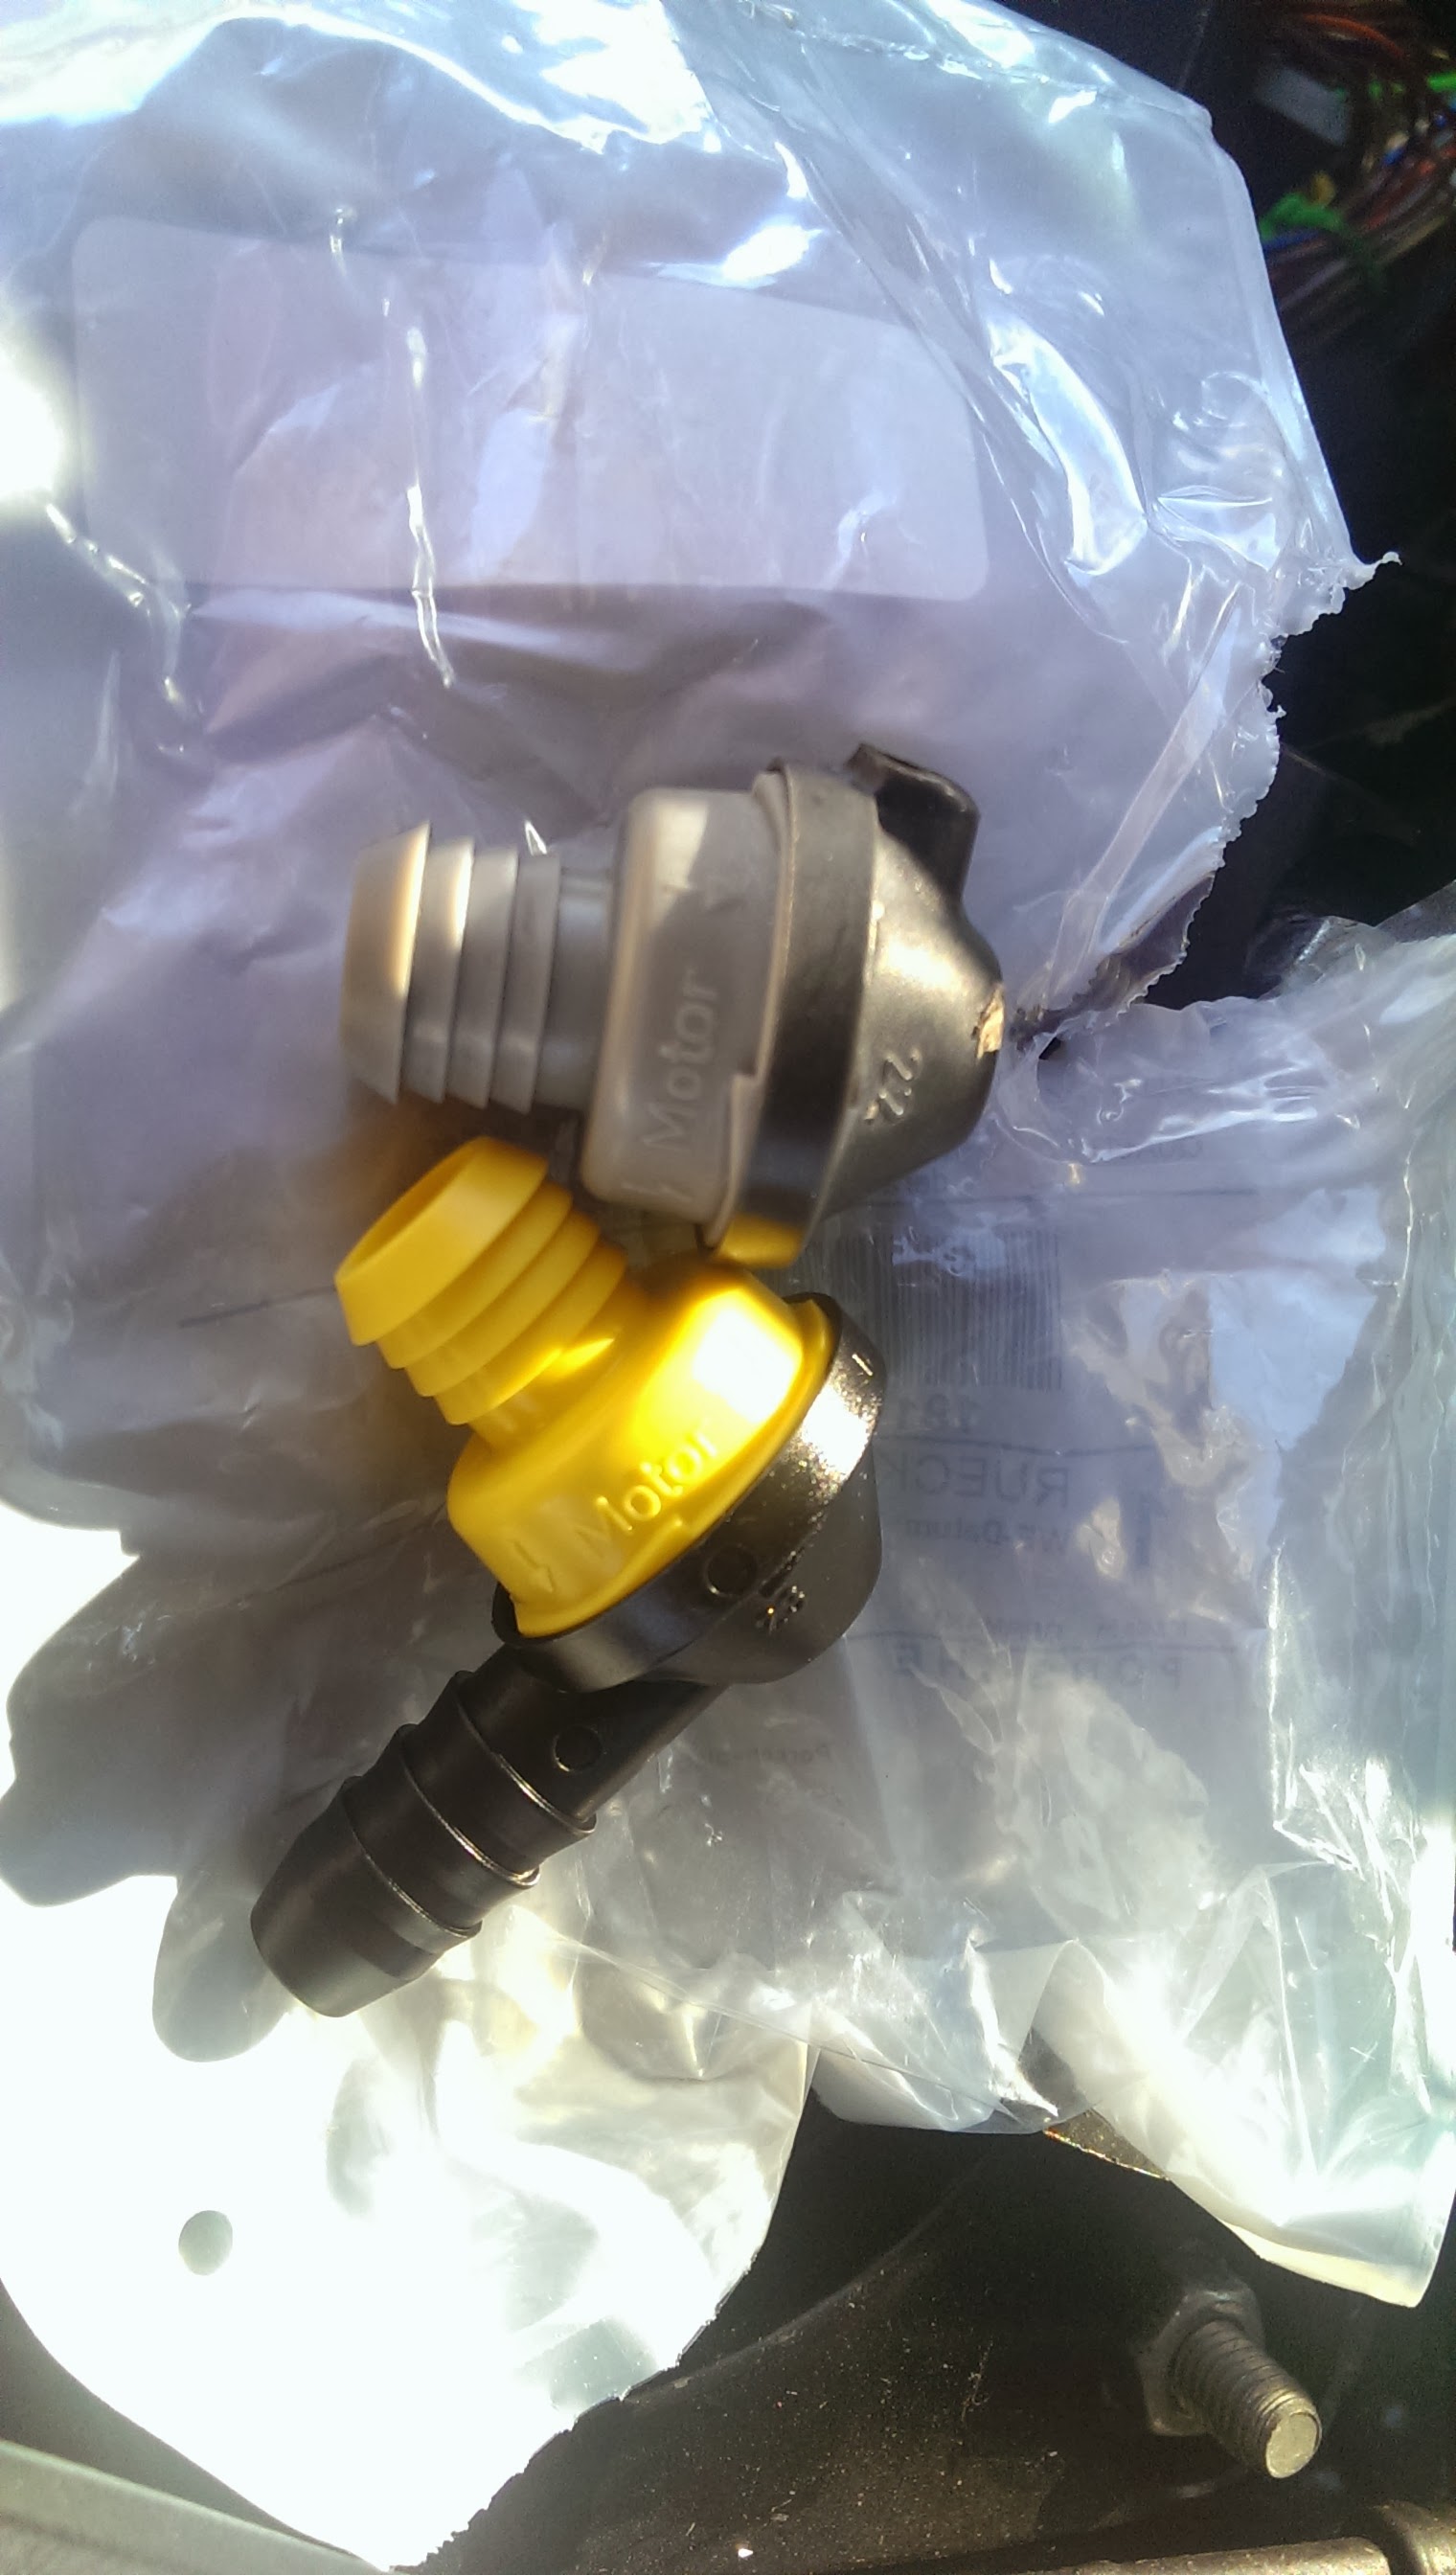
But since this broke, I decided to browse, and I found an alternative!!
this
http://www.ecstuning.com/ES1359452/
Is for a porsche 911
It is a check valve. Much like ours, but it has a barbed fitting outlet instead of a hard line already attached.
The side of the fitting that goes into the brake booster looked similar enough, as well as the marks on the injection molded halves, so I brought one on a whim, and it fits!
PERFECTLY!
Bonus for being cheaper too!
different color.. but who cares!
actuates the same way, and If i had to bet on it, they were made by the same company.
(all the markings are the same)

decided to get a new seal as well for good measure
old and broken vs new

only marking difference was on the caps. one said 22 and the other said 23. but they are not exactly identical due to the outlet :3
but most importantly.. SHE FITS!!

Hope you all enjoyed!
I was happy it worked
I will be sure and post of some of the final welds inside and out though once the 347 filler comes in!
But they will be 80% penetration welds with a convex outside bead, so it wont be any different than just a tac'd in place inside... :/
In other news!!
Well... I broke something the other day. I snapped the tube-side part of the vacuum check valve for the brake booster. OOPS.
I was fiddling with turbo positioning and went to move the vacuum line a little and it just snapped off at the valve.
For those that do not know of what I speak.
This fitting (part #5)
Which is sort of okay. I needed to ditch that line since it was in the way, and was not sure how I was going to remove the line cleanly. I figured I would just cut the line somewhere since it was a hard line and secure a soft line that was vacuum rated to it. Not clean.. but it would work.
But since this broke, I decided to browse, and I found an alternative!!
this
http://www.ecstuning.com/ES1359452/
Is for a porsche 911
It is a check valve. Much like ours, but it has a barbed fitting outlet instead of a hard line already attached.
The side of the fitting that goes into the brake booster looked similar enough, as well as the marks on the injection molded halves, so I brought one on a whim, and it fits!
PERFECTLY!
Bonus for being cheaper too!
different color.. but who cares!
actuates the same way, and If i had to bet on it, they were made by the same company.
(all the markings are the same)
decided to get a new seal as well for good measure
old and broken vs new
only marking difference was on the caps. one said 22 and the other said 23. but they are not exactly identical due to the outlet :3
but most importantly.. SHE FITS!!
Hope you all enjoyed!
I was happy it worked
Thread Starter
|
5th Gear
Joined: Aug 2008
Posts: 1,100
Likes: 13
From: Inman, SC
something about a brown chicken and a brown cow...
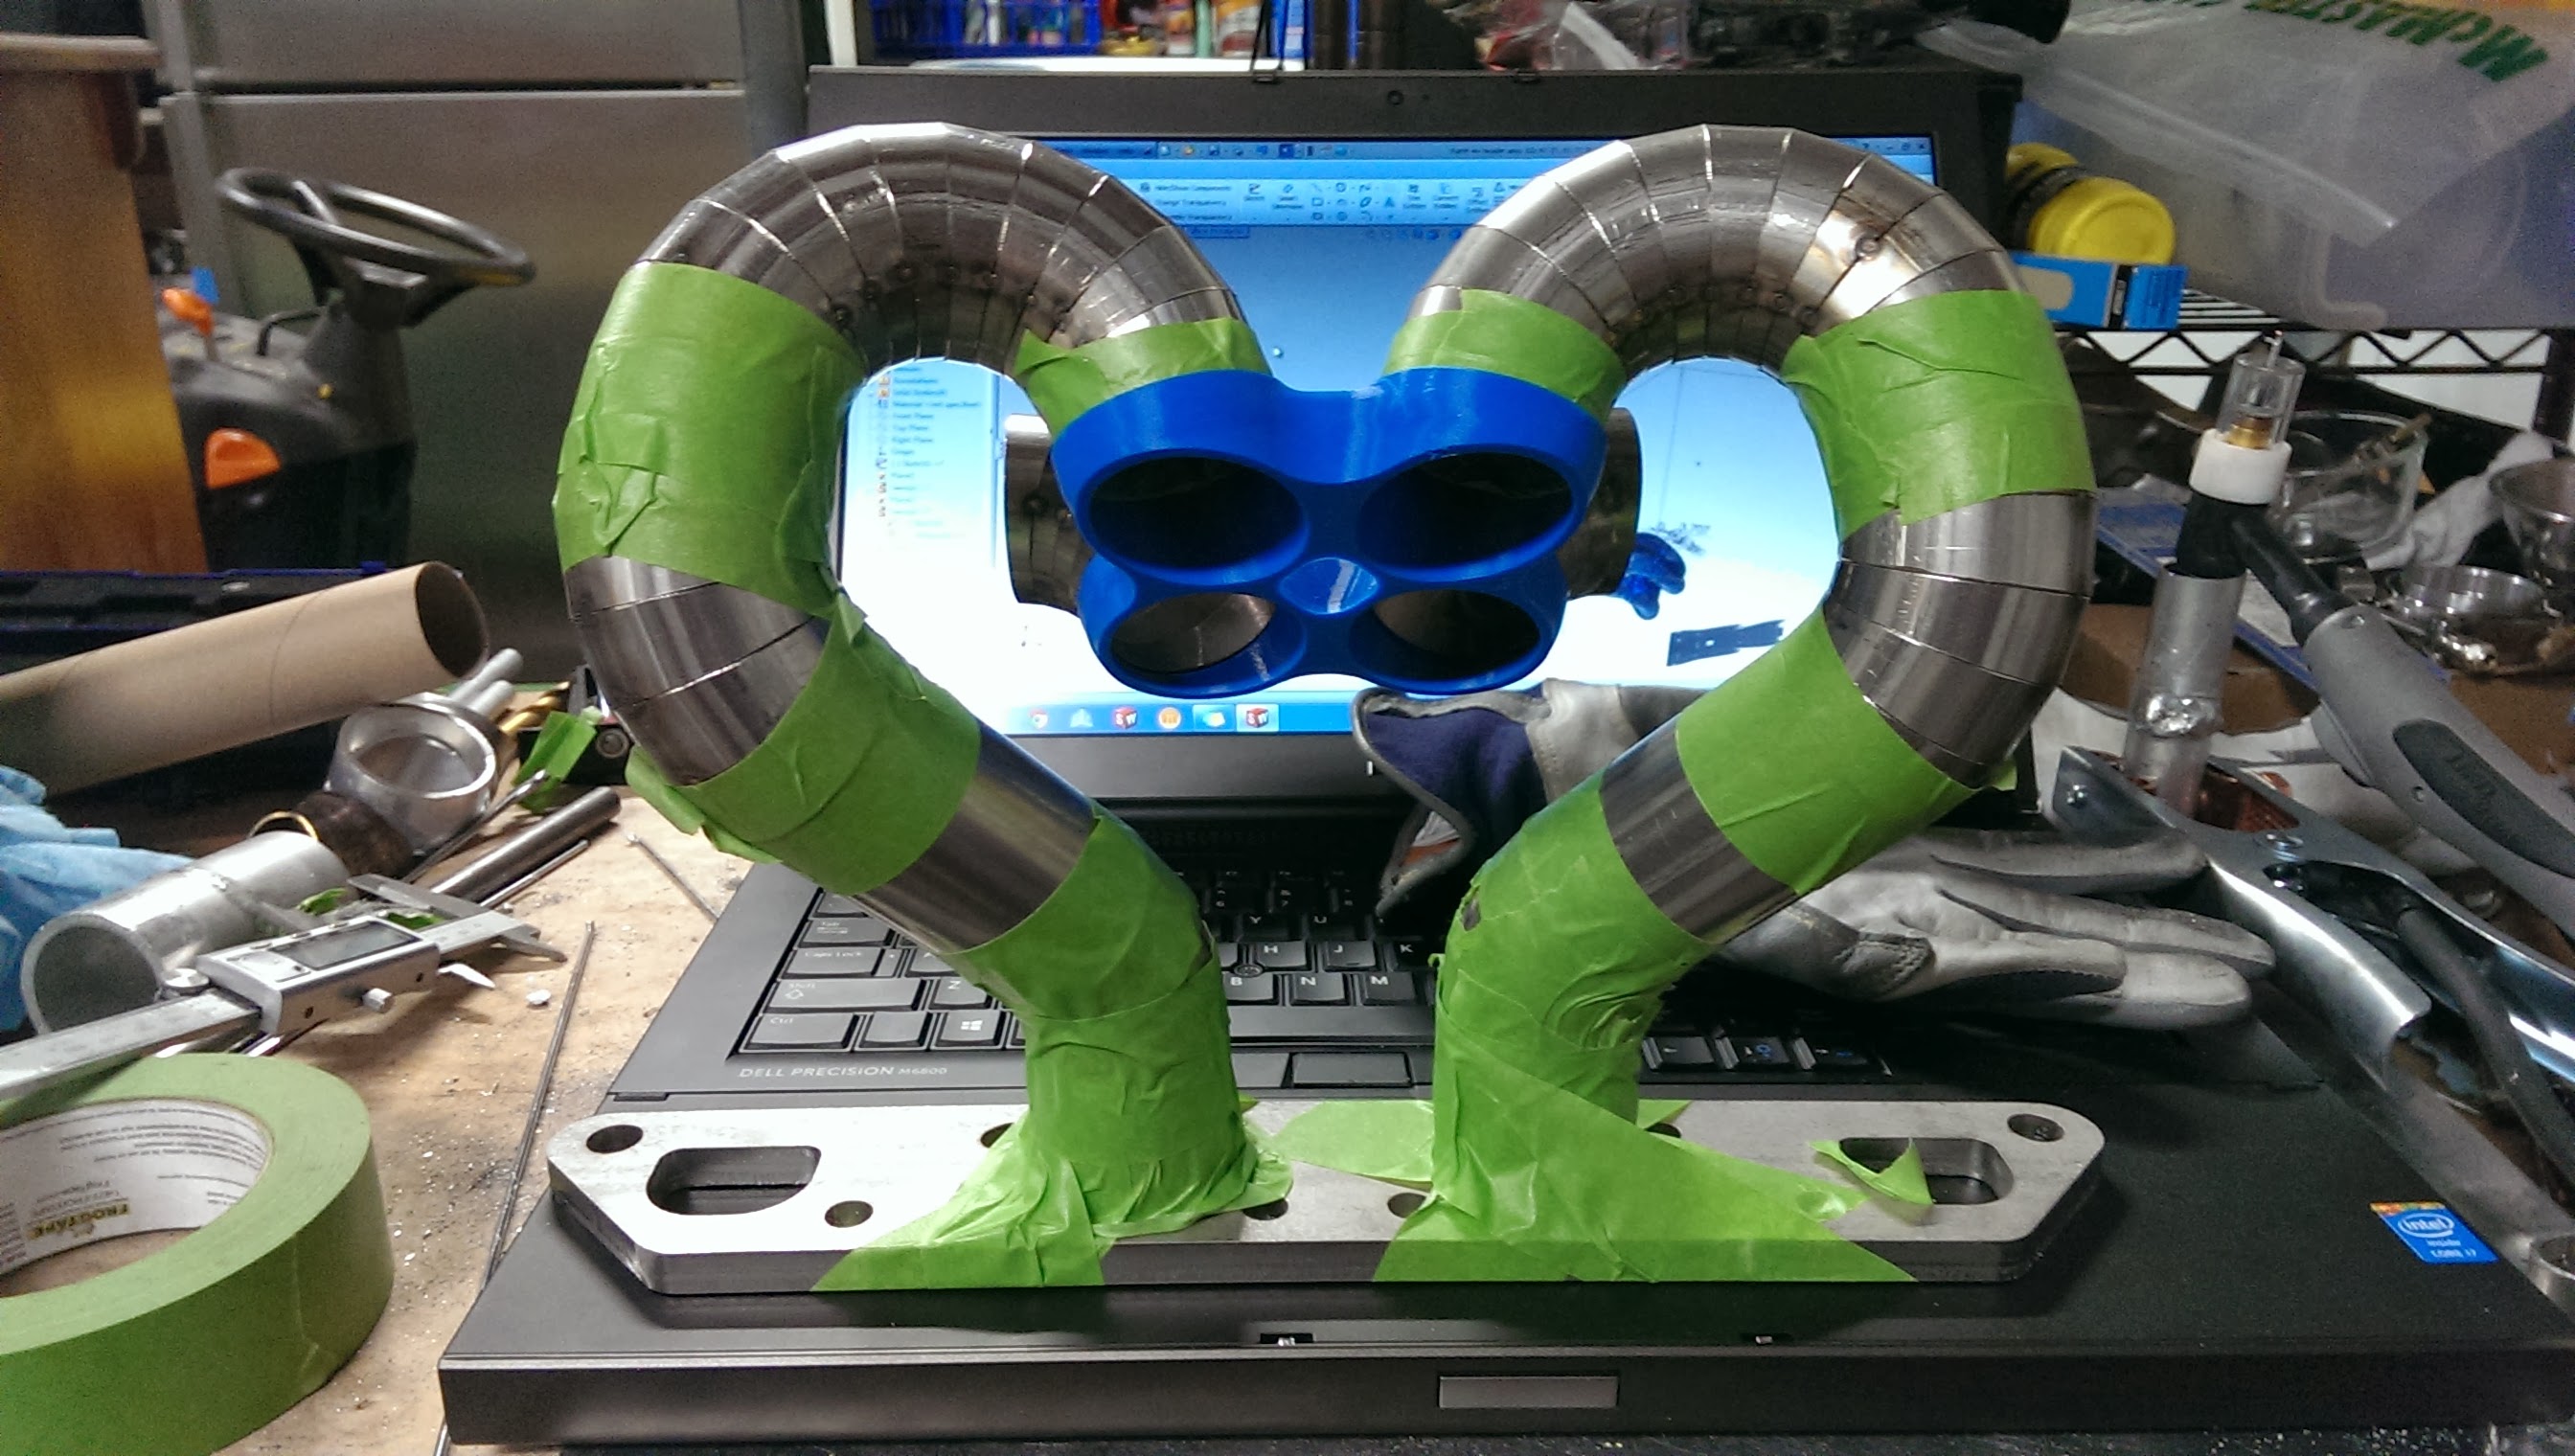
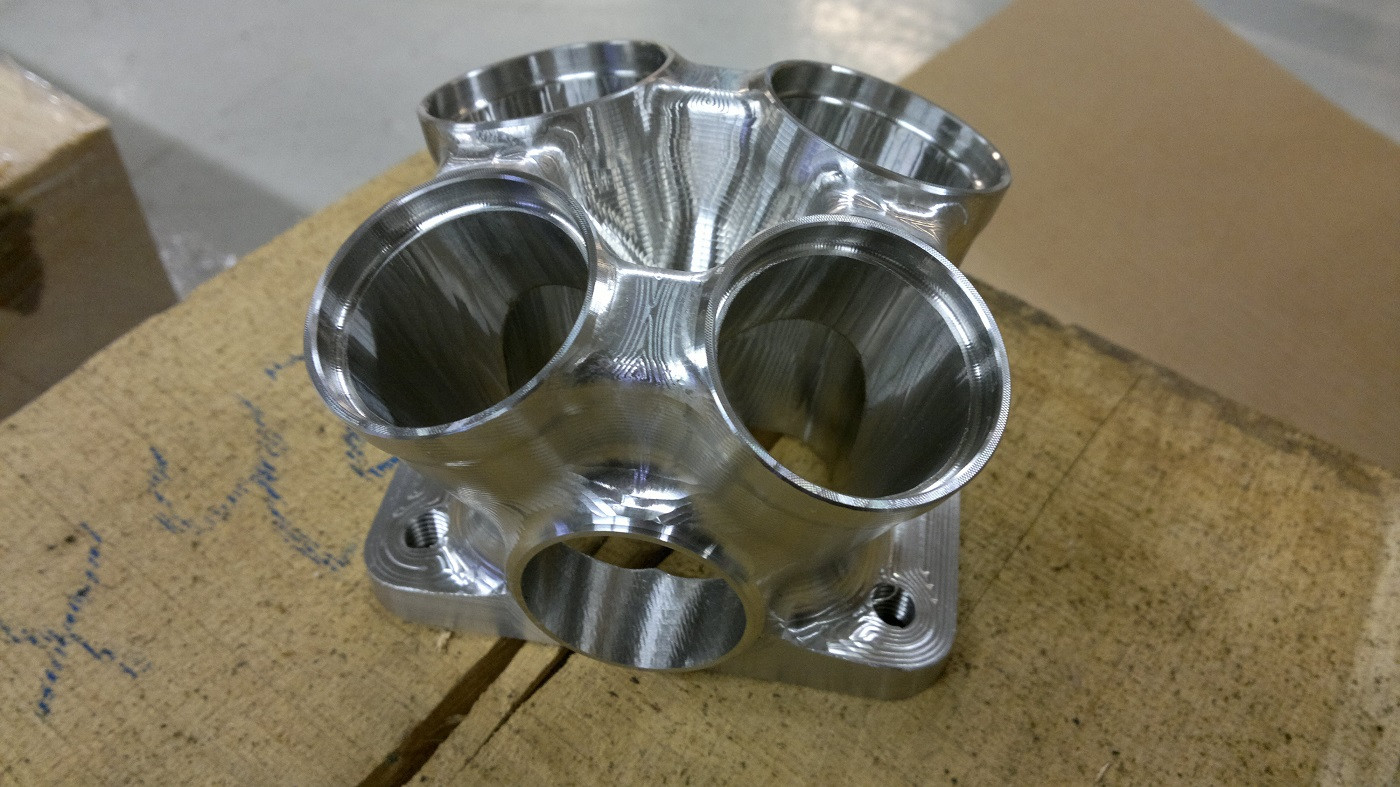
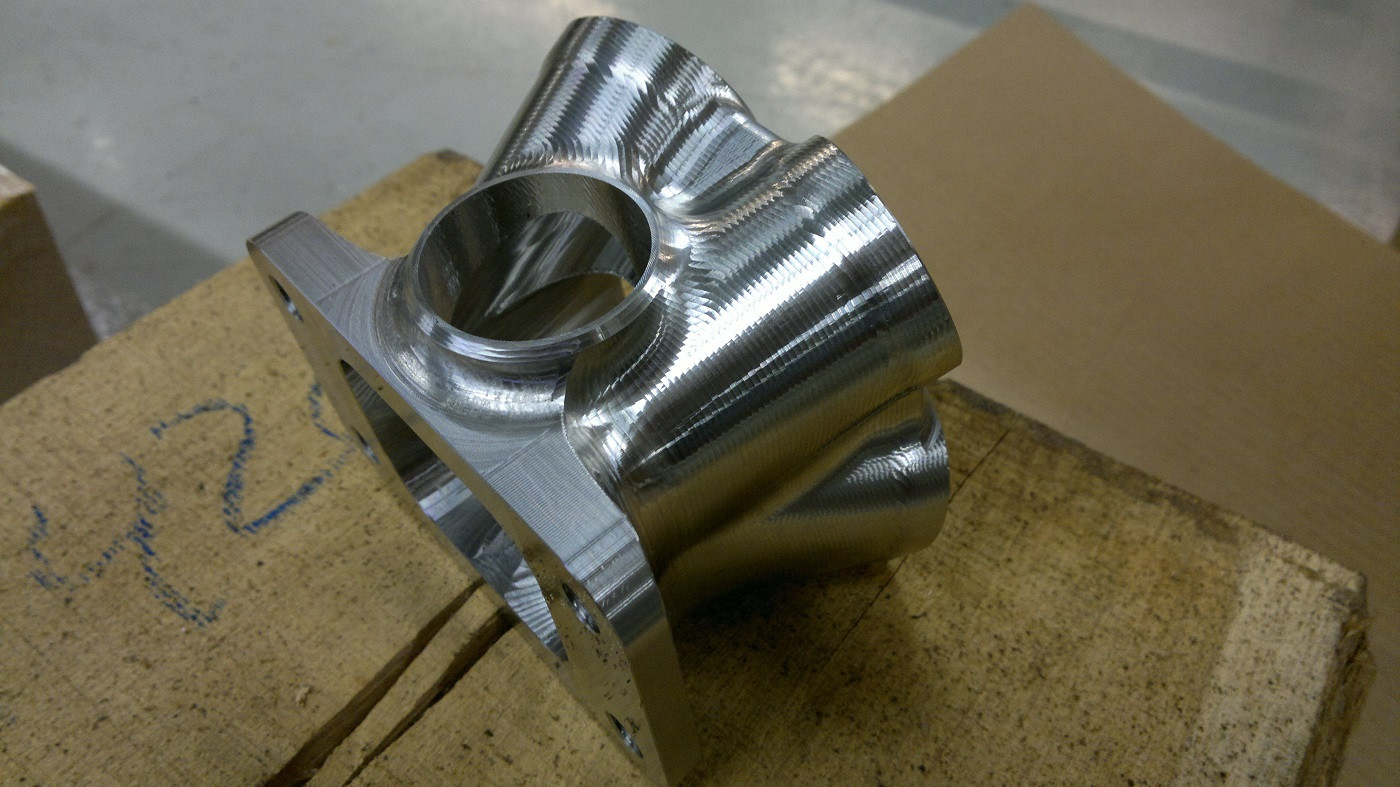
WIP: - decided to print just the merge section of the collector for mock up purposes.
No final welding till the actual collector comes in (clearances are UBER tight)
but it is good to preemptively check and get the straight bits cut.

WIP: - decided to print just the merge section of the collector for mock up purposes.
No final welding till the actual collector comes in (clearances are UBER tight)
but it is good to preemptively check and get the straight bits cut.
Thread Starter
|
5th Gear
Joined: Aug 2008
Posts: 1,100
Likes: 13
From: Inman, SC
OKAY!
first things first, since I know people are going to ask me to see the inside, or why the welds look like they do. Why they are not flat, and the pipe is not shiny anymore, and on and on.
If you have never welded turbo headers before... the RIGHT WAY
(321 SS, 347 filler, back purge, NOT FULL PENETRATION!, and a CONVEX weld bead.)
read this
->
http://www.burnsstainless.com/weldingarticle5.aspx
It is different from how a schedule pipe header would be done (no filler, fusion welded, flat weld bead)
as for why are mine dark?, well that is what happens when stainless gets really hot.
And these, being super tiny little pieces, get quite hot.
turned out pretty well I think. Not perfect, but it will get better with more practice. By the time I am done with these bends I should be pretty proficient!
HAHA
anywho.
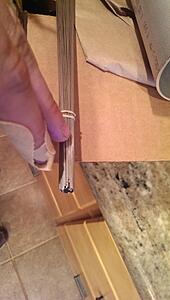
347 filler rod.
(I believe it has molybdenum in it... )
this stuff is small. .030" diameter.
the back purge set up
Crude for tonight, I will make a better version tomorrow.
Basically two flat plates. One has a spring bolted to it and the copper pipe supplies the argon. (end crushed, and holes drilled through pipe to let the gas diffuse out)
the spring goes through the plate on the other end (pull the spring through to apply tension) and then a small plate with a slit locks the spring in place and covers the hole it passes through.
Works well in a pinch.

and what I did tonight.
Cut my finger up with a razor at work today, and after these it was starting to throb a bit (doctor had option of 3 stitches or super glue. Ended up super gluing it.) so I quit for the evening.

first things first, since I know people are going to ask me to see the inside, or why the welds look like they do. Why they are not flat, and the pipe is not shiny anymore, and on and on.
If you have never welded turbo headers before... the RIGHT WAY
(321 SS, 347 filler, back purge, NOT FULL PENETRATION!, and a CONVEX weld bead.)
read this
->
http://www.burnsstainless.com/weldingarticle5.aspx
It is different from how a schedule pipe header would be done (no filler, fusion welded, flat weld bead)
as for why are mine dark?, well that is what happens when stainless gets really hot.
And these, being super tiny little pieces, get quite hot.
turned out pretty well I think. Not perfect, but it will get better with more practice. By the time I am done with these bends I should be pretty proficient!
HAHA
anywho.
347 filler rod.
(I believe it has molybdenum in it... )
this stuff is small. .030" diameter.

the back purge set up
Crude for tonight, I will make a better version tomorrow.
Basically two flat plates. One has a spring bolted to it and the copper pipe supplies the argon. (end crushed, and holes drilled through pipe to let the gas diffuse out)
the spring goes through the plate on the other end (pull the spring through to apply tension) and then a small plate with a slit locks the spring in place and covers the hole it passes through.
Works well in a pinch.

and what I did tonight.
Cut my finger up with a razor at work today, and after these it was starting to throb a bit (doctor had option of 3 stitches or super glue. Ended up super gluing it.) so I quit for the evening.

Thread Starter
|
5th Gear
Joined: Aug 2008
Posts: 1,100
Likes: 13
From: Inman, SC
a little sneak peak at the welding, and a few snaps of the back-purge setup I came up with.
If wanted I can go over how it was made, but it is all quite simple.
the back purge setup:
I have a flexible hose coming today instead of the push to connect hardline fitting, but besides that. this is it!

washers and spring are 316 SS. Fender washer drilled and tapped for a 1/4" NPT thread, and has a clearance hole for the spring anchor.
The other washer is just under the ID of the tubing, and has been drilled and tapped for 1/4-20 thread so the anchor screws into it.
the brass thingy is a muffler.
Commonly found on air valves, it is acting as a gas diffuser. Allows for more efficient use of argon on the back purge. (diffuses out and pushed out oxygen rather than just being turbulent and mixing for a while)
Spring gets pulled through other plate and then simply "locked into place"
what I got finished on the tank of argon I had on hand. (I also did a fair bit of contract aluminum welding for a turbo M5 this weekend)

and since people keep asking what the backside looks like
Here:
Just barely touching through.
This piece I ran slightly hotter than some of the others.
For headers it is not even really supposed to come through, but if you just slightly melt the inside, (so inside bead is still relatively flat) it should be okay.
If wanted I can go over how it was made, but it is all quite simple.
the back purge setup:
I have a flexible hose coming today instead of the push to connect hardline fitting, but besides that. this is it!

washers and spring are 316 SS. Fender washer drilled and tapped for a 1/4" NPT thread, and has a clearance hole for the spring anchor.
The other washer is just under the ID of the tubing, and has been drilled and tapped for 1/4-20 thread so the anchor screws into it.
the brass thingy is a muffler.
Commonly found on air valves, it is acting as a gas diffuser. Allows for more efficient use of argon on the back purge. (diffuses out and pushed out oxygen rather than just being turbulent and mixing for a while)
Spring gets pulled through other plate and then simply "locked into place"

what I got finished on the tank of argon I had on hand. (I also did a fair bit of contract aluminum welding for a turbo M5 this weekend)

and since people keep asking what the backside looks like
Here:

Just barely touching through.
This piece I ran slightly hotter than some of the others.
For headers it is not even really supposed to come through, but if you just slightly melt the inside, (so inside bead is still relatively flat) it should be okay.
Thread Starter
|
5th Gear
Joined: Aug 2008
Posts: 1,100
Likes: 13
From: Inman, SC
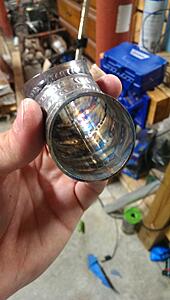
I'M SORRY!!! GAAAHH!!!
hahaha
other project, work etc.
May be headed off to NY this friday to visit a development partner for work, and have 3 projects all coming up to review dates, so things are busy.
But just to tease you guys a little more.
Something arrived in the mail today...
And it is ohh so sexy.

hahaha
other project, work etc.
May be headed off to NY this friday to visit a development partner for work, and have 3 projects all coming up to review dates, so things are busy.
But just to tease you guys a little more.
Something arrived in the mail today...
And it is ohh so sexy.
