
CooperSAZ's 2005 LY/Blk R53


Thread Starter
|
5th Gear
Joined: Jan 2005
Posts: 1,025
Likes: 40
From: Phoenix, AZ
I finally got around to swapping out the outer ball joints. Not a hard job by any means but it helps if you have the right tools.
After raising the vehicle and supporting him with jackstands, time to remove the wheels

Here is the driver side lower outer ball joint. At 111,000 miles, I figure they were due to replace.

I chose to remove the two 13mm bolts first. After impacting them off, the LBJ was stuck onto the hub. I grabbed my flathead screwdriver and tapped on the LBJ to jar it loose. Worked after a few taps.

I must have used this tool a million times. Cant imagine life without one.

Now as you apply pressure to the LBJ, I typically choose to lower the garage door down before the BOOM happens. When the LBJ pops out from the lower control arm, there is typically a sizeable BOOM/BANG. I elected to keep the nut on the LBJ as well so nothing takes flight when the LBJ is popped.
Old lower ball joint vs the new lower ball joint.

Cap removed off of the new lower ball joint. One thing I did notice was playing around with the old lower ball joint. You could swing the old LBJ bolt in 360-degrees at will. With the new LBJ, that thing is so stiff that you are not moving it much, if at all. This is a great way to help stiffen things back up on the suspension.


One thing I do not understand about MINI� The lower ball joints installed on the car back in 2004 were a standard hex-shaped 13mm bolt. Why go to a torx bit? In any event, you will need a T50 bit to torque/secure the LBJ mounting bolts.

Here is the driver side LBJ put back together but not torqued.

Torqued and ready to move to the passenger side.

After raising the vehicle and supporting him with jackstands, time to remove the wheels

Here is the driver side lower outer ball joint. At 111,000 miles, I figure they were due to replace.

I chose to remove the two 13mm bolts first. After impacting them off, the LBJ was stuck onto the hub. I grabbed my flathead screwdriver and tapped on the LBJ to jar it loose. Worked after a few taps.

I must have used this tool a million times. Cant imagine life without one.

Now as you apply pressure to the LBJ, I typically choose to lower the garage door down before the BOOM happens. When the LBJ pops out from the lower control arm, there is typically a sizeable BOOM/BANG. I elected to keep the nut on the LBJ as well so nothing takes flight when the LBJ is popped.

Old lower ball joint vs the new lower ball joint.

Cap removed off of the new lower ball joint. One thing I did notice was playing around with the old lower ball joint. You could swing the old LBJ bolt in 360-degrees at will. With the new LBJ, that thing is so stiff that you are not moving it much, if at all. This is a great way to help stiffen things back up on the suspension.


One thing I do not understand about MINI� The lower ball joints installed on the car back in 2004 were a standard hex-shaped 13mm bolt. Why go to a torx bit? In any event, you will need a T50 bit to torque/secure the LBJ mounting bolts.

Here is the driver side LBJ put back together but not torqued.

Torqued and ready to move to the passenger side.

Thread Starter
|
5th Gear
Joined: Jan 2005
Posts: 1,025
Likes: 40
From: Phoenix, AZ
Impacted the passenger side lower ball joint nut and the inner wheel carrier nut


Same thing as the driver side. I removed the 13mm bolts holding the LBJ to the hub. On this side, the lower ball joint just fell into my hand. No flathead screwdriver required to separate the lower ball joint.

Lower ball joint separator back in place. Boom coming…

Post-BOOM. Again, leave the nut onto the lower ball joint so nothing takes off on you.

New vs old


Starting the T50 mounting bolts to secure the lower ball joint

T50 bolts torqued and now I am just lining the lower control arm back up.

Everything is torqued and buttoned back up.

Again, I had to use this handmade pic of the surrounding area:

Last edited by CooperSAZ; Aug 27, 2016 at 02:30 PM.


Love the pics, bet the front end feels much tighter, mine did after 150K.
__________________

MINI Guru/ MINI Owner Since 2004 | NEW Lifetime Part Replacement | Local Pickup
Milltek | Genuine MINI | Forge Motorsport | NM Engineering | ECS Performance | M7 Speed
Customer Service Hours: 8am-8pm EST|Sales Team Hours: 8am-11pm | SAT 10am-7pm 800.924.5172
MINI Guru/ MINI Owner Since 2004 | NEW Lifetime Part Replacement | Local Pickup
Milltek | Genuine MINI | Forge Motorsport | NM Engineering | ECS Performance | M7 Speed
Customer Service Hours: 8am-8pm EST|Sales Team Hours: 8am-11pm | SAT 10am-7pm 800.924.5172
Thread Starter
|
5th Gear
Joined: Jan 2005
Posts: 1,025
Likes: 40
From: Phoenix, AZ
Thank you! It has tightened up a bit! Very noticeable.
Question, why go to a torx bit? The bolts on the car when built were a standard 13mm hex. Now they are T50 torx and circular? I dont get it...
Is there a benefit with going to a torx bolt? Or are they just having fun with us? hehe

They like to change things up with suppliers and safety things , keep us on our feet. 
__________________
MINI Guru/ MINI Owner Since 2004 | NEW Lifetime Part Replacement | Local Pickup
Milltek | Genuine MINI | Forge Motorsport | NM Engineering | ECS Performance | M7 Speed
Customer Service Hours: 8am-8pm EST|Sales Team Hours: 8am-11pm | SAT 10am-7pm 800.924.5172
MINI Guru/ MINI Owner Since 2004 | NEW Lifetime Part Replacement | Local Pickup
Milltek | Genuine MINI | Forge Motorsport | NM Engineering | ECS Performance | M7 Speed
Customer Service Hours: 8am-8pm EST|Sales Team Hours: 8am-11pm | SAT 10am-7pm 800.924.5172
Last edited by ECSTuning; Mar 14, 2016 at 01:53 PM.

Thread Starter
|
5th Gear
Joined: Jan 2005
Posts: 1,025
Likes: 40
From: Phoenix, AZ
I did the annual swap out of my wiper blades when I noticed one of my brake lights were out. Took some time to swap out the lights and replace them with new units. Back to motoring. 5 minute fix.
I gave him a bath and broke out my polisher and gave him a new coat of polish and wax.

Debating on picking up some black plasti dip and painting the wheels for fun. Curious to see what it would look like...
I gave him a bath and broke out my polisher and gave him a new coat of polish and wax.

Debating on picking up some black plasti dip and painting the wheels for fun. Curious to see what it would look like...

6th Gear
Joined: Jul 2014
Posts: 1,118
Likes: 25
From: North Carolina
I did the annual swap out of my wiper blades when I noticed one of my brake lights were out. Took some time to swap out the lights and replace them with new units. Back to motoring. 5 minute fix.
I gave him a bath and broke out my polisher and gave him a new coat of polish and wax.
I gave him a bath and broke out my polisher and gave him a new coat of polish and wax.

Thread Starter
|
5th Gear
Joined: Jan 2005
Posts: 1,025
Likes: 40
From: Phoenix, AZ
I agree! I am leaning towards the matte finish as well. Glossy might conflict with the trim too much. Thanks for the feedback!
Thread Starter
|
5th Gear
Joined: Jan 2005
Posts: 1,025
Likes: 40
From: Phoenix, AZ
Gave him a bath today. Cleans up well.
Out and about, the check engine light came on today. Woopee! Car ran fine, came home and put him in the garage. Connected him to the scanner and code P0340 came up. Camshaft Position Sensor! I guess it could be worse.
Cruising through NAM, it appears that the standard operating procedure is to clear the code and wait for strike two. So that is what I did. I cleared the code and took him for a test drive. Put on about 10-15 miles and nothing. He appears to be running fine like any other day. So I will sit and wait.
Mileage marker � 113,028 miles.
Currently, I am (being lazy and) sitting on the following parts: power steering hydraulic lines, fluid and new power steering fan, new radiator, new hoses and plastic connectors, new MINI fluid, new thermostat, new oil pan gasket, new dip stick o-ring and camshaft position sensor o-ring.
I will order the new sensor along with the transmission mount for when I go in and replace a bunch of stuff. Glad I was being a little lazy� I hate going in twice. But if the car triggered the CEL once, I can only assume it will do it again? While I am replacing the radiator, the front end will be exposed and make this sensor swap quite easy. Might as well while I am in there!
Cheers to all and Happy Fourth of July!


Thread Starter
|
5th Gear
Joined: Jan 2005
Posts: 1,025
Likes: 40
From: Phoenix, AZ
Spent some time on the MINI this morning.
I have been experiencing some odd things but was unable to put a finger on what it was� I was experiencing the following:
- Rough start/idle until warmed up which generated a sound that appeared to be valve train related (to me)
- There was a metallic flutter/valvetrain sound at idle (warm) up to 1500-1800rpm and then it disappears. Not the diesel sound emitted from a going belt tensioner but in the ballpark of that sound.
- Apparent loss of power in the higher rpm range of each gear
- (Recently) the DSC light would be triggered and stay on, until the MINI is shut down. Light is reset and off until triggered again.
- (Recently) The �Check Engine Soon� light came on but the MINI appeared to be running fine.
Threw him on the scanner and picked up code P0340 � Camshaft Position Sensor.
I cleared the code and waited to see how long it took before it came back on. That was the same day or about 12 miles later. Here is your sign! Hehe So not knowing or wanting to screw things up, we parked him for a few days and the wife took the Ody to work and I took the CRX to work. Nice having three cars for that reason.
So I went ahead and ordered a replacement part from a local dealership and it arrived is $82 flat.

Let the fun begin!
Safety first. I felt compelled to jack him into the air so that I could sneak the jack underneath the motor to support it while I remove the engine bracket.

Bay shot

Coming around the side and focusing on the passenger side

Focusing on the camshaft position sensor


You have to remove the passenger side engine bracket. This consists of 4 main bolts that secure the bracket to the engine, a single nut (18mm) securing the bracket to the passenger side mount and a little nut/bolt for the ground wire. This is the time to place the jack underneath the motor to support it for when the bracket is removed. I typically get the motor to lift a fraction of an inch to let me know it is in place.
Here are the front 2 main bracket to motor bolts. (16mm) An extension will serve you well.

Here are the 2 rear main bolts securing the bracket to the engine.

Bracket has been removed and now the old camshaft position sensor is visible.

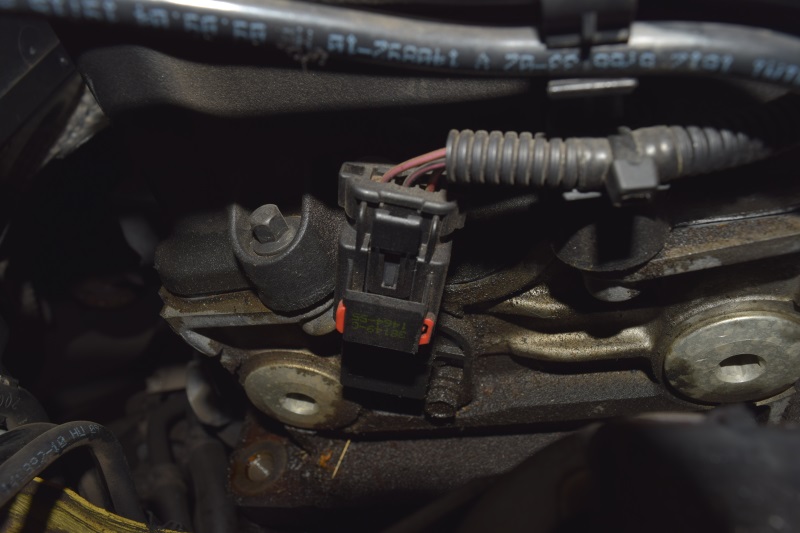
The red piece is a �lock� that needs to be slide one way or the other to unlock the sensor. Then push down on the tab and disconnect the sensor from the wiring harness.
Thread Starter
|
5th Gear
Joined: Jan 2005
Posts: 1,025
Likes: 40
From: Phoenix, AZ
Old camshaft position sensor removed with some oil on it.


Old sensor vs New sensor

Here is the location on the cylinder head where the sensor fits into to monitor the camshaft. The sensor was covered in oil so that tells me that after 113k miles, the o-ring was failing and I was leaking a small amount of oil.

Here is the red locking mechanism on the wiring harness. I don�t think I have seen a picture of this before so I thought I would post how is works to help someone out.
Locked:

Unlocked:

Here is a great pic of the old sensor depicting oil pre o-ring and post o-ring. Oil is clearly getting past the o-ring and then leaking out on the side of the motor� shameful!

While the engine bracket was out, I decided to clean it up so it is ready to get installed back under the bonnet�


Thread Starter
|
5th Gear
Joined: Jan 2005
Posts: 1,025
Likes: 40
From: Phoenix, AZ
New camshaft sensor installed. There is a single 10mm bolt that secures the sensor to the cylinder head. Does not need to be gorilla tight, just snug

Panning out with the new sensor installed

Wiring harness connected to the new installed sensor. Notice the red part on the wiring harness in the unlocked position.

Red slide on the harness slide over into the locked position

Once that is complete, its time to slide the engine bracket into place and around all of the hoses
Front two bolts securing the bracket to the motor

Two main rear bolts torqued securing the bracket to the engine


Align the motor so it sits on the engine mount. Torque the motor mount nut back down

Ground wire secured and you are done! Engine bay shot and everything buttoned back up


Last edited by CooperSAZ; Aug 27, 2016 at 02:34 PM.
Thread Starter
|
5th Gear
Joined: Jan 2005
Posts: 1,025
Likes: 40
From: Phoenix, AZ
After everything was buttoned up, I turned him over. Expecting the worst, I heard nothing but the motor turning over and idling beautifully. No metallic valvetrain (to me) sound at idle or starting up.
Interesting�
Rev a few times and the car sounds fantastic! Let him idle for about 5 minutes and no engine lights� Good sign� Time for a test drive. Took him for a quick stroll around the block incase there is a failure. He did great and sounds great. Much more quite albeit there is an intake, header and exhaust on him.
Time for a longer range test and got him to a major street before opening him up.
Wow, I would be willing to bet a picked up a bit of performance now. You never really know WHEN you start to lose power� but you surely know WHEN you gain it back. He is much more spunky through all of the gears! Wow. Big difference. Is that possible to get some power back? This monitors the camshaft position, so does this impact the ignition timing and fuel introduction?
Something happened and he feels like brand new again� much more spunky and he pulls much more now. Very happy camper. I am about 15 miles in now and no check engine light.
Fingers are crossed that this is it so I am pretty happy. I would encourage anyone to swap out this sensor if you get the chance. Its $75-85 depending, very straightforward to swap out and in the end, you eliminate a small oil leak and gain a bit of performance back.
I will follow up once I have a few more miles under my belt.
Cheers.
Thread Starter
|
5th Gear
Joined: Jan 2005
Posts: 1,025
Likes: 40
From: Phoenix, AZ
Thank you for the kind words.I hope it helps people out along the way. The forum has been good to me so I want to pay it forward.
What else do you have to work on?

Neutral
Joined: Jul 2016
Posts: 3
Likes: 0
Well, I just got rid of my 2000 BMW Z3 in exchange for a 06 Chili Red R53. I think it basically needs everything you have done so far. Honestly this is really the only thread I have found that comprehensively covers all of this basic maintenance stuff that needs to be done. Someone should sticky this.


Apljcks, join the club! I bought mine 3 months ago, just did all the motor mounts, control arm bushings, ball joints, cv boots, front crankshaft position sensor, timing chain tensioner, radiator resistor, bypass valve, and oil pan!!! It seems like 2016 is the year a bunch of us second/third generation of owners to decide to revive these things!
Just...uh...be prepared for it to stop working...a lot. I've owned mine for just over three months and I've only driven it to work 10-15 times, lol.
Just...uh...be prepared for it to stop working...a lot. I've owned mine for just over three months and I've only driven it to work 10-15 times, lol.
Thread Starter
|
5th Gear
Joined: Jan 2005
Posts: 1,025
Likes: 40
From: Phoenix, AZ
Liquid Yellow is starting to be a rare color and its not often you can catch two in the same pic!
sarom058�s MINI along with my MINI. Excuse the dust, he just got his Cooper mobile again...


sarom058�s MINI along with my MINI. Excuse the dust, he just got his Cooper mobile again...


My MINI just got so excited to see a friend! ...and then after six weeks in the garage, it promptly broke again a day later
Thread Starter
|
5th Gear
Joined: Jan 2005
Posts: 1,025
Likes: 40
From: Phoenix, AZ
My MINI just got so excited to see a friend! ...and then after six weeks in the garage, it promptly broke again a day later
Nice to see to LY park together. yea, what happened :(
__________________
MINI Guru/ MINI Owner Since 2004 | NEW Lifetime Part Replacement | Local Pickup
Milltek | Genuine MINI | Forge Motorsport | NM Engineering | ECS Performance | M7 Speed
Customer Service Hours: 8am-8pm EST|Sales Team Hours: 8am-11pm | SAT 10am-7pm 800.924.5172
MINI Guru/ MINI Owner Since 2004 | NEW Lifetime Part Replacement | Local Pickup
Milltek | Genuine MINI | Forge Motorsport | NM Engineering | ECS Performance | M7 Speed
Customer Service Hours: 8am-8pm EST|Sales Team Hours: 8am-11pm | SAT 10am-7pm 800.924.5172


