
CooperSAZ's 2005 LY/Blk R53


Thread Starter
|
5th Gear
Joined: Jan 2005
Posts: 1,025
Likes: 40
From: Phoenix, AZ
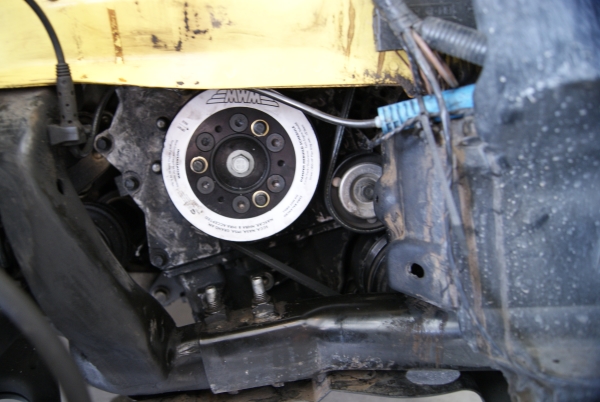
Step 8 is to inspect the crankshaft for any burrs or nicks. Mine looked good so I took some steel wool and lightly went over it to get any garbage off of it. I blew the hole free of any garbage as well. At this time, it is best to replace the seal.
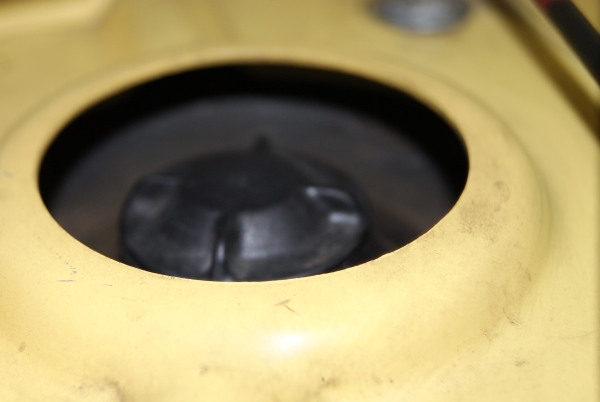
It is the circular seal around the crankshaft:

I used a pic to remove the old seal. Greased up the new seal and placed it into position. It is a tight fit so a little soft tapping helped move it into place.
Step 9, reinstalling. I pre-heated the kitchen oven to 250-degrees and threw the ATI unit on a cookie sheet for 15-20 minutes. Wife was thrilled! (not really) Then I took the mitts and ran out to the MINI to start the ATI damper by hand. This includes pushing the ATI pulley onto the crankshaft to start the re-install. I did not get very far but it was far enough to where the new unit was on the crank shaft.
Step 10, I used the supplied long bolt/washer to grab enough threads to where you can use a ratchet. This long bolt starts to press the pulley back into position. No impact here� All by hand. Once the long bolt/washer bottoms out, remove the bolt as you are done with it.
Step 11, Time to grab the NEW crank bolt and apply Blue Loctite on it. Stuff comes out fast so don�t make a mess. At this point, it should be JUST long enough to grab a few threads. By hand, ratchet the bolt down. As you approach the end, it will get tough and the pulley will want to turn. Two options: 1) someone hits the brake pedal, or 2) use a crowbar to lock the pulley from turning so you can finish off the ratcheting. Make sure your torque wrench is set to 85 ft-lbs and keep going until the torque wrench clicks. Try it again and make it click twice. You are done!
Should look like this:
Step 12 is to reinstall the belt using the proper routing (diagram). We got hung up a bit but it is straightforward. I have a 15% S/C pulley with the JCW belt so things get a little tight. Use the MINI tensioner tool again to pull back on the tensioner. Have your buddy pulley the pin/key out of the second hole and SLOWLY let the tensioner go and back into position. Make sure the belt is lined up properly and in all the grooves.
Step 13, turn the MINI over and inspect. You are looking at the new damper/pulley to make sure it is turning and that the belt is rotating properly. My MINI sounded good after so I revved it a bit, all is well. Turn on the A/C, the coil clicks and engages the compressor, cold air. Nice� You are good to go.
Step 14, re-install the fender/splash guard with the 8 plastic rivets and 3 metal screws.
Step 15, reinstall the wheel and lug nuts and torque to specs.
I went for a test drive around the block waiting for something to blow up. It didn�t. Then I went for a longer drive� then a �spirited� drive. Great to be motoring once again!
I can�t say that I gained any performance (maybe), but I did gain what was losing from the weakened OEM pulley. Now, I can rev to red line freely and go to the next gear. Car is spunky! With the aging OEM damper, I felt a growing resistance as I approach red line. I figured this was the pulley weakening so I would back off.
Currently, I have about 150 miles on the new ATI unit and the car is back to driving normally. Idle feels better and it feels smoother when driving or accelerating.
Sorry for the lack of pictures but I was under a time crunch. I only had a second pair of hands for about 90 minutes otherwise I would have documented this better.
Next stop is the front struts and two motor mounts.
Cheers!
It is the circular seal around the crankshaft:
I used a pic to remove the old seal. Greased up the new seal and placed it into position. It is a tight fit so a little soft tapping helped move it into place.
Step 9, reinstalling. I pre-heated the kitchen oven to 250-degrees and threw the ATI unit on a cookie sheet for 15-20 minutes. Wife was thrilled! (not really) Then I took the mitts and ran out to the MINI to start the ATI damper by hand. This includes pushing the ATI pulley onto the crankshaft to start the re-install. I did not get very far but it was far enough to where the new unit was on the crank shaft.
Step 10, I used the supplied long bolt/washer to grab enough threads to where you can use a ratchet. This long bolt starts to press the pulley back into position. No impact here� All by hand. Once the long bolt/washer bottoms out, remove the bolt as you are done with it.
Step 11, Time to grab the NEW crank bolt and apply Blue Loctite on it. Stuff comes out fast so don�t make a mess. At this point, it should be JUST long enough to grab a few threads. By hand, ratchet the bolt down. As you approach the end, it will get tough and the pulley will want to turn. Two options: 1) someone hits the brake pedal, or 2) use a crowbar to lock the pulley from turning so you can finish off the ratcheting. Make sure your torque wrench is set to 85 ft-lbs and keep going until the torque wrench clicks. Try it again and make it click twice. You are done!
Should look like this:
Step 12 is to reinstall the belt using the proper routing (diagram). We got hung up a bit but it is straightforward. I have a 15% S/C pulley with the JCW belt so things get a little tight. Use the MINI tensioner tool again to pull back on the tensioner. Have your buddy pulley the pin/key out of the second hole and SLOWLY let the tensioner go and back into position. Make sure the belt is lined up properly and in all the grooves.
Step 13, turn the MINI over and inspect. You are looking at the new damper/pulley to make sure it is turning and that the belt is rotating properly. My MINI sounded good after so I revved it a bit, all is well. Turn on the A/C, the coil clicks and engages the compressor, cold air. Nice� You are good to go.
Step 14, re-install the fender/splash guard with the 8 plastic rivets and 3 metal screws.
Step 15, reinstall the wheel and lug nuts and torque to specs.
I went for a test drive around the block waiting for something to blow up. It didn�t. Then I went for a longer drive� then a �spirited� drive. Great to be motoring once again!
I can�t say that I gained any performance (maybe), but I did gain what was losing from the weakened OEM pulley. Now, I can rev to red line freely and go to the next gear. Car is spunky! With the aging OEM damper, I felt a growing resistance as I approach red line. I figured this was the pulley weakening so I would back off.
Currently, I have about 150 miles on the new ATI unit and the car is back to driving normally. Idle feels better and it feels smoother when driving or accelerating.
Sorry for the lack of pictures but I was under a time crunch. I only had a second pair of hands for about 90 minutes otherwise I would have documented this better.
Next stop is the front struts and two motor mounts.
Cheers!

2nd Gear
Joined: Mar 2014
Posts: 70
Likes: 0
Hey there! I got the LY/black mini too!.. although I'm not the 1st owner. lol. But I got those mods with the mini when i got em. sssweet!!! How's your CA Bushing holding?.. mines is wayyy out. Gotta need to do it soon. Does DIY on these needs air tools? I heard they're pretty stuck in there to go out.. I only have manual tool set and a friend to help.
Thread Starter
|
5th Gear
Joined: Jan 2005
Posts: 1,025
Likes: 40
From: Phoenix, AZ
Very cool! Similar car with similar mods! When I ordered my MCS the LSD was not an option. My MINI was bulit in Aug-2004 and the LSD started in Jan-2005 I believe. Would have been a $300 option well spent I believe.
Funny you should ask. CA bushings are next! Mine are shot! Although I am not paying the $650-700 to have the MINI bushings put back in only to die 40k miles down the road. I am probably going to go with these: POWERFLEX with the pre-pressed bushing/bracket. Get the lower ball joints as well. Might as well while you are in there, right?
I went cordless instead of air tools. Air tools are nice but I did not want to deal with lines, loud compressor, maintenance etc. They make life much easier but I believe it can be done with enough arm strength. But I am only speculating. With the cordless, it is point and pull the trigger and bolts come flying off.
I picked up the Ingersoll-Rand w7150 cordless impact. INFO HERE
They say it peaks at 1100 ft-lbs of torque. I've read a lot of threads that say cordless impacts choke a lot when they have 300 ft-lbs of torque. $320 shipped I believe.
The w7150 takes off lug nuts in a single second. For fun, I recently replaced the axle on my 1990 Honda CRX Si. I left the axle nut staked (132 ft-lbs) and tried it to see what would happen. Took me 2 seconds to spin off the staked axle nut. Im impressed and sold.
I need to pick up a copy of the Bentley's Repair Manual so I can take everything apart and torque it back. The only piece I am missing are the torque numbers to put everything back together. And with dropping the subframe, which bolts to remove and which to loosen so the backend can be dropped to get to those brackets. Replace the brackets (prepressed bushings) and then reassemble and wheel alignment.
2nd Gear
Joined: Mar 2014
Posts: 70
Likes: 0
Yeah! Powerlex pre pressed and ball joints is the path I'll do at the same time.. Is there anything I could do while in there!? It'll be my first attempt for the mini to get in service mode, aside from oil change, 02 sensors change. And I will be tackling the thermostat/gasket/housing and coolant reservoir change. Flush coolant. Whew!
Thread Starter
|
5th Gear
Joined: Jan 2005
Posts: 1,025
Likes: 40
From: Phoenix, AZ
Yeah! Powerlex pre pressed and ball joints is the path I'll do at the same time.. Is there anything I could do while in there!? It'll be my first attempt for the mini to get in service mode, aside from oil change, 02 sensors change. And I will be tackling the thermostat/gasket/housing and coolant reservoir change. Flush coolant. Whew!
The most challenging part of this is the electrical connection for the sensor. It does not give you a lot of room (slack) to work with so instead of disconnecting it, pull the sensor out and let it dangle...
Image of the CPS:

Blue O-Ring is the piece to slip off and replace.
LINK TO PURCHASE CPS O-RING
Apparently the price has gone up to $7.70 shipped. You may want to strongly consider doing this while you are in that area. $7 and piece of mind.
How many miles are on your MINI? Replace the transmission fluid. Are you also replacing the radiator hoses?
2nd Gear
Joined: Mar 2014
Posts: 70
Likes: 0
Wow! Good info there. I'll check on that, Got the car with lil less to 80k. Currently 85k to almost a year now since. So I'm fairly new in the mini world my dream car lol. Oh and yes I forgot to mention I did transmission oil change as well.

2nd Gear
Joined: Mar 2014
Posts: 70
Likes: 0
Hey Boxer!, sometime next week i'll be replacing the ball joints, ca bushing and of course the swaybar bushings hope it'll come out right. I'll be doing this with justa tool set. Can't afford the cordless, AZ was talking about. You guys think it's possible!?
hope it'll come out right. I'll be doing this with justa tool set. Can't afford the cordless, AZ was talking about. You guys think it's possible!?
Thread Starter
|
5th Gear
Joined: Jan 2005
Posts: 1,025
Likes: 40
From: Phoenix, AZ
Today was MINI day. Had a few things to do on him so I thought I would get started.
Gave him a bath today
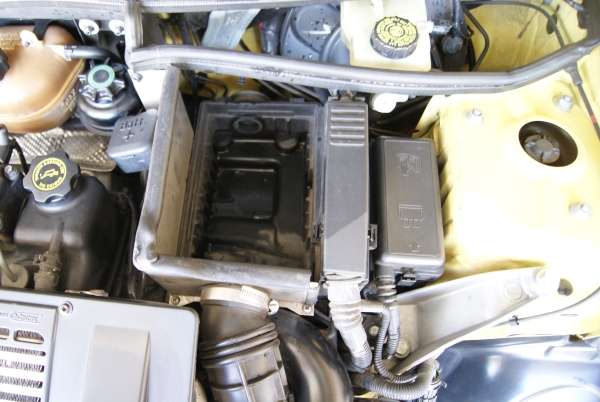
Hosed down the enginebay and cleaned that up:
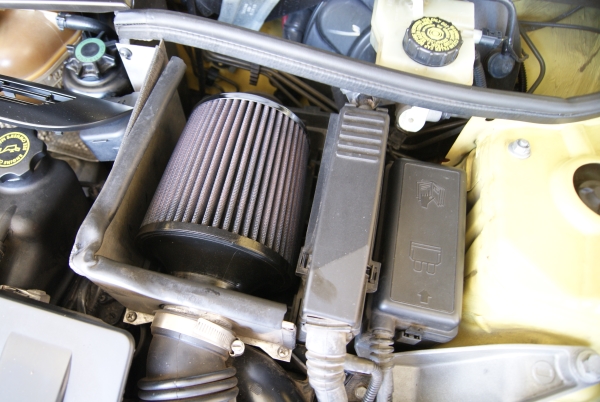
While cleaning the enginebay, went ahead and did the annual air filter clean/recharge:
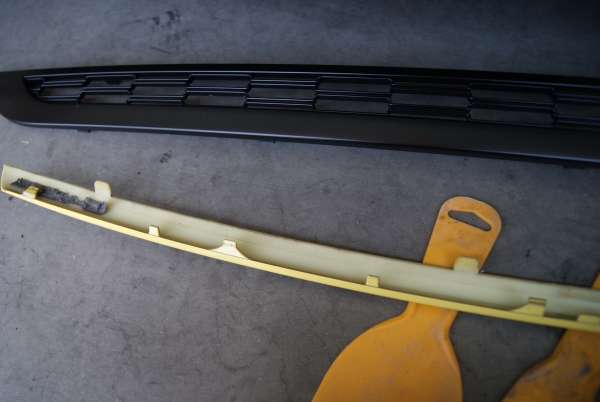
Thanks to OutMotoring for sending the JCW Grill Set so quickly. Used up some reward points and got this!
Nice packaged
Comes with all new washers and fittings
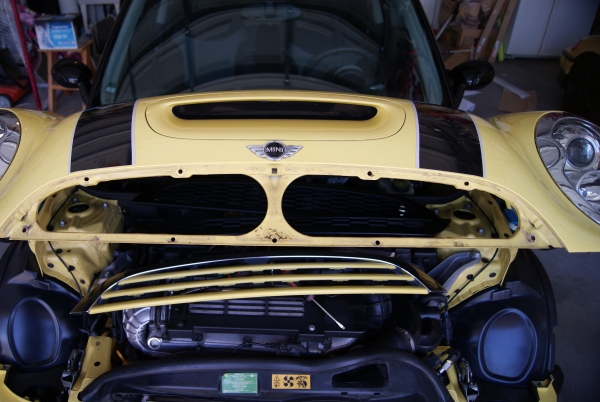
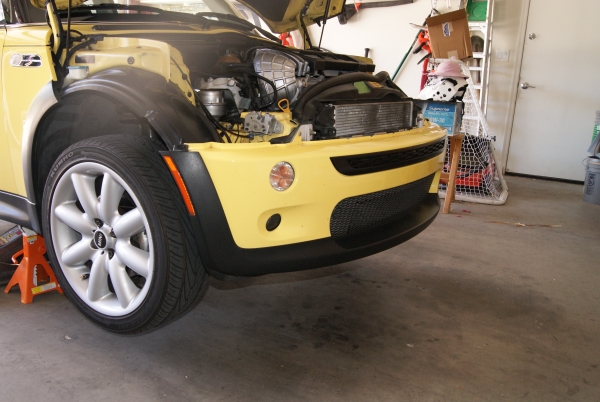
Starting position:
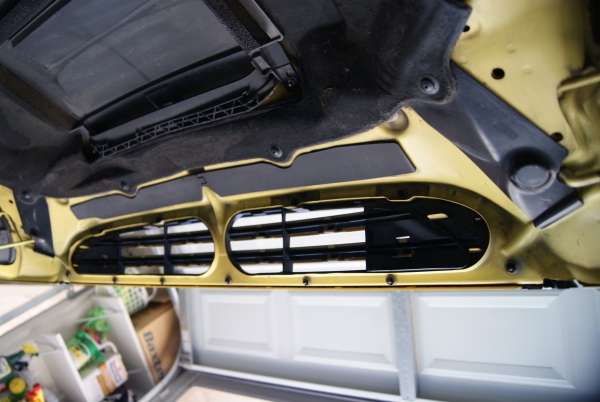
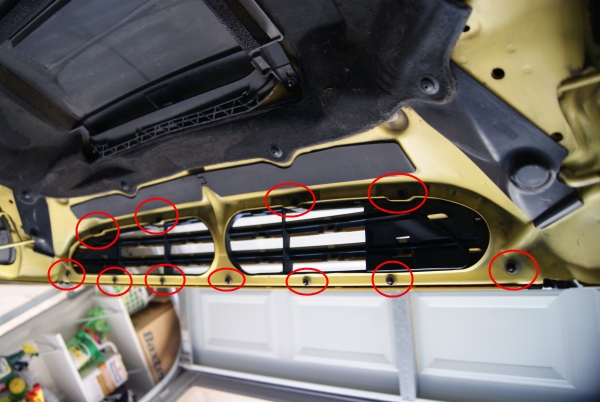
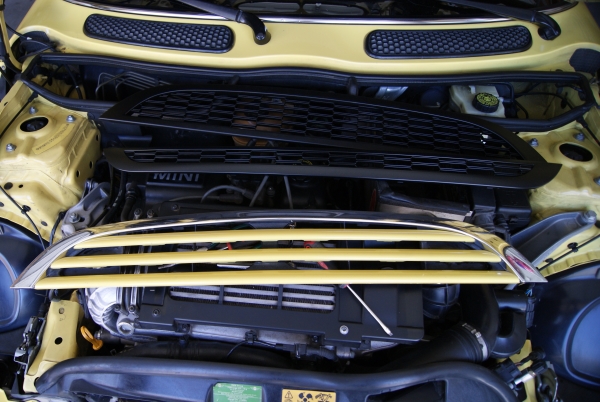
View from under the hood. Second pic is highlighting the 10-11 nuts/bolts fittings that need to be removed.
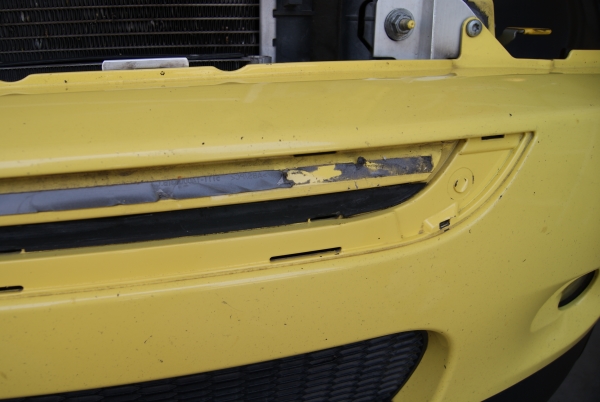
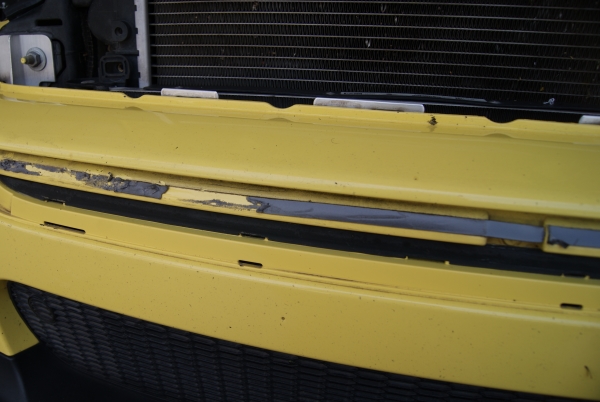
Old upper grill piece removed. It really is a bit silly with how MINI fixes this to the bonnet. Really? Can't use threads and traditional nuts to hold everything together?
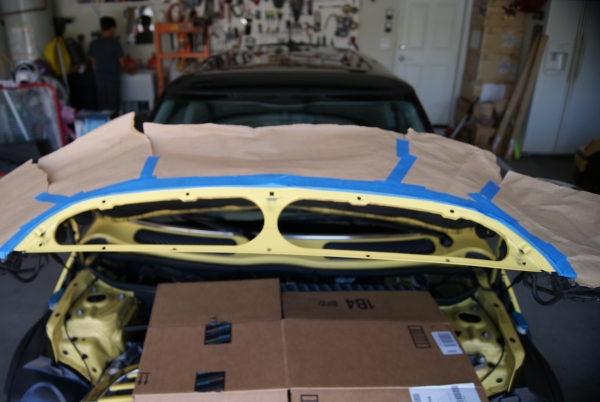
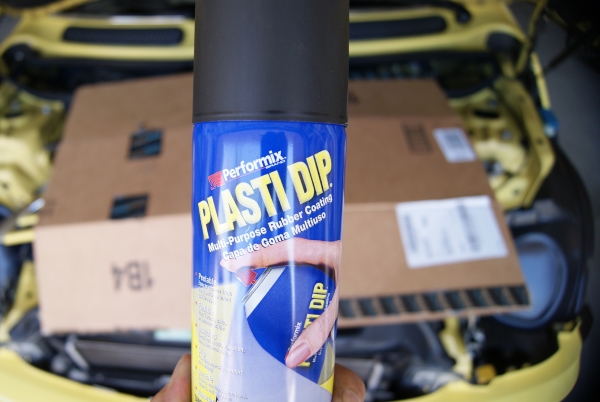
Time to clean up stuff while I am in there... I have seen quite a few JCW grill sets on the R53 and everyone seems to say the same thing with painting the hood black (portion behind the grill) so that it is not sticking out through the new grill set. So I cleaned everything up and sprayed it with black PlastiDip (non-permanent). So this way everything is black!
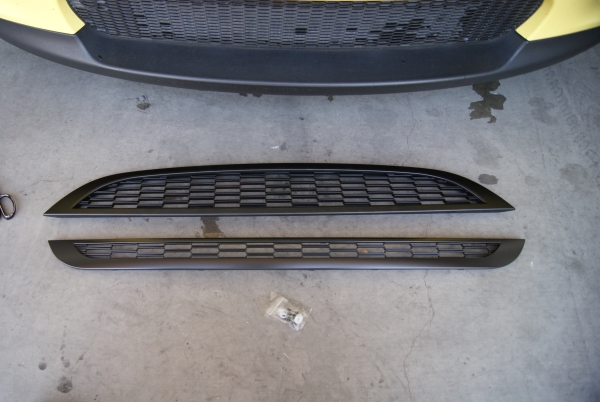
The bottom portion of the grill set is a bit tricky but still easy once you figure out the method to the madness. I used two plastic putty utensils to pry off the chrome portion of the lower grill.
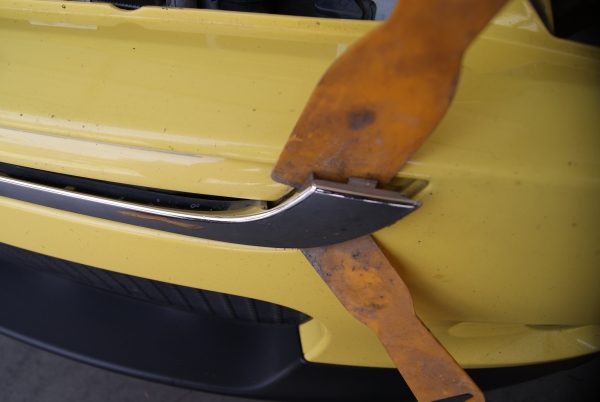
Then the body colored portion of the lower grill. This has clips and double sided stickey tape keeping everything together. I started on the left and then the right side and worked my way to to the middle. Once started, I used a small flat head screwdriver to start separating the double sided sticky tape.
Inside of the body colored piece:
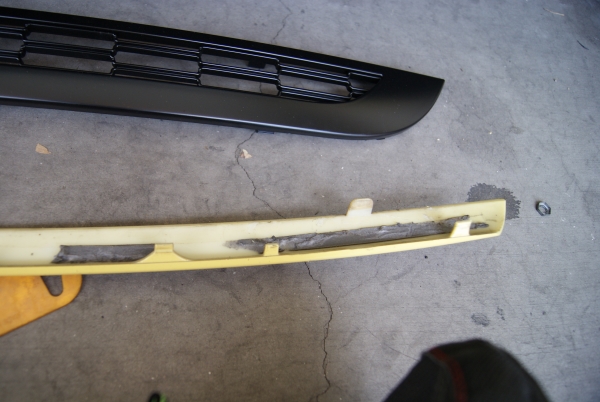
I took the liberty of spray painting the lower area black as well. There was a bit of yellow there and I did not want it to come through the new black grill. So I masked that off and sprayed it as well. Once dry, I installed the lower grill piece. It's snap/plug and play.
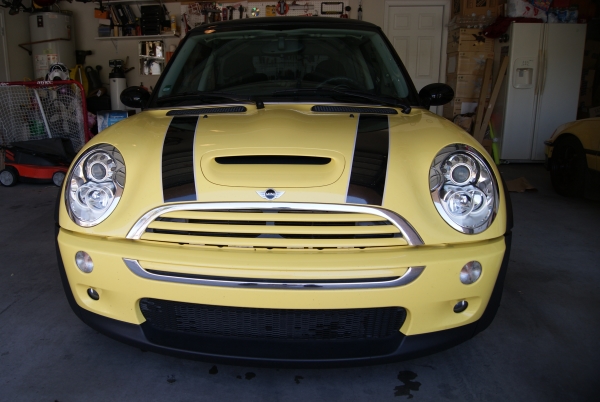
Final results:
Before:
After:
I moved on with working on the MINI today.
- I cleaned and vacuumed the interior so it looks brand new again.
- I changed out the cabin air filter. A/C smells great again instead of "crayons".
- Checked the battery levels and added distilled water as needed.
- Checked the spare tire pressure and added air. Getting ready to ditch the spare tire.
- Rear brakes were due so I swapped out the old rotors/pads and put in new PowerSlot rotors and Stoptech brake pads.
MINI is running really well, no complaints.
Gave him a bath today


Hosed down the enginebay and cleaned that up:

While cleaning the enginebay, went ahead and did the annual air filter clean/recharge:


Thanks to OutMotoring for sending the JCW Grill Set so quickly. Used up some reward points and got this!

Nice packaged

Comes with all new washers and fittings

Starting position:

View from under the hood. Second pic is highlighting the 10-11 nuts/bolts fittings that need to be removed.


Old upper grill piece removed. It really is a bit silly with how MINI fixes this to the bonnet. Really? Can't use threads and traditional nuts to hold everything together?

Time to clean up stuff while I am in there... I have seen quite a few JCW grill sets on the R53 and everyone seems to say the same thing with painting the hood black (portion behind the grill) so that it is not sticking out through the new grill set. So I cleaned everything up and sprayed it with black PlastiDip (non-permanent). So this way everything is black!


The bottom portion of the grill set is a bit tricky but still easy once you figure out the method to the madness. I used two plastic putty utensils to pry off the chrome portion of the lower grill.

Then the body colored portion of the lower grill. This has clips and double sided stickey tape keeping everything together. I started on the left and then the right side and worked my way to to the middle. Once started, I used a small flat head screwdriver to start separating the double sided sticky tape.


Inside of the body colored piece:


I took the liberty of spray painting the lower area black as well. There was a bit of yellow there and I did not want it to come through the new black grill. So I masked that off and sprayed it as well. Once dry, I installed the lower grill piece. It's snap/plug and play.
Final results:
Before:
After:

I moved on with working on the MINI today.
- I cleaned and vacuumed the interior so it looks brand new again.
- I changed out the cabin air filter. A/C smells great again instead of "crayons".
- Checked the battery levels and added distilled water as needed.
- Checked the spare tire pressure and added air. Getting ready to ditch the spare tire.
- Rear brakes were due so I swapped out the old rotors/pads and put in new PowerSlot rotors and Stoptech brake pads.
MINI is running really well, no complaints.


Thread Starter
|
5th Gear
Joined: Jan 2005
Posts: 1,025
Likes: 40
From: Phoenix, AZ
So I am starting to find myself thinking about a suspension setup. The front stock struts are dead. So its time to consider alternatives.
Currently, I am considering this setup:
- Koni Yellows
- TSW Springs
- IE Camber Plates
While I am doing this, I will go a step further and replace the LCA bushings with the Powerflex bushings along with replacing all four ball joints.
I was hoping that since my current strut mounts have (L/R) 21k & 11k miles on each respectively, that I could make it to when I swap the suspension out. I have to field strip my CRX and get it ready for paint/bodywork. After that, it is time to pull the trusty old D16 SOHC motor and install a DOHC VTEC motor. So the MINI suspension may very well take the back seat until I get through these upcoming stages.
So while driving the MINI, I was backing into the garage and noticed a slight squeaking sound when I turned the wheel. huh? Turn turn turn... squeak, squeak, squeak... Ok... Pop the bonnet and look at the P/S fluid level. Its good. Look at the strut mounts and BINGO! The passenger side mount was mushrooming. Nice... So before I refresh/upgrade the MINI suspension, I need to replace this strut mount, yet again. It was a MOOG mount and it lasted me 11,026 miles. Rather disappointing.
So I went back to RockAuto and ordered the KYB mount for now. $46-47 shipped. I was hoping I would have better luck with the KYB than I appeared to have the Moog mount.
This fix is fairly straightforward... here we go...
Picture of the passenger side strut mount that is mushrooming
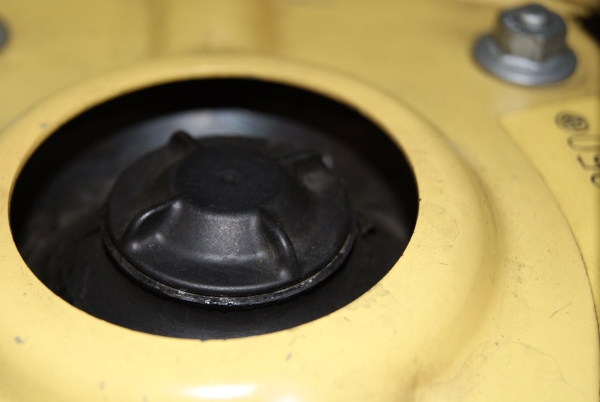
Better angle of the cap rising up through the hole:
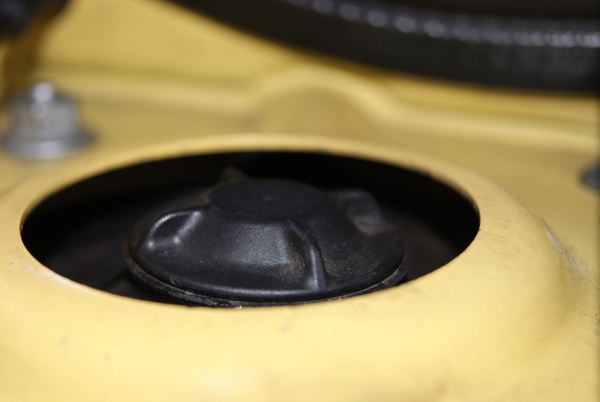
Compared to the driver side that is still good:
Safety First
Currently, I am considering this setup:
- Koni Yellows
- TSW Springs
- IE Camber Plates
While I am doing this, I will go a step further and replace the LCA bushings with the Powerflex bushings along with replacing all four ball joints.
I was hoping that since my current strut mounts have (L/R) 21k & 11k miles on each respectively, that I could make it to when I swap the suspension out. I have to field strip my CRX and get it ready for paint/bodywork. After that, it is time to pull the trusty old D16 SOHC motor and install a DOHC VTEC motor. So the MINI suspension may very well take the back seat until I get through these upcoming stages.
So while driving the MINI, I was backing into the garage and noticed a slight squeaking sound when I turned the wheel. huh? Turn turn turn... squeak, squeak, squeak... Ok... Pop the bonnet and look at the P/S fluid level. Its good. Look at the strut mounts and BINGO! The passenger side mount was mushrooming. Nice... So before I refresh/upgrade the MINI suspension, I need to replace this strut mount, yet again. It was a MOOG mount and it lasted me 11,026 miles. Rather disappointing.
So I went back to RockAuto and ordered the KYB mount for now. $46-47 shipped. I was hoping I would have better luck with the KYB than I appeared to have the Moog mount.
This fix is fairly straightforward... here we go...
Picture of the passenger side strut mount that is mushrooming

Better angle of the cap rising up through the hole:

Compared to the driver side that is still good:

Safety First


Thread Starter
|
5th Gear
Joined: Jan 2005
Posts: 1,025
Likes: 40
From: Phoenix, AZ
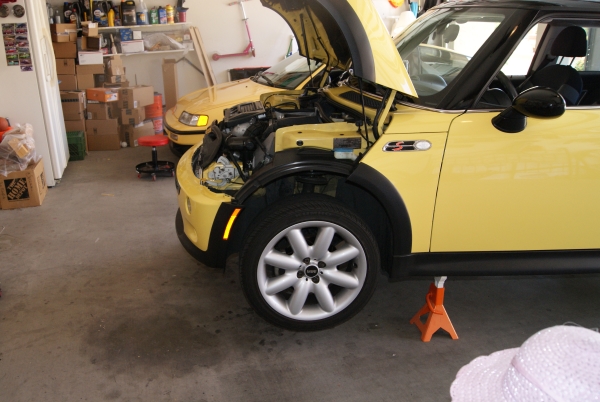
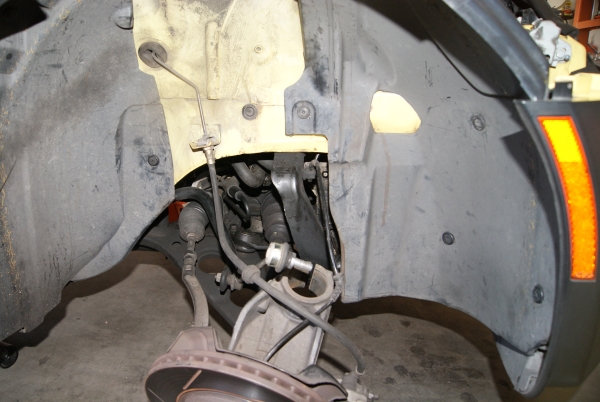
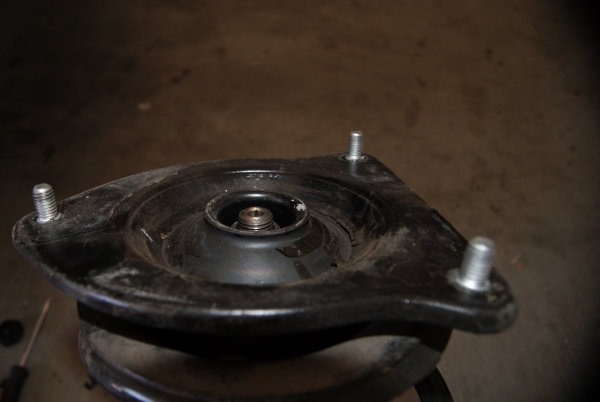
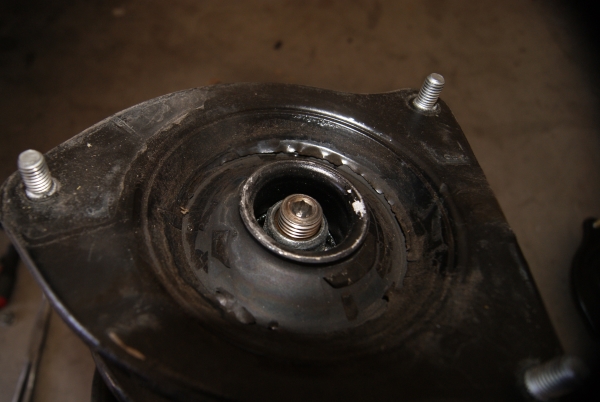
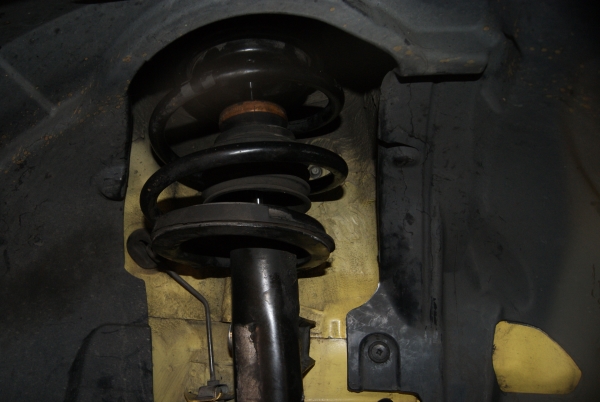
Status Pic prior to digging in
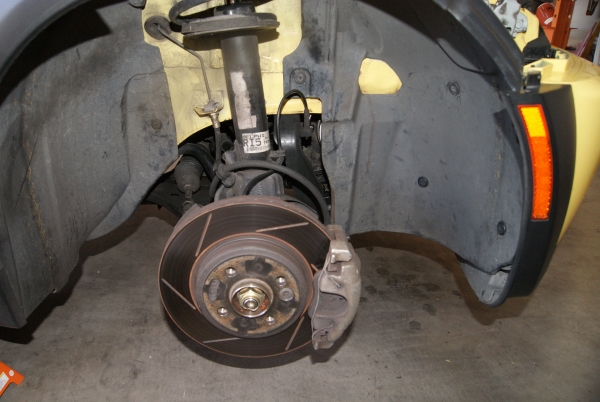
Disconnect the ABS and brake line from the strut
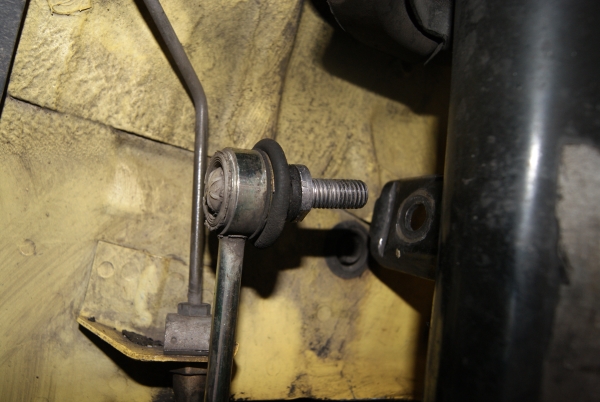
Disconnect the sway bar link from the strut. Now this CAN be a PITA. Removing the nut will just turn the bolt its screwed to. So you either have to use an allen wrench on the nut side to hold things still as the nut turns off. Or, you can get a pair of needle nose pliers to hold the bolt still as its located inbetween the rubber boot and the strut bracket (silver circular part).
Then there is the connecting bolt that holds the knuckle to the strut. Removing that is quite easy with an impact. Then you have the three nuts up above holding the strut in place, located in the engine bay. The strut will need some wiggling but it comes out from the car then.
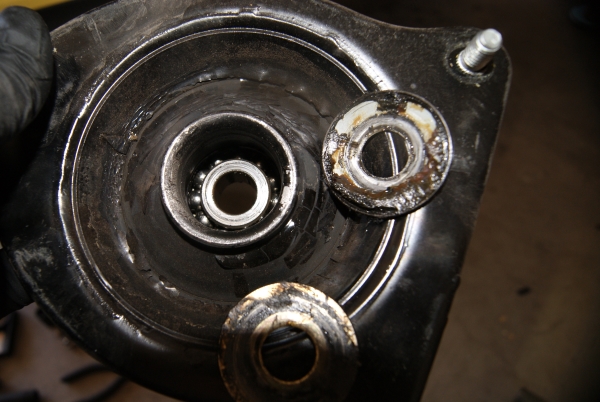
Here is a pic of the MOOG mount. Notice the hardened rubber mount mushrooming up:
A little disappointed with the Moog honestly. 11k miles is not much.
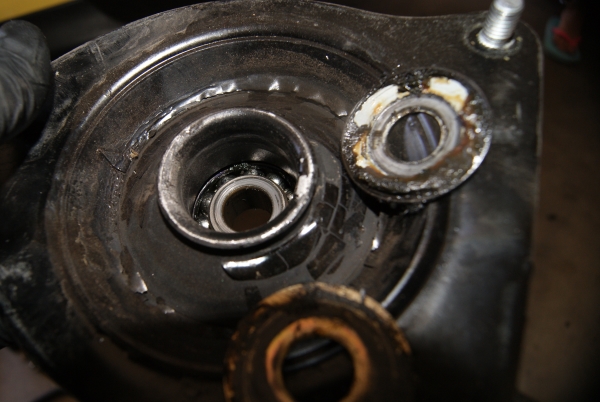
Another:
I compress enough springs on our cars that I went ahead and purchased a spring compressor from the local FLAPS. It was like $30-35. You can rent these from your friendly local auto parts store and then return it. You don't have to compress the spring to remove the mount, but it makes life a bit easier when installing the new mount. So I compressed the spring and impacted the mount nut off. Strut assembly comes apart then...
Here is what the strut mount looked like... Bearing was falling apart, grease was everywhere... failure!

Disconnect the ABS and brake line from the strut

Disconnect the sway bar link from the strut. Now this CAN be a PITA. Removing the nut will just turn the bolt its screwed to. So you either have to use an allen wrench on the nut side to hold things still as the nut turns off. Or, you can get a pair of needle nose pliers to hold the bolt still as its located inbetween the rubber boot and the strut bracket (silver circular part).

Then there is the connecting bolt that holds the knuckle to the strut. Removing that is quite easy with an impact. Then you have the three nuts up above holding the strut in place, located in the engine bay. The strut will need some wiggling but it comes out from the car then.

Here is a pic of the MOOG mount. Notice the hardened rubber mount mushrooming up:

A little disappointed with the Moog honestly. 11k miles is not much.
Another:


I compress enough springs on our cars that I went ahead and purchased a spring compressor from the local FLAPS. It was like $30-35. You can rent these from your friendly local auto parts store and then return it. You don't have to compress the spring to remove the mount, but it makes life a bit easier when installing the new mount. So I compressed the spring and impacted the mount nut off. Strut assembly comes apart then...
Here is what the strut mount looked like... Bearing was falling apart, grease was everywhere... failure!


Last edited by CooperSAZ; May 31, 2014 at 06:25 PM.
Thread Starter
|
5th Gear
Joined: Jan 2005
Posts: 1,025
Likes: 40
From: Phoenix, AZ
Time to re-assemble and re-install
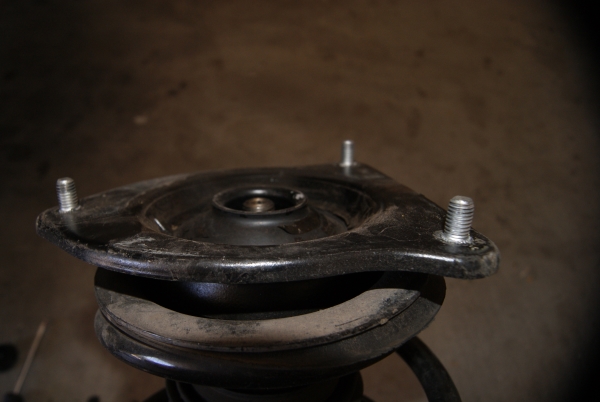
Now with your spring compressed, install the spring onto the strut, then there is a piece that seats the top of the spring, two washers, then slide the new strut mount onto the assembly. Since you compressed the spring, the top nut should thread right onto the strut and off you go.
If you choose not to compress the spring, this may turn into two person job... One attempting to compress the strut assembly down far enough until the second person can thread the top nut on. It is THAT close. You only need to compress the strut an inch to get enough threads for the nut to hold. Then you can ratchet the top nut on and your assembly is complete.
You can see why its easier to just compress the spring down. Easy and a one man job.
Once the assembly is put back together, it is time to install it back on the car. Again, some wiggling is required to find the top three holes for the strut mount and find the bottom cup in the knuckle. Tight fit but you can figure it out with some wiggling. Once you have everything in place, I thread the top three bolts up above so that the strut is held in place.

Now that the top is secured, it is time to sneak the strut back into the knuckle. There is probably one or two times that I have had the strut just fall into the knuckle to where you can bolt it back up and off you go. Sometimes, it doesnt. So I align the strut into the knuckle as best I can and use my floor jack to raise the knuckle up 1/4 of an inch at a time. Raise it, wiggle the strut so it remains IN LINE with the knuckle. Another 1/4", readjust. At some point, the strut drops right into the knuckle allowing you bolt them together.
Connecting bolt for the knuckle to strut link:
Back to the sway bar link. You can use an allan wrench or needle nose pliers, but feed the sway bar link through the strut bracket and thread the nut. Turn the nut down until it is secured to the bracket.
Reconnect the ABS sensor onto the strut along with the brake line.
Time to mount the wheel back onto the hub along with the lug nuts. Tighten the lug nuts to spec and lower the vehicle. Time to go for a test drive.
Picture of the strut mount (before/after) from up above:


Now with your spring compressed, install the spring onto the strut, then there is a piece that seats the top of the spring, two washers, then slide the new strut mount onto the assembly. Since you compressed the spring, the top nut should thread right onto the strut and off you go.
If you choose not to compress the spring, this may turn into two person job... One attempting to compress the strut assembly down far enough until the second person can thread the top nut on. It is THAT close. You only need to compress the strut an inch to get enough threads for the nut to hold. Then you can ratchet the top nut on and your assembly is complete.
You can see why its easier to just compress the spring down. Easy and a one man job.
Once the assembly is put back together, it is time to install it back on the car. Again, some wiggling is required to find the top three holes for the strut mount and find the bottom cup in the knuckle. Tight fit but you can figure it out with some wiggling. Once you have everything in place, I thread the top three bolts up above so that the strut is held in place.


Now that the top is secured, it is time to sneak the strut back into the knuckle. There is probably one or two times that I have had the strut just fall into the knuckle to where you can bolt it back up and off you go. Sometimes, it doesnt. So I align the strut into the knuckle as best I can and use my floor jack to raise the knuckle up 1/4 of an inch at a time. Raise it, wiggle the strut so it remains IN LINE with the knuckle. Another 1/4", readjust. At some point, the strut drops right into the knuckle allowing you bolt them together.

Connecting bolt for the knuckle to strut link:

Back to the sway bar link. You can use an allan wrench or needle nose pliers, but feed the sway bar link through the strut bracket and thread the nut. Turn the nut down until it is secured to the bracket.

Reconnect the ABS sensor onto the strut along with the brake line.

Time to mount the wheel back onto the hub along with the lug nuts. Tighten the lug nuts to spec and lower the vehicle. Time to go for a test drive.
Picture of the strut mount (before/after) from up above:

Last edited by CooperSAZ; May 31, 2014 at 06:28 PM.

6th Gear
Joined: Aug 2009
Posts: 1,505
Likes: 25
Great detailed updates, Coop. This thread will be a very good DIY guide for common Gen1 troubles & upkeep. Post back on how the KYBs stand miles down. I opted for LEMFORDERs from Pelican under $40ea. They're exactly the same as Sachs & Boge as the 3 brands are under 1 ZF umbrella. So far, they've held up well. It's really common to see the passenger side wear first as we're more cautious & conscious of driver side ruts, dips & pot holes.
Keep up the great work!
Keep up the great work!
Thread Starter
|
5th Gear
Joined: Jan 2005
Posts: 1,025
Likes: 40
From: Phoenix, AZ
Minor update. Anything worth doing is worth doing three times! 
Had to replace the passenger side strut mount yet again.
March-2013
Purchased the Moog Strut Mount. This item lasted 11,026 miles before bowing up and eventually cracking. Junk.
May-2014
Purchased the KYB Strut Mount. This item lasted 1,977 miles before the rubber start bowing up. The cap covering the top bolt was already exceeding the shock tower opening/hole. Very very disappointing.
August-2014
Purchased the Lemfoerder strut mount from Pelican Parts. $47 shipped so difference to Moog/Kyb is minimal. Pelican parts has incredibly fast shipping. Thumbs up to them!
As I understand it, I should get a lot more miles out of this Lemfoerder unit based on what everyone else has said. This is my fault. I should have researched it a bit more to find the best product instead of relying on Moog/KYB to get the job done.
My driver side strut mount just hit 22,858 miles so I am hoping to get 30-40k miles out of these.
In all honesty, I am probably going to refresh the suspension in the next 10k miles on the MINI. Just cannot decide if I want to go the OEM replacement route or the Koni Yellow/TSW Spring route. This includes new struts, springs (possibly), new mounts, new LCA bushings and all new ball joints.
Hope this helps someone out when they are trying to make that decision. Avoid Moog and KYB.
Thread Starter
|
5th Gear
Joined: Jan 2005
Posts: 1,025
Likes: 40
From: Phoenix, AZ
Small update.
Today I got around to replacing the lower engine mount on the MINI along with the passenger side mount. Really not that difficult if you are handy and have the proper tools. If you do not have the tools, the only part that changes is that you have to muscle the bolts off a bit more.
Now this is what I did and how I did it. This is only written to help others if they need it. I take no responsibility in anything that breaks or goes south on your car. End of disclaimer.
While I had the MINI up on jackstands, I also decided to change out the oil. It was at 4,563 miles since the last change. Close enough. I change out oil religiously at 5,000 miles. Oddly enough, I picked up the 5qt jugs of oil at Walmart since they are the cheapest. That is about all I use Walmart for� Oil filters, I order 3-5 at a time from RockAuto. The Wix filters are about $3/each plus shipping. So for around $20, I get 4-5 filters. Not a bad deal when you consider the local FLAPS wants $20-25 for a filter these days. Or used to�
Here is the gang/lineup for today:
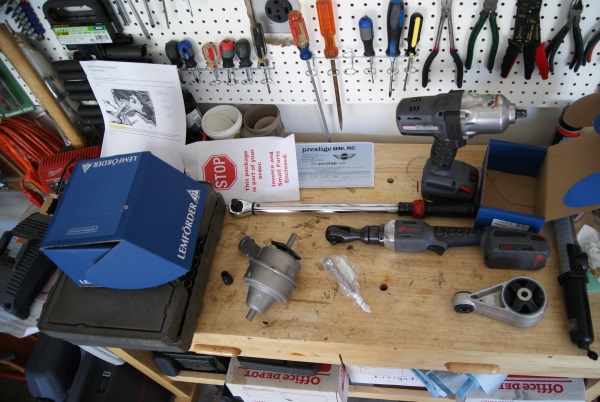
The cobra light wand is quite cool. You get LED lighting and the battery lasts forever. Both mounts are Lemforder and I picked them up from Pelican Parts. With the E12 bolt (passenger side mount), I think it came to $112 shipped. And fast shipping! Thumbs up to PP!
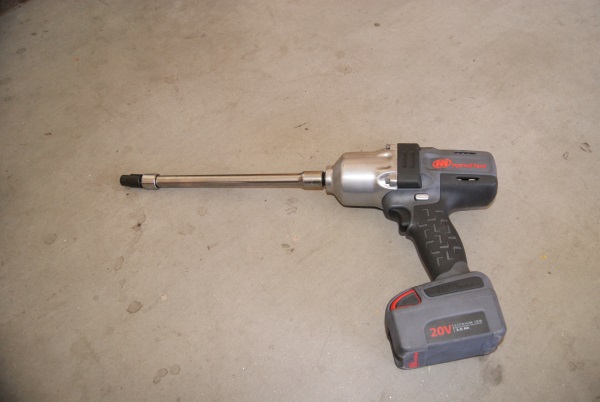
Now this tool is something I can no longer imagine working on a car without. It is the Ingersoll Rand w7150 cordless impact. You can read about it HERE. It is cordless so no airline, no compressor, no maintenance. It delivers a ton of torque. Truly! I have yet to run into a bolt that it cannot handle. If you are familiar with Hondas, the crankshaft bolt can be challenging to remove. This impact made quick work of it. Lugnuts in under 1 second. Truly cool! Half the time when I bring the impact out, I will notice the bolts I will need to remove turning themselves out already because they do not want anything to do with the impact.
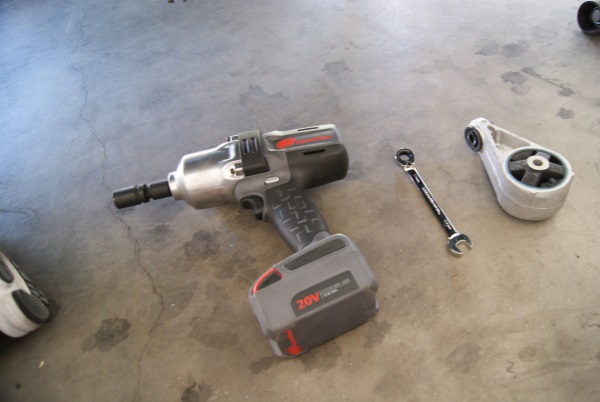
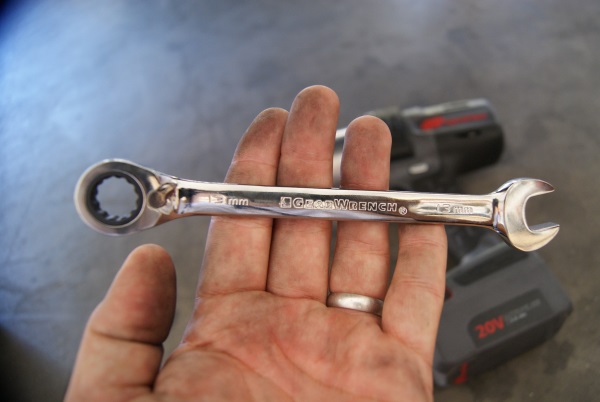
I also needed a set of ratcheting wrenches so I picked up this set by GearWrench. The set ranges from 8mm up to 25mm, they are reversible and a 5-degree offset so your knuckles approve! Lifetime warranty as well. Very cool �
Jack the MINI up, safety first.
Once you get underneath the car, here is the target with the 2 x 16mm bolts already removed:
Today I got around to replacing the lower engine mount on the MINI along with the passenger side mount. Really not that difficult if you are handy and have the proper tools. If you do not have the tools, the only part that changes is that you have to muscle the bolts off a bit more.
Now this is what I did and how I did it. This is only written to help others if they need it. I take no responsibility in anything that breaks or goes south on your car. End of disclaimer.
While I had the MINI up on jackstands, I also decided to change out the oil. It was at 4,563 miles since the last change. Close enough. I change out oil religiously at 5,000 miles. Oddly enough, I picked up the 5qt jugs of oil at Walmart since they are the cheapest. That is about all I use Walmart for� Oil filters, I order 3-5 at a time from RockAuto. The Wix filters are about $3/each plus shipping. So for around $20, I get 4-5 filters. Not a bad deal when you consider the local FLAPS wants $20-25 for a filter these days. Or used to�
Here is the gang/lineup for today:
The cobra light wand is quite cool. You get LED lighting and the battery lasts forever. Both mounts are Lemforder and I picked them up from Pelican Parts. With the E12 bolt (passenger side mount), I think it came to $112 shipped. And fast shipping! Thumbs up to PP!
Now this tool is something I can no longer imagine working on a car without. It is the Ingersoll Rand w7150 cordless impact. You can read about it HERE. It is cordless so no airline, no compressor, no maintenance. It delivers a ton of torque. Truly! I have yet to run into a bolt that it cannot handle. If you are familiar with Hondas, the crankshaft bolt can be challenging to remove. This impact made quick work of it. Lugnuts in under 1 second. Truly cool! Half the time when I bring the impact out, I will notice the bolts I will need to remove turning themselves out already because they do not want anything to do with the impact.
I also needed a set of ratcheting wrenches so I picked up this set by GearWrench. The set ranges from 8mm up to 25mm, they are reversible and a 5-degree offset so your knuckles approve! Lifetime warranty as well. Very cool �
Jack the MINI up, safety first.
Once you get underneath the car, here is the target with the 2 x 16mm bolts already removed:
Thread Starter
|
5th Gear
Joined: Jan 2005
Posts: 1,025
Likes: 40
From: Phoenix, AZ
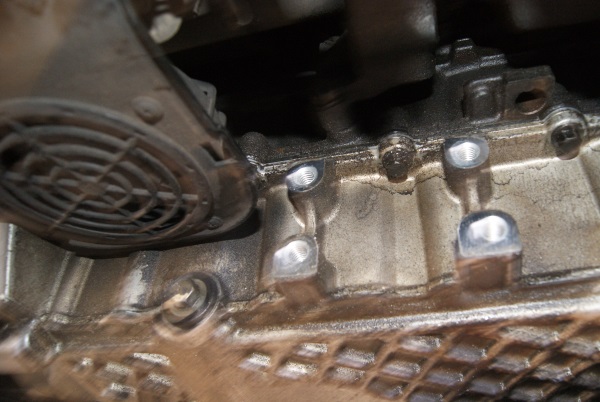
The two 16mm mounting bolts need to be removed. One is vertical and the other is horizontal. But you will notice that the mount will not come out. So you have to remove the bracket that is attached to the oil pan. This is secured by 4 x 13mm bolts. They are not torqued on very tightly.
Once the four bolts are removed, slide the bracket and old mount out from underneath.
Dirty:
Beat up:
Shame on me for waiting so long:
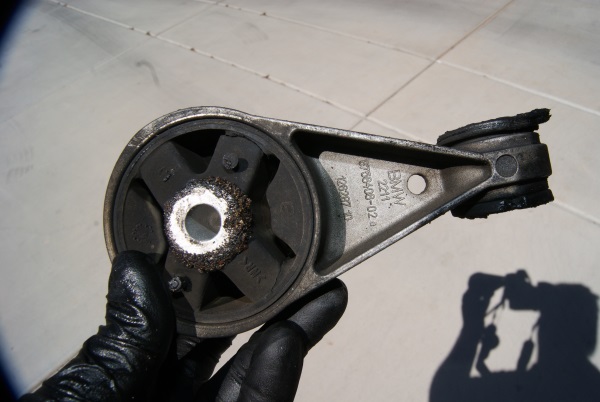
Old coldness vs new hotness:
Here is a status pic of the immediate area with the lower mount removed/missing. You will notice the two holes that hold the vertical mounting bolt.
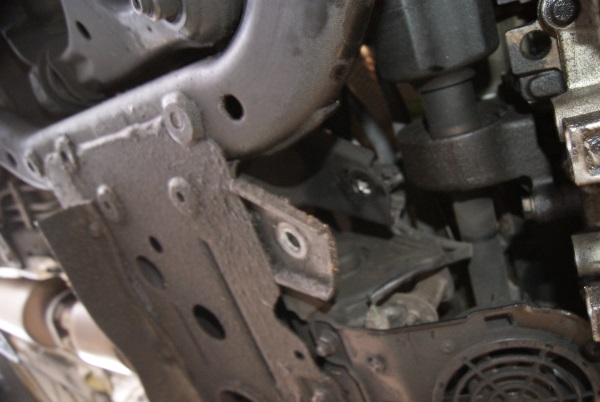
Below is a pic of the oil pan and where the 4 x 13mm bolt holes are that secure the bracket.
Time to re-install�
Place the new lower mount back into position and THREAD the vertical bolt back into place,
I felt compelled to clean up the bracket from all the grime. So some quick hits with brake clean and we are back in business.

Status pic. Bracket has been slide back into place and all 4 x 13mm bolts are threaded.
All 4 x 13mm bolts have been torqued.
Once the four bolts are removed, slide the bracket and old mount out from underneath.
Dirty:
Beat up:
Shame on me for waiting so long:
Old coldness vs new hotness:
Here is a status pic of the immediate area with the lower mount removed/missing. You will notice the two holes that hold the vertical mounting bolt.
Below is a pic of the oil pan and where the 4 x 13mm bolt holes are that secure the bracket.
Time to re-install�
Place the new lower mount back into position and THREAD the vertical bolt back into place,
I felt compelled to clean up the bracket from all the grime. So some quick hits with brake clean and we are back in business.
Status pic. Bracket has been slide back into place and all 4 x 13mm bolts are threaded.
All 4 x 13mm bolts have been torqued.
Thread Starter
|
5th Gear
Joined: Jan 2005
Posts: 1,025
Likes: 40
From: Phoenix, AZ
Time to thread the horizontal bolt connecting the mount to the bracket. This required some wiggling to get things lined up. The old mount would allow anything. The new mount had something to say about it and would only allow the bolt to be threaded one way.
But once started, torque down both bolts. Once secured, you are done. It almost takes longer to gather all the tools needed and jack the car up than it takes to actually replace this piece.
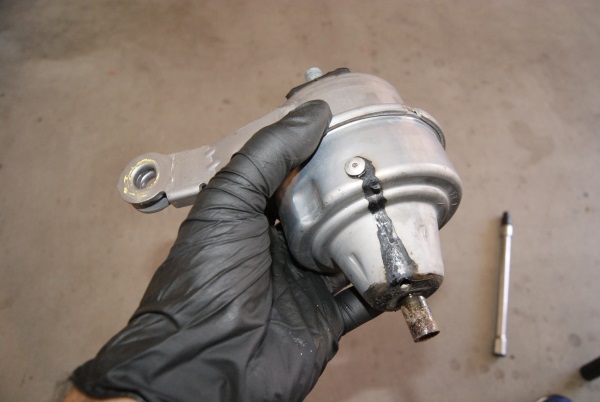
Passenger side mount time�
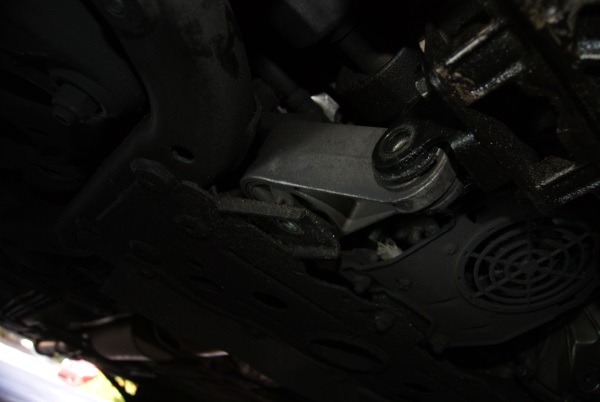
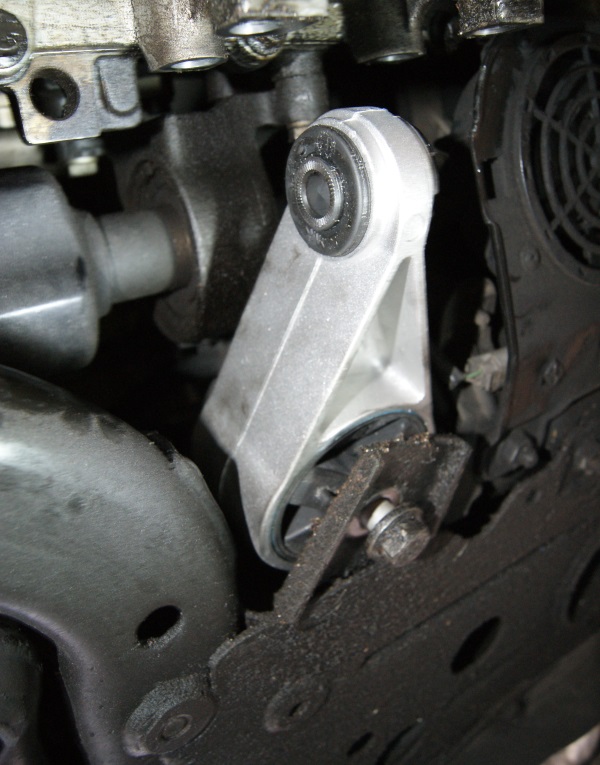
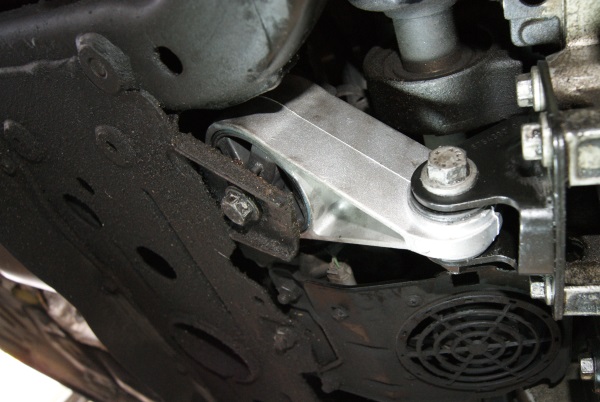
Status pic prior to digging in�
Before you start playing with replacing mounts, this is a good time to use your hydraulic jack to �support� your motor. This is the helping hand that keeps your engine level while you are swapping out mounts. Never use the jack directly on the motor. Metal on metal is bad. Most people have a piece of wood inbetween because its softer. It is the wood that takes a beating, not the engine. I bought a jack stand pad and tried it out for the first time. It fits over the jack stand lift point and is soft and solid. Can you say that about the same piece?
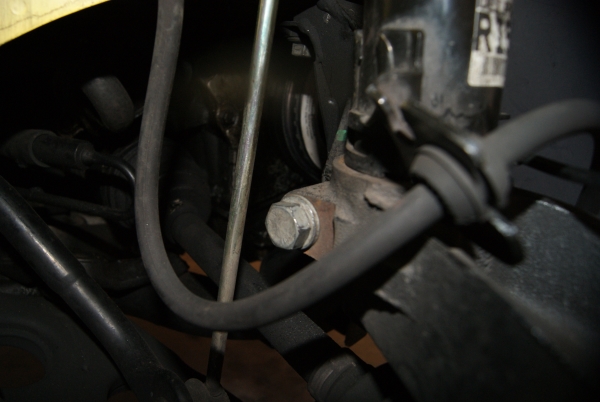
First step is to remove the three top bolts securing the engine bracket to the mount (top) and the mount to the firewall (towards the back). Third bolt is just a simple ground strap (up front). Careful when removing this bolt/nut combo. The nut is on top and the bolt underneath will drop and hide if you let it. Have your hand underneath to catch it WHEN it falls.
The only bolt left for the mount is the one underneath.
You will need an E12 socket head. I believe I picked one up on Amazon. Why MINI would use an E12 head is beyond me, but I only play the game, I don�t get to make up the rules.
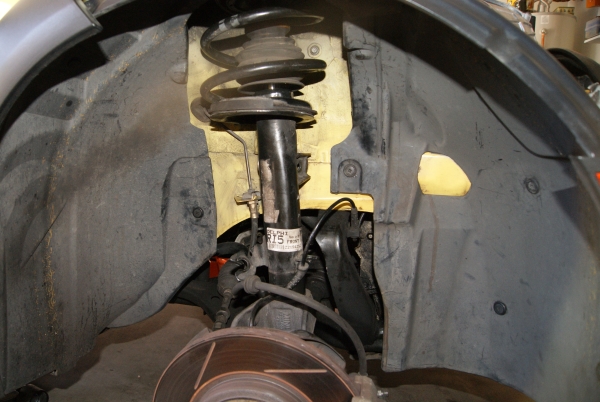
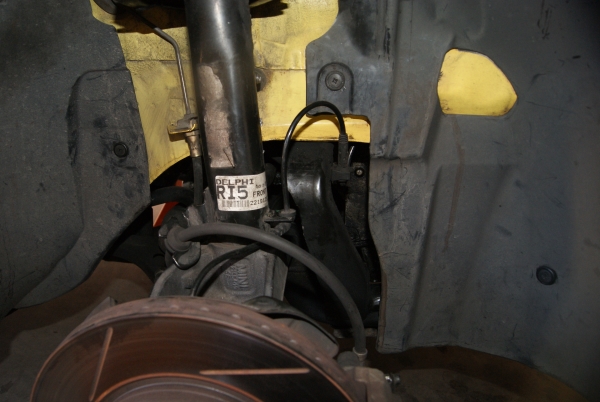
I elected to remove the passenger RF tire and get underneath the car again. Looking up, you will locate the E12 bolt head.
The pic above is with the RF plastic wheel well IN PLACE. Some people say you have to remove it. I disagree. If you have an impact and an extension, leave the wheelwell/splashguard in place!
Here is with the wheel well pulled to the side a bit. You can still see the E12 bolt.
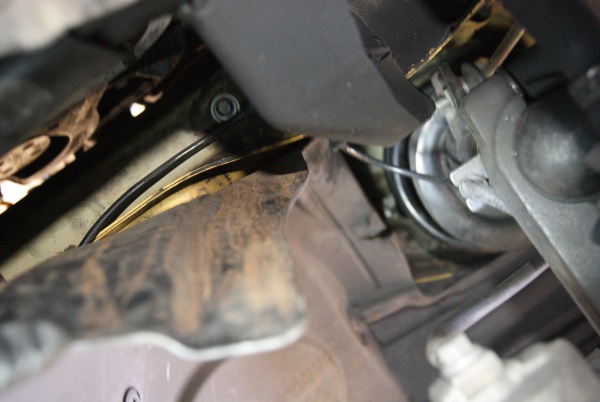
Preparing to removing the E12 bottom mount bolt.
Remember when I said this impact was tough and bolts do not stand a chance?
It didn�t�
But once started, torque down both bolts. Once secured, you are done. It almost takes longer to gather all the tools needed and jack the car up than it takes to actually replace this piece.
Passenger side mount time�
Status pic prior to digging in�
Before you start playing with replacing mounts, this is a good time to use your hydraulic jack to �support� your motor. This is the helping hand that keeps your engine level while you are swapping out mounts. Never use the jack directly on the motor. Metal on metal is bad. Most people have a piece of wood inbetween because its softer. It is the wood that takes a beating, not the engine. I bought a jack stand pad and tried it out for the first time. It fits over the jack stand lift point and is soft and solid. Can you say that about the same piece?
First step is to remove the three top bolts securing the engine bracket to the mount (top) and the mount to the firewall (towards the back). Third bolt is just a simple ground strap (up front). Careful when removing this bolt/nut combo. The nut is on top and the bolt underneath will drop and hide if you let it. Have your hand underneath to catch it WHEN it falls.
The only bolt left for the mount is the one underneath.
You will need an E12 socket head. I believe I picked one up on Amazon. Why MINI would use an E12 head is beyond me, but I only play the game, I don�t get to make up the rules.
I elected to remove the passenger RF tire and get underneath the car again. Looking up, you will locate the E12 bolt head.
The pic above is with the RF plastic wheel well IN PLACE. Some people say you have to remove it. I disagree. If you have an impact and an extension, leave the wheelwell/splashguard in place!
Here is with the wheel well pulled to the side a bit. You can still see the E12 bolt.
Preparing to removing the E12 bottom mount bolt.
Remember when I said this impact was tough and bolts do not stand a chance?
It didn�t�
Thread Starter
|
5th Gear
Joined: Jan 2005
Posts: 1,025
Likes: 40
From: Phoenix, AZ
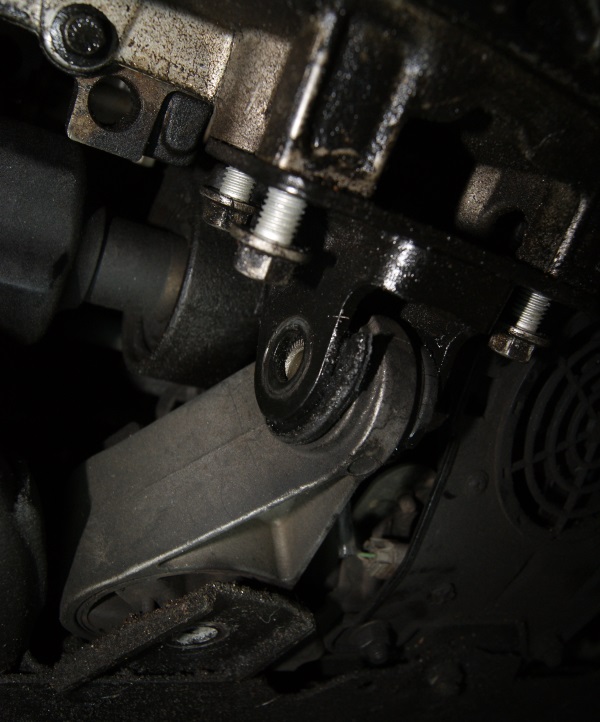
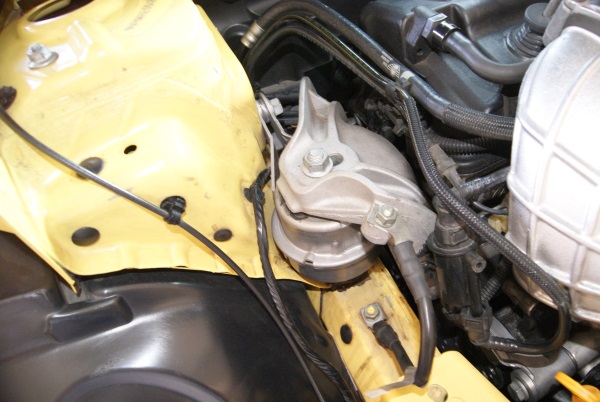
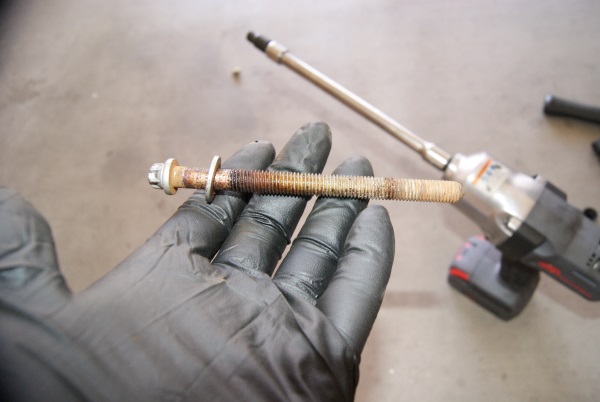
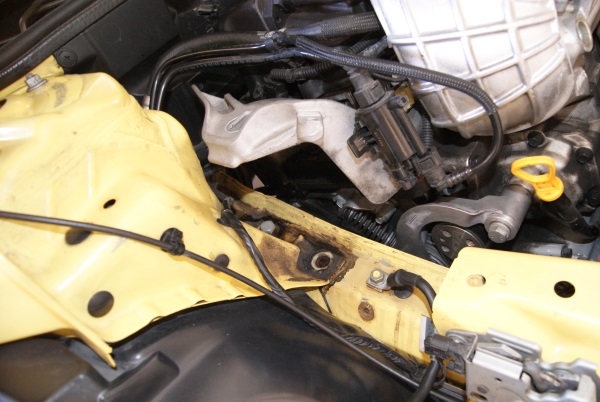
Looks a little rough. I know people try to REUSE this bolt on the next mount. Why? Don�t! The bolt is like $6 for a new one and in the grand scheme of things, immaterial! Just get a new one.
Now with all of the mount bolts removed, I tried to wiggle the mount out of position. No way! I jack the motor up a bit from underneath to see if I could sneak it out. Nope. Time to loosen up the bracket that attaches to the motor itself. It is secured on by 4 x 16mm bolts.
Bolts in front:
Bolts in back:

16mm socket, extension and the impact. I got the bolts to where I could lift them out and away but left them in place. This allowed me the necessary engine bracket wiggle room to lift it up and sneak the mount out underneath.
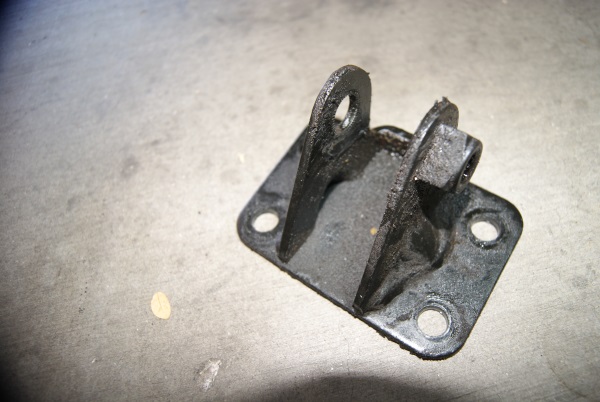
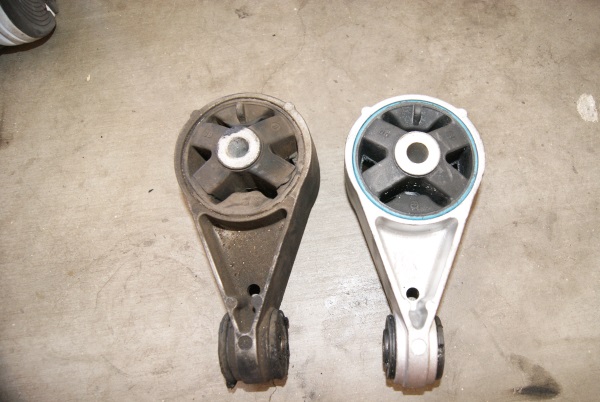
Old mount removed:
Status pic:
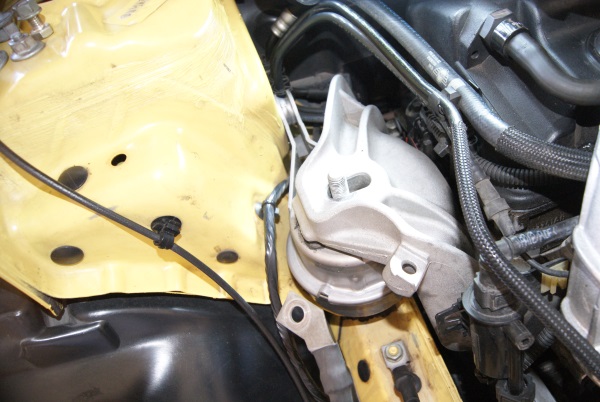
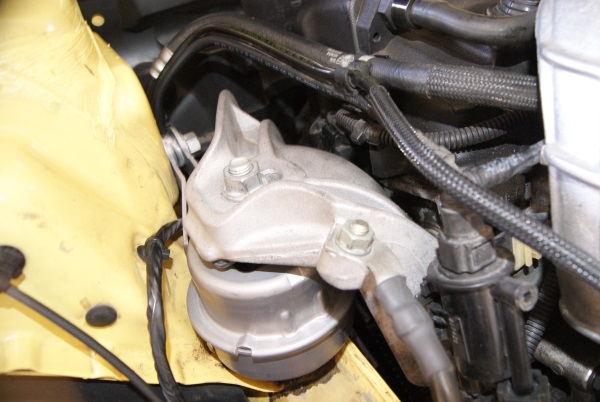
Time to sneak the new engine mount back into place. First find the hole underneath and place the mount in the hole. Once into place, I went ahead and secured the 4 x 16mm bolts that attach the engine bracket back to the engine.
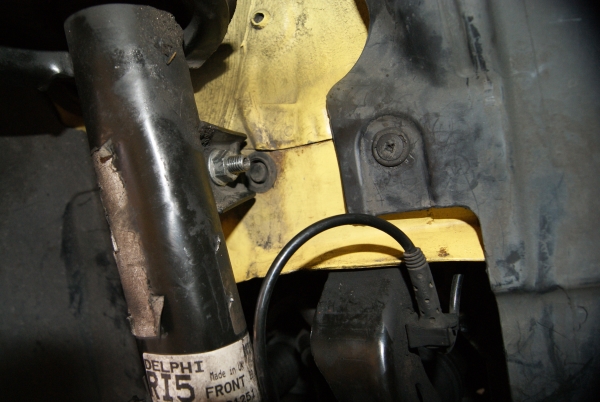
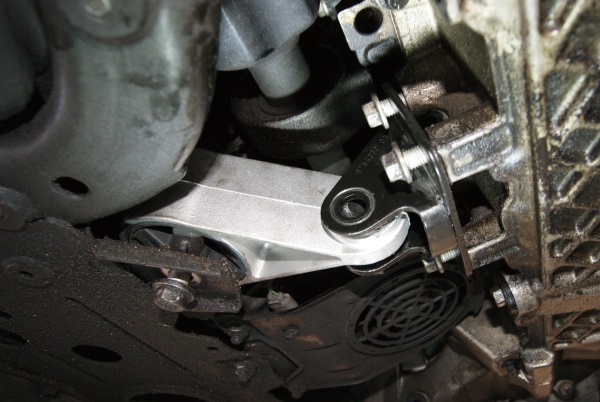
Now its time to wiggle the new mount into position. I started with THREADING the back bolt that secures the mount to the firewall. Then I threaded the nut up top. Should look like this�

Time to thread the NEW E12 bolt back into place.
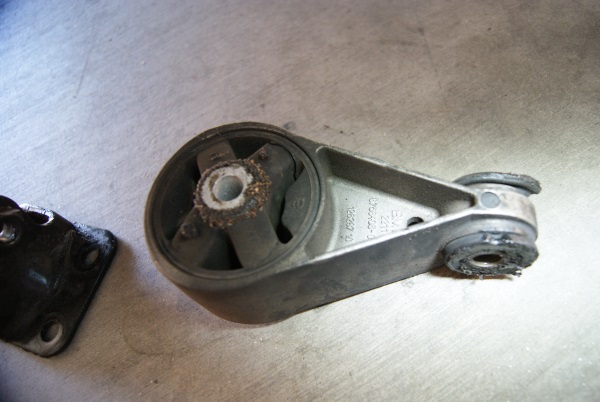
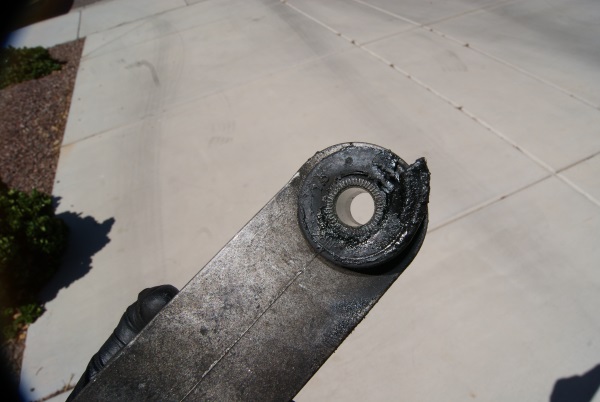
New vs old:

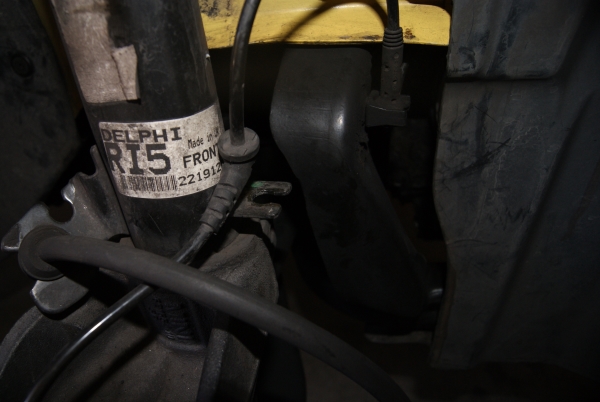
With the extension, I started the threading the bolt back into place. (nice pic of the new ATI damper�)

Once the E12 bolt was threaded, I ratchet it down and torqued it to 50 ft/lbs. Done underneath.
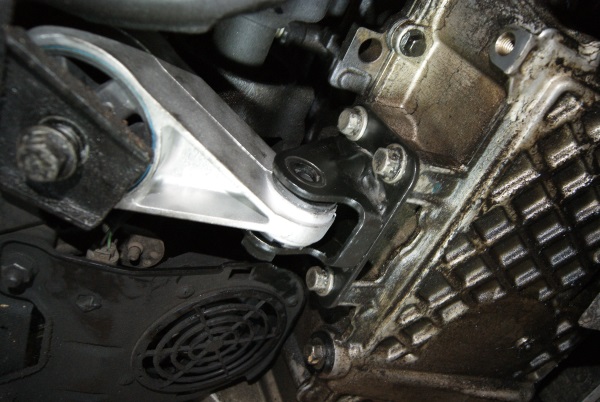
Now its time to finalize the mount up top. Ratchet down the rear bolt (mount to firewall) until it is secured. Then I torqued the top nut to 50 ft/lbs. With an open wrench, I secured the ground strap. Careful not to torque it too much. The bolt/nut combo only secures the ground strap, it is not load bearing. No need to go crazy.
Once done, it should look something like this�
After this, I replaced the oil and filter. Cleaned up the car and lowered the car back down onto all four tires. Filled it up with oil, topped it off and went for a four mile spin.
Maybe it is me (quite possibly), but I feel like the car is more solid or there is less �movement� when driving. If so, then I attribute that to the motor no longer allowed to shift or move around underneath the bonnet.
Anyway, I hope this helps someone out in some way.
Back to motoring...
Now with all of the mount bolts removed, I tried to wiggle the mount out of position. No way! I jack the motor up a bit from underneath to see if I could sneak it out. Nope. Time to loosen up the bracket that attaches to the motor itself. It is secured on by 4 x 16mm bolts.
Bolts in front:
Bolts in back:
16mm socket, extension and the impact. I got the bolts to where I could lift them out and away but left them in place. This allowed me the necessary engine bracket wiggle room to lift it up and sneak the mount out underneath.
Old mount removed:
Status pic:
Time to sneak the new engine mount back into place. First find the hole underneath and place the mount in the hole. Once into place, I went ahead and secured the 4 x 16mm bolts that attach the engine bracket back to the engine.
Now its time to wiggle the new mount into position. I started with THREADING the back bolt that secures the mount to the firewall. Then I threaded the nut up top. Should look like this�
Time to thread the NEW E12 bolt back into place.
New vs old:
With the extension, I started the threading the bolt back into place. (nice pic of the new ATI damper�)
Once the E12 bolt was threaded, I ratchet it down and torqued it to 50 ft/lbs. Done underneath.
Now its time to finalize the mount up top. Ratchet down the rear bolt (mount to firewall) until it is secured. Then I torqued the top nut to 50 ft/lbs. With an open wrench, I secured the ground strap. Careful not to torque it too much. The bolt/nut combo only secures the ground strap, it is not load bearing. No need to go crazy.
Once done, it should look something like this�
After this, I replaced the oil and filter. Cleaned up the car and lowered the car back down onto all four tires. Filled it up with oil, topped it off and went for a four mile spin.
Maybe it is me (quite possibly), but I feel like the car is more solid or there is less �movement� when driving. If so, then I attribute that to the motor no longer allowed to shift or move around underneath the bonnet.
Anyway, I hope this helps someone out in some way.
Back to motoring...