CooperSAZ's 2005 LY/Blk R53
#51
 08-16-2014, 02:59 PM


#52
08-16-2014, 03:11 PM

Agreed. It is hardly ideal. But with that said, I have a list of TO DOs coming up in the near future.
Start off, I'm breaking the suspension refresh into two pieces:
- First, replace all four corners with Koni Yellows, replace both top strut mounts. This will end my "fun" with the blown struts and mounts. I want to sneak in the TSW springs but the wife drives downtown and is not interested in the idea of lowering the MINI any further.

- Second, I will have to drop the subframe next. Replace both LCA bushings (powerflex), both wheel carrier joints, both lower ball joints, swaybar bushings, power steering fan (just because) and both power steering lines (might as well while the frame is down).
Coming up at some point, I want to replace the radiator, top and bottom hoses and thermostat/housing.
After that (shooting for summer 2015), its time to refresh the brakes:
- Replace front pads/rotors, rear pads/rotors, convert lines to SS (on the fence about this one) and replace both rear calipers. I suspect they need replacement due to the tears and highly accelerated brake pad wear and dusting.
#53
08-26-2014, 02:00 PM

Great thread. You're on par with the items i've done/been doing. I've got a pair of Koni Yellows waiting to go up front when I pull the subframe to do the LCA's. I'm at 215k on them and they're toast, along with the struts and a bunch of other stuff.
I did do the s/s brake lines when I did my 100k brake job along with the JCW brake kit. I couldn't tell a difference in feel or distance but the stock mini brakes are pretty robust.
I did do the s/s brake lines when I did my 100k brake job along with the JCW brake kit. I couldn't tell a difference in feel or distance but the stock mini brakes are pretty robust.
#54
08-29-2014, 02:40 PM
Great thread. You're on par with the items i've done/been doing. I've got a pair of Koni Yellows waiting to go up front when I pull the subframe to do the LCA's. I'm at 215k on them and they're toast, along with the struts and a bunch of other stuff.
I did do the s/s brake lines when I did my 100k brake job along with the JCW brake kit. I couldn't tell a difference in feel or distance but the stock mini brakes are pretty robust.
I did do the s/s brake lines when I did my 100k brake job along with the JCW brake kit. I couldn't tell a difference in feel or distance but the stock mini brakes are pretty robust.
Good to know about the SS lines. I have them on my CRX but he had 232k miles on him. So it was time. I might wait on the MINI.
#55
10-05-2014, 12:53 PM
Just a quick update...
Ok, so before spending the money on redoing the suspension, I thought I would start an experiment on the existing suspension. With the front struts dead or dying, it appears that the rubber mounts take more of a beating and accelerate their wear and tear.
My Moog top mount lasted about 11,026 miles.
Replaced that with a KYB mount and that lasted 1,977 miles.
Ordered a Lemforder mount and just hit 2,300 miles. It looks as good as when I installed it on the car. So for now, the KYB mounts suck and should be avoided at all costs.
Curious to see how long this lasts...
#56
10-06-2014, 06:09 AM

Platinum Sponsor
Lemforder - No problems here, and been running for a while now. 
https://www.northamericanmotoring.co...alignment.html
https://www.northamericanmotoring.co...alignment.html
__________________

MINI Guru/ MINI Owner Since 2004 | NEW Lifetime Part Replacement | Local Pickup
Milltek | Genuine MINI | Forge Motorsport | NM Engineering | ECS Performance | M7 Speed
Customer Service Hours: 8am-8pm EST|Sales Team Hours: 8am-11pm | SAT 10am-7pm 800.924.5172
MINI Guru/ MINI Owner Since 2004 | NEW Lifetime Part Replacement | Local Pickup
Milltek | Genuine MINI | Forge Motorsport | NM Engineering | ECS Performance | M7 Speed
Customer Service Hours: 8am-8pm EST|Sales Team Hours: 8am-11pm | SAT 10am-7pm 800.924.5172

#59
11-15-2014, 01:35 PM
Quick update on the Lemforder mount. It just hit 3,700 miles and going strong!
Question to everyone who sees this thread:
This deals with the rear brakes on the Cooper. I am blowing through rear brake pads in about 15,000-16,000 miles. Both the inner and outer pad wear evenly on each side. Each side wear evenly as well. This is second set of pads that have this accelerated wear on them.
I am at 6,017 miles on this set of rear pads (Hawk HPS) and my pads are measuring 6mm. (10mm = new, 2-3mm is the service limit) the brake dust on the rear wheels is much worse than the front wheels so you know something is up.
At this rate, I am looking at about 12,000-15,000 miles on a set of brake pads.
Any thoughts? I have Hawk HPS pads up front as well and they are currently 5mm at 29,506 miles. I am very happy with those...
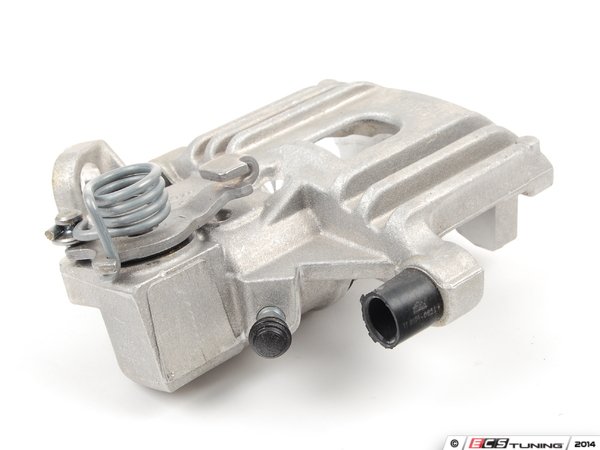
Is this a caliper replacement issue? Would both go at the same time? Only item I have noticed is on the rt rear caliper, there is a tear in the rubber piece that surrounds the caliper piston.
E-brake sticking? If so, how do you check/fix?
Any thoughts/feedback would be greatly appreciated. This is driving me nuts.
Cheers.
Question to everyone who sees this thread:
This deals with the rear brakes on the Cooper. I am blowing through rear brake pads in about 15,000-16,000 miles. Both the inner and outer pad wear evenly on each side. Each side wear evenly as well. This is second set of pads that have this accelerated wear on them.
I am at 6,017 miles on this set of rear pads (Hawk HPS) and my pads are measuring 6mm. (10mm = new, 2-3mm is the service limit) the brake dust on the rear wheels is much worse than the front wheels so you know something is up.
At this rate, I am looking at about 12,000-15,000 miles on a set of brake pads.
Any thoughts? I have Hawk HPS pads up front as well and they are currently 5mm at 29,506 miles. I am very happy with those...
Is this a caliper replacement issue? Would both go at the same time? Only item I have noticed is on the rt rear caliper, there is a tear in the rubber piece that surrounds the caliper piston.
E-brake sticking? If so, how do you check/fix?
Any thoughts/feedback would be greatly appreciated. This is driving me nuts.
Cheers.
#60
11-17-2014, 04:55 AM
#61
11-17-2014, 08:09 AM
Platinum Sponsor
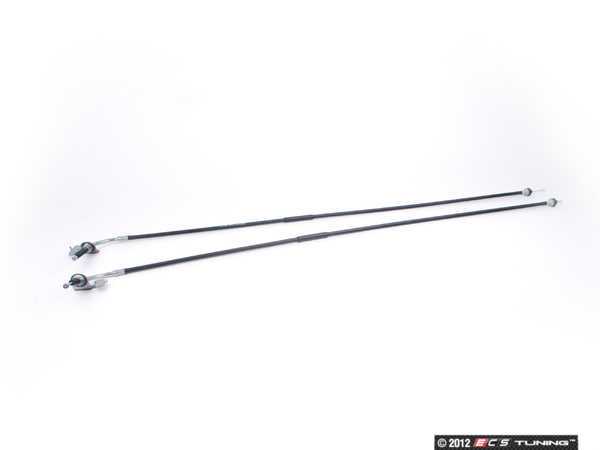
"E-brake sticking? If so, how do you check/fix? "
, see if the rear springs moves the attachment point back after you pull the e'brake , then disengage, you can see it right under the rear of your MINI. See how the little spring pushed the attachment point / hook all the way back.
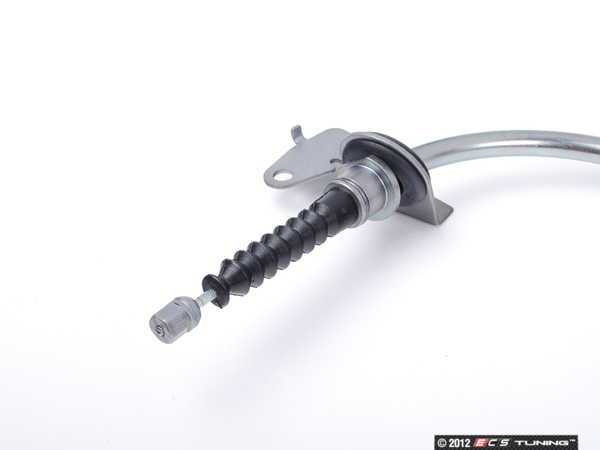
If not after release the cables are stuck or rusted inside the boot, 34406777400KT
http://www.ecstuning.com/Search/SiteSearch/34406777400KT/
Thanks
, see if the rear springs moves the attachment point back after you pull the e'brake , then disengage, you can see it right under the rear of your MINI. See how the little spring pushed the attachment point / hook all the way back.
If not after release the cables are stuck or rusted inside the boot, 34406777400KT
http://www.ecstuning.com/Search/SiteSearch/34406777400KT/
Thanks
__________________
MINI Guru/ MINI Owner Since 2004 | NEW Lifetime Part Replacement | Local Pickup
Milltek | Genuine MINI | Forge Motorsport | NM Engineering | ECS Performance | M7 Speed
Customer Service Hours: 8am-8pm EST|Sales Team Hours: 8am-11pm | SAT 10am-7pm 800.924.5172
MINI Guru/ MINI Owner Since 2004 | NEW Lifetime Part Replacement | Local Pickup
Milltek | Genuine MINI | Forge Motorsport | NM Engineering | ECS Performance | M7 Speed
Customer Service Hours: 8am-8pm EST|Sales Team Hours: 8am-11pm | SAT 10am-7pm 800.924.5172
#62
11-18-2014, 03:40 PM
"E-brake sticking? If so, how do you check/fix? "
, see if the rear springs moves the attachment point back after you pull the e'brake , then disengage, you can see it right under the rear of your MINI. See how the little spring pushed the attachment point / hook all the way back.
If not after release the cables are stuck or rusted inside the boot, 34406777400KT
http://www.ecstuning.com/Search/SiteSearch/34406777400KT/
Thanks
This piece would not swivel if it was stuck/rusted, correct? Mind you, I am in Arizona where rust does not exist.
So if I understand you, and my comment is valid, then I should be eyeballing the rear calipers for replacement since it means that my e-brake mechanism is functioning.
#63
11-19-2014, 04:58 AM
Platinum Sponsor
Yes , after e brake release the spring will sling it back and the cable boot should be extended all the way. When he ebrake it pulled the disk will move and the cable will be very short. The piston on the rear calipers can stick at the interior seal with age. You can get the outside dust cover but not the inside piston seal from MINI. Check both cables as one stick can stick and the other is fine.
One other way if you have a manual is use the e brake then go on a slight hill , release the ebake and see if you drift back a bit.
One other way if you have a manual is use the e brake then go on a slight hill , release the ebake and see if you drift back a bit.
__________________
MINI Guru/ MINI Owner Since 2004 | NEW Lifetime Part Replacement | Local Pickup
Milltek | Genuine MINI | Forge Motorsport | NM Engineering | ECS Performance | M7 Speed
Customer Service Hours: 8am-8pm EST|Sales Team Hours: 8am-11pm | SAT 10am-7pm 800.924.5172
MINI Guru/ MINI Owner Since 2004 | NEW Lifetime Part Replacement | Local Pickup
Milltek | Genuine MINI | Forge Motorsport | NM Engineering | ECS Performance | M7 Speed
Customer Service Hours: 8am-8pm EST|Sales Team Hours: 8am-11pm | SAT 10am-7pm 800.924.5172
#64
11-19-2014, 06:41 AM

5th Gear
#65
11-19-2014, 08:35 AM
Yes , after e brake release the spring will sling it back and the cable boot should be extended all the way. When he ebrake it pulled the disk will move and the cable will be very short. The piston on the rear calipers can stick at the interior seal with age. You can get the outside dust cover but not the inside piston seal from MINI. Check both cables as one stick can stick and the other is fine.
One other way if you have a manual is use the e brake then go on a slight hill , release the ebake and see if you drift back a bit.
One other way if you have a manual is use the e brake then go on a slight hill , release the ebake and see if you drift back a bit.
I am eyeballing some remanufactured calipers from RockAuto as well. Just replace both pieces for $80ea (after core charges). Maybe that will take care of it. Kind of surprised if that will take care of it� Calipers sticking after 80-90k miles.
I like the test! Get on a slight hill and see if the MINI drifts back! I will do that to help eliminate any variables. Thank you!

I looked into those but was unsure! My concern rests with any/all vibration being felt, so after reading a few threads, I opted for the factory replacements. Do these mounts (Vibratechnics) pass vibrations through to the cabin? I need to check these out.
#66
12-20-2014, 03:32 PM
So about ten days ago the car developed a nasty screeching sound from the enginebay. Loud enough to when we dropped kids off at school, people would notice the sound and look at the car. Great... It was metallic sounding, almost bearing like... like a bearing was being killed. hehe There was NO correlation between throttle response and the bearing sound. It was constant. Sound did not change when pressing in the clutch pedal. Not that... I had comfort in thinking that if the WP or S/C were going, the sound would grow as the throttle was pressed. There was no apparent drop in performance that was noticeable.
Freaking out for the worst (e.g. supercharger/water pump), we shut the MINI down from daily duty and hopped over to the CRX and Ody.
After letting the car sit for several days, I jumped back in to turn him over. No more bearing being killed sound. But what was present was a very subtle high pitched whistling sound. Took him for a spin and he drove fine! Gets up to speed nicely, the supercharger is cranking away! No CELs to date.
Suspicious of the following: tensioner, idler pulley, water pump, supercharger.
Turns out the idler pulley was dying and needed to be replaced.
Took the car for a spin, no screeching, no whistling, just a nice quiet hum from the motor/blower.
Car moves quite well still and pulls all the way through the gears.
Fingers crossed and motoring again!
Happy Holidays to everyone!
#67
12-21-2014, 12:34 PM

That was Whew!! Lol. Nothing as bad like I had a month ago. While I was spirited driving my clutch pedal went to almost no tension so the shifting were almost impossible to put into gears without pressure. Well I had that Bad Sreeeechh!! And there were a grinding, felt on while pressing the clutch pedal. But all is good now.. Just have to spend big $$ before the holidays isn't so good :(lol. Fingers crossed no more screeching again like you mentioned for SC and WP.
#68
12-21-2014, 05:16 PM
That was Whew!! Lol. Nothing as bad like I had a month ago. While I was spirited driving my clutch pedal went to almost no tension so the shifting were almost impossible to put into gears without pressure. Well I had that Bad Sreeeechh!! And there were a grinding, felt on while pressing the clutch pedal. But all is good now.. Just have to spend big $$ before the holidays isn't so good :(lol. Fingers crossed no more screeching again like you mentioned for SC and WP.
#69
02-28-2015, 07:34 PM
Small update... had a car day with the guys and got a few things done.
The Lemforder strut mount has hit 5,200 miles now so I am a big believer in those over the previous mounts I have used.
Accomplished today:
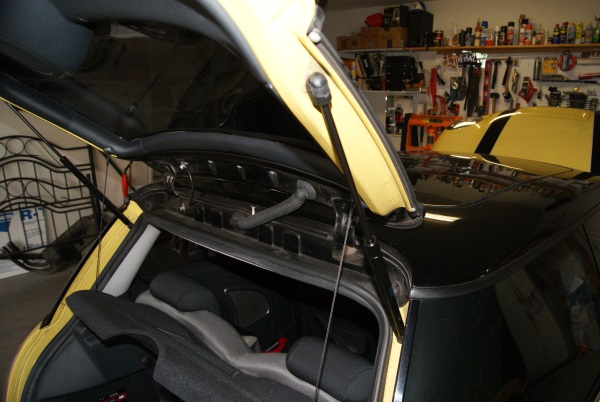
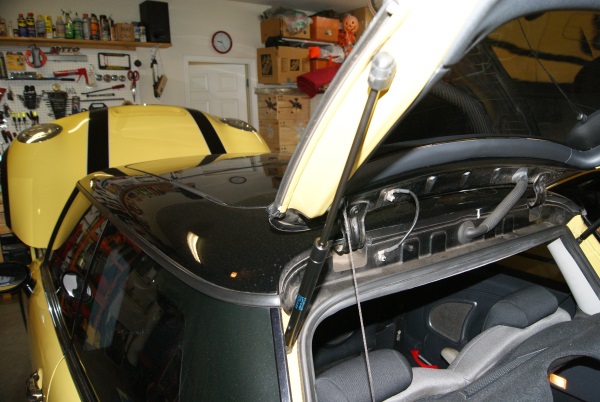
- Oil Change
- Hatch struts swapped
- Fuel Filter changed
Safety first
Oil Change (Mobil 1, stick with every 5k miles)
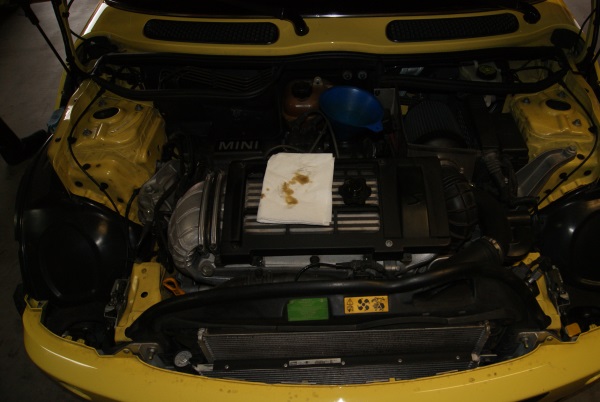
Hatch struts
Always fun to find out these are going. Usually involves looking in the hatch for something when it comes down crashing on you. Pretty easy to remove the old and install the new Stabilus replacements.
The Lemforder strut mount has hit 5,200 miles now so I am a big believer in those over the previous mounts I have used.
Accomplished today:
- Oil Change
- Hatch struts swapped
- Fuel Filter changed
Safety first

Oil Change (Mobil 1, stick with every 5k miles)

Hatch struts
Always fun to find out these are going. Usually involves looking in the hatch for something when it comes down crashing on you. Pretty easy to remove the old and install the new Stabilus replacements.


#70
02-28-2015, 07:46 PM
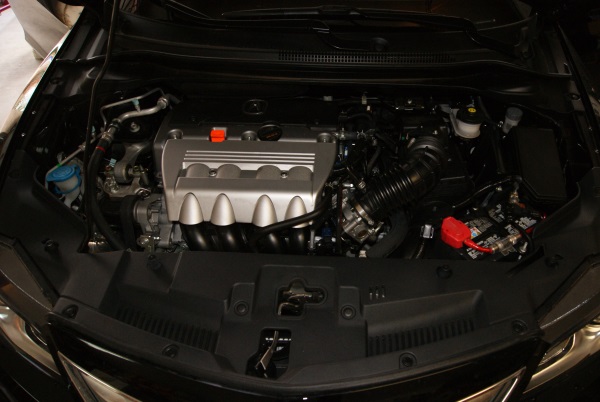
Fuel filter. Not a tough job. Took me an hour and I believe I could get it done in 30 minutes now. Bugs me that is the normal curve, but it is what it is.
Bought the kit off of eBay for $47 shipped. Mini of Tempe AZ no less...
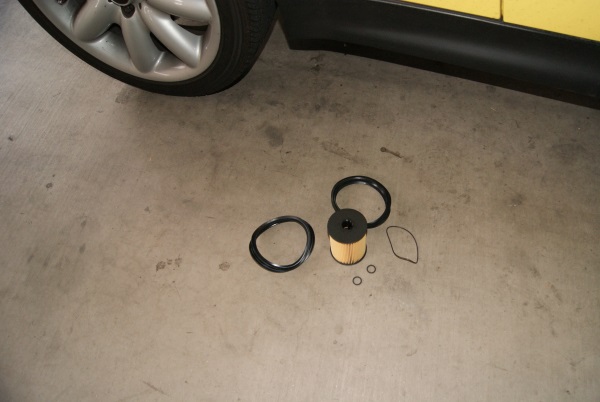
Not terribly difficult to remove the kid latch pieces. Then lift up on the rear seat and it comes out pretty easily.

After removing the five 10mm nuts holding the plate/cover on, you can see the filter canister. Nice and dirty...
I used the Pelican Parts write up to assist me. Very good description and pics for those wanting to tackle this job.
Here is the flared side of the new fuel filter canister seal.
I had a challenging time trying to put everything back together. Work space was tight but doable. Once I figure out how to seat the canister/new seal back in the fuel tank so that the metal ring could secure it, it came together and went back together very easily.
Leaving everything out and not put back together, I primed the fuel system and proceeded with turning the car over.
The MINI actually started up right, I believe it catches and turns over quicker than it did before. While driving around, the car does appear to run a little smoother.
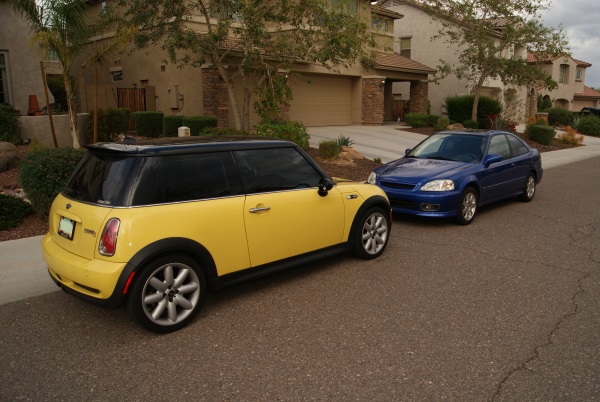
Odd day in Phoenix... it rained... but it was still fun.
Buddy's 2015 Acura ILX 2.4L 6MT
Mini and other buddy's EM1 Civic Si

Bought the kit off of eBay for $47 shipped. Mini of Tempe AZ no less...

Not terribly difficult to remove the kid latch pieces. Then lift up on the rear seat and it comes out pretty easily.


After removing the five 10mm nuts holding the plate/cover on, you can see the filter canister. Nice and dirty...

I used the Pelican Parts write up to assist me. Very good description and pics for those wanting to tackle this job.

Here is the flared side of the new fuel filter canister seal.

I had a challenging time trying to put everything back together. Work space was tight but doable. Once I figure out how to seat the canister/new seal back in the fuel tank so that the metal ring could secure it, it came together and went back together very easily.
Leaving everything out and not put back together, I primed the fuel system and proceeded with turning the car over.
The MINI actually started up right, I believe it catches and turns over quicker than it did before. While driving around, the car does appear to run a little smoother.
Odd day in Phoenix... it rained... but it was still fun.
Buddy's 2015 Acura ILX 2.4L 6MT

Mini and other buddy's EM1 Civic Si


#71
03-06-2015, 12:16 PM
Platinum Sponsor
Your car is so clean on the outside, that AZ weather really helps it last. Congrats on the diy.
__________________
MINI Guru/ MINI Owner Since 2004 | NEW Lifetime Part Replacement | Local Pickup
Milltek | Genuine MINI | Forge Motorsport | NM Engineering | ECS Performance | M7 Speed
Customer Service Hours: 8am-8pm EST|Sales Team Hours: 8am-11pm | SAT 10am-7pm 800.924.5172
MINI Guru/ MINI Owner Since 2004 | NEW Lifetime Part Replacement | Local Pickup
Milltek | Genuine MINI | Forge Motorsport | NM Engineering | ECS Performance | M7 Speed
Customer Service Hours: 8am-8pm EST|Sales Team Hours: 8am-11pm | SAT 10am-7pm 800.924.5172
#72
03-06-2015, 12:30 PM
I believe I am going to be hitting your guys up here shortly for when I tackle both power steering lines. They are leaking so it is time to address that... Job looks pretty straightforward but I am trying to find a way to make it less messy.
Only thing I can come up with is inserting a clear fish tube line down into the P/S hose and syphoning the fluid out before removal? Less messy...
#73
03-06-2015, 12:37 PM
Platinum Sponsor
Thanks
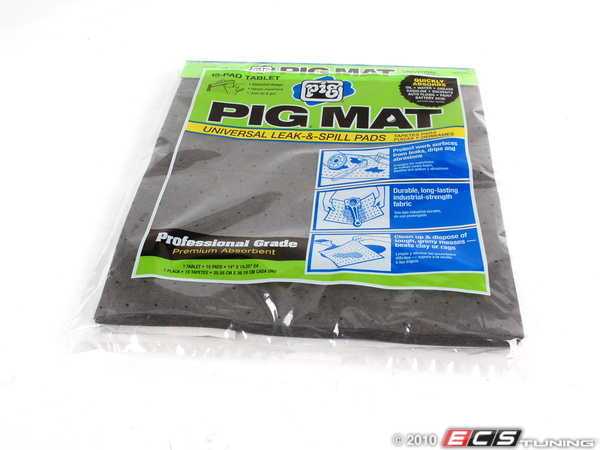
Yea, that about the easiest way to keep it clean, that and a turkey baster for the main container. Then a smaller one or tube hooked to the end for the lines.
New Pig stuff help with the mess. So you save the floors.
http://www.ecstuning.com/Search/SiteSearch/New_Pig/
Good luck.
Yea, that about the easiest way to keep it clean, that and a turkey baster for the main container. Then a smaller one or tube hooked to the end for the lines.
New Pig stuff help with the mess. So you save the floors.
http://www.ecstuning.com/Search/SiteSearch/New_Pig/
Good luck.
__________________
MINI Guru/ MINI Owner Since 2004 | NEW Lifetime Part Replacement | Local Pickup
Milltek | Genuine MINI | Forge Motorsport | NM Engineering | ECS Performance | M7 Speed
Customer Service Hours: 8am-8pm EST|Sales Team Hours: 8am-11pm | SAT 10am-7pm 800.924.5172
MINI Guru/ MINI Owner Since 2004 | NEW Lifetime Part Replacement | Local Pickup
Milltek | Genuine MINI | Forge Motorsport | NM Engineering | ECS Performance | M7 Speed
Customer Service Hours: 8am-8pm EST|Sales Team Hours: 8am-11pm | SAT 10am-7pm 800.924.5172
#74
03-06-2015, 12:52 PM
Thanks
Yea, that about the easiest way to keep it clean, that and a turkey baster for the main container. Then a smaller one or tube hooked to the end for the lines.
New Pig stuff help with the mess. So you save the floors.
http://www.ecstuning.com/Search/SiteSearch/New_Pig/
Good luck.
Yea, that about the easiest way to keep it clean, that and a turkey baster for the main container. Then a smaller one or tube hooked to the end for the lines.
New Pig stuff help with the mess. So you save the floors.
http://www.ecstuning.com/Search/SiteSearch/New_Pig/
Good luck.
Be in touch after I swap the motor in my CRX. Can only afford to have 1 vehicle down at a time! hehe
#75
05-25-2015, 09:58 AM
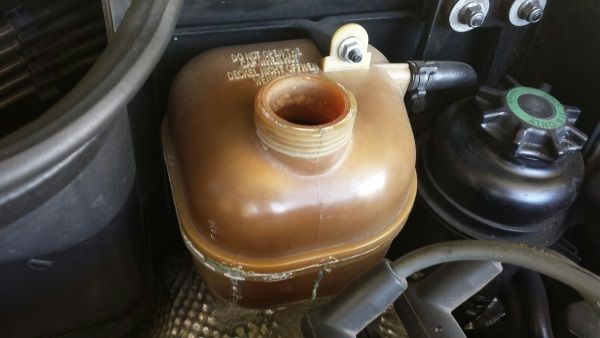
Quick update, noticed the reservoir tank leaking so I replaced that on the MINI. $62 shipped and the repair took about 15 minutes to complete. Check your tanks! Mine was worse in back, side facing the firewall.
Love the discoloration and you can see the leak marks in front.
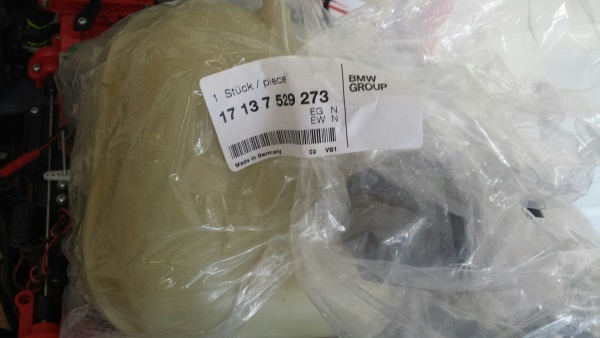
Part number for the replacement piece:
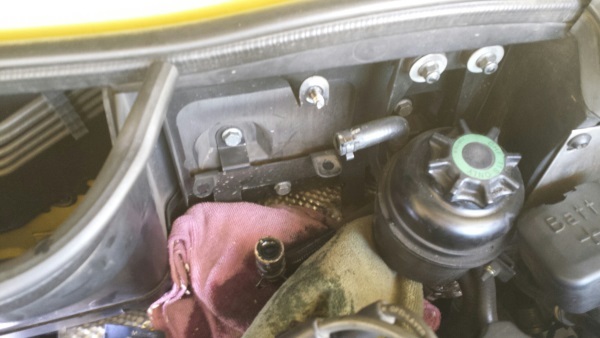
To remove the tank, it is secured by a 10mm nut on top that is easy to access. The other two connecting points are the hose that attaches from the driver side and there is a hose underneath the tank as well. The tank has two cylinder pegs that fit into a support bracket attached to the firewall. I assume this handles most of the tank support with the 10mm nut on top just keeping the tank from moving.
The hose coming from the driver side is easy to remove and does not leak any fluid. But you will have to find a way to remove the radiator fluid from the tank as best you can. I syphoned it out using hose line and got AS much as I could. There was still a decent amount left in the tank so make sure you have rags underneath to catch whatever falls out when you disconnect the hose underneath. The hose underneath is not difficult but as with any pinch type bracket, you have to find the right position to pinch the two arms together and work the bracket off the hose. Once complete, you can carefully pull the hose down and away from the expansion tank. Any remaining fluid will leak out so have those rags ready. You may find the top bracket arm (10mm nut you removed) getting in the way from removing the tank, I elected to bend the arm up a little and enough to remove the tank. It worked. Once the new tank is in place, bend the arm back down.
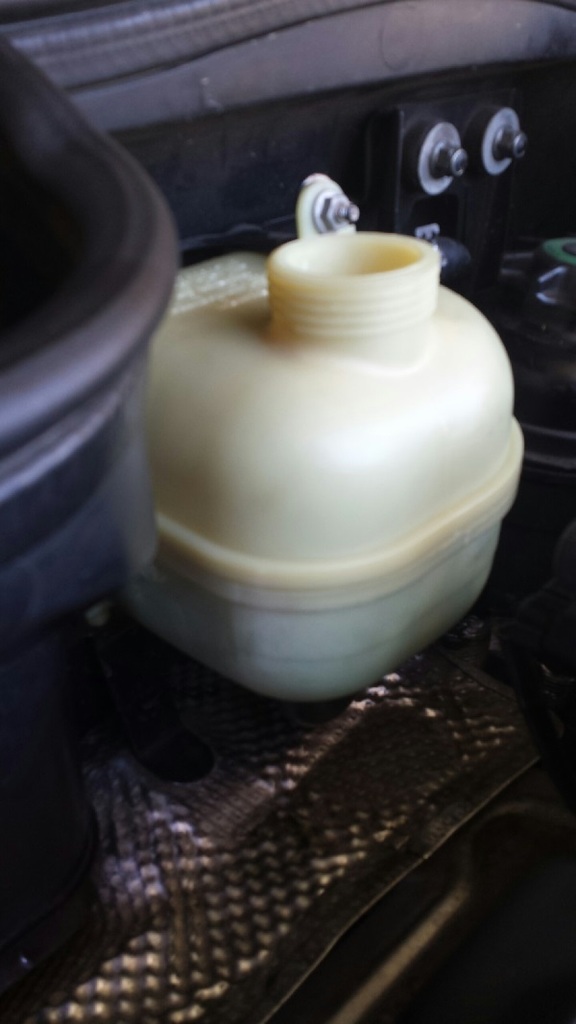
Pic of the connections and the tank removed.
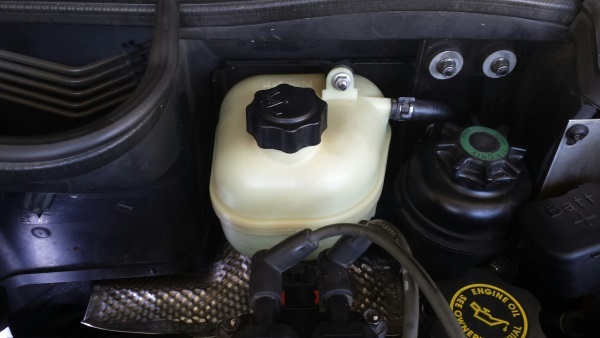
New tank installed. I connected the bottom hose first, pinched the bracket back onto the hose and into position. I installed the second hose from the driver side and place the bracket into position. Next up is to locate the two cylinder pegs on the tank and place them into the holes on the bracket attached to the MINI�s firewall. Once you find them, snap them into place and move the tank onto the top bracket and secure the 10mm bolt once again. Done. Should look like this:

Final step. Grab yourself some mixed MINI radiator coolant (blue) and a funnel. Carefully pour the MINI radiator fluid into the funnel to reach a level above MIN and below MAX. I typically fill mine up to about 90% or 100% of MAX. That way I have a guidline IF the fluid should drop. I am not guessing it the prior level was 40%, or was it 60%, maybe it was 80%???
Done. Please note, when you have everything buttoned back up and turn your MINI over, there is a good chance your rags did not catch All of the escaping radiator fluid. So you will see a little smoke rising from the heat shield/header location. I went for a quick drive around the block to get him up to operating temperature and make sure everything was in order. When I got back to the garage, popped the bonnet and looked again. No more smoke� so it is quick to be gone after a drive around the neighborhood.
Old tank was ugly looking. Leaking all over the place. I bought a OEM replacement for the money. I did not have the heart to spend twice what I paid for something aftermarket. This one lasted me 106k miles and 10y 6m. I may think differently if this one fails prematurely. Prematurely, I don�t think this should have failed to begin with but that is another story for another time.


Love the discoloration and you can see the leak marks in front.

Part number for the replacement piece:

To remove the tank, it is secured by a 10mm nut on top that is easy to access. The other two connecting points are the hose that attaches from the driver side and there is a hose underneath the tank as well. The tank has two cylinder pegs that fit into a support bracket attached to the firewall. I assume this handles most of the tank support with the 10mm nut on top just keeping the tank from moving.
The hose coming from the driver side is easy to remove and does not leak any fluid. But you will have to find a way to remove the radiator fluid from the tank as best you can. I syphoned it out using hose line and got AS much as I could. There was still a decent amount left in the tank so make sure you have rags underneath to catch whatever falls out when you disconnect the hose underneath. The hose underneath is not difficult but as with any pinch type bracket, you have to find the right position to pinch the two arms together and work the bracket off the hose. Once complete, you can carefully pull the hose down and away from the expansion tank. Any remaining fluid will leak out so have those rags ready. You may find the top bracket arm (10mm nut you removed) getting in the way from removing the tank, I elected to bend the arm up a little and enough to remove the tank. It worked. Once the new tank is in place, bend the arm back down.
Pic of the connections and the tank removed.

New tank installed. I connected the bottom hose first, pinched the bracket back onto the hose and into position. I installed the second hose from the driver side and place the bracket into position. Next up is to locate the two cylinder pegs on the tank and place them into the holes on the bracket attached to the MINI�s firewall. Once you find them, snap them into place and move the tank onto the top bracket and secure the 10mm bolt once again. Done. Should look like this:


Final step. Grab yourself some mixed MINI radiator coolant (blue) and a funnel. Carefully pour the MINI radiator fluid into the funnel to reach a level above MIN and below MAX. I typically fill mine up to about 90% or 100% of MAX. That way I have a guidline IF the fluid should drop. I am not guessing it the prior level was 40%, or was it 60%, maybe it was 80%???
Done. Please note, when you have everything buttoned back up and turn your MINI over, there is a good chance your rags did not catch All of the escaping radiator fluid. So you will see a little smoke rising from the heat shield/header location. I went for a quick drive around the block to get him up to operating temperature and make sure everything was in order. When I got back to the garage, popped the bonnet and looked again. No more smoke� so it is quick to be gone after a drive around the neighborhood.

Old tank was ugly looking. Leaking all over the place. I bought a OEM replacement for the money. I did not have the heart to spend twice what I paid for something aftermarket. This one lasted me 106k miles and 10y 6m. I may think differently if this one fails prematurely. Prematurely, I don�t think this should have failed to begin with but that is another story for another time.

