
R50/53 Rear Bearing/Hub Replacement


Thread Starter
|
1st Gear
Joined: May 2011
Posts: 42
Likes: 0
From: Charleston, SC
Rear Bearing/Hub Replacement
We have had the typical noise coming from the back of our 2003 S which reading up tells me I had a bad bearing in the rear of the car. I guess after 255,000 miles it can be expected. I purchased two new ones not sure what I was getting myself into having never changed one out before. I bought mine from Rocks Auto made by Timkens. From looking around it was a good price and Timkens is a leader in bearings.So I bought two because if one has gone bad the other probably isn't far off, might as well do both at the same time. This turned out to be one of the easiest things I have done yet to my car. So having discovered that, I wanted to post a little step by step to encourage other people to save them selves some money and do this on their own. There really is no reason just about anyone can do this on there own. Tools needed for this little task are as follows: flat blade screw driver, T20 Torq head, 7mm Allen wrench, 13mm socket and ratchet with 6 inch extension, open end wrench optional I used for leverage with my Allen wrench. And of course a hydraulic jack and a safety jack stand.
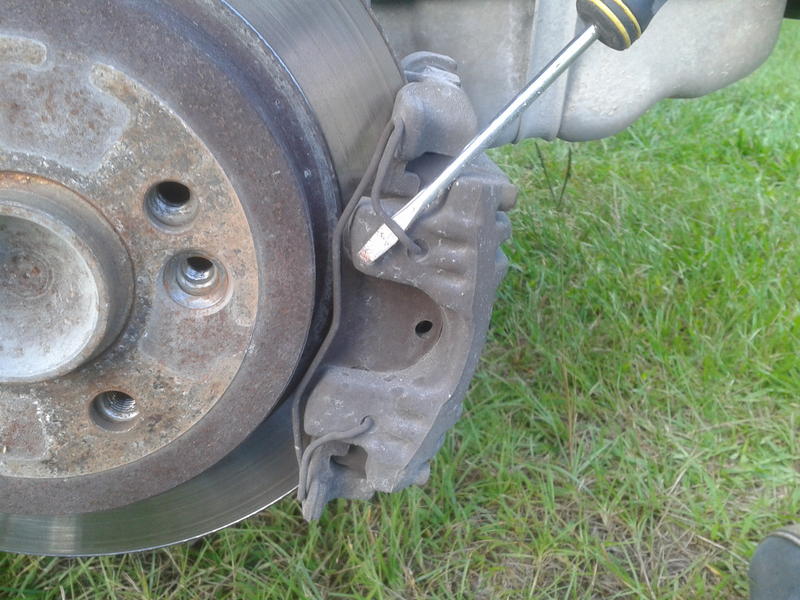
1. Jack the car up, put a safety jack stand under it and take the wheel off. 2. Pop spring off of caliper with the screw driver. Pop caps off the caliper holding bolts on back side and unscrew with Allen wrench.
  Pull the caliper and brake pads off. Set caliper aside, prop it up on something not to let it hang by the brake hose.
3. Take brake disc off by unscrewing T20 torq head bolt. Now I did this by screwing two of my lug bolts back in and putting my jack handle between them as leverage against the ground to hold the disc from turning.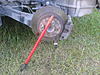 4. Now you are down to the hub which has the bearing in it. The four 13mm bolts are accessible from the back side using the 6 inch extension to remove them, it will take a little elbow grease they're tight. That's it, once the new hub is bolted back in place (I didn't have the torque spec handy so I just made them really tight). Reassemble in the reverse order. Make sure when bolting the new hub back in that you pay attention to the small bump on the inside of the hub. I believe the bump went up on mine. Happy Motoring!
1. Jack the car up, put a safety jack stand under it and take the wheel off. 2. Pop spring off of caliper with the screw driver.
 Pop caps off the caliper holding bolts on back side and unscrew with Allen wrench.
  Pull the caliper and brake pads off. Set caliper aside, prop it up on something not to let it hang by the brake hose.
 3. Take brake disc off by unscrewing T20 torq head bolt. Now I did this by screwing two of my lug bolts back in and putting my jack handle between them as leverage against the ground to hold the disc from turning.
 4. Now you are down to the hub which has the bearing in it. The four 13mm bolts are accessible from the back side using the 6 inch extension to remove them, it will take a little elbow grease they're tight. That's it, once the new hub is bolted back in place (I didn't have the torque spec handy so I just made them really tight). Reassemble in the reverse order. Make sure when bolting the new hub back in that you pay attention to the small bump on the inside of the hub. I believe the bump went up on mine. Happy Motoring!


4th Gear
Joined: Oct 2012
Posts: 579
Likes: 15
From: Maine
I just discovered this post as I'm having some rear wheel bearing issues. Is the hub assembly difficult to remove once it is unbolted? Thanks for the post as I'm going to attempt to replace them on my own.
Thread Starter
|
1st Gear
Joined: May 2011
Posts: 42
Likes: 0
From: Charleston, SC
Fastzombie-Once you unbolt the hub it just falls off. Just pay attention to the dircetion the hub bolts in, there is a top to it. Just look for the flat spot and line it back up when you rebolt it in. It took me under two hours to do both in my back yard taking my time its really easy to do.

1st Gear
Joined: Oct 2012
Posts: 16
Likes: 0
Trending Topics


1st Gear
Joined: Oct 2012
Posts: 16
Likes: 0


Thread
Thread Starter
Forum
Replies
Last Post
Interior/Exterior Need Help With Exterior Decisions (05' MCS PHM/W)
boostedhaze
Interior/Exterior
7
Jan 2, 2018 07:26 PM
squawSkiBum
MINI Parts for Sale
15
Oct 2, 2015 09:21 AM
Navigation & Audio Audio system power issues?
jeffbeckhudd
Navigation & Audio
1
Aug 29, 2015 09:11 PM
Minibeagle
Stock Problems/Issues
6
Aug 13, 2015 10:00 AM