When you click on links to various merchants on this site and make a purchase, this can result in this site earning a commission. Affiliate programs and affiliations include, but are not limited to, the eBay Partner Network.
General MINI TalkShared experiences, motoring minutes, and other general MINI-related discussion that applies to all MINIs, regardless of model, year or trim.
Changed the oil and filter after 5k miles. Ran 4 ounces of sea foam in the oil for 50 miles before Changing. I was using m1 0w-40 but was using about 2 quarts between changes so Im trying...m1 5w-30.
Mobil 1 5W-30 only has ACEA A1/B1 cert and no LL-01 cert and is thinner (viscosity 11 @ 100C, 62 @ 40C)
than the 0W-40 (viscosity 13.5 @100C, 75 @ 40C) which has ACEA A3/B3 and LL-01 certs that are
recommended for MINI.
I think you'll have more oil use and less protection with the 5W30.
Washed her again. Tried out the Griots Spray On Wax, it made drying it pretty easy! Detailed the interior and cleaned her all out after a week of working, petsitting and housesitting. All clean, for about 2 minutes anyway. Hahaha
Mobil 1 5W-30 only has ACEA A1/B1 cert and no LL-01 cert and is thinner (viscosity 11 @ 100C, 62 @ 40C)
than the 0W-40 (viscosity 13.5 @100C, 75 @ 40C) which has ACEA A3/B3 and LL-01 certs that are
recommended for MINI.
I think you'll have more oil use and less protection with the 5W30.
I have verified I used twice as much oil using 5w-30 instead of 0w-40. I've used multiple brands of each weight and everytime I used 5w-30 the engine just drinks that oil away.
I've switched to Amsoil European 5-40. I too found 5-30 tends to need topping off more often. Even with good brands like Mobil. My son is now an Amsoil guy, so I buy from the family store. Great stuff BTW!! Motor on!
Installed the Sprint Booster I bought pre owned off eBay.
Simply the best update Ive done to the car.
Kind of ridicluous how neutered the throttle is on the car.
Whole different car
Forgot to tell the forums that my Mini attempted suicide two weeks ago. The TPS sensor on the throttle body went, along with one of the plastic intake pipes. Had a huge crack in the tube... The same night, the serpentine belt snapped and I drove the car in limp mode for about a mile to get it to a place where it could spend the night (I didn't know the belt had snapped at the time and the car was in limp mode due to the TPS going). Got the throttle body and intake tube replaced, tipped off the coolant, and he was okay... Until the plastic ends where the bolts are on the radiator cracked and shot out the bolts like a bullet. It's just one thing to the next lately, but hopefully my luck will be better.
I will be getting graphics put on my MINI in a few weeks so decided to do this for fun. These chrome letters will be pulled off and replaced with black so decided to add some color in the meantime.
Sorry to hear that Bernie, hopefully you cant get things fixed.
Thanks. I also had the power steering and coolant act up that night, but that was likely related to the serpentine belt snapping. All the while, I'm trying to repair damage from my accident too. Money that should be buying me a new hood and front bumper is going to throttle bodies and radiators.
For myself i added a little protection from the other idiots by installing a 3rd brake light pulsar. Pretty easy install. I wanted to document it but kind of got into it and forgot lol.
For myself i added a little protection from the other idiots by installing a 3rd brake light pulsar. Pretty easy install. I wanted to document it but kind of got into it and forgot lol.
The previous owner of the car did a lot of mods to it and this was one of them. I love my blinky 3rd brake light! Should have came that way from the factory. And I understand why they did it too cause the car was rearended while they owned it... It's been rearended three times since I've owned it. lol
The previous owner of the car did a lot of mods to it and this was one of them. I love my blinky 3rd brake light! Should have came that way from the factory. And I understand why they did it too cause the car was rearended while they owned it... It's been rearended three times since I've owned it. lol
Wow, 3 times? That would honestly make me think the car is possessed at that point. Talk about bad luck...
The previous owner of the car did a lot of mods to it and this was one of them. I love my blinky 3rd brake light! Should have came that way from the factory. And I understand why they did it too cause the car was rearended while they owned it... It's been rearended three times since I've owned it. lol
That is terrible! May I ask where you live? Or part of a state? If possible I will try to avoid that location if ever out and about!
That is terrible! May I ask where you live? Or part of a state? If possible I will try to avoid that location if ever out and about!
The previous owner was is Dallas... Only reason I know they got rearended was because when I took the bumper off, there was blue paint underneath the red. I bought it in Memphis and lived in Tupelo, MS.
Actually, the first two times it got rear-ended, the Mini was parked. First time, I was inside of a Mexican restaurant, only to come outside and see my arch mouldings on the ground and an 8" dent. The second time, my Dad just flat out backed into it... The third time was a pissed-off mom who was disciplining her kids for throwing toys in the backseat. Saw the whole thing happen right in my rear view and saw the look of horror on her face when she did it. Funny thing is afterwards, she accidentally butt dialed my phone and left a message of her screaming at her kids. "That's why you don't throw $&*# in the car and #$%@ing behave!" lmao
haha Funny stories! Here is hoping for some future good luck for you!
First. Assemble the required tools. and loosen the wheel nuts and the axle nut. I had sprayed the axle nut in a penetrant / rust "unsticker" to make it easier to get off. Worked a treat!
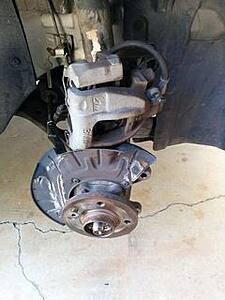
Jack it up, place on stands. Put a spare wheel under the sill so if it falls it doesn't hit the ground. Remove the wheel, axle bolt, brake caliper, ABS sensor, brake disc.
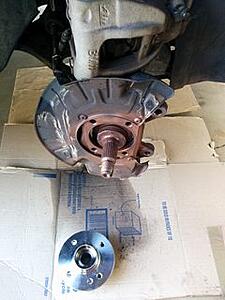
Undo the four bolts from the back that hold the bearing on. Tap the axle with a soft hammer to loosen it, remove the bearing. Clean everything with brake cleaner then give the mating surfaces a light coat of antiseize (I have a Rocol spray copper antiseize that dries to a thin film), give all the threads a good coating of antiseize. Cardboard is to stop staining the concrete.
Put your new bearing on. The holes only line up one way so if it looks like the incorrect part turn it 180 and it will be right! Nip up all the bolts (tighter than you can do with your fingers, but not much) until everything fits and looks correct, then tighten everything except the axle nut to torque in your preferred method (I use the star pattern to get to ~1/3 final torque, a different star pattern to ~2/3, then round to get to final torque).
"Installation is the reverse of disassembly." Put it all back together, clean the brake surfaces with brake cleaner once everything else is antiseized and torqued up, put the wheel on and nip up the bolts, put the car back on the ground and torque the wheel nuts and axle nut. Punch the axle nut over in the flat of the axle to stop it loosening.
First. Assemble the required tools. and loosen the wheel nuts and the axle nut. I had sprayed the axle nut in a penetrant / rust "unsticker" to make it easier to get off. Worked a treat!
Jack it up, place on stands. Put a spare wheel under the sill so if it falls it doesn't hit the ground. Remove the wheel, axle bolt, brake caliper, ABS sensor, brake disc.
Undo the four bolts from the back that hold the bearing on. Tap the axle with a soft hammer to loosen it, remove the bearing. Clean everything with brake cleaner then give the mating surfaces a light coat of antiseize (I have a Rocol spray copper antiseize that dries to a thin film), give all the threads a good coating of antiseize. Cardboard is to stop staining the concrete.
Put your new bearing on. The holes only line up one way so if it looks like the incorrect part turn it 180 and it will be right! Nip up all the bolts (tighter than you can do with your fingers, but not much) until everything fits and looks correct, then tighten everything except the axle nut to torque in your preferred method (I use the star pattern to get to ~1/3 final torque, a different star pattern to ~2/3, then round to get to final torque).
"Installation is the reverse of disassembly." Put it all back together, clean the brake surfaces with brake cleaner once everything else is antiseized and torqued up, put the wheel on and nip up the bolts, put the car back on the ground and torque the wheel nuts and axle nut. Punch the axle nut over in the flat of the axle to stop it loosening.
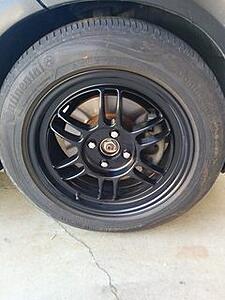
Go for a drive and enjoy the silence!
James
Very cool! Good job! Question, how many miles do you have on your MINI?
- Replaced both rear tires (down to 2/32" tread)
- Replaced the rear rotors
- Replaced the rear brake pads (down to 2mm)
- Cleaned up the caliper guide bolts
- Replaced the guide bushings and caps
- Took brake cleen to everything I could and cleaned it up.
First. Assemble the required tools. and loosen the wheel nuts and the axle nut. I had sprayed the axle nut in a penetrant / rust "unsticker" to make it easier to get off. Worked a treat!
Jack it up, place on stands. Put a spare wheel under the sill so if it falls it doesn't hit the ground. Remove the wheel, axle bolt, brake caliper, ABS sensor, brake disc.
Undo the four bolts from the back that hold the bearing on. Tap the axle with a soft hammer to loosen it, remove the bearing. Clean everything with brake cleaner then give the mating surfaces a light coat of antiseize (I have a Rocol spray copper antiseize that dries to a thin film), give all the threads a good coating of antiseize. Cardboard is to stop staining the concrete.
Put your new bearing on. The holes only line up one way so if it looks like the incorrect part turn it 180 and it will be right! Nip up all the bolts (tighter than you can do with your fingers, but not much) until everything fits and looks correct, then tighten everything except the axle nut to torque in your preferred method (I use the star pattern to get to ~1/3 final torque, a different star pattern to ~2/3, then round to get to final torque).
"Installation is the reverse of disassembly." Put it all back together, clean the brake surfaces with brake cleaner once everything else is antiseized and torqued up, put the wheel on and nip up the bolts, put the car back on the ground and torque the wheel nuts and axle nut. Punch the axle nut over in the flat of the axle to stop it loosening.