

What did you do to your mini today?


3rd Gear
Joined: Feb 2014
Posts: 191
Likes: 2
From: Des Plaines, IL
Pepper has gotten some much needed TLC the last few weeks.
- New rubber (Bridgestone DriveGuards). The original Continentals were more than ready to go...
- New spark plugs (NGK ILZKBR7A8G). Correcting an issue with misfires.
- New ignition coils (BREMI STI). Correcting an issue with misfires.
- Matte black door handle covers.
- Upgraded my reverse lamps (JDM ASTAR 800LM). I needed brighter output due to my tinting the reverse lamp lens.
- LED license plate lights from Out Motoring.
- 2nd Cat & Resonator delete.
- Full interior and exterior detailing.
- Installed a magnetic cell phone mount above the right drivers-side vent and ran power and audio cables behind the dash for my phone.
- ALTA Blow-off Valve Spring.
- NM Engineering Torque Arm Inserts.
I still have a few more projects to tackle this spring, but I'm pretty happy with what's been accomplished so far!


4th Gear
Joined: Oct 2012
Posts: 579
Likes: 15
From: Maine
Centium,
How do you like the drivegaurds so far? I have a 2012 with Contis on right now and will need to be changing over by about August. I'm trying to decide if I want to just dump run flats and go with a Michelin AS3 or keep the run flats.
Matt
How do you like the drivegaurds so far? I have a 2012 with Contis on right now and will need to be changing over by about August. I'm trying to decide if I want to just dump run flats and go with a Michelin AS3 or keep the run flats.
Matt
4th Gear
Joined: Oct 2012
Posts: 579
Likes: 15
From: Maine
Today I installed a Borla S-Type Cat Back exhaust. Came by in an interesting fashion and am very pleased with it. Install was super easy, build quality look awesome, tips are very nice and fill up the rear valance and the sound is deep, throaty and no drone.

5th Gear


Joined: Jun 2012
Posts: 1,016
Likes: 44

4th Gear
Joined: Oct 2012
Posts: 579
Likes: 15
From: Maine
yesti,
I'm really pleased with my Borla. It is the S-Type, part #140517, and it is not loud or obnoxious. I use mine for daily driving and am not striving for huge performance gains, rather I wanted a nicer tail pipe look, a throatier sound over stock, and a little bit better breathing of the exhaust system.
The installation went extremely well and the system installed without any fiddling or pain in the *** tweaks. It just lined right up. I used a chain tail pipe cutter in place of a saw and it worked like a charm. The clamps that come with the exhaust are recommended to be torqued to 32 - 35 FT LBS. I need to double check mine today after running it through a heat cycle last night.
The biggest pain in the *** was getting the rubber exhaust hangers free from the rear section. I haven't found any tricks on those other than a lot of WD40 and muscle.
Matt

 Spray a little lube, pry and POP! Less than 5 seconds each.
3rd Gear
Joined: Feb 2014
Posts: 191
Likes: 2
From: Des Plaines, IL
I got mine at Costco on sale ($70 off a set of 4). They had to order them, but it only took 3 days. They did the swap, balance, and filled the tires with nitrogen. They also informed me about a misalignment on the passenger rear tire that was causing uneven wear. I'll be bringing that up when I bring Pepper back to my dealer to ***** them out for never rotating the tires during service, and still quoting it on my receipt. >:(

5th Gear
Joined: Jul 2013
Posts: 679
Likes: 27
In the last few weeks my car three times has just gone click when I've gone to start it. I figured that the starter motor went collywobbles and ordered a rebuilt one.
I went to install it and the replacement won't fit, now I have collywobbles. I ordered another one from a different vendor. The first vendor only has one part number listed for all models and transmissions.
Does anyone know why the starter motors are so screwed up in vendor's data bases? I saw that MOD MINI on YouTube ran into this problem. The car is an R53 with a manual trans

3rd Gear
Joined: Feb 2014
Posts: 191
Likes: 2
From: Des Plaines, IL
In the last few weeks my car three times has just gone click when I've gone to start it. I figured that the starter motor went collywobbles and ordered a rebuilt one.
I went to install it and the replacement won't fit, now I have collywobbles. I ordered another one from a different vendor. The first vendor only has one part number listed for all models and transmissions.
Does anyone know why the starter motors are so screwed up in vendor's data bases? I saw that MOD MINI on YouTube ran into this problem. The car is an R53 with a manual trans
I went to install it and the replacement won't fit, now I have collywobbles. I ordered another one from a different vendor. The first vendor only has one part number listed for all models and transmissions.
Does anyone know why the starter motors are so screwed up in vendor's data bases? I saw that MOD MINI on YouTube ran into this problem. The car is an R53 with a manual trans

5th Gear
Joined: Jun 2012
Posts: 1,016
Likes: 44
I never realized how rigid the Continentals really were until I got the DriveGuards on... The ride is much smoother and quieter, and I haven't felt like I've lost any grip. They feel like regular tires rather than like I'm driving on solid core forklift tires.
I got mine at Costco on sale ($70 off a set of 4). They had to order them, but it only took 3 days. They did the swap, balance, and filled the tires with nitrogen. They also informed me about a misalignment on the passenger rear tire that was causing uneven wear. I'll be bringing that up when I bring Pepper back to my dealer to ***** them out for never rotating the tires during service, and still quoting it on my receipt. >:(
I got mine at Costco on sale ($70 off a set of 4). They had to order them, but it only took 3 days. They did the swap, balance, and filled the tires with nitrogen. They also informed me about a misalignment on the passenger rear tire that was causing uneven wear. I'll be bringing that up when I bring Pepper back to my dealer to ***** them out for never rotating the tires during service, and still quoting it on my receipt. >:(
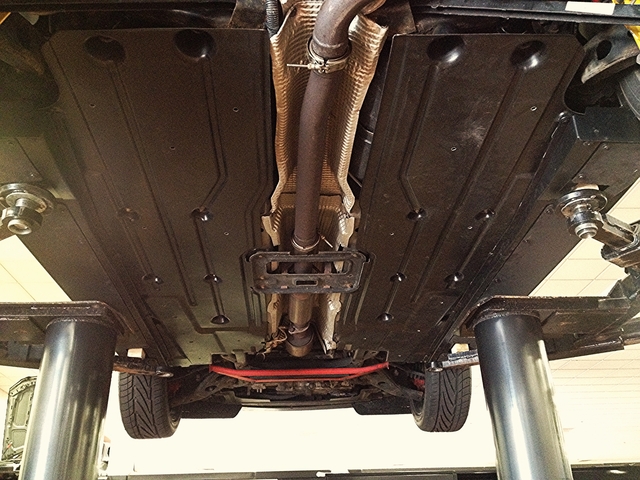
Attempted this on my own, but really needed the use of a lift....Tech at MINI of Warwick finished this yesterday. The bracket for left panel had no place to attach, some bending and drilling new hole in rear sub-frame fixed that.
I originally had the support sills from the aero kit mated with the GP side body kit, but were not designed to mate with the GP under body panels. The back section of panels left about 6 attaching points with nothing to mate with. The sills gradually tapered outwards leaving no place for screws for GP panels to line up with. So purchased the support sills for the GP side sills and everything matched up perfectly. If doing this mod no matter what body kit you have, the GP side sill supports would be required # 3 in diagram.


The Bilstein Sport struts installed last week ended up being a perfect match for the JCW Springs....A tad firmer than the OEM JCW struts, but not harsh over bumps. No rocking of car at WOT runs, corners flat with very predictable turn in.
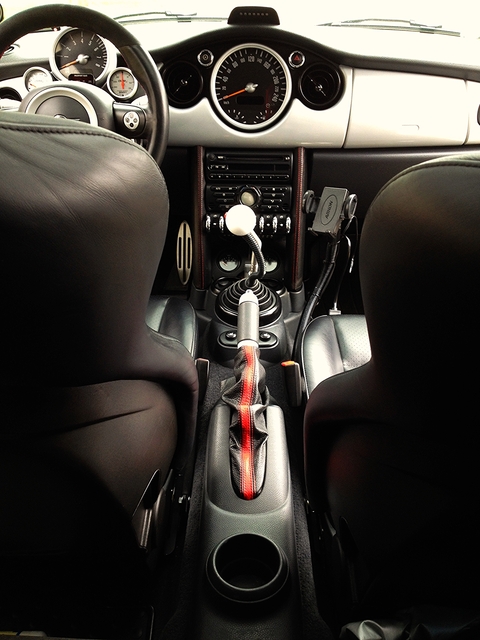
Update on this shifter mod. Two thumbs up. Repositioning the **** about an inch to the left with this angled extension was good move I would do again. Took to new location like a fish to water.
I originally had the support sills from the aero kit mated with the GP side body kit, but were not designed to mate with the GP under body panels. The back section of panels left about 6 attaching points with nothing to mate with. The sills gradually tapered outwards leaving no place for screws for GP panels to line up with. So purchased the support sills for the GP side sills and everything matched up perfectly. If doing this mod no matter what body kit you have, the GP side sill supports would be required # 3 in diagram.
The Bilstein Sport struts installed last week ended up being a perfect match for the JCW Springs....A tad firmer than the OEM JCW struts, but not harsh over bumps. No rocking of car at WOT runs, corners flat with very predictable turn in.
Update on this shifter mod. Two thumbs up. Repositioning the **** about an inch to the left with this angled extension was good move I would do again. Took to new location like a fish to water.


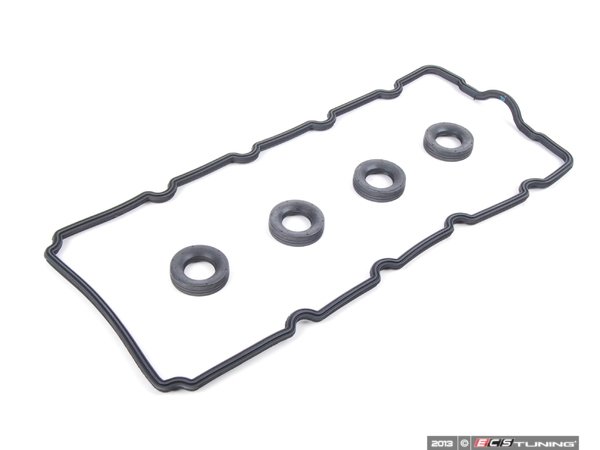
Wasn't too hard. I followed the Pelican article for the gasket and seals although that was a R50. The R53 looks easier by removing the intercooler and the two intercooler support arms. You'll need an 8mm deep socket for some of the valve cover bolts. A 1/4" drive swivel with a 10mm regular socket helped get to the supports arms. The spark plug seals went in easy. Some how to's say a 36mm socket but anything clean and solid that covers the seal will do. A light tap with a hammer with proper support under the cover will seat the seals. The valve cover gasket presses into a groove in the cover, no sealer needed.
BTW, I had a heck of a time getting the hose off the right/drivers side of the valve cover even with the spring clip slid down a ways. The rubber hose was dried out at the valve cover and made it hard to get off.
R50: http://www.pelicanparts.com/techarti...eplacement.htm
R53:
I spent more time researching how to do it than the time it really took to finish. Could do it again in about 1.0-1.5 hours.
Last edited by Stinch; May 4, 2015 at 04:03 AM. Reason: spelling

Attempted this on my own, but really needed the use of a lift....Tech at MINI of Warwick finished this yesterday. The bracket for left panel had no place to attach, some bending and drilling new hole in rear sub-frame fixed that.
I originally had the support sills from the aero kit mated with the GP side body kit, but were not designed to mate with the GP under body panels. The back section of panels left about 6 attaching points with nothing to mate with. The sills gradually tapered outwards leaving no place for screws for GP panels to line up with. So purchased the support sills for the GP side sills and everything matched up perfectly. If doing this mod no matter what body kit you have, the GP side sill supports would be required # 3 in diagram.

The Bilstein Sport struts installed last week ended up being a perfect match for the JCW Springs....A tad firmer than the OEM JCW struts, but not harsh over bumps. No rocking of car at WOT runs, corners flat with very predictable turn in.
Update on this shifter mod. Two thumbs up. Repositioning the **** about an inch to the left with this angled extension was good move I would do again. Took to new location like a fish to water.

I originally had the support sills from the aero kit mated with the GP side body kit, but were not designed to mate with the GP under body panels. The back section of panels left about 6 attaching points with nothing to mate with. The sills gradually tapered outwards leaving no place for screws for GP panels to line up with. So purchased the support sills for the GP side sills and everything matched up perfectly. If doing this mod no matter what body kit you have, the GP side sill supports would be required # 3 in diagram.
The Bilstein Sport struts installed last week ended up being a perfect match for the JCW Springs....A tad firmer than the OEM JCW struts, but not harsh over bumps. No rocking of car at WOT runs, corners flat with very predictable turn in.
Update on this shifter mod. Two thumbs up. Repositioning the **** about an inch to the left with this angled extension was good move I would do again. Took to new location like a fish to water.
Good to know .
__________________

MINI Guru/ MINI Owner Since 2004 | NEW Lifetime Part Replacement | Local Pickup
Milltek | Genuine MINI | Forge Motorsport | NM Engineering | ECS Performance | M7 Speed
Customer Service Hours: 8am-8pm EST|Sales Team Hours: 8am-11pm | SAT 10am-7pm 800.924.5172
MINI Guru/ MINI Owner Since 2004 | NEW Lifetime Part Replacement | Local Pickup
Milltek | Genuine MINI | Forge Motorsport | NM Engineering | ECS Performance | M7 Speed
Customer Service Hours: 8am-8pm EST|Sales Team Hours: 8am-11pm | SAT 10am-7pm 800.924.5172
The gasket is not too bad, its those old rusted bolts that can be a pain if the heads are rusted.
Hardware linked:
https://www.northamericanmotoring.co...er-screws.html

Valve cover gasket set here: 11121485838
http://www.ecstuning.com/Search/SiteSearch/11121485838/
__________________
MINI Guru/ MINI Owner Since 2004 | NEW Lifetime Part Replacement | Local Pickup
Milltek | Genuine MINI | Forge Motorsport | NM Engineering | ECS Performance | M7 Speed
Customer Service Hours: 8am-8pm EST|Sales Team Hours: 8am-11pm | SAT 10am-7pm 800.924.5172
MINI Guru/ MINI Owner Since 2004 | NEW Lifetime Part Replacement | Local Pickup
Milltek | Genuine MINI | Forge Motorsport | NM Engineering | ECS Performance | M7 Speed
Customer Service Hours: 8am-8pm EST|Sales Team Hours: 8am-11pm | SAT 10am-7pm 800.924.5172
Last edited by ECSTuning; Jul 24, 2015 at 08:03 AM.