

R56 Possible to replace brake pad sensor without removing pads?


Thread Starter
|
Neutral
Joined: Dec 2012
Posts: 9
Likes: 0
From: Edmonton, AB
Possible to replace brake pad sensor without removing pads?
Have owned 40 some vehicles and a mini has always been on the list. Picked up a 07 MCS with 40k miles this weekend and the warning lights are lit up like a Christmas tree. Oil, no problem to fix. Front and rear brake lights are on and way past mileage wise. Pulled the wheels and the pads look thick and new. Makes me think someone replaced the brakes but not the sensors. Was going to take it to the dealer but figure that's a good way to rack up my credit card. Can I purchase and replace the two sensors without having to pull the pads out?
Thanks!
Thanks!

You can replace the sensor without the pads, if you're sure the pad has enough on it. The sensor just clips into a notch on the pad. The min spec is 3mm. The sensor goes off at 6mm for stage 1 which sets the countdown to about 6000 miles (and 3mm to bring up the red light). Its a pain getting under the wheel arch liner to get to the sensor socket.
Thread Starter
|
Neutral
Joined: Dec 2012
Posts: 9
Likes: 0
From: Edmonton, AB
You can replace the sensor without the pads, if you're sure the pad has enough on it. The sensor just clips into a notch on the pad. The min spec is 3mm. The sensor goes off at 6mm for stage 1 which sets the countdown to about 6000 miles (and 3mm to bring up the red light). Its a pain getting under the wheel arch liner to get to the sensor socket.


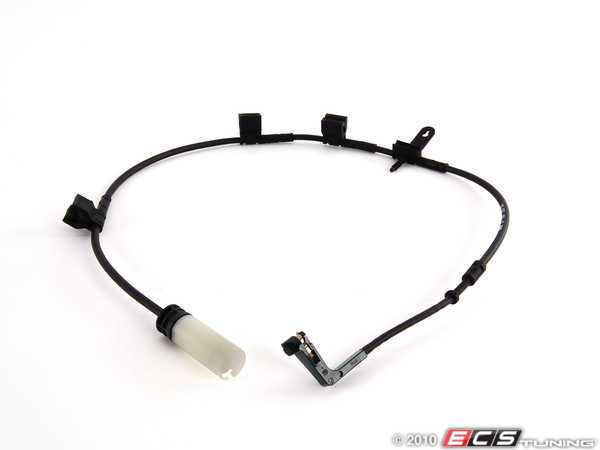
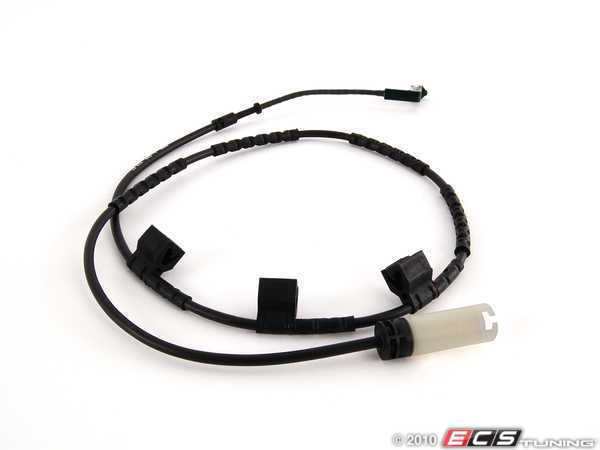
Mattkosem - great advice , those little U shaped springs just click into the pad. One sensor for the driver front and one sensor for the passenger rear.
You can see on the pics the sensor attach and hold with built in snaps.
Fronts used up to production 8/2010
http://www.ecstuning.com/Search/34356789329/
&
Rear Used for production up to 8/2010
http://www.ecstuning.com/Search/34356789330/
Thanks and I hop those pictures help.
You can see on the pics the sensor attach and hold with built in snaps.
Fronts used up to production 8/2010
http://www.ecstuning.com/Search/34356789329/
&
Rear Used for production up to 8/2010
http://www.ecstuning.com/Search/34356789330/
Thanks and I hop those pictures help.
__________________

MINI Guru/ MINI Owner Since 2004 | NEW Lifetime Part Replacement | Local Pickup
Milltek | Genuine MINI | Forge Motorsport | NM Engineering | ECS Performance | M7 Speed
Customer Service Hours: 8am-8pm EST|Sales Team Hours: 8am-11pm | SAT 10am-7pm 800.924.5172
MINI Guru/ MINI Owner Since 2004 | NEW Lifetime Part Replacement | Local Pickup
Milltek | Genuine MINI | Forge Motorsport | NM Engineering | ECS Performance | M7 Speed
Customer Service Hours: 8am-8pm EST|Sales Team Hours: 8am-11pm | SAT 10am-7pm 800.924.5172
Last edited by ECSTuning; Feb 19, 2013 at 05:31 AM.

OVERDRIVE
Joined: Jul 2006
Posts: 7,037
Likes: 283
From: Melbourne, FL
first check to see if there are even sensors where they are supposed to be!
IME getting a worn sensor out of the worn pad can be a PIA - I destroyed mine in the process. It is possible the prior owner just cut the old sensor wires and tossed the sensor with the old pads and din't replace anything - this leaves an open circuit which the car continues to read as 'worn pads'.
IF this is what happened you might decide you don't really need those sensors anyway - just like the PO did. I don't use 'em. My 02 didn't come with them. You can make the light go out IF PO didn't remove the entire shootin match. If the wire is there all you have is two ends of a loop. strip back the ends and tie them together. I solder 'em and shrink wrap for water tightness, then zip tie out of the way. Then do the regular 'reset'. The miles counter will still count down - but when it gets low just reset it again (good time for a visual check of pad wear!). You'll never get the actual worn pad warning because the car will never see the sensor loop broken....
If however PO removed the entire sensor all the way back to where it plugs in . . you can not make the warning go away because the car will see this open circuit. You need some way to connect the ends - close the open circuit...
Thread Starter
|
Neutral
Joined: Dec 2012
Posts: 9
Likes: 0
From: Edmonton, AB
first check to see if there are even sensors where they are supposed to be!
IME getting a worn sensor out of the worn pad can be a PIA - I destroyed mine in the process. It is possible the prior owner just cut the old sensor wires and tossed the sensor with the old pads and din't replace anything - this leaves an open circuit which the car continues to read as 'worn pads'.
IF this is what happened you might decide you don't really need those sensors anyway - just like the PO did. I don't use 'em. My 02 didn't come with them. You can make the light go out IF PO didn't remove the entire shootin match. If the wire is there all you have is two ends of a loop. strip back the ends and tie them together. I solder 'em and shrink wrap for water tightness, then zip tie out of the way. Then do the regular 'reset'. The miles counter will still count down - but when it gets low just reset it again (good time for a visual check of pad wear!). You'll never get the actual worn pad warning because the car will never see the sensor loop broken....
If however PO removed the entire sensor all the way back to where it plugs in . . you can not make the warning go away because the car will see this open circuit. You need some way to connect the ends - close the open circuit...
IME getting a worn sensor out of the worn pad can be a PIA - I destroyed mine in the process. It is possible the prior owner just cut the old sensor wires and tossed the sensor with the old pads and din't replace anything - this leaves an open circuit which the car continues to read as 'worn pads'.
IF this is what happened you might decide you don't really need those sensors anyway - just like the PO did. I don't use 'em. My 02 didn't come with them. You can make the light go out IF PO didn't remove the entire shootin match. If the wire is there all you have is two ends of a loop. strip back the ends and tie them together. I solder 'em and shrink wrap for water tightness, then zip tie out of the way. Then do the regular 'reset'. The miles counter will still count down - but when it gets low just reset it again (good time for a visual check of pad wear!). You'll never get the actual worn pad warning because the car will never see the sensor loop broken....
If however PO removed the entire sensor all the way back to where it plugs in . . you can not make the warning go away because the car will see this open circuit. You need some way to connect the ends - close the open circuit...
Trending Topics
Thread Starter
|
Neutral
Joined: Dec 2012
Posts: 9
Likes: 0
From: Edmonton, AB
first check to see if there are even sensors where they are supposed to be!
IME getting a worn sensor out of the worn pad can be a PIA - I destroyed mine in the process. It is possible the prior owner just cut the old sensor wires and tossed the sensor with the old pads and din't replace anything - this leaves an open circuit which the car continues to read as 'worn pads'.
IF this is what happened you might decide you don't really need those sensors anyway - just like the PO did. I don't use 'em. My 02 didn't come with them. You can make the light go out IF PO didn't remove the entire shootin match. If the wire is there all you have is two ends of a loop. strip back the ends and tie them together. I solder 'em and shrink wrap for water tightness, then zip tie out of the way. Then do the regular 'reset'. The miles counter will still count down - but when it gets low just reset it again (good time for a visual check of pad wear!). You'll never get the actual worn pad warning because the car will never see the sensor loop broken....
If however PO removed the entire sensor all the way back to where it plugs in . . you can not make the warning go away because the car will see this open circuit. You need some way to connect the ends - close the open circuit...
IME getting a worn sensor out of the worn pad can be a PIA - I destroyed mine in the process. It is possible the prior owner just cut the old sensor wires and tossed the sensor with the old pads and din't replace anything - this leaves an open circuit which the car continues to read as 'worn pads'.
IF this is what happened you might decide you don't really need those sensors anyway - just like the PO did. I don't use 'em. My 02 didn't come with them. You can make the light go out IF PO didn't remove the entire shootin match. If the wire is there all you have is two ends of a loop. strip back the ends and tie them together. I solder 'em and shrink wrap for water tightness, then zip tie out of the way. Then do the regular 'reset'. The miles counter will still count down - but when it gets low just reset it again (good time for a visual check of pad wear!). You'll never get the actual worn pad warning because the car will never see the sensor loop broken....
If however PO removed the entire sensor all the way back to where it plugs in . . you can not make the warning go away because the car will see this open circuit. You need some way to connect the ends - close the open circuit...
tawheed - If you need new ones the full selection from Genuine MINI to aftermarket is linked in the pictures above. Hope you can find your problem. Since the front one is there, I would also make sure they are connected correctly at the female connect end, you have to push the plastic boot all the way in till it clicks.
Good luck.
Good luck.
__________________
MINI Guru/ MINI Owner Since 2004 | NEW Lifetime Part Replacement | Local Pickup
Milltek | Genuine MINI | Forge Motorsport | NM Engineering | ECS Performance | M7 Speed
Customer Service Hours: 8am-8pm EST|Sales Team Hours: 8am-11pm | SAT 10am-7pm 800.924.5172
MINI Guru/ MINI Owner Since 2004 | NEW Lifetime Part Replacement | Local Pickup
Milltek | Genuine MINI | Forge Motorsport | NM Engineering | ECS Performance | M7 Speed
Customer Service Hours: 8am-8pm EST|Sales Team Hours: 8am-11pm | SAT 10am-7pm 800.924.5172
OVERDRIVE
Joined: Jul 2006
Posts: 7,037
Likes: 283
From: Melbourne, FL
is it also possible that OP replaced the pads AND the sensors but didn't reset the system. Why don't you try that b4 spending anything?
from MiniMania:
After replacing the worn sensor, reset the service light with the following procedure:
For Gen 2 2007+ R56 Hatchbacks, 2008+ R55 CLUBMAN, and 2009+ R57 Convertibles
To enter the service Menu:
A. Insert Key
B. Do not press clutch / brake
C. Press Start button
D. Wait until the Car / revelant Service symbol disappears on the Rev counter display
E. Immediately after the symbol goes out - Press and hold Both buttons on the Rev Counter
F. Continue to hold - the system Will run a dash light check
G. Continue to hold
H. Display will then show VIN / Menu, - continue to hold through this until the time Reappears on the display.
I. Now release Only the Right hand Button (trip reset) for about a second, and then press and hold again (whilst still holding the LH button)
J. After another second of 2 the display will show the Front Brake Symbol You Are Now in the Service Menu:D
K. Use the BC Button (on indicator stalk) to scroll through to the relevant symbol - eg Rear Brakes
L. To Reset the warning indicator light - Press & Hold the BC Button at the revelant symbol until RESET appears - then press and hold again until the process is complete.
Turn Off and On the Ignition again - Warning should now have gone!
**********************
if the sensors are there but used, you'll get the worn pad warning almost immediately.
if the system resets, you're good to go and cost nothing
if the sensors are there but used, I'd jumper 'em then do the reset. How hard is it to check for pad wear?
You may to reset both ends - front and back have sep' reminders
6th Gear
Joined: Feb 2008
Posts: 2,358
Likes: 1
From: Graham, NC
fwiw, a little easier way to reset the service reminders:
1.Turn on vehicle without starting the engine.
2.Wait for vehicle to cycle through all checks.
3.Press and hold the trip odometer button for approximately 10 seconds (only takes about 4 seconds for me) until the service job displays in the LCD.
4.The upper display will show the service symbol, e.g. an oil can for oil change.
5.The lower display will indicate the time or distance remaining until the next service is due for that item.
6.Press the OBC button (on the end of the turn signal stalk) repeatedly to scroll through the service items.
7.When you are on the item you want to reset, press and hold the OBC button until “RESET” appears in the lower display. Once RESET appears, you can release the OBC button.
8.Press the OBC button again to reset the service shown.
One advantage that I have found to this method is that it does not reset the trip odometer.
I've found that different MINIs respond to one or other of those ways of resetting the service indicator. I'm not sure if its specific to model year or what. If one doesn't work, try the other.
Thread Starter
|
Neutral
Joined: Dec 2012
Posts: 9
Likes: 0
From: Edmonton, AB
is it also possible that OP replaced the pads AND the sensors but didn't reset the system. Why don't you try that b4 spending anything?
from MiniMania:
After replacing the worn sensor, reset the service light with the following procedure:
For Gen 2 2007+ R56 Hatchbacks, 2008+ R55 CLUBMAN, and 2009+ R57 Convertibles
To enter the service Menu:
A. Insert Key
B. Do not press clutch / brake
C. Press Start button
D. Wait until the Car / revelant Service symbol disappears on the Rev counter display
E. Immediately after the symbol goes out - Press and hold Both buttons on the Rev Counter
F. Continue to hold - the system Will run a dash light check
G. Continue to hold
H. Display will then show VIN / Menu, - continue to hold through this until the time Reappears on the display.
I. Now release Only the Right hand Button (trip reset) for about a second, and then press and hold again (whilst still holding the LH button)
J. After another second of 2 the display will show the Front Brake Symbol You Are Now in the Service Menu:D
K. Use the BC Button (on indicator stalk) to scroll through to the relevant symbol - eg Rear Brakes
L. To Reset the warning indicator light - Press & Hold the BC Button at the revelant symbol until RESET appears - then press and hold again until the process is complete.
Turn Off and On the Ignition again - Warning should now have gone!
**********************
if the sensors are there but used, you'll get the worn pad warning almost immediately.
if the system resets, you're good to go and cost nothing
if the sensors are there but used, I'd jumper 'em then do the reset. How hard is it to check for pad wear?
You may to reset both ends - front and back have sep' reminders
from MiniMania:
After replacing the worn sensor, reset the service light with the following procedure:
For Gen 2 2007+ R56 Hatchbacks, 2008+ R55 CLUBMAN, and 2009+ R57 Convertibles
To enter the service Menu:
A. Insert Key
B. Do not press clutch / brake
C. Press Start button
D. Wait until the Car / revelant Service symbol disappears on the Rev counter display
E. Immediately after the symbol goes out - Press and hold Both buttons on the Rev Counter
F. Continue to hold - the system Will run a dash light check
G. Continue to hold
H. Display will then show VIN / Menu, - continue to hold through this until the time Reappears on the display.
I. Now release Only the Right hand Button (trip reset) for about a second, and then press and hold again (whilst still holding the LH button)
J. After another second of 2 the display will show the Front Brake Symbol You Are Now in the Service Menu:D
K. Use the BC Button (on indicator stalk) to scroll through to the relevant symbol - eg Rear Brakes
L. To Reset the warning indicator light - Press & Hold the BC Button at the revelant symbol until RESET appears - then press and hold again until the process is complete.
Turn Off and On the Ignition again - Warning should now have gone!
**********************
if the sensors are there but used, you'll get the worn pad warning almost immediately.
if the system resets, you're good to go and cost nothing
if the sensors are there but used, I'd jumper 'em then do the reset. How hard is it to check for pad wear?
You may to reset both ends - front and back have sep' reminders
OVERDRIVE
Joined: Jul 2006
Posts: 7,037
Likes: 283
From: Melbourne, FL
if you do get the sensor out .... mine broke b4 I could get them out
a new sensor should have a clean black plastic tip. When this tip gets work off by the rotor, as the pad material gets thinner, it exposes a loop of wire that eventually get broken.
Here's the end of my sensor still in the worn pad and I'm circled the two tips of the wire, embedded in the plastic body of the sensor ...
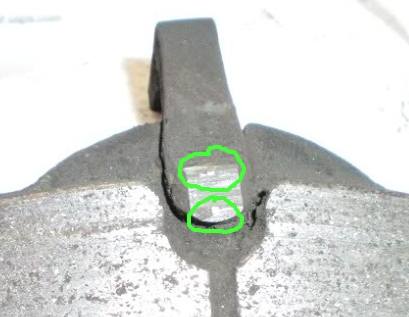
here's that sensor dissected from the side. The part that would come in contact with the rotor face is the bottom right.

a new sensor should have a clean black plastic tip. When this tip gets work off by the rotor, as the pad material gets thinner, it exposes a loop of wire that eventually get broken.
Here's the end of my sensor still in the worn pad and I'm circled the two tips of the wire, embedded in the plastic body of the sensor ...
here's that sensor dissected from the side. The part that would come in contact with the rotor face is the bottom right.
That's what happened to me with a sensor worn to stage 1, but not yet stage 2 and the red light. That was when I learnt the sensors were 2 stage. Changing the sensor allowed it to reset.

Thread
Thread Starter
Forum
Replies
Last Post
igzekyativ
MINIs & Minis for Sale
34
Jul 16, 2020 12:54 PM
squawSkiBum
MINI Parts for Sale
15
Oct 2, 2015 09:21 AM
Yazon
Tires, Wheels, & Brakes
11
Aug 27, 2015 04:41 PM