
Interior/Exterior Headliner DIY


Thread Starter
|
3rd Gear
Joined: Apr 2007
Posts: 286
Likes: 3
From: Danvers, MA
Headliner DIY
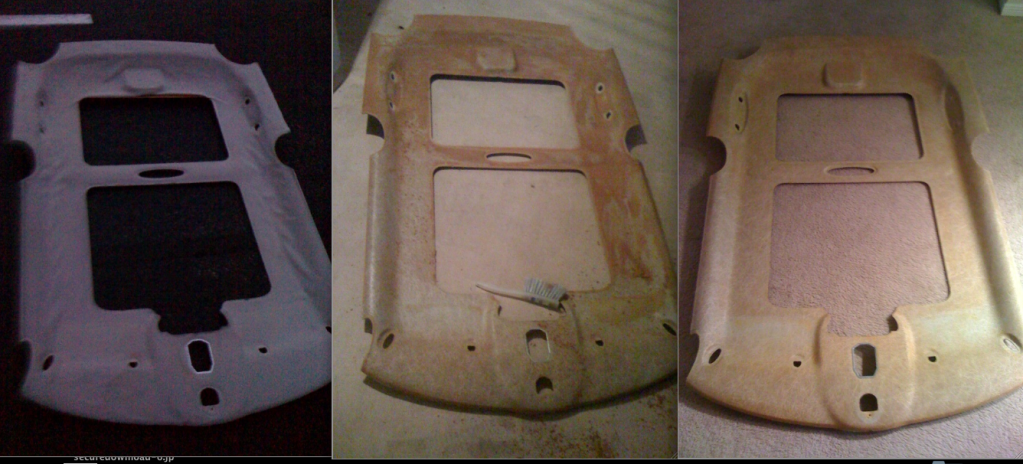
Im in the process of re-doing my 02' headliner since it started drooping down... since I dont see one, i'll probably do a DIY write up after i'm done  I was able to take down the headliner without fully taking off the pillars on the inside BTW.. lets see if I can put it back in that way too! there's gonna be a lot of pictures for this!! here's a couple of example pics of how to clean off your headliner anyhow.. but everything will be posted up soon!! whooot whoot
items needed:
*phillips screwdriver
*pliers
*flat head screw driver
*gloves
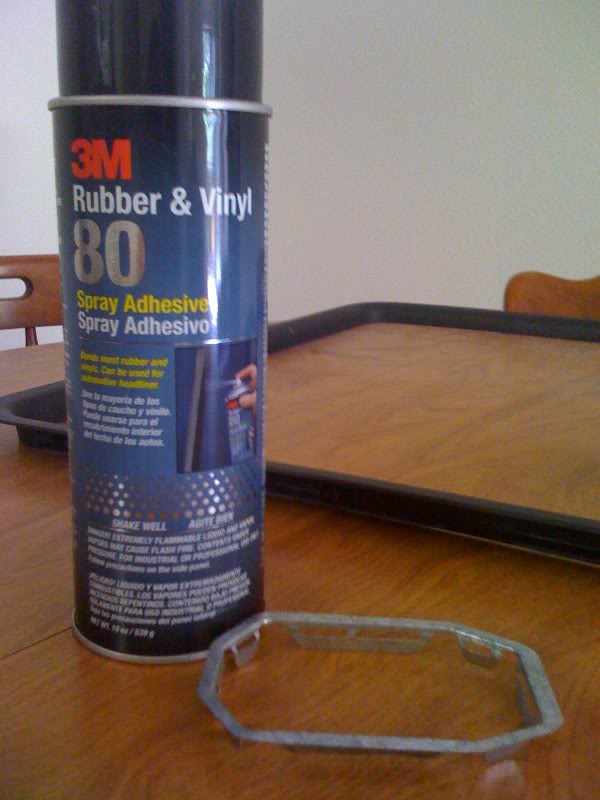
*adhesive spray (I used 3M- 80 adhesive spray) $10 from home depot
*2.15 yards of headliner fabric (from Joann's for $14.99 per yard, but used a 50% off coupon so it was only $16) (the farbic needs to be like 1.5 yds x 2.15 yds, however the width at joanns was already that wide so ::thumbs up:
*hand brush or something with bristles to scrape with (i need a brush for my dust pan thing, pic below)
*towel to wipe your sweat if u live in tx
Time:
1hr-2hrs to take off headliner
1-2 days for the headliner and new fabric to dry against each other
1hr+ to put it back in and attach everything back in order
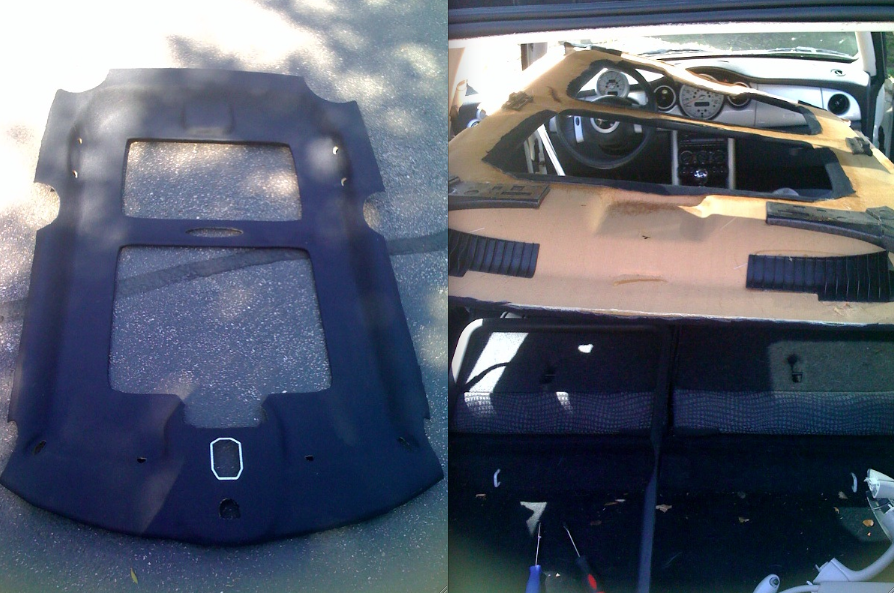
1.) First remove all the pieces in the roof, you can do so with a normal screw driver and unplug the electronics.
*for the visors, you'd have to basically dig in your flat head into the small crevasses to pop out the cover, then u can unscrew it.
* everything just basically pops off.
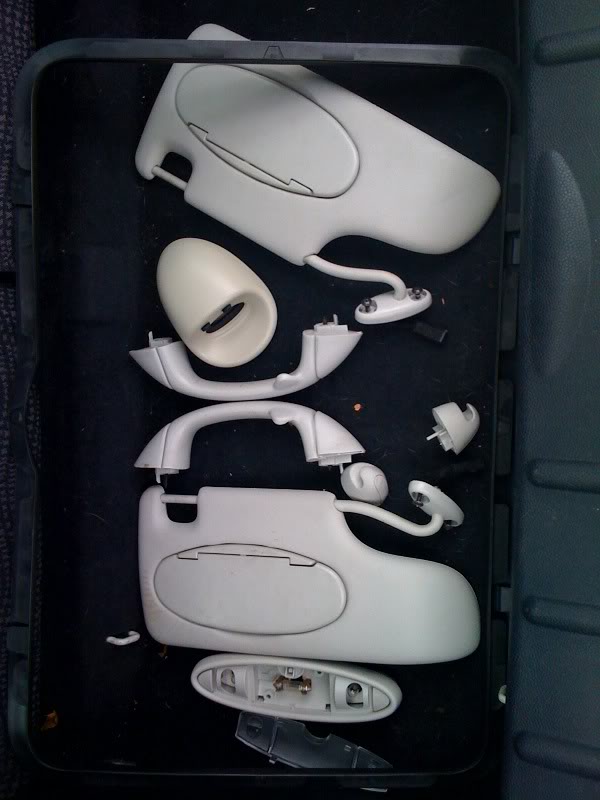
the rearview mirror you just twist it off. left loosey, righty tighty
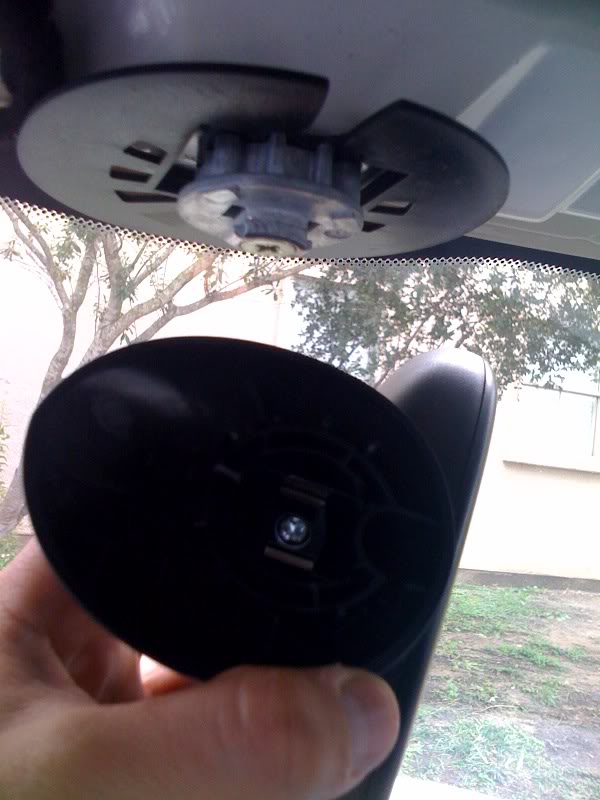
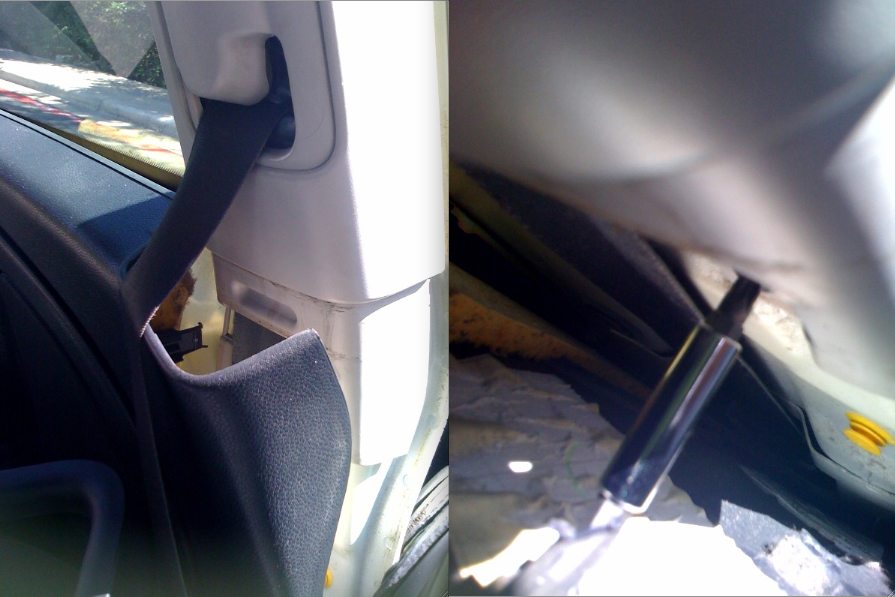
there's gonna be a small black plug by the rearview, and you have to pull it out with the pliers.. it'll look like this...
2.) Time to take unplug your pillars! 2 in front, 2 in the middle, and 2 in the back. they dont need to come all the way off (if you can do that, fantastic, but i didnt wanna buy more pillars so i just slightly took them off like the pics below, with some slight tugging)you have to remove the all black trimming around the trunk/door in order to get a grip on the plastic to yank it out just enough to get the headliner off. I started in the back pillars first. You don't have to undo the bottom trim panel (should be the black/grey colored part)
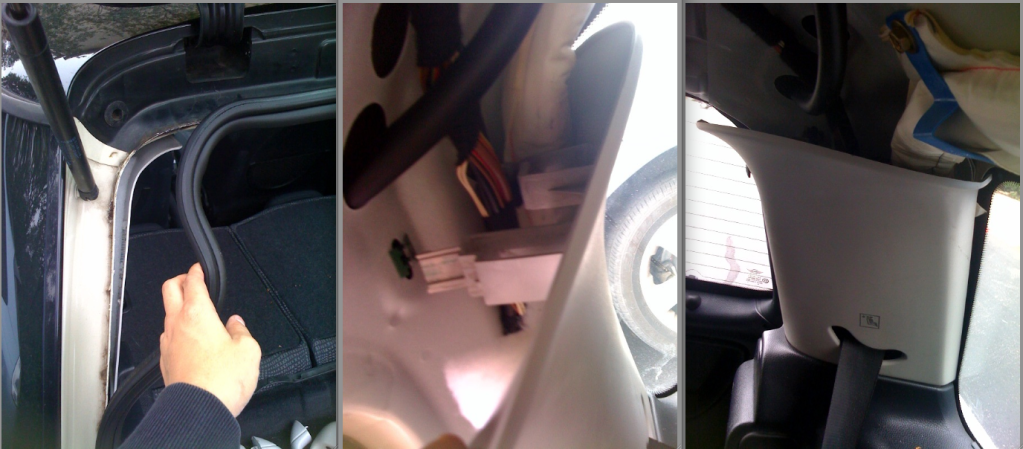
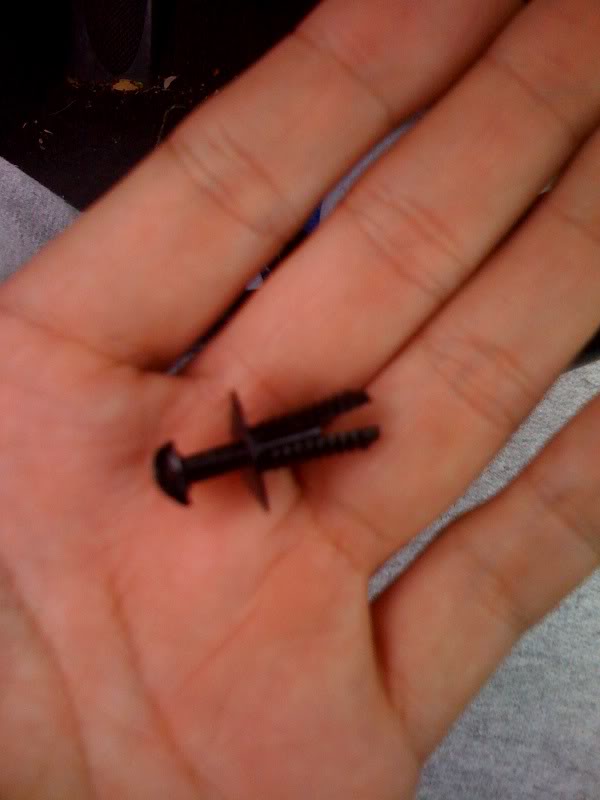
then i did the sides where the seat belts are. Remember, pull off the black rubber trim around the door (do not pull all the way off, just leave it hanging), then you have to undo the bottom trim panel, then pop out the pillars. If you separate the pillar from the bottom, there's a screw u can unscrew, if u have a small enough phillips or if u just have like a screw bit to manually unscrew it like I did (pic below), after you pop the pillars out, you have pull the pillar downward to unhook them from the metal hooks. (as u see in the pics)
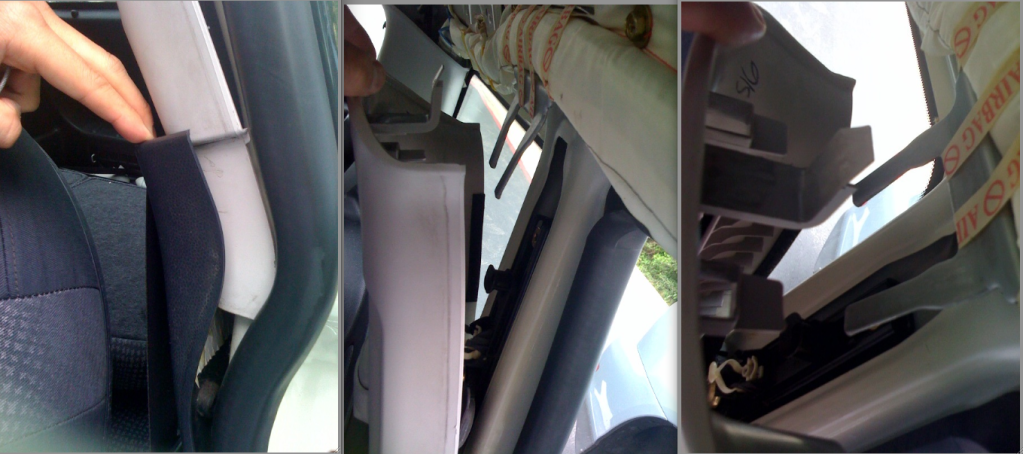
On the front pillars, before i took it off, i undid the battery, cus for some reason, i was scared that the airbag would deflate, so that's just my pre-caution. Maybe a good idea.
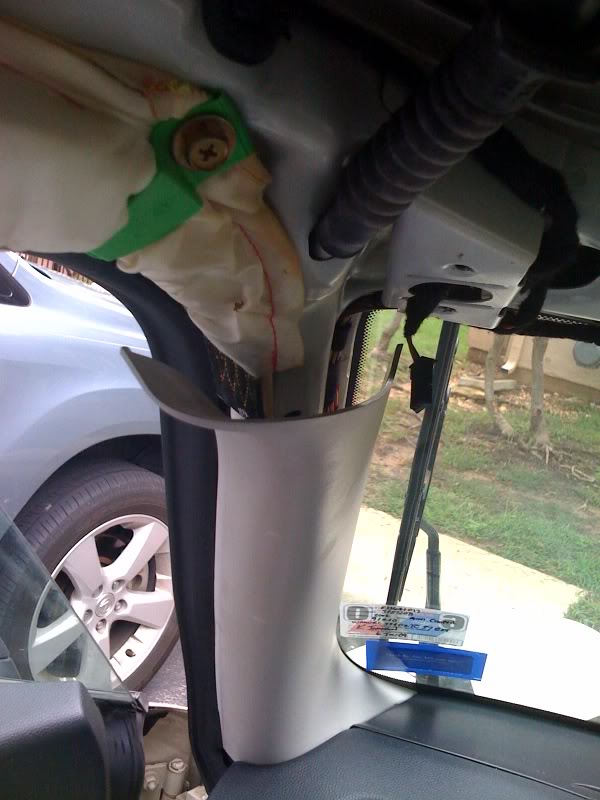
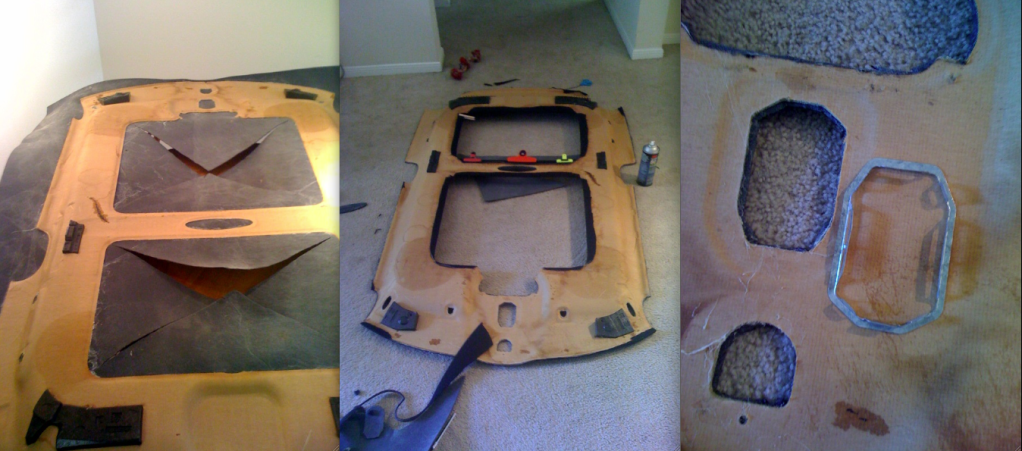
3.) After you do that, you'll be able to pull the headliner off, please be careful and treat the headliner as if it is a cardboard... cussss it practically is. Pull it out through the trunk/boot at a diagonal.
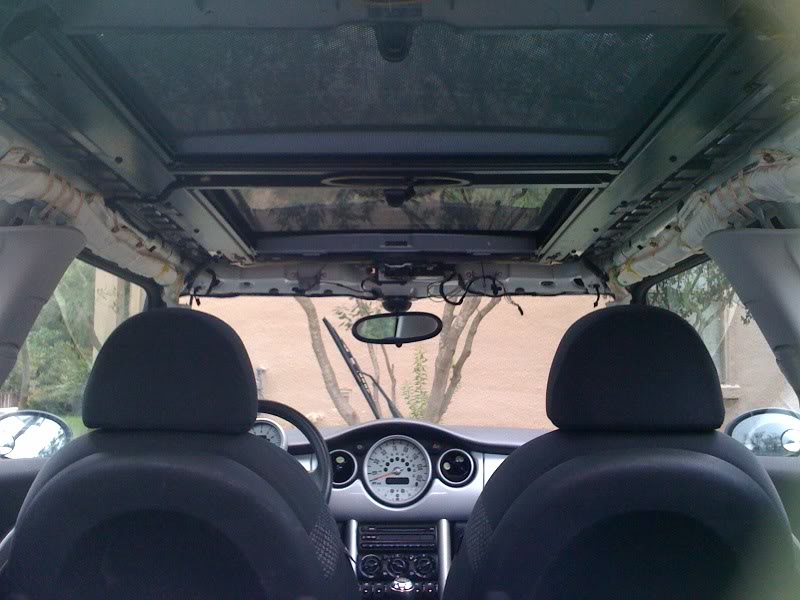
4.) You will peel off the existing fabric, and it will leave this old rusty color foam particles.
Put your gloves on while trying to dust/scrape off all that foam part, otherwise u'd have some itchy hands like mines *itch, itch*
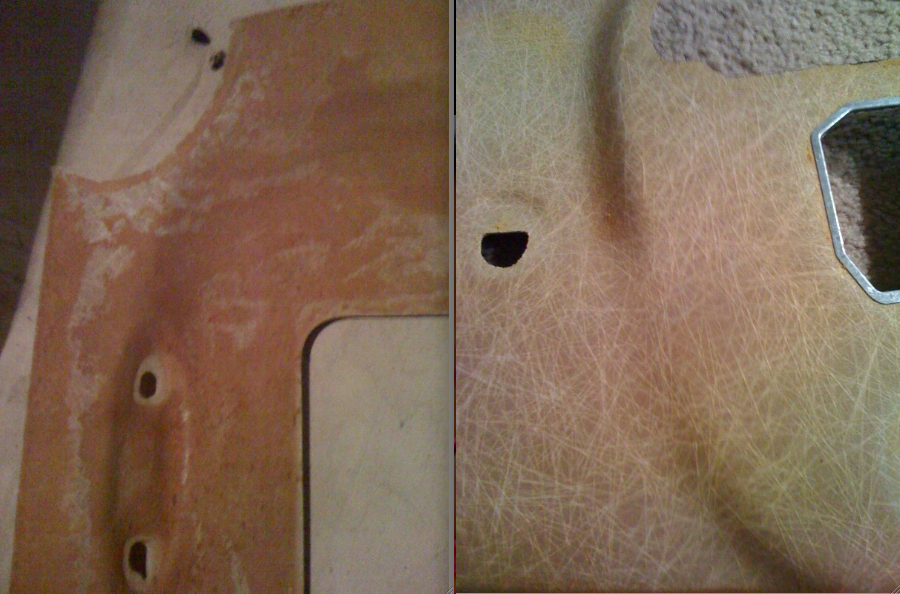
You need to basically scrape it ALL off to where u can see the fibers in the headliner.. pic below. After scraping that off, take the metal piece off the front of the ceiling piece.
5.) get your adhesive spray (I used 3M spray adhesive 80 rubber/vinyl.. it said it's for headliners so that's what I used.) spray the back of your fabric, as well as the headliner cardboard piece, and let it dry for like 4 minutes.. or so.. after it dries.. then you can put the fabric on the ceiling piece, but it WILL NOT STICK, you'll have to spray the ceiling piece and part-by-part make the fabric stick to the ceiling piece.. you'll have to hold the fabric and the ceiling piece together for a good like 30 seconds or so before moving on, because once it's bonded, it will not come apart! I used clamps like those potato chip bag clamps for edges. (look in the pics) after everything's on there good, start your cutting (I used scissors and a razor for the small holes), and I also had extra flap on the sun room openings so it wraps around and make a stronger hold on the fabric. (look in the pics)
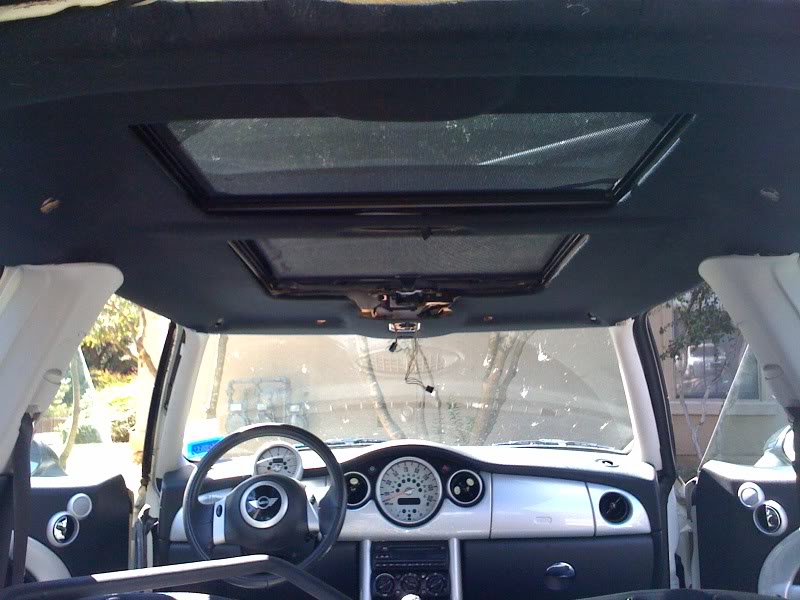
5.) time to put this beast back into the mini.. (this is the scary part if your'e squeezing it in) I put it in at a diagonal (and I had to pull the seat all the way in the upfront position, then after I got the ceiling in halfway, I put them back in the reclining position. and it eventually got in. hard part number one done.. hard part number two starts for those that didn't take off the pillars, like me! lol you'd have to force it to go above the pillars.. and that's pretty much everything. put everything back,a and you're good togo!
thecar make have a stench of adhesive spray for the first couple days, but other than that, u save yourself $250 for headliner job, and spent under $30 in supplies. I tried to do the leather, but with the curves, going IN, it would have a lot of wrinkles, so I just used the normal black cloth headliner fabric. *shrugs, looks goooooood! whooot whooot, my first headliner job.. Passed!
I was able to take down the headliner without fully taking off the pillars on the inside BTW.. lets see if I can put it back in that way too! there's gonna be a lot of pictures for this!! here's a couple of example pics of how to clean off your headliner anyhow.. but everything will be posted up soon!! whooot whootitems needed:
*phillips screwdriver
*pliers
*flat head screw driver
*gloves
*adhesive spray (I used 3M- 80 adhesive spray) $10 from home depot
*2.15 yards of headliner fabric (from Joann's for $14.99 per yard, but used a 50% off coupon so it was only $16) (the farbic needs to be like 1.5 yds x 2.15 yds, however the width at joanns was already that wide so ::thumbs up:
*hand brush or something with bristles to scrape with (i need a brush for my dust pan thing, pic below)
*towel to wipe your sweat if u live in tx
Time:
1hr-2hrs to take off headliner
1-2 days for the headliner and new fabric to dry against each other
1hr+ to put it back in and attach everything back in order
1.) First remove all the pieces in the roof, you can do so with a normal screw driver and unplug the electronics.
*for the visors, you'd have to basically dig in your flat head into the small crevasses to pop out the cover, then u can unscrew it.
* everything just basically pops off.
the rearview mirror you just twist it off. left loosey, righty tighty
there's gonna be a small black plug by the rearview, and you have to pull it out with the pliers.. it'll look like this...
2.) Time to take unplug your pillars! 2 in front, 2 in the middle, and 2 in the back. they dont need to come all the way off (if you can do that, fantastic, but i didnt wanna buy more pillars so i just slightly took them off like the pics below, with some slight tugging)you have to remove the all black trimming around the trunk/door in order to get a grip on the plastic to yank it out just enough to get the headliner off. I started in the back pillars first. You don't have to undo the bottom trim panel (should be the black/grey colored part)
then i did the sides where the seat belts are. Remember, pull off the black rubber trim around the door (do not pull all the way off, just leave it hanging), then you have to undo the bottom trim panel, then pop out the pillars. If you separate the pillar from the bottom, there's a screw u can unscrew, if u have a small enough phillips or if u just have like a screw bit to manually unscrew it like I did (pic below), after you pop the pillars out, you have pull the pillar downward to unhook them from the metal hooks. (as u see in the pics)
On the front pillars, before i took it off, i undid the battery, cus for some reason, i was scared that the airbag would deflate, so that's just my pre-caution. Maybe a good idea.
3.) After you do that, you'll be able to pull the headliner off, please be careful and treat the headliner as if it is a cardboard... cussss it practically is.
Pull it out through the trunk/boot at a diagonal.4.) You will peel off the existing fabric, and it will leave this old rusty color foam particles.
Put your gloves on while trying to dust/scrape off all that foam part, otherwise u'd have some itchy hands like mines *itch, itch*
You need to basically scrape it ALL off to where u can see the fibers in the headliner.. pic below. After scraping that off, take the metal piece off the front of the ceiling piece.
5.) get your adhesive spray (I used 3M spray adhesive 80 rubber/vinyl.. it said it's for headliners so that's what I used.) spray the back of your fabric, as well as the headliner cardboard piece, and let it dry for like 4 minutes.. or so.. after it dries.. then you can put the fabric on the ceiling piece, but it WILL NOT STICK, you'll have to spray the ceiling piece and part-by-part make the fabric stick to the ceiling piece.. you'll have to hold the fabric and the ceiling piece together for a good like 30 seconds or so before moving on, because once it's bonded, it will not come apart! I used clamps like those potato chip bag clamps for edges. (look in the pics) after everything's on there good, start your cutting (I used scissors and a razor for the small holes), and I also had extra flap on the sun room openings so it wraps around and make a stronger hold on the fabric. (look in the pics)
5.) time to put this beast back into the mini.. (this is the scary part if your'e squeezing it in) I put it in at a diagonal (and I had to pull the seat all the way in the upfront position, then after I got the ceiling in halfway, I put them back in the reclining position. and it eventually got in. hard part number one done.. hard part number two starts for those that didn't take off the pillars, like me! lol you'd have to force it to go above the pillars.. and that's pretty much everything. put everything back,a and you're good togo!
thecar make have a stench of adhesive spray for the first couple days, but other than that, u save yourself $250 for headliner job, and spent under $30 in supplies. I tried to do the leather, but with the curves, going IN, it would have a lot of wrinkles, so I just used the normal black cloth headliner fabric. *shrugs, looks goooooood! whooot whooot, my first headliner job.. Passed!
Last edited by mrgentleminh; Oct 19, 2009 at 08:19 AM. Reason: editing


I did mine on my 03'
Taking it out was easy and so was putting it back in. I just pulled the weather stripping off and then pulled the tops of the pillars down enough to break free the first set of clips. It give's you enough room to slide it out from the rear and put it back on as well. You will have to bend it a little on the rear pillar (either side) that way it can slide out! Make sure you scrap the glue off all the way! The hardest part was making my new fabric fit because since the headliner is rounded you have to cut some fabric out (triangle shaped) and then match the ends together. But it wasn't too bad. I bought super 3m headliner adhesive from home depot and fabric from Hobby Lobby! Good luck!
https://www.northamericanmotoring.co...headliner.html
Last edited by GumbyLara; Oct 5, 2009 at 12:26 PM.
 (I got her to buy a mini btw..) so did u take your pillars all the way off (did they break?)

Thread Starter
|
3rd Gear
Joined: Apr 2007
Posts: 286
Likes: 3
From: Danvers, MA
well i slightly squeezed the sides together, carefully and got it out.. it'll go in the same way.. i'll take more pictures of it to show soon
Last edited by mrgentleminh; Oct 6, 2009 at 10:24 AM. Reason: editing
Trending Topics

How much fabric/leather did you need to do the entire headliner? I'm interested in doing mine in black speaker cloth of all things, I like the look of it plus it goes with my custom black and red interior. Thanks in advance.
Thread Starter
|
3rd Gear
Joined: Apr 2007
Posts: 286
Likes: 3
From: Danvers, MA
the fabric at joann's fabric was already wide enough (about 1.5 yds), but you'll need about 2.15 yards of the fabric. like gumby said.. (I bought 2 yrds and now im missing about 1/2 inch of fabric in the back... ughhh but fixed it with extra slack and still looks gooood!

3rd Gear

Joined: Jun 2006
Posts: 171
Likes: 2
From: Chester VA
Thanks for the write up and tips everyone. I will be tackling this in the next few weeks. One headliner shop quoted me $350, $400 for a sunroof. Another told me he could not give me a price until he saw my MINI. Screw them. I'll do it myself for under $40. I already have the adhesive, now all I need is the headliner material.

3rd Gear
Joined: Nov 2011
Posts: 203
Likes: 0
From: South Jersey
Great write-up! Once again, the score is Bentley Manual 1, NAM poster 100. I'm going to take my headliner off to chase down some noises and snug it all up with felt tape and second-skin (as much as is possible given the small amount of exposed metal). This is encouraging - thanks!


3rd Gear
Joined: Jun 2006
Posts: 171
Likes: 2
From: Chester VA
Just tackiling this project today on my 03 MCS. The headliner had been coming loose for at least 3 years and I did not want to pay $350+ to have it done . $20 for the fabric plus $11 for a can of headliner/carpet spray and I am in like Flynn. Thanks for the write up and pics on doing this.
. $20 for the fabric plus $11 for a can of headliner/carpet spray and I am in like Flynn. Thanks for the write up and pics on doing this.

1st Gear
Joined: May 2011
Posts: 13
Likes: 0
I am also doing my headliner over. As far as taking everything off it was going good until I came to the handrails in the rear. I can't seem to get them off. It should have just "popped off" like the description said and I used a good amount of force but they won't come off. Don't want to break anything

3rd Gear
Joined: Oct 2006
Posts: 239
Likes: 0
Sorry, I was wondering what type of matering you guys is using for the headliner? I mean is it cotton, etc? In my country its kinda hard to find as they didn't specific whether it is suitable for headliner or not sigh.
Another thing is, did u guys stick the foam/sponge first than only the fabric? I notice the OEM one they have a thin layer of foam/sponge first than the fabric and when you touch/press you can feel it is spongy.
Thank you
Another thing is, did u guys stick the foam/sponge first than only the fabric? I notice the OEM one they have a thin layer of foam/sponge first than the fabric and when you touch/press you can feel it is spongy.
Thank you


4th Gear
Joined: Feb 2012
Posts: 334
Likes: 0
I was thinking the same thing, I see ppl say "headliner material"
but has anyone had success using other types of material?
I found some nice black denim style material that would be perfect for hiding imperfections/dust, but isn't as thick as the foamy oem stuff.
but has anyone had success using other types of material?
I found some nice black denim style material that would be perfect for hiding imperfections/dust, but isn't as thick as the foamy oem stuff.
Sorry, I was wondering what type of matering you guys is using for the headliner? I mean is it cotton, etc? In my country its kinda hard to find as they didn't specific whether it is suitable for headliner or not sigh.
Another thing is, did u guys stick the foam/sponge first than only the fabric? I notice the OEM one they have a thin layer of foam/sponge first than the fabric and when you touch/press you can feel it is spongy.
Thank you
Another thing is, did u guys stick the foam/sponge first than only the fabric? I notice the OEM one they have a thin layer of foam/sponge first than the fabric and when you touch/press you can feel it is spongy.
Thank you