
How To Electrical :: AutoMeter Boost Gauge Install


Thread Starter
|
6th Gear
Joined: Dec 2003
Posts: 1,805
Likes: 30
From: Quebec City, Qc
Here's a quick picture to show where the screws that hold the speedometer console. There's also that dimmer wire behing it, connected to the dimmer button.
Just remove the 2 surrounding moldings around the dimmer button and the hazard button in order to remove that part.

Just remove the 2 surrounding moldings around the dimmer button and the hazard button in order to remove that part.
Thread Starter
|
6th Gear
Joined: Dec 2003
Posts: 1,805
Likes: 30
From: Quebec City, Qc
Last Friday, I've seen Bahamabart's custom bracket for a VDO gauge and it looks great! It's a little more "involving" job than buying an AutoMeter kit, but it is still "do-able" for anyone that wants a different gauge brand!

Originally Posted by DarkMiniCooperS
Last Friday, I've seen Bahamabart's custom bracket for a VDO gauge and it looks great! It's a little more "involving" job than buying an AutoMeter kit, but it is still "do-able" for anyone that wants a different gauge brand!
Either way you go - you can easily add a boost guage to your MINI bringing boost entertainment to the cockpit.
6th Gear
Joined: Feb 2006
Posts: 2,398
Likes: 0
From: Cincinnati, Ohio
I was thinking of doing this...but had a question.
I have to buy a bulb for the gauge?
How many do I buy, and how do I put them in, and where do I put them in at?
BTW: I was thinking of this one: http://store.summitracing.com/partde...5&autoview=sku
And is there anyway to mount to on the right side? I'd like to add another gauge on the left side later on, but I want the boost gauge on the right so I can see it.
Edit* After reading more, I figured out I can buy the "extended" bracket, but where can I buy that? Also, what is the dimension of the tubing I need, so I can pick up some.
Thanks!
-Cody
Peter of MyMini had always liked the guage bracket I had fabricated out of an extended bracket. Peter has fabricated his own MyMini single guage bracket (made out of steel and painted blank).
These aren't even posted yet on his website www.myminiparts.com.
The bracket is designed to accept an autometer cup and he is offering them for $15 bucks. While modding the extended bracket is a fun project, when you add up the bracket and paint - $15 bucks isn't bad at all.
worth considering and stays true to the $70 guage.
take a look -
Originally Posted by JoeCool
The bracket looks nice. Do you know if Peter will be selling the bracket with an appropriately sized screw to fix the bracket onto the tach?
Since I only used 1 screw, I supplemented it with double stick tape. I recently used some of the 3M tape and I bet that stuff would afix it to the tach alone just fine. The stuff really sticks.
If anyone is interested in this - you gotta call Peter since its not even on the website to get one (code word is "bahamabart"
 ).
).
Originally Posted by polizei
So the bracket comes like that for $15, then I also have to buy the mounting cup, correct?
-Cody
-Cody
This thread has covered two approaches using the bracket that comes with the guage cup or modding an extended bracket. The extended bracket which costs like $5 bucks requires a little fabrication and then painting which this bracket eliminates. You still have to drill a hole in the bracket to attach to the tach based on location. Ths bracket is generic so it requires fitment based on where you want the guage.
So this bracket is additional to the guage and the cup but I think it gives you a little more flexibility when mounting a guage. In particular the ring that goes around the cup ends up in the middle as opposed to using the little bracket that comnes with the pod, the ring ends farther back. You also get some left right angle justment for that cockpit view.
Up til now any guage holders has been high end like alta, promini and others. Each gorgeous - some out of billet aluminum.
This bracket is for the budget enthusiasts who wants a Mini project by adding an autometer guage to the cockpit. Again designed to take an autometer cup! The placement is your choice and you decide on how to attach to the tach pod.


Originally Posted by ada722
Will this bracket work for those of us with chrono or nav packs?
From here its your imagination - 1 bracket, 2 brackets, 9 o'clock position, 8 o'clock position, 3 o'clock position, ............
Thread Starter
|
6th Gear
Joined: Dec 2003
Posts: 1,805
Likes: 30
From: Quebec City, Qc
Originally Posted by ncirillo31
i have a jcw recommended boost guage and where to get it??
Thanks Bart for the link to the bracket. I received 2-3 PM lately about it


4th Gear
Joined: Jun 2005
Posts: 436
Likes: 0
From: Northern VA
I noticed a problem with the one I installed some monthes ago, the boost reading was slowly getting lower and lower until finally there was no reading at all, the needle stayed at 0 psi.
Pulled apart the intercooler yesterday and like I figured, the hose had come off the fuel regulator. I put the hose back on but it would just slip right off. I ended up using electrical tape to keep it up and it reads normal now
Pulled apart the intercooler yesterday and like I figured, the hose had come off the fuel regulator. I put the hose back on but it would just slip right off. I ended up using electrical tape to keep it up and it reads normal now

Originally Posted by duglas
well... I ordered my gauge and cup from Summit and I ordered the bracket from myminiparts.com... it is on there site now, it was like $21 shipped though....
1) the holes in the bracket are just there - you will want to drill "the" hole. in my case I wanted my guage to be in the 7-8 o'clock position. As you can see I did not get it exactly where i wanted it the first time.
But this is the beauty of the bracket in the sense that you "customize" the fit and location.

2) adding a curve to the bracket just ties it all in to the tach and allows for the double stick tape.

have fun

Coordinator :: Manitoba MINI Motoring Club
Joined: Nov 2005
Posts: 284
Likes: 0
From: Winnipeg, MB
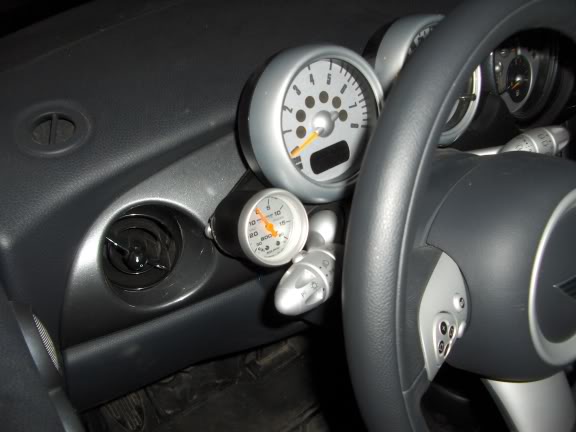
Just to add to this thread for people with the Chrono dash, I used the smaller (2 1/16th") Auto-meter boost gauge. I did not use the mounting cup at all but instead I used a 2" wide piece of flat aluminum and drilled holes to bolt the gauge directly to it. I painted the aluminum piece and the gauge flat black (except for the part where I needed two sided sticky tape) and using sticky tape, I just stuck it to the back of the Chrono gauges-it works and looks awesome. No holes drilled in the car and no messing with weird bolts or screws. I followed the directions on this thread for where to attach the hose and the electrical, it was all easy and I didn't scrape any knuckles and got the right wire on the first try. Here's pics:


5th Gear
Joined: Dec 2004
Posts: 950
Likes: 0
From: Sweden
I installed this Saturday when I did my 15% pulley and it was a really straightforward install, no problems. You had to wiggle the IC quite a bit though to get it off, but then again I might not have done it correctly.
I'm now boosting 1 BAR.
Do you guys also have a special sound when boost gauge is pointing inside that box on the gauge, the 0?
I'm now boosting 1 BAR.
Do you guys also have a special sound when boost gauge is pointing inside that box on the gauge, the 0?

2nd Gear
Joined: Dec 2005
Posts: 89
Likes: 0
From: Winnipeg
Originally Posted by fj0
I installed this Saturday when I did my 15% pulley and it was a really straightforward install, no problems. You had to wiggle the IC quite a bit though to get it off, but then again I might not have done it correctly.
I'm now boosting 1 BAR.
Do you guys also have a special sound when boost gauge is pointing inside that box on the gauge, the 0?
I'm now boosting 1 BAR.
Do you guys also have a special sound when boost gauge is pointing inside that box on the gauge, the 0?

6th Gear
Joined: Dec 2002
Posts: 1,172
Likes: 1
From: Wisconsin
Did this boost gauge install a while ago with the directions posted and im still staring at the gauge. 
What fun. With the -15%/ + 2% crank and MTH tuner I hit ~16 psi at redline.
I wonder what the additional "whisker" of psi gives me in terms of power...likely not much...still fun all the same.
This is a great Mod
What fun.
With the -15%/ + 2% crank and MTH tuner I hit ~16 psi at redline.I wonder what the additional "whisker" of psi gives me in terms of power...likely not much...still fun all the same.
This is a great Mod
5th Gear
Joined: Dec 2004
Posts: 950
Likes: 0
From: Sweden
Originally Posted by TwOMINIs
Did this boost gauge install a while ago with the directions posted and im still staring at the gauge.
What fun. With the -15%/ + 2% crank and MTH tuner I hit ~16 psi at redline.
I wonder what the additional "whisker" of psi gives me in terms of power...likely not much...still fun all the same.
This is a great Mod
What fun.
With the -15%/ + 2% crank and MTH tuner I hit ~16 psi at redline.I wonder what the additional "whisker" of psi gives me in terms of power...likely not much...still fun all the same.
This is a great Mod