
How To Electrical :: AutoMeter Boost Gauge Install


Thread Starter
|
6th Gear
Joined: Dec 2003
Posts: 1,805
Likes: 30
From: Quebec City, Qc
Electrical :: AutoMeter Boost Gauge Install
Hi motorers!
Since I posted my boost gauge about 5 months ago, I receive at least 2 PM per week, so I though it might be a good idea to share the details to everybody!
The AutoMeter gauge and mounting cup come to under 70$us, with everything needed to plug it. and it matches the MINI gauges so well, it looks like it came from MINI factory!
Here are the part numbers and stuff you'll need :
**IMPORTANT NOTE : I used a 2"5/8 diameter gauge because I liked the way it would look with big MINI gauges. Someone bought a smaller gauge and mounting cup, and it didn't fit bolt-on behind the tach, so be aware that the 2"5/8 fits bolt-on, but smaller gauge might not!**
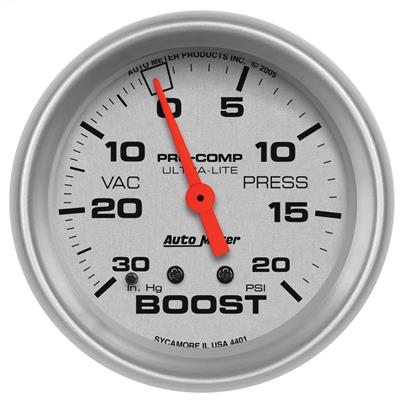
Boost/vacuum gauge (good for stock or pulley'd car since the boost limit is 20psi and the MCS engine reaches vacuum of 25-26hg-in) : ATM-4401 -- 49.88$us
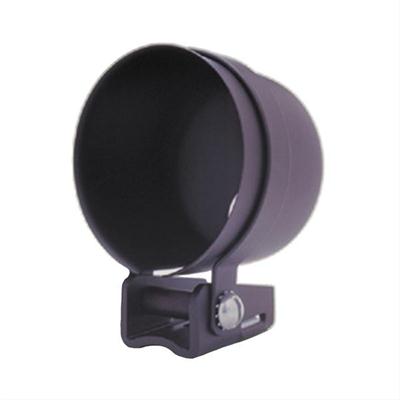
Mounting cup : ATM-3204 -- 13.88$us (the last 2 installs I made, the owners bought this mounting cup, but the hole was under (not behind) the mounting cup... It's not a big deal, you just have to drill a hole behind it to get the vacuum hose through the cup... so get your drill ready lol)
Extra vaccum hose from any local auto parts stores -- diameter is 5/32" Inside Diameter (5/16" Outside Diameter) -- about 1 feet long, to leave room for mistakes! -- 2-3$us
Orange light bulb, available at your local auto parts store, using the Autometer bulb, you can find it very easily! -- under 1$us/bulb
The mounting cup fits right behing the tach using a longer screw. No hole to drill, and no mod required to the tach! I had a bunch of screws at my place, and got the right one after two tries. Then I cut it the lenght I needed and voila!
Here are some pictures :
night shot:

day shot with lights on:

day view:

side view: (note that I painted the screw in black to match... see next picture!)

view from behind: (with screw painted black)

under the intercooler view:
!!CLICK HERE FOR FOR INSTALL WITHOUT VACUUM GAIN SYSTEM (VGS)!!

To install the hose, you need to remove the intercooler, which is pretty easy! Simply remove the screws on the clamps, and slide it to the left side (when facing the car). A little force is required to remove and reinstall the intercooler, but nothing very complicated!
Once the intercooler is removed, you can access the fuel pressure regulator, between cylinder 2 and 3. Under it, there is a hose that you can disconnect. Simply connect it to the "T" fitting included with the gauge, and use the extra vaccum you bouhgt to connect the "T" fitting to the fuel pressure regulator. The other end of the "T" fitting will be connected to the boost gauge, which includes the vacuum hose needed. You can now re-install the intercooler.
The vacuum hose that connects to the boost gauge need to be run through the car's firewall's rubber seal. (near the air intake box). Use a screwdriver to punch a hole in it, and run the hose under the dash to the gauge.
**Just a quick tip to run the hose from the inside to the engine bay...
When standing in front of your MINI, look behind the intake airbox, just a bit to the left of it, and you'll see a big red wire coming through the firewall... That's the positive wire going to the battery. Take a long screwdriver and punch a hole through that gommet. You'll see the screwdriver from under the dashboard and be able to attach the vacuum hose to it... Now just pull slowly the screwdriver from the engine bay and you'll get the hose through in no time! **
To install the boost gauge mounting cup, you need to remove the tach, which is pretty easy! For security, unplug your battery. And remove the 2 screws holding the tach to the steering column. Then, unplug the connector behind it.
You can get electric power from many places... I chose to get the power from my heat seat switch, because the gauge would be dimming and light with my car's headlights. Just like a stock gauge! The negative wire can be connected to any screw under the dash. (that touches metal surface)
And voila! you've got your boost gauge installed and working for less than 70$us. And it matches so well the MINI gauges!
Feel free to add any useful infos !
--> Update : Don't try to install the gauge on the right side of the tach. The Autometer bracket will scratch your dashboard. On the left side, it fits great! I can still adjust my steering wheel's tilt. <--
--> 2nd update! I've installed a friend's boost gauge on the Chrono Pack kit (speedo/tach on the steering wheel column) and it fits right behind the tach's screw... So people with Chrono Pack or Navi can also do this mod!
Since I posted my boost gauge about 5 months ago, I receive at least 2 PM per week, so I though it might be a good idea to share the details to everybody!
The AutoMeter gauge and mounting cup come to under 70$us, with everything needed to plug it. and it matches the MINI gauges so well, it looks like it came from MINI factory!
Here are the part numbers and stuff you'll need :
**IMPORTANT NOTE : I used a 2"5/8 diameter gauge because I liked the way it would look with big MINI gauges. Someone bought a smaller gauge and mounting cup, and it didn't fit bolt-on behind the tach, so be aware that the 2"5/8 fits bolt-on, but smaller gauge might not!**
Boost/vacuum gauge (good for stock or pulley'd car since the boost limit is 20psi and the MCS engine reaches vacuum of 25-26hg-in) : ATM-4401 -- 49.88$us
Mounting cup : ATM-3204 -- 13.88$us (the last 2 installs I made, the owners bought this mounting cup, but the hole was under (not behind) the mounting cup... It's not a big deal, you just have to drill a hole behind it to get the vacuum hose through the cup... so get your drill ready lol)
Extra vaccum hose from any local auto parts stores -- diameter is 5/32" Inside Diameter (5/16" Outside Diameter) -- about 1 feet long, to leave room for mistakes! -- 2-3$us
Orange light bulb, available at your local auto parts store, using the Autometer bulb, you can find it very easily! -- under 1$us/bulb
The mounting cup fits right behing the tach using a longer screw. No hole to drill, and no mod required to the tach! I had a bunch of screws at my place, and got the right one after two tries. Then I cut it the lenght I needed and voila!
Here are some pictures :
night shot:
day shot with lights on:
day view:
side view: (note that I painted the screw in black to match... see next picture!)
view from behind: (with screw painted black)
under the intercooler view:
!!CLICK HERE FOR FOR INSTALL WITHOUT VACUUM GAIN SYSTEM (VGS)!!
To install the hose, you need to remove the intercooler, which is pretty easy! Simply remove the screws on the clamps, and slide it to the left side (when facing the car). A little force is required to remove and reinstall the intercooler, but nothing very complicated!
Once the intercooler is removed, you can access the fuel pressure regulator, between cylinder 2 and 3. Under it, there is a hose that you can disconnect. Simply connect it to the "T" fitting included with the gauge, and use the extra vaccum you bouhgt to connect the "T" fitting to the fuel pressure regulator. The other end of the "T" fitting will be connected to the boost gauge, which includes the vacuum hose needed. You can now re-install the intercooler.
The vacuum hose that connects to the boost gauge need to be run through the car's firewall's rubber seal. (near the air intake box). Use a screwdriver to punch a hole in it, and run the hose under the dash to the gauge.
**Just a quick tip to run the hose from the inside to the engine bay...
When standing in front of your MINI, look behind the intake airbox, just a bit to the left of it, and you'll see a big red wire coming through the firewall... That's the positive wire going to the battery. Take a long screwdriver and punch a hole through that gommet. You'll see the screwdriver from under the dashboard and be able to attach the vacuum hose to it... Now just pull slowly the screwdriver from the engine bay and you'll get the hose through in no time! **
To install the boost gauge mounting cup, you need to remove the tach, which is pretty easy! For security, unplug your battery. And remove the 2 screws holding the tach to the steering column. Then, unplug the connector behind it.
You can get electric power from many places... I chose to get the power from my heat seat switch, because the gauge would be dimming and light with my car's headlights. Just like a stock gauge!
The negative wire can be connected to any screw under the dash. (that touches metal surface)And voila! you've got your boost gauge installed and working for less than 70$us. And it matches so well the MINI gauges!
Feel free to add any useful infos !
--> Update : Don't try to install the gauge on the right side of the tach. The Autometer bracket will scratch your dashboard. On the left side, it fits great! I can still adjust my steering wheel's tilt. <--
--> 2nd update! I've installed a friend's boost gauge on the Chrono Pack kit (speedo/tach on the steering wheel column) and it fits right behind the tach's screw... So people with Chrono Pack or Navi can also do this mod!
Thread Starter
|
6th Gear
Joined: Dec 2003
Posts: 1,805
Likes: 30
From: Quebec City, Qc
SPECIAL NOTE!
I'm running Andy's VGS too, so here is the detailed pics about the hoses:
** See post # 7 in this thread for a much clearer shot of the hoses installation! **

1 - the fuel pressure regulator hose that needs to be connected to one end of the "T" fitting
2 - the boost gauge's hose that runs from the engine bay (another end of the "T" fitting") to the boost gauge
3 - a VGS hose that is not needed for gauge's install ( for those without VGS)
4 - the extra hose you bought that connects the "T" fitting to the fuel pressure regulator
5 - VGS hose (not needed for those without VGS mod) that connects to the supercharger's bypass valve.
I hope this clears things up!
Also here is the rubber "seal" that you need to punch a hole through:
location:

Larger view of it: (shot taken from the inside of the car. Look for that big red wire under the bonnet to easily spot the gommet)

I'm running Andy's VGS too, so here is the detailed pics about the hoses:
** See post # 7 in this thread for a much clearer shot of the hoses installation! **
1 - the fuel pressure regulator hose that needs to be connected to one end of the "T" fitting
2 - the boost gauge's hose that runs from the engine bay (another end of the "T" fitting") to the boost gauge
3 - a VGS hose that is not needed for gauge's install ( for those without VGS)
4 - the extra hose you bought that connects the "T" fitting to the fuel pressure regulator
5 - VGS hose (not needed for those without VGS mod) that connects to the supercharger's bypass valve.
I hope this clears things up!
Also here is the rubber "seal" that you need to punch a hole through:
location:
Larger view of it: (shot taken from the inside of the car. Look for that big red wire under the bonnet to easily spot the gommet)

5th Gear
Joined: Dec 2004
Posts: 1,091
Likes: 0
From: San Luis Obispo, CA
What wires are you passing through to the car? Is there a reciever unit u mount somewhere? I would really like to install a boost gauge. Also, will this gauge work well for when I move up to a 15% reduction pulley? What about a 17%?
Also how much of a benefit is it to complete the VGS on an 06? Not sure if I notice the "yo-yo" problem as much. Maybe it's a good thing to do?
Also how long of a screw do I need and what size?
Also how much of a benefit is it to complete the VGS on an 06? Not sure if I notice the "yo-yo" problem as much. Maybe it's a good thing to do?
Also how long of a screw do I need and what size?
Thread Starter
|
6th Gear
Joined: Dec 2003
Posts: 1,805
Likes: 30
From: Quebec City, Qc
The gauge is a mechanical-type.. the only wire you pass through the firewall is the hose that reads boost/vacuum from the supercharger.
The gauge I suggested in my post has a boost limit of 20psi, so no problem with either 15% and 17% pulleys!
As for the screw, you'll have to do the "trial and error" method... I had a bunch of old screws at my place and got the correct one after 2 tries... You could also bring the screw to a local store and find the correct one very easily! I had to cut the screw to fit in lenght.
As for the VGS, I had some yo-yo problems and it helped a lot! My MCS is a 2003, so I'm not sure about 2006 models! Better ask Andy about this! But for more infos about it, please see the huge thread Andy made on this forum!
I hope this thread will help many people on installing a boost gauge to their car! Maybe it will make it to the "sticky" status, which would be awesome!
Thread Starter
|
6th Gear
Joined: Dec 2003
Posts: 1,805
Likes: 30
From: Quebec City, Qc
Thanks! now, vote for a Sticky status with me! lol
I'm sure many people would really like to add a boost gauge to their MCS, but are afraid of installation and cost.
I'm really not an expert, and got it installed in less than an hour, successfully. And that gauge is so much fun to watch!
I'm sure many people would really like to add a boost gauge to their MCS, but are afraid of installation and cost.
I'm really not an expert, and got it installed in less than an hour, successfully. And that gauge is so much fun to watch!
Thread Starter
|
6th Gear
Joined: Dec 2003
Posts: 1,805
Likes: 30
From: Quebec City, Qc
I've found a picture with only the VGS install on my MCS. It might make things easier for many people !
So don't bother with the VGS install, just look at the hose layout! It is only for helping people understand better the hoses routing, since it looks the same for the boost gauge install.
Here is the pics and details :

1 - The hose from the fuel pressure regulator (#4 on the picture), which is located right above the "T" fitting. You disconnect it from underneath, and plug it to the "T" fitting.
2 - The extra hose you bought, which reconnects the fuel pressure regulator to the "T" fitting. You only need about 6-7 inches lenght.
3 - It's the hose that you run from the "T" fitting to inside your MINI, and connect it to the boost gauge.
4 - it's the fuel pressure regulator!!
I think this picture is a lot easier to understand! (since it doesn't have 5 hoses going everywhere! lol)
So don't bother with the VGS install, just look at the hose layout! It is only for helping people understand better the hoses routing, since it looks the same for the boost gauge install.
Here is the pics and details :
1 - The hose from the fuel pressure regulator (#4 on the picture), which is located right above the "T" fitting. You disconnect it from underneath, and plug it to the "T" fitting.
2 - The extra hose you bought, which reconnects the fuel pressure regulator to the "T" fitting. You only need about 6-7 inches lenght.
3 - It's the hose that you run from the "T" fitting to inside your MINI, and connect it to the boost gauge.
4 - it's the fuel pressure regulator!!
I think this picture is a lot easier to understand!
(since it doesn't have 5 hoses going everywhere! lol)
Trending Topics
5th Gear
Joined: Dec 2004
Posts: 1,091
Likes: 0
From: San Luis Obispo, CA
how hard is that wire to find? do I just need to pop one of those little blue clippy things (wire tap??) on those two wires?
Everything is on order, I'm just trying to figure out about the lighting for it.
Everything is on order, I'm just trying to figure out about the lighting for it.


regarding the grey/red wire - if you are working near the fuse panel 2 grey/reds can be found in one of the big wiring harness. I KNOW because I have the boost guage attached to one and the second one has black electrical tape on it!
"Choose wisely" (From Indiana Jones).
"Choose wisely" (From Indiana Jones).
Thread Starter
|
6th Gear
Joined: Dec 2003
Posts: 1,805
Likes: 30
From: Quebec City, Qc
From BahamaBart in another thread, I've found this:
Alongside of the cars inside fuse box (must remove platic) is a bunch of cables, which is infront of the fuses. Inside those are TWO GRAY w/ PINK STRIPE - one of those is the cable that handles the dash lights.
You got a 50/50 chance of selecting the right one without tools. My guage lights worked after the SECOND attempt .
.
.
I just dropped the wire down and found it easier to work there than farther up the dash near the tach. Also easy to find ground in the area
But I've seen a picture of the complete harness under the dash on this forum, not too long ago... I've tried to find it back, but didn't... :-(
Alongside of the cars inside fuse box (must remove platic) is a bunch of cables, which is infront of the fuses. Inside those are TWO GRAY w/ PINK STRIPE - one of those is the cable that handles the dash lights.
You got a 50/50 chance of selecting the right one without tools. My guage lights worked after the SECOND attempt
. .
I just dropped the wire down and found it easier to work there than farther up the dash near the tach. Also easy to find ground in the area
But I've seen a picture of the complete harness under the dash on this forum, not too long ago... I've tried to find it back, but didn't... :-(
5th Gear
Joined: Dec 2004
Posts: 1,091
Likes: 0
From: San Luis Obispo, CA
I feel like a hunter trying to find bugs bunny. Once I get home later, I'm gonna go searching. Now if summit racing can hurry up and send me the stuff . Ohh heres a stupid question...
When I poke through the grommet with the vaccum hose where does it come out in the car? under the dash, I hope? Or somewhere I have to rip appart half the car to get to?
. Ohh heres a stupid question...When I poke through the grommet with the vaccum hose where does it come out in the car? under the dash, I hope? Or somewhere I have to rip appart half the car to get to?

Originally Posted by FlynHawaiian
Ohh heres a stupid question...
When I poke through the grommet with the vaccum hose where does it come out in the car? under the dash, I hope? Or somewhere I have to rip appart half the car to get to?
When I poke through the grommet with the vaccum hose where does it come out in the car? under the dash, I hope? Or somewhere I have to rip appart half the car to get to?
You think your having fun now! Wait until you get to hooking up to the vaccum line. It took 2 weeks for the skin to grow back on my knuckles
.I had a long surgical clamp that helped me get a hold of that line while trying to attach the T connector.


