

Official MINI DRLs Fitted

4th Gear
Joined: Feb 2012
Posts: 399
Likes: 0
From: Exit 9
I would prefer to ground it close to where I'm mounting the control unit, that is inside the cowl area by the firewall. I much rather not try to fish the wire through the firewall to find a ground inside the passenger compartment.
It will be a few weeks before I can complete this install due to extenuating circumstances, but I'll let everyone know when I have an update.
It will be a few weeks before I can complete this install due to extenuating circumstances, but I'll let everyone know when I have an update.

anyone in socal have experience in installing this? Anyone want to help?
Or if anyone knows a successful shop or dealer in Los Angeles / orange that has installed these successfully let me know
Or if anyone knows a successful shop or dealer in Los Angeles / orange that has installed these successfully let me know
Last edited by WhiteSilverMCS; Aug 26, 2014 at 03:10 AM.


5th Gear
Joined: Jul 2012
Posts: 777
Likes: 1
From: Richardson, TX
Me too. The hardest part was locating the correct wire at the footwell module. I also made a doh! In the darkness of the underdash I managed to plug the relay in the wrong way. That made for some frustration figuring that out. I was surprised it fit out of clock! Pretty straight forward. I replaced my bumper with an aero when I did the install.

If I had still lived in SoCal I would have helped you. Sorry. If you are near Santa Ana you may want to try Crevier MINI. That's the only dealer I ever trusted taking my MINI to.

If you want to drive it up to Vegas, I can help you with it. Otherwise, if you want to do it there, I can Skype/Facetime with you and step you through it.
-Z
-Z

5th Gear

Joined: Nov 2012
Posts: 645
Likes: 2
Here's a pic of the gray wire you tap into just above my thumb for reference. You can follow it towards the top of the pic where I did the tapping with the blue wire. Goodluck!
Sent from my iPhone using NAMotoring
Sent from my iPhone using NAMotoring
is this in the dirvers side?, the rest of the install the manual is pretty clear then??
5th Gear
Joined: Nov 2012
Posts: 645
Likes: 2
Edit: Here's another pic of the socket X14260 you do not want to tap into: it is gray with a black casing. The correct one is black/black which is X14261. Hope that helps.
Also, there is an error in the pic of the instructions where the wiring bundle appears to be coming from the floor going up, but it is actually coming from the top going down.
Sent from my iPhone using NAMotoring
Last edited by KilmerPT; Aug 29, 2014 at 05:09 PM.

4th Gear
Joined: Jun 2013
Posts: 519
Likes: 13
From: Charlottesville, VA
I tried without removing the bumper and in the end removed the bumper. Removing right away would have saved me hours. Keep in mind you will need a few replamement plastic expanding rivets for the wheel trim--since once you punch the center out it is difficult to find the little pieces. Everything else was a torx or nut. Also, the windshield washer fluid resovior is on the driverside behind the bumber so it blocks access to the fog light.
Simply pop the center grill off the bumper to access the torx bolt, remove the first three fasterners on the black wheel well trim and partially pull the trim to expose another torx bolt. Remove the fasteners from the underside of the bumper and the bumper is off.
Simply pop the center grill off the bumper to access the torx bolt, remove the first three fasterners on the black wheel well trim and partially pull the trim to expose another torx bolt. Remove the fasteners from the underside of the bumper and the bumper is off.
5th Gear
Joined: Nov 2012
Posts: 645
Likes: 2
Helix has a good video on how to remove the bumper to give you an idea of what to expect. However, some of those fasteners can be a real PITA the first time you do it compared to their video.
Sent from my iPhone using NAMotoring
Sent from my iPhone using NAMotoring
anyone in socal have one and want to install it together?
We can do two, and help each other!
Also I had a question for whoever that can answer it.
When im snaking the blue line into the firewall, where does it go through? How do i go through the black plastic stuff that covers the grommet on the firewall?
We can do two, and help each other!
Also I had a question for whoever that can answer it.
When im snaking the blue line into the firewall, where does it go through? How do i go through the black plastic stuff that covers the grommet on the firewall?
Last edited by WhiteSilverMCS; Sep 3, 2014 at 08:38 PM.
So i just did this today, it went well, people have to make sure they clamp down hard on the blue and grey lines. I was nervous after i didn't see the full circles but went back and pushed down really hard and they finally lit up.
Like everyone says, they are well worth it and looks amazing.
They are bright as hell.
I got quoted 400-600$ and no cheaper in LA area so i went on ahead and accomplished it today and am happy. Asides from breaking a few clips here and there. Everything went smooth.
Like everyone says, they are well worth it and looks amazing.
They are bright as hell.
I got quoted 400-600$ and no cheaper in LA area so i went on ahead and accomplished it today and am happy. Asides from breaking a few clips here and there. Everything went smooth.
This right here is all you really need to install the fogs lol
Im so glad you posted that
mine is up and kicking =)
damn i missed this one, i did everything without removing the headlight or the bumper, just removed the GP skidplate and the front wheel well liners... 
Congrats on the install...
Congrats on the install...
5th Gear
Joined: Nov 2012
Posts: 645
Likes: 2
Sent from my iPhone using NAMotoring
4th Gear
Joined: Jun 2013
Posts: 519
Likes: 13
From: Charlottesville, VA
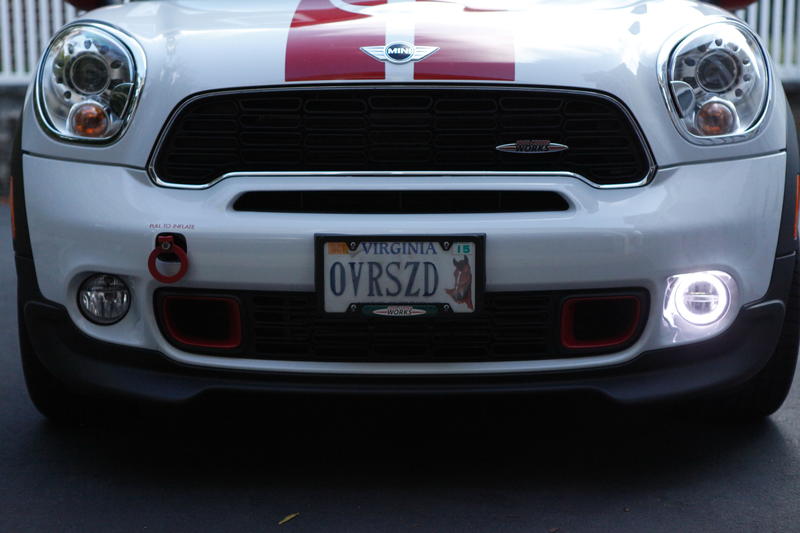
One of my DRL halo rings went dim (basically out) and as I wait for a replacement which is being shipped to me this week, I thought I would take photos with the original Mini OEM fog light installed on the left and the new Mini DRL installed on the right.
When all lights are in off position. MINI DRL halo turns on. OEM on left, correctly is off when all lights are in off position.

When headlights are turned on and fog lights off: the DRL only the partial halo lights and the OEM turns on upper marker lights. Note the OEM is definitely more yellow and the DRL is brighter.

With headlights on and fog lights activated: the OEM lights the fog light and upper marker lights, the DRL lights again light up the upper halo and activates fog. Again DRLs are a much whiter light.

When all lights are in off position. MINI DRL halo turns on. OEM on left, correctly is off when all lights are in off position.
When headlights are turned on and fog lights off: the DRL only the partial halo lights and the OEM turns on upper marker lights. Note the OEM is definitely more yellow and the DRL is brighter.
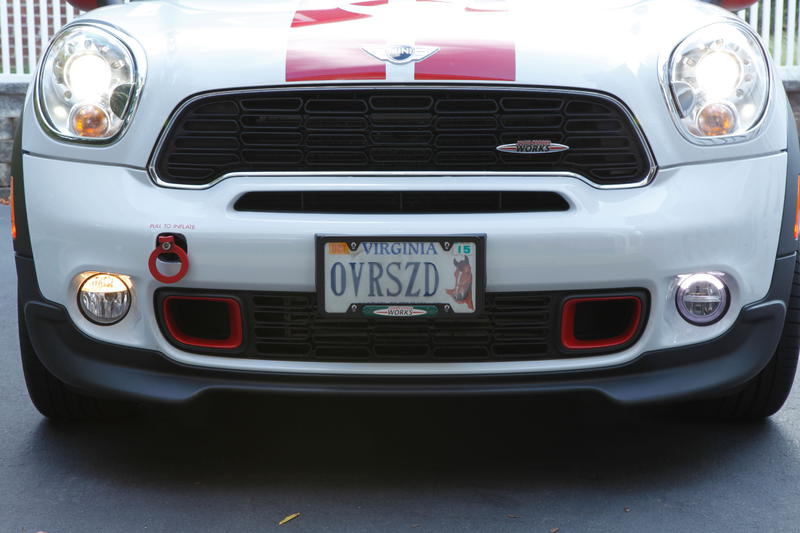
With headlights on and fog lights activated: the OEM lights the fog light and upper marker lights, the DRL lights again light up the upper halo and activates fog. Again DRLs are a much whiter light.

Last edited by TJANK; Sep 24, 2014 at 04:52 PM.
4th Gear
Joined: Feb 2012
Posts: 399
Likes: 0
From: Exit 9
How long did you have the set on the car before one went dim?