When you click on links to various merchants on this site and make a purchase, this can result in this site earning a commission. Affiliate programs and affiliations include, but are not limited to, the eBay Partner Network.
General MINI TalkShared experiences, motoring minutes, and other general MINI-related discussion that applies to all MINIs, regardless of model, year or trim.
...' got me pondering about pulling the non functional lower bumper vents to see if I could modify them for actual air flow.
Maybe a future project...
Originally Posted by RB-MINI
...I haven�t re-read the thread so I�m not sure if this is where I also read that once opened, all you�ll see is the silver heat shielding right behind the bumper and would need to be cut or bent to allow more air to flow.
Re: The title of this post.
My initial plans to install a catch can today have been dashed due to shipment delays. I had also hoped to install a pair of salvage find R52 chassis support braces. Only to discover I was too late and the braces had gone to the crusher along with the car.
So I thought I'd spend some time on the lower rear bumper grilles. The temps are too low to be laying on my back underneath the Mini in a parking lot. Not to mention wrestling with trying to bend the heat shields out of the way for extraction.
Seems to me, it would be easier to remove the entire outer bumper cover. Not today.
Saving it for later
Yep - the heat shields need to be trimmed quite a bit to get them out of the way. I marked mine a bit further out than I thought I would need and then crimped a new edge crimp by bending the heat shielding back on itself on the upper side and then crimping the new edge between a couple scrap pieces of metal I had laying around between the jaws of a vice grip. Was somewhat time consuming, but turned out pretty good - and I was workign with a brand new heat shield so I wanted to be super careful. I think I have a pic in my thread of my first attempt using my old original heat shield for practice before putting the new one in. Then I just re-formed them to be up high enough to be out of the way with a bit of careful bending. Can't really do it without the back bumper coming off.
Today I replaced the PCV valve and installed a crankcase breather canister/aka: catch can in my '04 R53.
I've always installed one in all my previous classic performance built VW/Porsche 914 motors.
So why not my Mini?
Common $30 eBay Catch Can breather reservoir .
After a receiving this thing, I popped open the hood to pick a spot for installation. Only to realize there's not a lot of options within that congested little space.
I would've liked to mount the catch can on the outside of the passenger side/ABS cowl to compliment the reservoir motif - but that space is already occupied by my oil pressure sending unit/oil pressure gauge line.
Pretty much demoralized at this point, ' started closing the hood until I saw a spot that might work...
Although It almost required the skill of surgeon in order to bolt this thing in where I did - I'm pretty satisfied with the location and results.
Notwithstanding: I really need to get around to addressing the looks of that brass oil pressure set up - A little too much "in your face". IMO...
Not my finest work but....
I didn't anticipate the "supply chain" to be as long...
I just hope I won't have maintain it too often. Anything more than 5 turns unscrewing the bottom canister in that tight space - is risking a sprained thumb.
Get a hold of a basting syringe from a kitchen store and use a small piece of tubing to go in through the dipstick hole on the oil catch can rather than removing the bottom of it.
Get a hold of a basting syringe from a kitchen store and use a small piece of tubing to go in through the dipstick hole on the oil catch can rather than removing the bottom of it.
I like that Idea ... OR better yet - To paraphrase one of your previous replies : "wait until the wife is out so I can "improperly" use a kitchen utensil"
Doing it myself. Not hard to do. Just some elbow grease. Got everything order today.
Ecs
Amazon
RockAuto
Ebay
Took several day of research to get my parts list together. Figuring out the conditions A versus B on the shifter( AKA the lug ). Had to order the correct shift cables.
But I was able to figure it all out. Pain in the butt thow.
Will start the conversion in a few weeks. Once all my parts are here.
Although nothing as heroic as preparing to install a 6ix speed manual in an R50 ...
Per my last installment (catch can): I had made reference to the obnoxious appearance of my brass oil pressure gauge/sending unit.
I kinda already had an idea as to what I was going to implement and the approach I was going to take to help make it less visually unappealing..
As weekends would have it- It was another miserable rainy Sunday. A perfect day to be stuck inside to get creative...
A quick run to the local Homeboy Depot to pick up an 80/PVC conduit box.
After Cutting 3/16" off the back of the box - I broke out 'Ole Painless' (aka: Dremel) and made some adjustments and openings with a 1/8" Roto-zip tile bit.
I had also purchased some 3/4" PVC conduit clamps which I cut off one of the small tabs to graft in a support eyelet.
This afternoon, (Monday), I took advantage of the clear conditions and installed the final result...
Only after installation did I realize - I forgot to cut a 1/2" (right side in pic) off the "end snout" and insert a grommet where my sensor wire feeds in.
The encasement is easy enough to remove to make those minor adjustments.
Yesterday I scrubbed upand installed the winter wheels and tires on Grumpy. I also replaced the driver's low beam bulb. The passenger side went out a few months ago, so I'm not too surprised. The Depo lights have been installed for about 3 years, now, and the bulbs came with them. We'll see how well genuine BMW/MINI H7s hold up to the opening and closing of the hood.
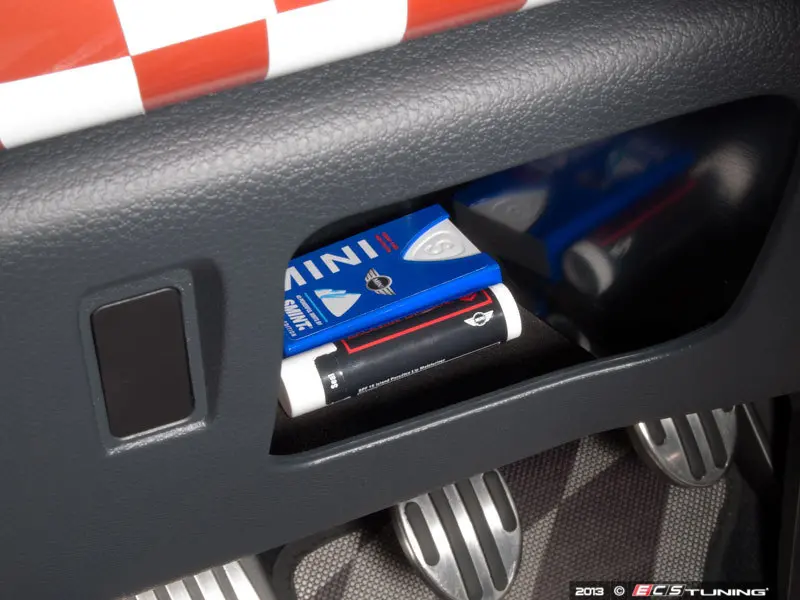
Today I reconditioned the interior of my glovebox.
Recently I contributed a suggestion to a user's post with regards to the glovebox organizer.
I had fabricated my own years ago, so I couldn't offer much with respect to OEM. But -this gave me a good reason to take a look at my own glovebox interior. In doing so; What I often neglected to address (prompted by @Oldboy Speedwell pic), was how aged and scratched the inside of the/my cover had become.
I liked the look of how clean his black plastic looked compared to the original, degraded, OEM
rubberized panther black finish had become in mine. I had seen how Simple Green used full strength could easily eat away a paint finish. So I used it along with a 3M 120grit thin sanding sponge. Afterwards polished up 400 and a brown Scotch Brite pad.
I decided to leave the panther black "rubberized" cup holders alone and not strip them.
A side note: The lighting conditions were different in this pic. Panther black is not as blue as seen in this pic..
I lightly scuffed and feathered the scratched painted rims of the cup holders. I had saved the panther black color match info that I mixed when I restored/repaired and painted my cracked and broken dash top last year.
I mixed the water borne paint in with Mod Podge -Then painted in/blended the color around the rims of the integrated cup holders. A light dusting/layer of Krylon Satin clear afterwards to "unify" and finish things off.
After fully curing; I polished the refinished plastic interior with Mothers shine protectant.
Now.... to clear out all those archaic things known as CDs
I love how back in the day that was considered a cut holder with the door down. A pen clips in and i had my MINI smint mints in there. You used to get these in the glove box at the MINI dealer when you got your car.. Also those slots are for change.
Even after 19 years of ownership - I would have never guessed that those were coin holders. It's no wonder why I couldn't get my credit cards to stay in those slots!
I found a new, better-fitting, insulated sunshade for the windshield yesterday.
I had the old one too long to return it, so waste not....
Today I "Customized" the old, ill-fitting, insulated sunshade with a pair of scissors and now have perfect-fitting moonroof/sunroof shades as a result. Now I need to find some of the material used for the shade's edging, and someone with a sewing machine I can borrow for a few minutes, so that the cut edge looks as nice as the rest of it.
I stopped in at the local Autozone where I had previously spent so much time and money trying to keep my previous car alive, and I chatted with Paul, the clerk (a nice older gentleman and fellow guitar picker) a bit while I considered picking up a small can of paint to paint the "S" on my intercooler cover red. I am glad I decided not to, as I've seen a better idea on another thread here: get a spare "S" logo and JB-Weld it to the intercooler cover....
I would have loved to have taken a nice drive, but it's been pouring most of the day here, and most of the scenic out-of-town places I like to drive are prone to flash-flooding.... At least I got to run a couple errands.
I also briefly considered the possibility shaving the "C" off of the rear "COOPER S" badge, then relocating the "S" in its place. Decided to leave it as-is for now.
Even after 19 years of ownership - I would have never guessed that those were coin holders. It's no wonder why I couldn't get my credit cards to stay in those slots!
^^^Now that is really cool. I love the idea of having that little cubby.
I think its was even for euro coins as they tend to be thicker. lol
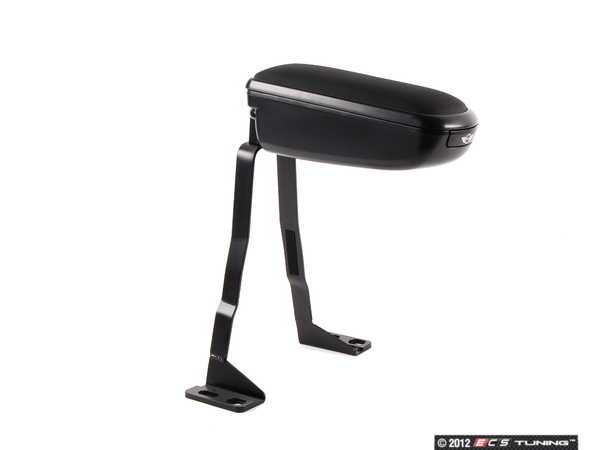
I scored an accessory armrest for my daughter's Mini off of FB Marketplace while traveling out of town to visit family for Christmas
Awesome score! - Looks OEM. if 'not mistaken(?).
I was lucky to find an (albeit), aftermarket armrest for my '04. Although it is the "slide top", I think it really adds to the car as well as being comfortable and useful.
I believe it is OEM. I'm not sure if it was OEM fit as an factory-order option or within an option package, but I think it was for sure available as an OEM dealer accessory.
Was this a dealer option armrest or what ? It fits as good as the oem ones do but imo is so much better. I'm going to out it in my other mini soon as it's here.
i will better inspect it for part #s and manufacturers markings..


 ... OR better yet - To paraphrase one of your previous replies : "wait until the wife is out so I can "improperly" use a kitchen utensil"