
Drivetrain DIY Engine Cleaning (Intake Valves)


I just purchased the required parts and am planning to attempt this week. I bought a few different parts. Can the "experts" take and look at this and let me know if it will work?
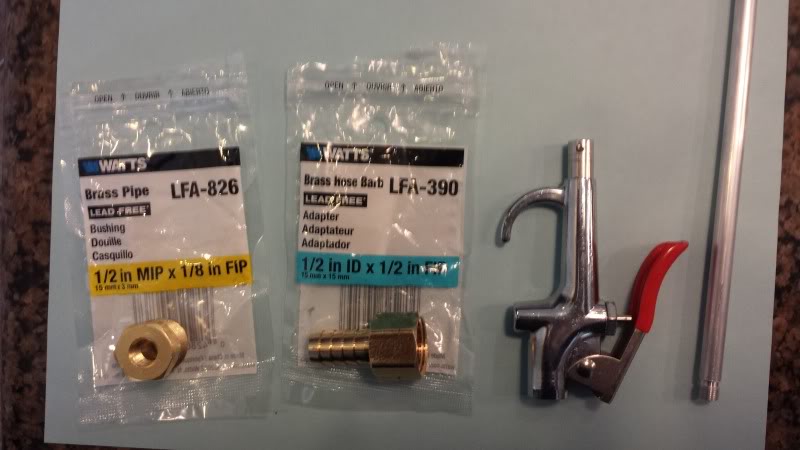
I picked up A-826 instead of A-827. The hole is 1/8" instead of 1/4" like the original poster used.
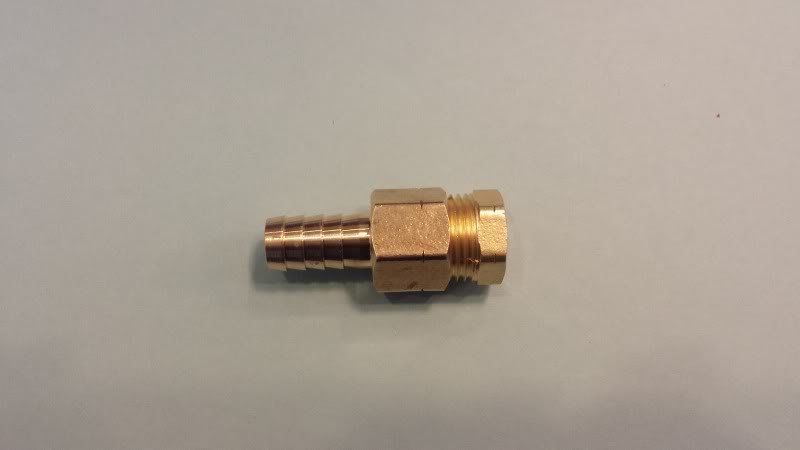
I removed the tip from the Harbor Freight blow gun. It threads into the handle and the long extension threads into it. It is a perfect fit for the A-826 1/8" thread. No tape needed
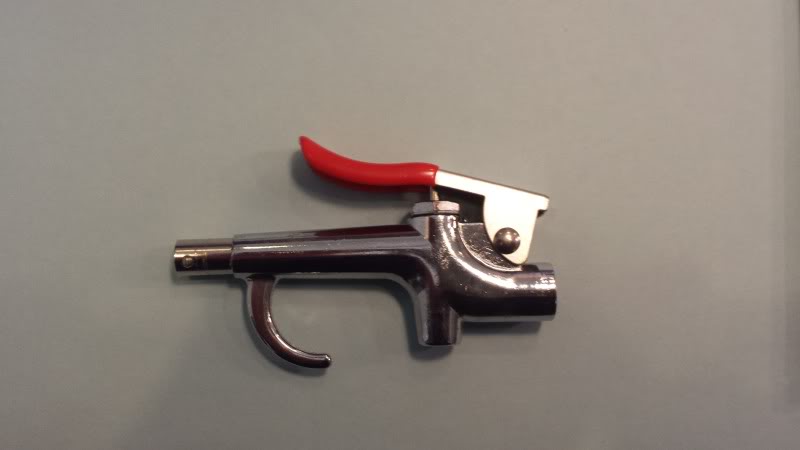
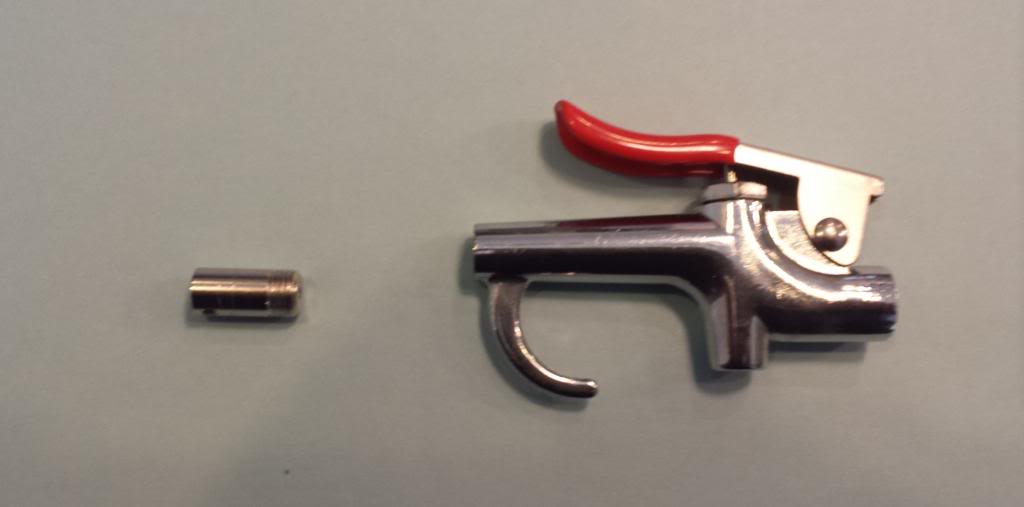
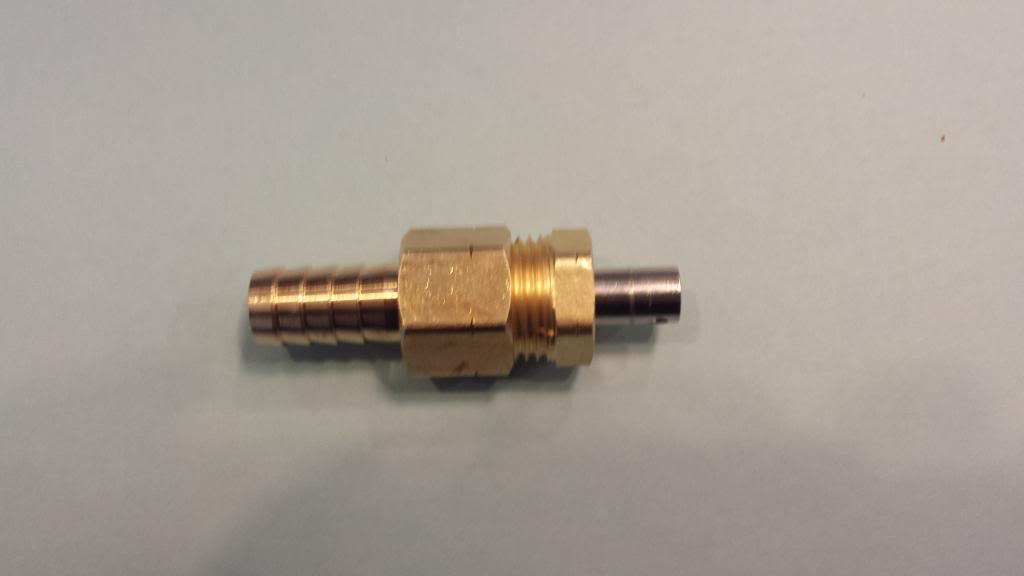
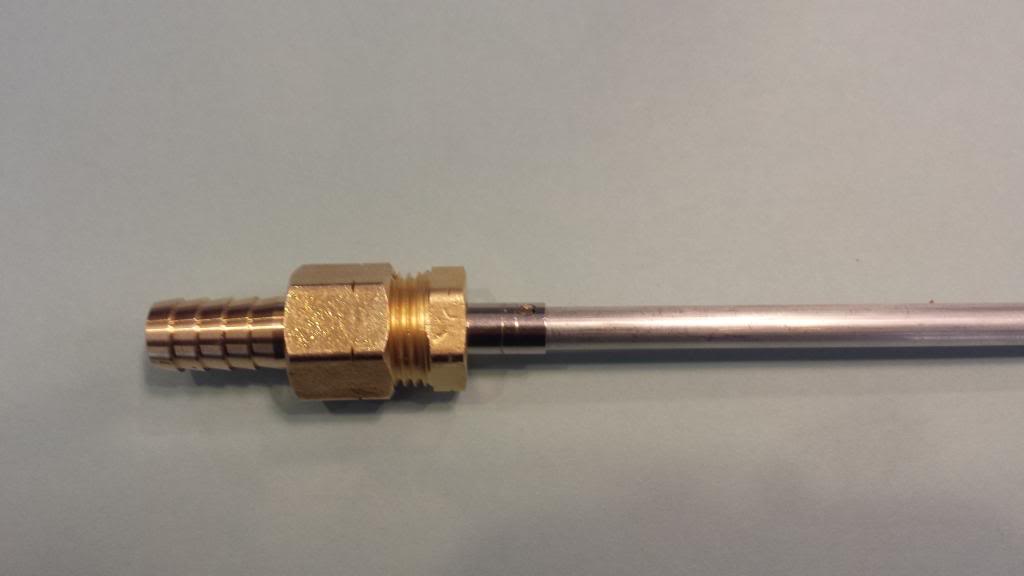
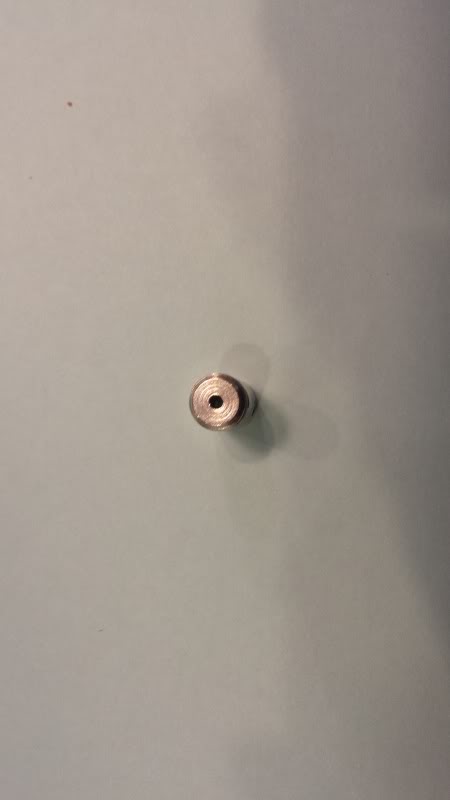
I had to drill out the orifice on the tip that was removed from the blow gun handle.
After drilling and installed in the A-826 fitting.
Completed
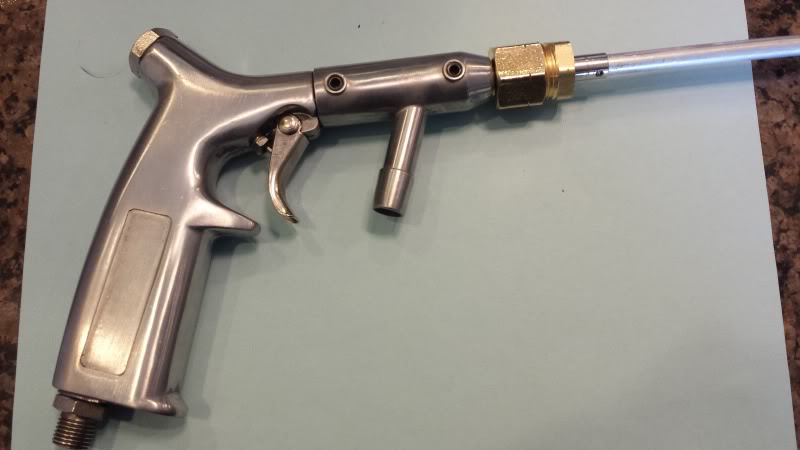
I noticed the OP said to insert the aluminum tubing so it didnt pass the barbed fitting. Mine is going to be flush with the end of the gun. Does anyone see any problems with that? Now I have to work on the vac setup. I have a few ideas for that but will have to wait to see what works once I remove the intake. Thanks for all the work you guys have put into this thread. Made my life much easier.

I picked up A-826 instead of A-827. The hole is 1/8" instead of 1/4" like the original poster used.
I removed the tip from the Harbor Freight blow gun. It threads into the handle and the long extension threads into it. It is a perfect fit for the A-826 1/8" thread. No tape needed


I had to drill out the orifice on the tip that was removed from the blow gun handle.

After drilling and installed in the A-826 fitting.

Completed

I noticed the OP said to insert the aluminum tubing so it didnt pass the barbed fitting. Mine is going to be flush with the end of the gun. Does anyone see any problems with that? Now I have to work on the vac setup. I have a few ideas for that but will have to wait to see what works once I remove the intake. Thanks for all the work you guys have put into this thread. Made my life much easier.
Last edited by phxsteele; Aug 26, 2013 at 03:16 PM.


5th Gear

Joined: Mar 2009
Posts: 835
Likes: 5
From: Atlanta, GA
The important thing is that the inside diameter of the tubing needs to be about 0.20". Believe you are using the same tubing I specified. Some have written me that they tried larger tubing and this will directly reduce the impact speed of the walnut shells and result in poor blasting performance. Smaller tubing will reduce the amount of media that it picks up.
Also, as long as the tubing does not insert any farther into the gun than the ceramic insert you removed there will be sufficient space inside the gun between the internal Venturi and the end of the tubing. If the barbed portion of the fitting you used is the same length as the one I specified you should be fine. If the tubing is inserted too far into the gun it will not pick up the media.
I did not use the end of the blow gun. I only used the full 0.20" portion of the aluminum tubing. If the piece you removed from the blow gun nozzle is less than 0.20" it may prevent proper media pickup.
You can PM me if you have problems. Good luck!
Last edited by gawannamini; Aug 29, 2013 at 08:30 PM.


4th Gear
Joined: Aug 2008
Posts: 470
Likes: 1
From: Harleysville PA
One question that I was wondering. Does anyone know the socket size needed to fit the crankshaft pulley bolt? I don't want to get half way into the job and need to put it back together to got get a socket.

5th Gear
Joined: Mar 2009
Posts: 835
Likes: 5
From: Atlanta, GA
Great thread and great instructions also! I have read everything and bought the blaster, already have the compressor and Shop-vac. I intend on doing the walnut blasting tomorrow morning.
One question that I was wondering. Does anyone know the socket size needed to fit the crankshaft pulley bolt? I don't want to get half way into the job and need to put it back together to got get a socket.
One question that I was wondering. Does anyone know the socket size needed to fit the crankshaft pulley bolt? I don't want to get half way into the job and need to put it back together to got get a socket.
Good luck!

Thanks!
4th Gear
Joined: Aug 2008
Posts: 470
Likes: 1
From: Harleysville PA
phxsteele says above that he bought a reduce bushing that is 1/2" x 1/8" in order to screw the tubing onto the nozzle. However he is still using the 0.20" tubing. That's the only reference I see to that size.
If you see it elsewhere, please correct me.
Thanks
5th Gear
Joined: Mar 2009
Posts: 835
Likes: 5
From: Atlanta, GA
I just purchased the required parts and am planning to attempt this week. I bought a few different parts. Can the "experts" take and look at this and let me know if it will work?

I picked up A-826 instead of A-827. The hole is 1/8" instead of 1/4" like the original poster used.
I removed the tip from the Harbor Freight blow gun. It threads into the handle and the long extension threads into it. It is a perfect fit for the A-826 1/8" thread. No tape needed
I had to drill out the orifice on the tip that was removed from the blow gun handle.
After drilling and installed in the A-826 fitting.
Completed
I noticed the OP said to insert the aluminum tubing so it didnt pass the barbed fitting. Mine is going to be flush with the end of the gun. Does anyone see any problems with that? Now I have to work on the vac setup. I have a few ideas for that but will have to wait to see what works once I remove the intake. Thanks for all the work you guys have put into this thread. Made my life much easier.
I expected my sloppy, electrical tape wand to be toast after one use but it looked like new. The walnut shells must be pretty gentle on aluminum - which is why they are used for this purpose.
Good luck!
The tubing is the .20 that was found in the harbor freight blow gun the op used. I did have to use the tape method to attach. The tube does need to extend into the brass fitting to the end of the barb to get proper flow. Also another tip to bend the tubing. Fill it with water and let it freeze solid. This lets you bend it easily without kinking.
5th Gear
Joined: Mar 2009
Posts: 835
Likes: 5
From: Atlanta, GA
The tubing is the .20 that was found in the harbor freight blow gun the op used. I did have to use the tape method to attach. The tube does need to extend into the brass fitting to the end of the barb to get proper flow. Also another tip to bend the tubing. Fill it with water and let it freeze solid. This lets you bend it easily without kinking.
bratling, I'm not sure where you see that.
phxsteele says above that he bought a reduce bushing that is 1/2" x 1/8" in order to screw the tubing onto the nozzle. However he is still using the 0.20" tubing. That's the only reference I see to that size.
If you see it elsewhere, please correct me.
Thanks
4th Gear
Joined: Aug 2008
Posts: 470
Likes: 1
From: Harleysville PA
I want to thank gawannamini, phxsteele, and everyone else who contributed to this thread. I walnut blasted my MINI today, and despite a few glitches, I'm finished and it turned out great! I don't think I would have attempted this without everyone's help.
The socket needed to turn the crank is 18 mm for anyone interested. I did have one.
I bought my MINI new and it now has slightly over 70k miles on the clock. I installed a BSH OCC at about 20k miles and began seafoam treatments about every 6k miles at the same time. However it's probably at least 10k since I did the last seafoam treatment. I've been planning on the walnut blast for a while and finally got to it.
I bought a Whistler Inspection Camera to use with the job. I looked into the cylinders before starting and really was able to see very little because of the huge amount of carbon. I removed the spark plugs to find TDC, when the valves are closed. After blasting the cylinders twice, I was able to use the camera and clearly see what I had. The intake cleaned up pretty easily, but the backs of the valves really needed alot of work.
I strongly recommend an inspection camera to do this work. It really showed me when I needed to do more, or when I was done with a cylinder and it was time to move to the next. Without it, I'm sure I would not have cleaned the valves nearly as good.
I started blasting with my air pressure set @ 60 lbs. That wasn't getting it done. I turned up the regulator to 80 lbs., which seemed better. I turned it up again to 100 lbs. and the last two cylinders cleaned up pretty quickly. The two outside cylinders were last, and they cleaned up the easiest.
I put everything back together and fired her up. I was down a cylinder. I took it for a quick ride around the block, got check engine light and no improvement.
I pulled the spark plugs, and the passenger side cylinder plug was darker than the others and appeared to be the problem cylinder. I was afraid I'd have to pull everything apart, but I decided to switch plugs and coils before I went that route.
After switching plugs and coils, fired her up, and idle was very smooth. Took the MINI for a ride around the block and runs great. I went for a long ride to get lunch, have put on over 30 miles and doesn't skip a beat. Why the earlier problem, I really don't know. But at this point, I'm not complaining.
Gave her a good workout on the way home, and seems like much more power than before. Again, thanks everyone for your help!!
Okay, here is my experience. Spent about 3 hours yesterday prepping and removing the intake. Today I spent about 4-5 hours blasting 2 inner cylinders, 4 valves. I had the recommended parts, but the .20" tubing was not working. I made sure it was not in too far, gun worked fine without it. I ended up with, I think is 5/16" id nylon tubing @ 80# pressure. It took about 1 1/2 to do the first set of valves and about 30 minutes for the second one. I went through ( don't laugh) the whole box , 25# of walnut shells, twice. I got about 10 minutes of spraying with a full hopper. I don't know why it took so long, I tried to stay about 1/2" away from my target. Hopefully the other 2 go faster, but my passenger side looks really bad. I have a 08' Clubman S with 79,000 miles.
4th Gear
Joined: Aug 2008
Posts: 470
Likes: 1
From: Harleysville PA
Red, I can't tell what equipment you are using, but the you should be using alot of air and a little bit of walnut shells, when blasting. Using a full hopper of walnut shells in 10 minutes is far too much. I tried to do exactly as gawannamini's instructions said, even removing the abrasive supply hose after blasting for 20-30 seconds to evacuate all walnut shells from inside the cylinder. Too much abrasive is as much of a problem as not enough.
I'd say I used 15 lbs of walnut shells in 2-3 hours.
I'd say I used 15 lbs of walnut shells in 2-3 hours.
Last edited by gregsmini; Sep 9, 2013 at 03:45 AM.

5th Gear
Joined: Mar 2009
Posts: 835
Likes: 5
From: Atlanta, GA
Okay, here is my experience. Spent about 3 hours yesterday prepping and removing the intake. Today I spent about 4-5 hours blasting 2 inner cylinders, 4 valves. I had the recommended parts, but the .20" tubing was not working. I made sure it was not in too far, gun worked fine without it. I ended up with, I think is 5/16" id nylon tubing @ 80# pressure. It took about 1 1/2 to do the first set of valves and about 30 minutes for the second one. I went through ( don't laugh) the whole box , 25# of walnut shells, twice. I got about 10 minutes of spraying with a full hopper. I don't know why it took so long, I tried to stay about 1/2" away from my target. Hopefully the other 2 go faster, but my passenger side looks really bad. I have a 08' Clubman S with 79,000 miles.
At the risk of straying deep into nerd ness (warning - I am an engineer:-)) to remove the carbon we need the media (walnut shells) to hit the carbon build up at a strong impact speed. It is the high speed impact that does the work. The 0.20" tubing is basically a nozzle and its size determines how hard the media will strike the carbon. Using a nozzle size of 0.30" (for example) will result in the impact speed of the media being less than half what it would be with 0.20" tubing. A lot of media will be moved but it will not clean well.
5th Gear
Joined: Mar 2009
Posts: 835
Likes: 5
From: Atlanta, GA
Red, I can't tell what equipment you are using, but the you should be using alot of air and a little bit of sand, when blasting. Using a full hopper of sand in 10 minutes is far too much. I tried to do exactly as gawannamini's instructions said, even removing the sand supply hose after blasting for 20-30 seconds to evacuate all sand from inside the cylinder. Too much sand is as much of a problem as not enough.
I'd say I used 15 lbs of sand in 2-3 hours.
I'd say I used 15 lbs of sand in 2-3 hours.
I saw a video of a dealer doing the walnut shell procedure and they had a separate valve so they could stop the media flow to allow the compressed air to stir things up so that the shop vacuum can remove the walnut shells. With our cheap set up we just pull the media hose loose to stop the media flow and then reinsert the hose. The valves are in a dead area and it doesn't make any difference how strong the shop vac is - you need the compressed air to churn things up.
Just in case someone reads this out of context - we are using ONLY walnut shells and not literally sand. The beauty of the walnut shells is they are very abrasive to the carbon build up but NOT to the aluminum head or the valves.
4th Gear
Joined: Aug 2008
Posts: 470
Likes: 1
From: Harleysville PA
Good catch, gawannamini. I went back and updated the post.
Using a larger nozzle will also impact the volume of air necessary to do the job. I can see problems when the air supply is marginal and the larger nozzle size will cause your air supply to be inadequate. Adequate air supply is critical for this application!
Using a larger nozzle will also impact the volume of air necessary to do the job. I can see problems when the air supply is marginal and the larger nozzle size will cause your air supply to be inadequate. Adequate air supply is critical for this application!
I understand the tubing being larger will result in less impact speed, but
as soon as I put the .20 tube on the flow stops, even if I add it to the end
of the larger tube. I will try again today
as soon as I put the .20 tube on the flow stops, even if I add it to the end
of the larger tube. I will try again today