
Drivetrain DIY Engine Cleaning (Intake Valves)


5th Gear

Joined: Mar 2009
Posts: 835
Likes: 5
From: Atlanta, GA
DIY Walnut Shell Cleaning for About $70
The engine response is now much improved with noticeably more power, much smoother operation and throttle response, lower engine vibration/harshness, improved mileage, and smoother idle. Click on the attachment below for a detailed step-by-step writeup. Good luck!
Last edited by gawannamini; Mar 27, 2013 at 06:32 PM.


1st Gear
Joined: Mar 2013
Posts: 40
Likes: 0
From: Delaware
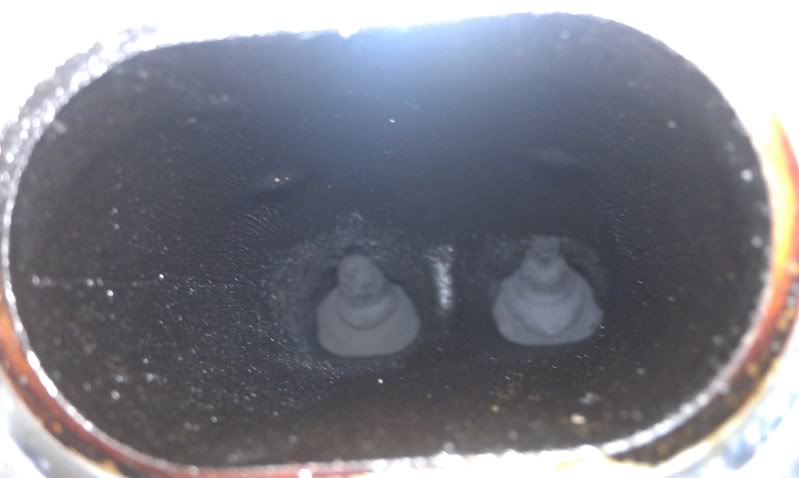
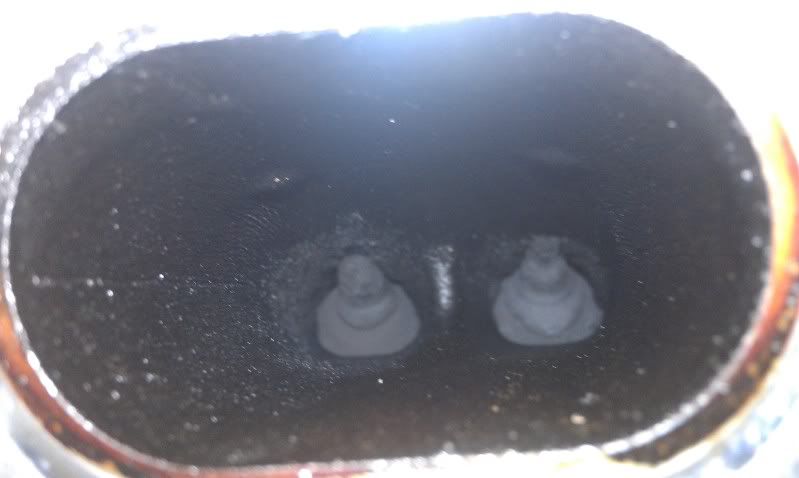
I can't believe how dirty those valves are! That much buildup in such a short amount of time cannot be normal.
A quick question; do the supercharged R53's see similar buildup like this? Or is this purely a PCV problem on the turbo engines?
A quick question; do the supercharged R53's see similar buildup like this? Or is this purely a PCV problem on the turbo engines?

2nd Gear
Joined: Nov 2012
Posts: 97
Likes: 3
I just came from the 2.0T world of VAG and now I'm dealing with this. As Porthos said, I think this should be a how-to or sticky. Great info. My car has cracked 6-digits and I'm scared to think of whats inside.
The build up is normal that quick. The GTI guys were pissed when they started pulling heads at 15,000. It happens, and quick. With all that being said about our cars, it still does happen on standard multi-port cars as well, especially if they have PCV, but much slower.
6th Gear
Joined: Sep 2010
Posts: 1,807
Likes: 14
From: FL
You can't even tell there ARE valves in that before picture! Wtf is up with those engines!?
I also read something interesting about carbon and seafoam. Apparently, seafoam can do more harm than good, depending on the car and it's age. With an older car, the carbon actually helps with compression, filling small gaps in the rings. By cleaning that with seafoam, apparently you can lose hp on the engine, and burn more oil!...
So glad the R53s are Not prone to this problem....
5th Gear
Joined: Mar 2009
Posts: 835
Likes: 5
From: Atlanta, GA
First generation MINIs have older style fuel injection and should not normally require removal of carbon build up. Second generation MINIs (and many other cars) have direct injection and carbon build up problems. This is an industry wide problem.
These direct injection engines provide the nice flat torque curve (in MINI R56 max torque is reached at 1400 RPM and is available almost to redline RPM), superior efficiency and lower emissions and that is why we are seeing more and more of them - often even replacing V6 engines with 4 cylinder engines in many cases (even full size Buicks!). Depending on the PCV system, degree of oil separation from crankcase vent airflow, valve timing, and other variables some manufacturers are having more problems than others. Even with their problems I love the way these direct injected engines pull like a freight train in any gear. I discovered long ago - when I had a rotary engine Mazda RX-2 (decent HP but almost no torque!) that I am a torque junky.
Last edited by gawannamini; Apr 7, 2013 at 07:59 PM.

Thanks for the DIY gawannamini. Used it yesterday to do my carbon cleaning job on my 08 mcs with 80k miles. Carbon was so heavy I had to manually remove part of it prior and during blasting as it was baked on so badly. Here's an example.....drivers side valves....
Car runs so much better now and power is back. Only issues I had was getting the HF blaster gun to feed properly. I think it had more to do with air pressure than anything....had it set too high initially. I fabricated a vacuum fitting from a piece of mdf and one of the attachments that came with my little shop vac....screwed and epoxy held them together. A bit ghetto, but it worked.
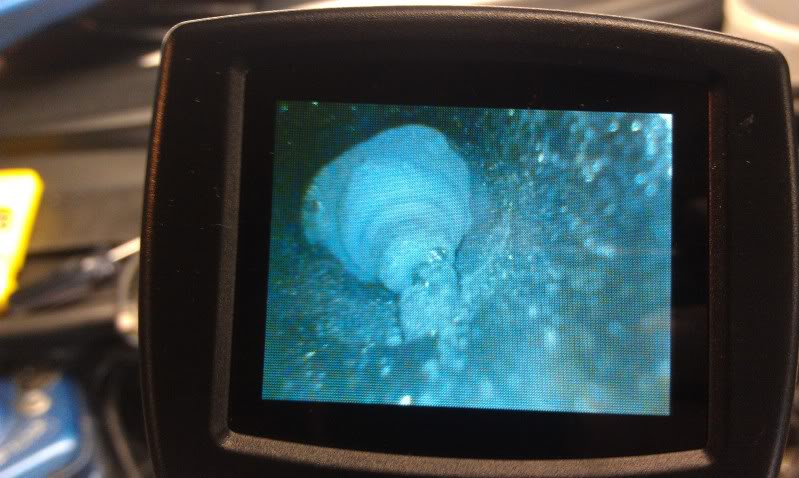
Was a PITA but well worth the time and money. Spent $150 total including a new video inspection camera that I always kinda wanted anyway.
Thanks again.
Car runs so much better now and power is back. Only issues I had was getting the HF blaster gun to feed properly. I think it had more to do with air pressure than anything....had it set too high initially. I fabricated a vacuum fitting from a piece of mdf and one of the attachments that came with my little shop vac....screwed and epoxy held them together. A bit ghetto, but it worked.
Was a PITA but well worth the time and money. Spent $150 total including a new video inspection camera that I always kinda wanted anyway.
Thanks again.
5th Gear
Joined: Mar 2009
Posts: 835
Likes: 5
From: Atlanta, GA
Thanks for the DIY gawannamini. Used it yesterday to do my carbon cleaning job on my 08 mcs with 80k miles. Carbon was so heavy I had to manually remove part of it prior and during blasting as it was baked on so badly. Here's an example.....drivers side valves....
Car runs so much better now and power is back. Only issues I had was getting the HF blaster gun to feed properly. I think it had more to do with air pressure than anything....had it set too high initially. I fabricated a vacuum fitting from a piece of mdf and one of the attachments that came with my little shop vac....screwed and epoxy held them together. A bit ghetto, but it worked.
Was a PITA but well worth the time and money. Spent $150 total including a new video inspection camera that I always kinda wanted anyway.
Thanks again.
When initially modifying the gun I had a problem with media pickup. I had inserted the aluminum tubing too far into the barbed brass fitting. There is a venturi inside the gun and the media enters in this the low pressure area.
There has to be a gap between media entry point and the end of the aluminum extension tube inside the gun to allow the media to sort itself out and find its way into the aluminum tube. I found that the brass barbed fitting was the perfect insertion depth to ensure sufficient gap when it is fully inserted.
My mistake was that I initially allowed the aluminum tube inserted inside the barbed fitting to extend FARTHER into the gun than the end of the barbed fitting. This reduced the gap too much and prevented media pick up.
I removed the barbed fitting from the gun for inspection and reset the aluminum tubing insertion depth so that it did NOT extend past the barbed end of the brass fitting and reassembled. Once done, media flow was consistently great. I did not have to do any manual cleaning.
Your vacuum pick up looks great and gets the job done.
5th Gear
Joined: Mar 2009
Posts: 835
Likes: 5
From: Atlanta, GA
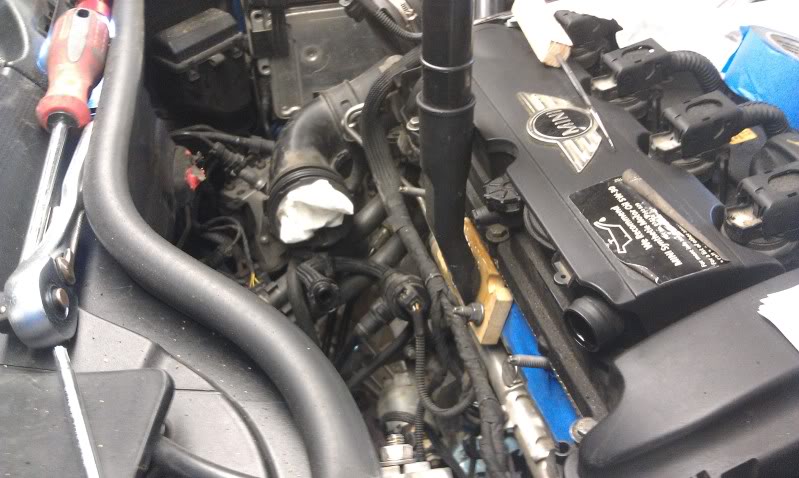
If you plan to follow the DIY instructions in post #27 above please note that the size of the nozzle tubing is very important. The blow gun extension that I detailed in the DIY has aluminum tubing with an ID of about 0.20". It worked very well and delivered consistent, strong walnut shell media flow. The carbon build up was rapidly removed.
I originally tried smaller copper tubing and it was far too restrictive. I had minimal walnut shell flow. It was not nearly sufficient to remove carbon buildup. If you use larger tubing with, for example, 0.305" inside diameter the impact velocity will be less than half what it would be with the 0.20" tubing.
The 0.20" ID aluminum tubing was the answer for me. I had a PM from another member that this diameter is critical for consistent media flow with high impact speed for rapid cleaning.
Last edited by gawannamini; May 30, 2013 at 08:32 PM.

Neutral
Joined: Apr 2013
Posts: 4
Likes: 0
Interesting. I have all the necessary equipment & decades of experience as a mechanic to walnut blast, but if the goal here is to clean the valves, combustion chamber, injectors, intake manifole etc. it is far easier ( and cheaper) to just run a can of Techron concentrate through the gas tank prior to changing the oil. I have used this in my Porsches, Mercedes & other cars as well as Honda/Yamaha/Harley etc. etc. bikes and having torn down the top ends can report back that everything was clean as a hounds tooth. For a demo video try out:http://www.texaco.com/techron/. It's simple,
I just add a 20 oz bottle of the Concentrate (not the Pro-Gard, which is Techron light) to a full fuel tank and then run it down to near empty once a oil change cycle.
I just add a 20 oz bottle of the Concentrate (not the Pro-Gard, which is Techron light) to a full fuel tank and then run it down to near empty once a oil change cycle.
5th Gear
Joined: Mar 2009
Posts: 835
Likes: 5
From: Atlanta, GA
Interesting. I have all the necessary equipment & decades of experience as a mechanic to walnut blast, but if the goal here is to clean the valves, combustion chamber, injectors, intake manifole etc. it is far easier ( and cheaper) to just run a can of Techron concentrate through the gas tank prior to changing the oil. I have used this in my Porsches, Mercedes & other cars as well as Honda/Yamaha/Harley etc. etc. bikes and having torn down the top ends can report back that everything was clean as a hounds tooth. For a demo video try out:http://www.texaco.com/techron/. It's simple,
I just add a 20 oz bottle of the Concentrate (not the Pro-Gard, which is Techron light) to a full fuel tank and then run it down to near empty once a oil change cycle.
I just add a 20 oz bottle of the Concentrate (not the Pro-Gard, which is Techron light) to a full fuel tank and then run it down to near empty once a oil change cycle.
The oil mist from the crankcase vent (PCV) coats the back of the intake valves and this bakes into a carbon build up. This is an industry wide problem with the new direct injection engines but some makes have more problems than others depending on PCV system design, amount of oil in the vent from the crankcase and valve timing.
I saw where Texaco claimed that it worked on direct injection but this is marketing and is not possible.
Did any of the cars and bikes that you mentioned above have direct injection engines?
Last edited by gawannamini; May 14, 2013 at 08:09 PM.

2nd Gear
Joined: Sep 2012
Posts: 119
Likes: 0
Here's a update.
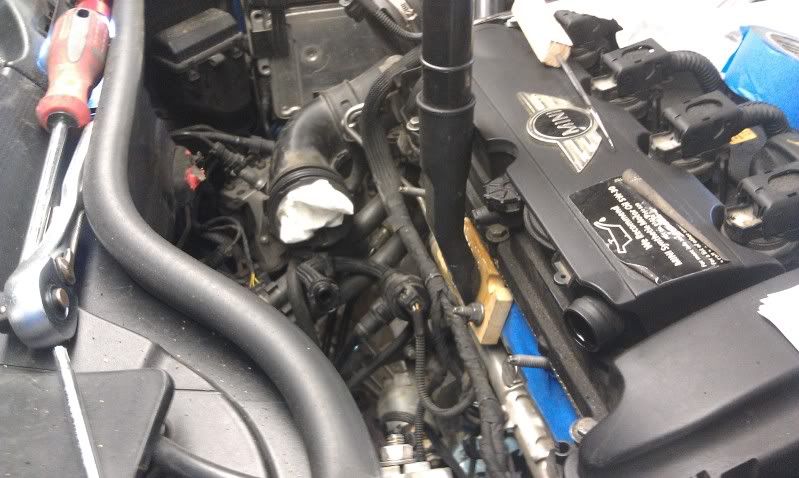
My tools just came in this morning. The BMW sprayer wand thing didn't work with my sandblasting nozzle. LOL
Attachment 66686
So I made my own. A valve and a couple of fittings I got from my local hardware store.
Cost = $6
Attachment 66687
Attachment 66688
As for the air compressor I used. It is a dinky little 4 gallon bositich compressor since my 20 gal air compressor and good shop vac are shot. Dam hurricane sandy flooded my uncle's basement along with a couple other tools he borrowed.
Attachment 66689
The media I used is fine crushed walnuts. 24 grit
Attachment 66690
I'm happy to say it went quicker than I thought Actually a lot quicker than I thought. To decently clean all 4 intake valves took me about 15 minutes.
About a minute to clean one cylinder pretty good and prolly a minute for my air compressor to charge/catch up. My little compressor came on 4 times so a 20 gallon tank would be easily capable of carbon blasting a Mini.
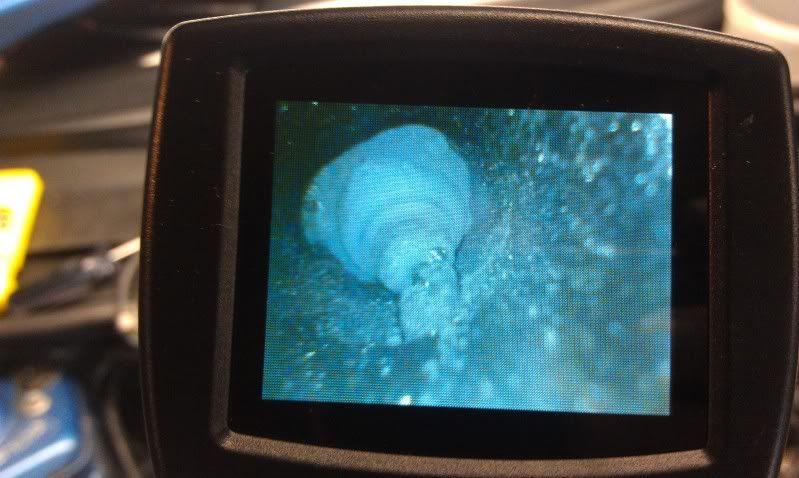
Before:
Attachment 66691
After:
Attachment 66692
As for the amount of walnut media used to clean the intake valves. About 5 pounds.
This is how much that was in my vacuum after the valves were clean. And to me the media still looks pretty clean so I can still reuse it for something else.
Attachment 66693
After I put my Mini back together. I did a test run. I can definitely feel the difference. I have the AP running stage 3 and usually in sport mode always I hit boost cut for some reason but, couldn't figure why it did that. Now no more boost cuts in sport mode.
All in all it took less than a hour to completely carbon blast my Mini. Now I'm going to stop wasting my money buying seafoam and deep creep for my Mini. Instead, since I have to BMW tools to carbon clean. Next time I do it should cost less than five bucks.
Now for the money I saved not going to the dealer is going towards a new air compressor since the old one shot. Debating if I should go for a nice 30gal portable belt driven or 60 gal belt driven stationary($50 difference)
Sent from my iPhone using NAMotoring
My tools just came in this morning. The BMW sprayer wand thing didn't work with my sandblasting nozzle. LOL
Attachment 66686
So I made my own. A valve and a couple of fittings I got from my local hardware store.
Cost = $6
Attachment 66687
Attachment 66688
As for the air compressor I used. It is a dinky little 4 gallon bositich compressor since my 20 gal air compressor and good shop vac are shot. Dam hurricane sandy flooded my uncle's basement along with a couple other tools he borrowed.
Attachment 66689
The media I used is fine crushed walnuts. 24 grit
Attachment 66690
I'm happy to say it went quicker than I thought Actually a lot quicker than I thought. To decently clean all 4 intake valves took me about 15 minutes.
About a minute to clean one cylinder pretty good and prolly a minute for my air compressor to charge/catch up. My little compressor came on 4 times so a 20 gallon tank would be easily capable of carbon blasting a Mini.
Before:
Attachment 66691
After:
Attachment 66692
As for the amount of walnut media used to clean the intake valves. About 5 pounds.
This is how much that was in my vacuum after the valves were clean. And to me the media still looks pretty clean so I can still reuse it for something else.
Attachment 66693
After I put my Mini back together. I did a test run. I can definitely feel the difference. I have the AP running stage 3 and usually in sport mode always I hit boost cut for some reason but, couldn't figure why it did that. Now no more boost cuts in sport mode.
All in all it took less than a hour to completely carbon blast my Mini. Now I'm going to stop wasting my money buying seafoam and deep creep for my Mini. Instead, since I have to BMW tools to carbon clean. Next time I do it should cost less than five bucks.
Now for the money I saved not going to the dealer is going towards a new air compressor since the old one shot. Debating if I should go for a nice 30gal portable belt driven or 60 gal belt driven stationary($50 difference)
Sent from my iPhone using NAMotoring
I recently cleaned my own intake valves on my R57 for about $70 with materials purchased from Harbor Freight. It was really pretty easy and the results were well worth it. I had only 33,000 miles on my 2009 MINI but live only 3 miles from work and make alot of short trips.
The engine response is now much improved with noticeably more power, much smoother operation and throttle response, lower engine vibration/harshness, improved mileage, and smoother idle. Click on the attachment below for a detailed step-by-step writeup. Good luck!
The engine response is now much improved with noticeably more power, much smoother operation and throttle response, lower engine vibration/harshness, improved mileage, and smoother idle. Click on the attachment below for a detailed step-by-step writeup. Good luck!

You two are gods.
My hat off to you, sirs!
 I have everything except for the nozzle and walnut.
Don't take this the wrong way guys, but I love you.
Great thread!!!
__________________
Your Trusted Source For DIY and Parts
FREE SHIPPING over $99 click here
MINI Parts | DIY Help | Facebook | Twitter | Instagram | YouTube | Promos
888.280.7799 | 6am - 5pm PST

FREE SHIPPING over $99 click here
MINI Parts | DIY Help | Facebook | Twitter | Instagram | YouTube | Promos
888.280.7799 | 6am - 5pm PST

Why not try and do it yourself? You'll be more connected to your MINI:-). I am going to give it a shot at 80k miles.
Thank for convincing me, most the DIY I did end up was broke all clips or something.

5th Gear
Joined: Mar 2009
Posts: 835
Likes: 5
From: Atlanta, GA
Disregard if you have an automatic.
Regarding the walnut shell blasting make sure you use the aluminum tubing or an equivalent 0.20" internal diameter tubing. I have received feedback from others that tried larger and smaller tubing and had problems - until they used the correct 0.20" tubing. Small differences really affect cleaning performance. Good luck.
Last edited by gawannamini; Jun 19, 2013 at 08:04 PM.
This looks like something I can handle.  How tight are the valves when they are closed (air tight, I assume)? Do you need to change the gasket on the intake manifold when you reinstall it?
How tight are the valves when they are closed (air tight, I assume)? Do you need to change the gasket on the intake manifold when you reinstall it?
imagineary- what maintenance items have you done to date on your '09? All sorts of things you can do as preventive maintenance, changing trans fluid as mentioned above is one. Serpentine belt replacement is another. Great DIY's here on NAM. For further reading pleasure, we cover many maintenance areas/DIY projects here: MINI Technical Articles
Mark/Pelican Parts
Mark/Pelican Parts
__________________
Your Trusted Source For DIY and Parts
FREE SHIPPING over $99 click here
MINI Parts | DIY Help | Facebook | Twitter | Instagram | YouTube | Promos
888.280.7799 | 6am - 5pm PST
FREE SHIPPING over $99 click here
MINI Parts | DIY Help | Facebook | Twitter | Instagram | YouTube | Promos
888.280.7799 | 6am - 5pm PST
5th Gear
Joined: Mar 2009
Posts: 835
Likes: 5
From: Atlanta, GA
Replacement of intake gasket is not required. MINI uses o-ings and they remain in place and reseal fine. The valves seal very tightly. You don't have to worry about any walnut shell bits passing through closed valves. You just have to make sure you rotate the engine such that the valves on the cylinder on which you are working are closed.