When you click on links to various merchants on this site and make a purchase, this can result in this site earning a commission. Affiliate programs and affiliations include, but are not limited to, the eBay Partner Network.
I just picked up an 09 JCW Hardtop with 68K miles. It runs well, but I figure it needs this service so I'm doing all the research. I'll probably buy the official vacuum adapter for ease of use, but I noticed that when you look at the kit on BAVauto they say this:
"Please note: Intake manifold gasket set and Throttle body gasket, sold separately, must be replaced when removing intake manifold."
I don't see anyone mentioning this here. Has anyone who has done this actually replacing those gaskets?
I've had mine off several times for cleaning and never replaced them
I've had mine off several times for cleaning and never replaced them
+1
Unless they are hard or damaged they probably don't need replacing. 09 MCS with 85k and 7 summers in Phoenix and the original intake manifold gaskets are still in good condition.
Which, of course, you wouldn't know until you remove the intake manifold. What happens if on tears when you are removing the manifold? What happens when, after tearing your car apart, doing the blast (after investing in parts/supplies, then you put it back together only to find you have an unmetered air leak? Isn't the cost of 4(!) rubber gaskets ( maybe $15) worth knowing that you aren't going to wait on them? Just replace the gaskets, for Pete's sake!
Unless they are hard or damaged they probably don't need replacing. 09 MCS with 85k and 7 summers in Phoenix and the original intake manifold gaskets are still in good condition.
I've done a manual cleaning on my ports and have had the intake off several times. The seals were fine. I may replace them the third time I take it off. It's not a major event even if you have replace them later.
Here's a couple of video I did showing how long it takes to decently clean one cylinder. Sorry for the blurriness of the video, stupid autofocus didn't quite work.
Couldn't figure out how it would take more than 3 hours to clean the intake valves. Dam the dealer make alot of money off this cleaning, $900 - $5 in walnut media and less than a hour or so in labor = at least $750 profit. Since I know how to do it now, I could charge like half that and still make a killing.
Good luck to anyone trying to walnut blast clean their valves.
NOTE: Don't forget to check to see if your valves are closed before doing this, you don't want walnuts going into you cylinder. How I checked is taking all the spark plugs out and using my mouth I tried to blow air in to see if it had pressure in the cylinder. If it didn't leak, I knew it was closed, if it did I get in my Mini and try to turn over the engine and check again.
I don't know if it would of made a difference in cleaning the carbon off. I did the cleaning after a drive to get some walnut media so the engine was all warmed up. I didn't mind the engine heat since it was 45 degrees outside.
Do you still have these videos up somewhere? The links don't work anymore.
Getting geared up to decoke the intake ports and valves this weekend. I have completed my vacuum adaptor and blast gun nozzle, thanks to the excellent diy provided by gawannamini. I made some slight adaptations because my vacuum hose is bigger (that's what she said) and I'm using a different type of blast gun. The car has 76,000km and its never been decoked. I've had it for 1000km or 10 days. Anyway, I'm excited and nervous.
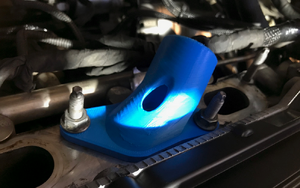
I 3D printed an adapter and made an easier to understand guide
So I handmade an adapter out of PVC and wood and it worked, but using and making it was difficult. For my second cleaning I designed and 3D printed an adapter that is much easier to use. I also created a guide that I will copy and paste below. The file to print it yourself is here. If you don't have a 3D printer (aka most people) send me a PM and I can printer and ship you one.
Update: Due to popular demand I am now selling these on ebay!
Pictures:
The guide I created: (I couldn't transfer links so the properly formatted guide WITH LINKS IS HERE):
CLICK HERE TO GO TO THE BETTER VERSION OF THIS GUIDE (With links etc.):
About
This is an adapter to make carbon blasting the intake valves on a Mini Cooper R56 / N14 much easier. Normally you have to custom make you own, and that can be very difficult. This replaces a $90 adapter made by mini. If you do not have a 3D printer, you can order the part on various websites, or contact me and I can ship you one for cheap.
I designed this for the N14 engine (The R56 turbo), but it may fit other engines.
Designed for a 1-1/4" vac connection.
If I designed this as one part with 4 mounting holes it would not have fit on the intake ports on the far left and right. Thus, you need two versions. A normal one and a mirrored one.
I made this to fit a cheap homemade blaster. Directions on how to make the blaster are below.
Why carbon clean?
On the N14 engine (and many others) pressure from the crankcase is vented directly into the intake. This pressure includes gasses like oil vapor. This is called the PCV (positive crankcase ventilation) system. The PCV system does a poor job getting rid of the oil vapor before it is vented into the intake. In fact, if you take apart the intake ducting you will often find oil lining the pipes. As a result, these oil droplets hit the hot intake valves and quickly bake on and turn to carbon. In the direct injection engine the gas is injected directly into the cylinder, so nothing ever cleans the intake valves. Over time the carbon builds up on the intake valves and slowly chokes the engine resulting in poor overall performance, misfires, low MPG, and poor idling performance. It can even cause catastrophic failure by allowing the valves to heat up more than normal causing the valve to have a hole burned into the edge resulting in a loss of compression.
If you Mini is over 40K miles, chances are you need it done.
The procedure is done often by Mini, but you are looking at around $600 for that. You save a ton of money by doing it yourself, especially because you will likely have to do this every 40K miles or so to keep it clean and you will already have all of the tools and knowledge from the first time. The first time I did this took me a day because I didn’t know all of the tricks and had a TON of carbon to remove, but I have done it again recently and it only took a few hours.
What you need
Total cost for the whole project should be around $50 assuming you have an air compressor and shop vac. If you don't have an air compressor I bought this one and it worked perfectly. The blaster and media can be used for other projects. This should just take a trip to harbor freight and home depot/lowes.
Air compressor. Ideally 1.5 horse power or higher and 6 gallons or higher. Less is fine, but you will have to take more breaks for it to recharge.
Shop vac with 1-1/4 hose connector.
Socket set and torque wrench. Need up to 17mm socket.
These adapters, bother normal and mirrored.
Portable abrasive blaster kit from harbor freight.
25lbs Fine walnut shell media (Do NOT use sand). This should be almost double what you need.
Air Blow Gun with 2 ft. Extension from Harbor Freight. Item 68257.
Watts A-827 1/2-in x 1/4-in Brass Pipe Fitting or similar
Watts A-390 1/2-in x 1/2-in Barb Fitting or similar
Electrical tape
4 Intake manifold gaskets. Part# 11617528340 for the N14 as well as many other engines. Check realoem.com to find what part number you need. This is not required, but they are cheap and if you have a high mileage mini it’s a good idea to change them out.
If you are not very flexible a mirror is handy.
How to
If you are a DIY’er or someone mechanically savvy then this is a fairly straightforward project. Set aside one day for it, but it should only take an afternoon, especially if you have remove the intake manifold before.
(1. Make the blasting tool.
This is fairly easy. Download this guide and it shows how to make the tool. Here are some pictures of mine that shows how everything fits together. Test and make sure it works before use.
(2. Disconnect the battery.
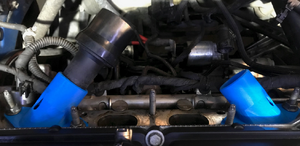
(3. Remove the intake manifold.
This is the guide I use for removing the intake manifold. Here are some tips:
When removing the noise maker from the firewall (step 8) don’t worry about about breaking it. It’s tough. Just yank it off by hand.
When removing the ducting from the throttle housing (step 12), I leave the ducting connected to the throttle housing. It doesn’t get in the way when removing the manifold. I just remove the ducting connected to the angled ducting going into the throttle housing. This is much easier. The red line shows where I disconnect it.
When removing the purge solenoid tubing (step 13) don’t squeeze both sides of the connector. Only squeeze the top half of it. I use a set of pliers and a long flathead screwdriver to pop it off.
When removing the 10mm bolt bracing the manifold (step 14) I find it easiest to just remove the passenger tire and get to the bolt from that side instead of coming under the car. This is fairly easy so don’t over think it. You will have to remove the wheel later anyway. Here it is
Make sure when putting everything back together that both hoses are connected to EPPC solenoid (seen in step 21). They can fall off easily and you will have no boost if that happens.
(4. Check each intake port by eye or using a mirror to find what valves are closed. It is very important that you do NOT blast into a port that has valves that are open. Stuff a rag into all of the port except the one you are working on.
(5. Attach the 3D printed adapter to the engine head using one or two of the nuts you removed earlier. Make sure not to lose the nuts. Attach the vacuumed and blast for 10 seconds. I used 100 PSI. If there is a ton of carbon I found it helpful to stop blasting after a bit and then use a metal stick or similar to pick off big chunks of the carbon. This gave the walnut shell a better surface to attack. Before removing the wand pinch the media feeding hose so that you can just use the air pressure to blow away remaining walnut shell. Keep it pinched until it is removed so that the vacuumed doesn’t pull more walnut shell out.
(6. Once you have cleaned all of the ports with closed valves, you need to rotate the engine to close the other valves. The easiest / safest way to do this is to turn it by hand. Remove the passenger wheel as well as one of the expanding rivets holding the carpet wheel well liner so that you can get to the engine from inside the wheel well. You should see the serpentine belt attached to a pulley with a big bolt in it (16mm if my memory is correct.) Turn the bolt CLOCKWISE a few rounds. Do NOT turn it counterclockwise. This could lessen the bolt and then your timing will be off. This should not take much effort.
(7. Clean the remaining ports.
(8. Put everything back together. 14.7 ft/lbs for the intake manifold nuts and 100 ft/lbs for the wheel.
(9. When you start the engine. It will likely run rough or may take a while to turn over at all. This is because the engine ECU has slowly adjusted to running with the carbon, so now that it can breathe easier it is not used to that and has to adjust. Disconnecting and reconnecting the battery sometimes helps prevent this. It should run normal after 5 min or so, and then after a while should run much better than before the carbon cleaning.
Good luck and have fun saving around $500!
I copied some of this from this guide. I recommend reading it as well.
Last edited by geofox784; Oct 1, 2024 at 01:26 PM.
Thanks to all that have contributed to this thread. Finally finished this project. It took me a few weeks as I was very cautious and didn't want to screw this up. I also used a small 6 gallon compressor from Harbor Freight, so basically had to do this only on the weekends when everyone was out of the house cause the compressor was so loud.
I couldn't get the valves as clean as some of the other folks did, as some of the carbon was baked solid on. But they were completely clogged up at 57k. I had to use dental pics to chip away as well as soak with carbon cleaner for awhile. At first I thought I might have sprayed walnut shells into the cylinders because I didn't know that the skewer stakes would go up and down that far. So I ended up buying a boroscope from Amazon to check if I had walnut shells in them. And some vacuum attachments to suck any shells out of the spark plug holes. But in the end there were none and even though I didn't rotate the engine to ensure the skewer stakes were at the highest level, they were closed. When I was done, she fired up immediately with no issues.
Was it worth it to do myself even if it was a lot of work, I just find satisfaction in being able to accomplish these tasks myself.
Turning a wrench or picking carbon from your valves can be a PIA during the process, don't ask me how I know at least on the wrench part, but upon completion yes it is quite satisfying to know you did it yourself.
I have cleaned my intake valves three times in the 75,000 miles I have had this MINI. I wrote the write up after the first cleaning. I always drive in Sport mode and the carbon deposits have always been very hard.
Things I have learned:
In my experience if the walnut shell blasting nozzle is too close to the carbon deposit, it will not clean well. I have to force myself to pull the nozzle back further, swirl the nozzle around, and change the insertion depth back and forth. We need to give the walnut particle room to accelerate.
If the compressed air is not dry enough the pick up
of the walnut shells can be reduced at times due to pluggage.
I have always been able to get the valves totally clean but have to wiggle the nozzle around and continuously reposition it to ensure walnut shells are hiting the area behind the valve stem.
It is very important to clear the walnut shells off of the back of the valves by using compressed air to stir up the accumulated shells (with NO shells being fed) to allow the vacuum to remove the accumulation. If walnut shells impact walnut shells no cleaning occurs.
The number one offender in reduced cleaning performance is wrong tubing size used to fabricate the nozzle. Even a relatively small increase in tubing inside diameter (from my post) will notably reduce particle impact velocity. In this case size maters - in a big way!
I added an oil catch can and deleted the rear PCV hose that feeds into the throttle body after the first walnut shell cleaning. I saw minimal reduction in the rate of the build up. After only 20,000 (mostly city) miles I can detect marked performance improvement after performing a walnut blast. The engine is much more lively and smoother. I have even had the low mass airflow check engine code from this carbon obstruction. Cleaning eliminates this code.
Based on my experiences, I plan on routinely walnut shell blasting every 20,000 miles. Good luck!
Last edited by gawannamini; Jun 25, 2018 at 07:24 PM.
Awesome, thanks for the additional tips gawannamini! The next time I do this, I will try to pull the nozzle out further. I kept getting closer thinking I needed to impact the carbon more directly. I also tried to keep short walnut bursts and then blow compressed air constantly. But after awhile, they didn't seem to get any cleaner. I used 100psi but maybe because of my small compressor, it likely dropped below that so then I didn't always shoot with 100psi.
I went ahead and purchased another bsh oil catch can and with boost tap and will be installing that soon.
Compressor pressure is important. I try for about 125 psi. My compressor is a pretty high capacity 2HP, 230 VAC, unit that keeps up well. Low air pressure will absolutely sap your cleaning power. I blast about 20-30 seconds, shut off walnut shell feed, blast air-only for about 5 seconds, then hit it with the shells again for another 20 - 30 seconds.
I can typically clean both intake valves in a cylinder in about 5 minutes of actually blasting.
I think my catch can does catch a bit of oil but in cold weather it primarily catches condensation (water) with some oil. It certainly can't hurt to have it.
Last edited by gawannamini; Jun 26, 2018 at 07:52 PM.
PM geofox784, I just purchased a set and he shipped them to me in a few days. Great little adapters to add to the toolbox for when you need them.
Yup I am still making these. Right now I'm in the middle of overhauling a part of my printer though so it could be awhile before I can print some more. Waiting on a part that should show up Tuesday.
Has anyone tried the 3D adapters on an N18 engine?
I have not had anyone specifically tell me they have, but from what I have seen they should fit. If you are willing to be the guinea pig I'll send you a set and refund you if it doesn't fit.
Cheap trick instead of using the proper vacuum adapters: (though I do have the OEM adapters, I'm offering this tip because I also blast other cars now)
Over the years, I've kept a few different sized coolant hoses (any of them with a good elbow shape would be a good choice). I would try to trim one end so it can "plug" into the intake port, then drill a hole opposite from the port on the coolant hose, this hole is where I'd insert the blaster tube into. I make the hole slightly large to allow angular maneuverability. Most hoses I'm able to fit the top end to the vacuum cleaner by some different means. This has worked for Mini, BMW, VW, Audi.
Well, I got everything back together, went to start it and no go. It cranks but seems like no spark. I checked all connections, but will check again. I pretty mechanically inclined but this carbon blasting got the best of me. I ran the battery down, is on a charger now.
I know it has been a long, long time since this post/comment, but did you figure out what was wrong with yours? I have the same symptoms... no spark when cranking the engine post-blast. Wondering what I've missed. Pulling it all apart to check connections and inlet ports again. :-/


 Since I know how to do it now, I could charge like half that and still make a killing
 .
.
 . How I checked is taking all the spark plugs out and using my mouth I tried to blow air in to see if it had pressure in the cylinder. If it didn't leak, I knew it was closed, if it did I get in my Mini and try to turn over the engine and check again.


 I checked all connections, but will check again. I pretty mechanically inclined but this carbon blasting got the best of me. I ran the battery down, is on a charger now.