
Suspension NM Engineering torque arm insert install/engine bushings


Thread Starter
|
5th Gear
Joined: Oct 2007
Posts: 974
Likes: 0
From: Norwalk, CT
NM Engineering torque arm insert install/engine bushings
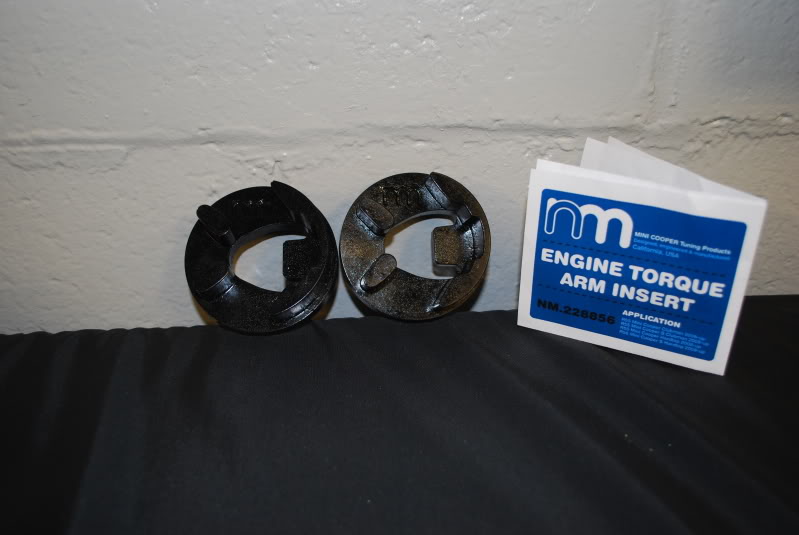
Ok, so tonight I put the car in the air and decided to put in my Torque Arm Insert from NM Engineering.
From first bolt off to last bolt on, it took 25 minutes. Now, this is obviosuly much easier to do when the car is in the air and you have the proper tools! I used my mechanic's air tools for the most part.
First things first, heres what the set looks like off the torque arm.
Second, went to the car and used PB Buster on the bolts, as they were very tight and rusted. Even with the air tool it was tough, so I sprayed it and it helped loosen the bolt. This stuff is great for loosening anything that seems super tight! Made it much easier.
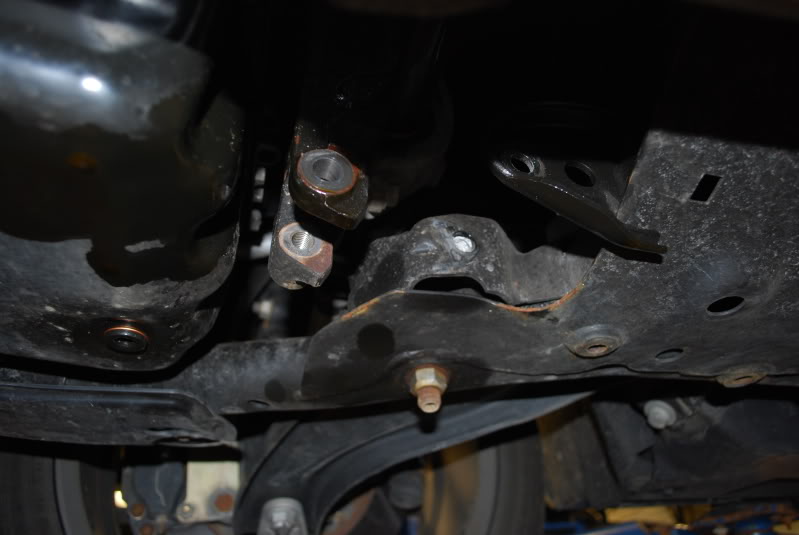
So heres where the Torque arm goes, in this picture it is off the car.
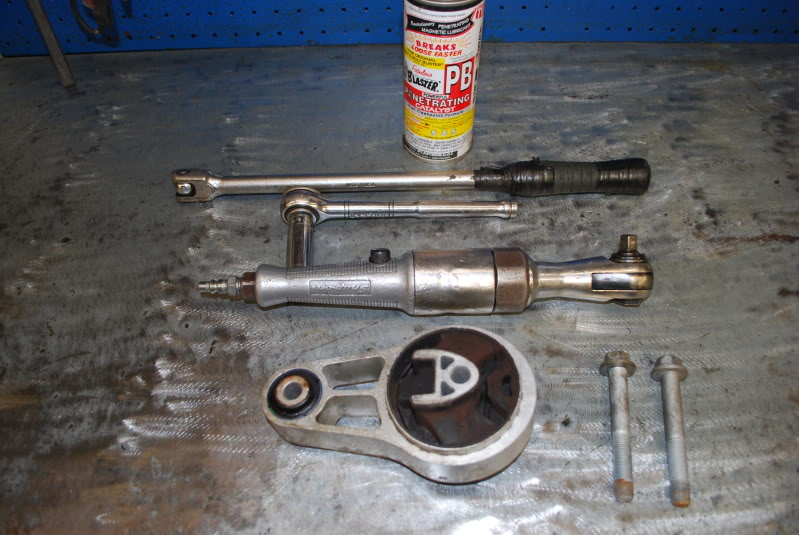
Here are the tools I used. The assortment of tools was because the sockets I had were both big and small. For the bolt that is closest to the front of the car, it's a tight fit due to the DP. So a smaller 16mm socket is needed. The torque bar is also in this picture, however, the inserts are not yet installed.
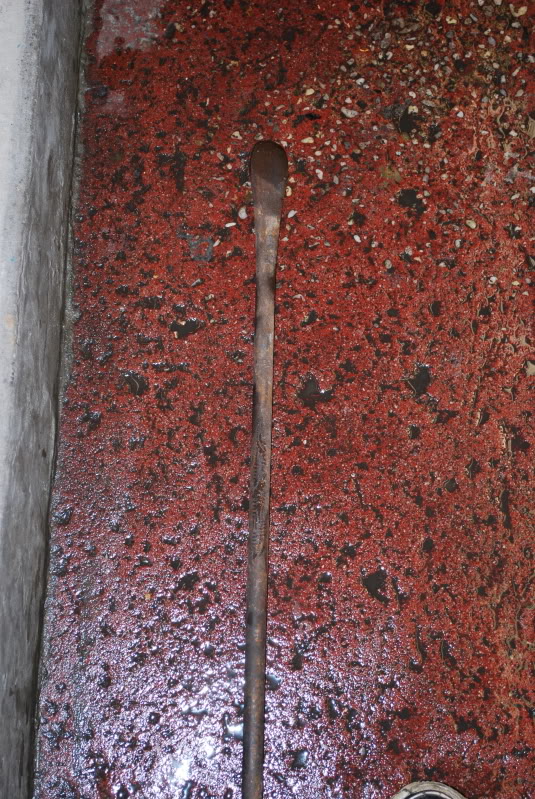
The pry bar is also a huge help when trying to get it back in, as the fit is tighter and lining up the bolt holes by hand could be tricky. Something like this.
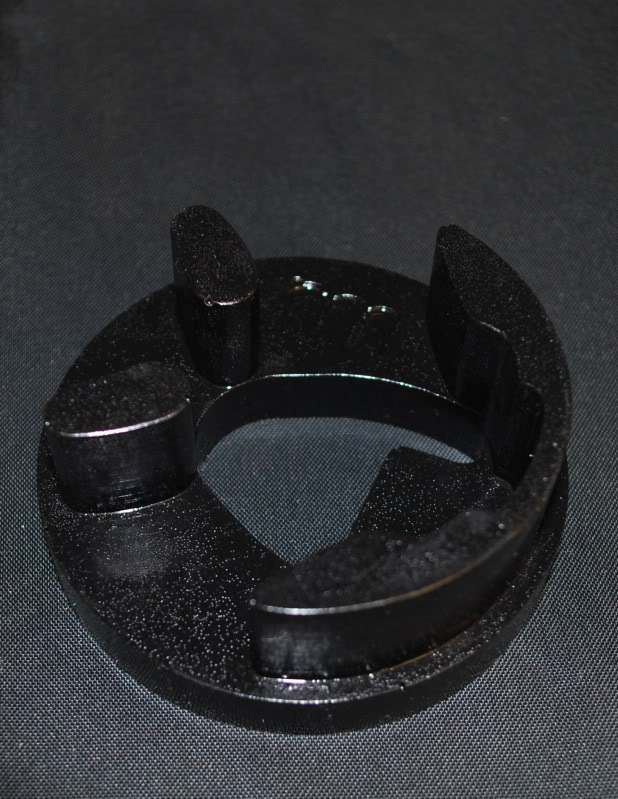
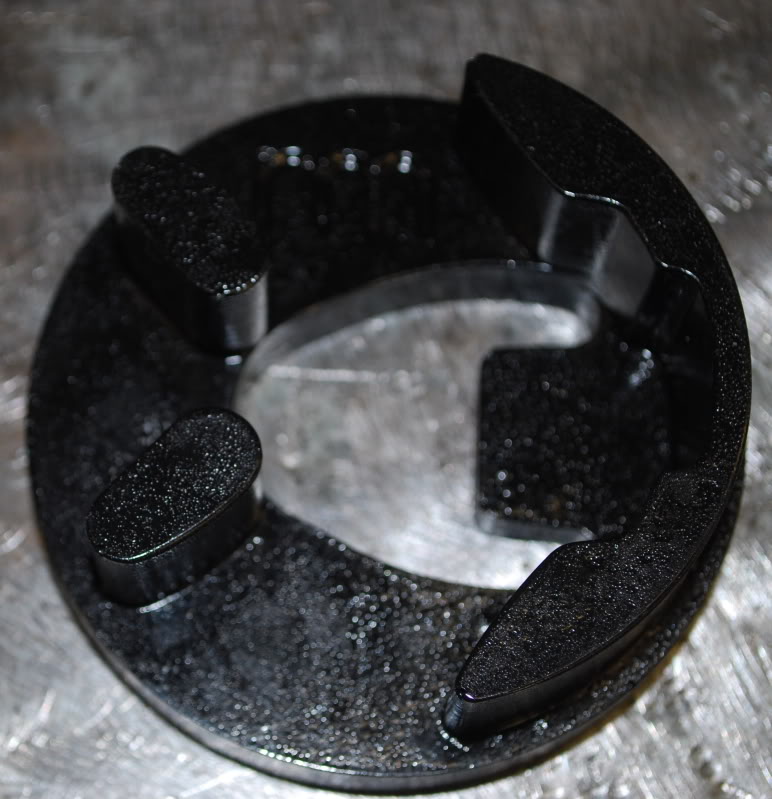
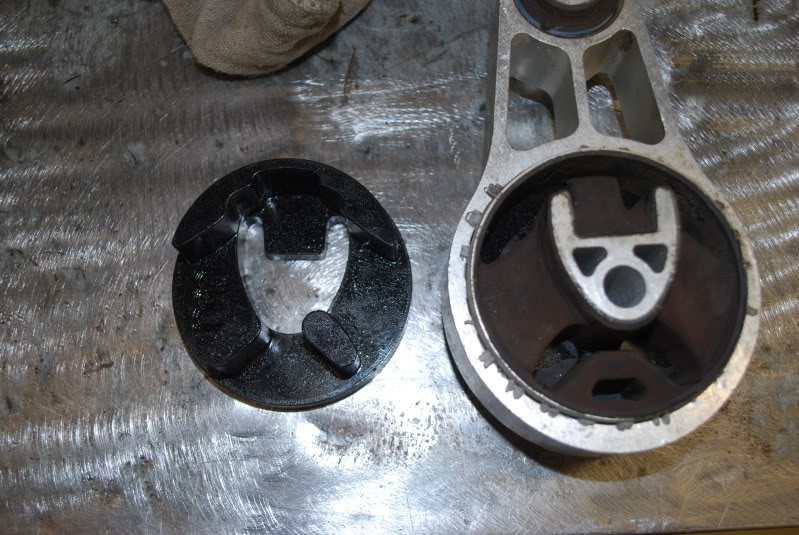
Now, with the torque bar off the car, the inserts are installed. This the simplest thing you could possibly do. All you need to do is stick the inserts in the bar in the proper place. It's just like playing with the blocks in kindergarten and trying to fit them in the right slots

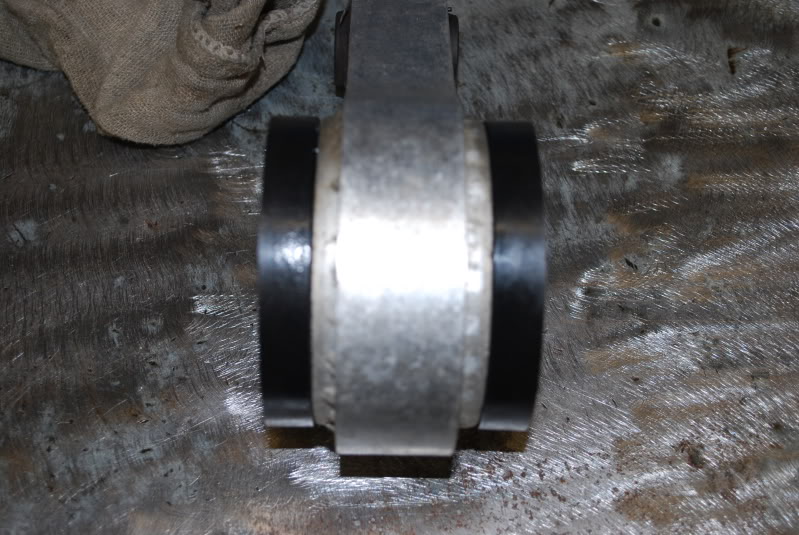
Then, once you have both inserts in, you put it back on the car, line up the bolts, and bolt it tight to 80 foot lb torque. This is where the pry par could really come in handy, it did for me!


Thats it, the end! Lower the car off the lift and feel an immediate imrpovement in shifting and quicker transfer of power from engine to ground. Even after holding the bar in my hand and trying to move it after it was bolted up, it seemed much more solid than stock. The car felt crisper and more responsive on the throttle.
As for noise and vibration - NO VIBRATION AT ALL! Not in the steering wheel, pedals, or stick shift. Noise, well, at idle there is a slight noise. As soon as I put it into gear, it disappears. I may even need to tighten the bolts harder, I'm going to check tomorrow.
All in all, great bang for your buck and a worthwhile mod. Takes minutes to put in and you recieve immeidate results. Very happy with it and many Thanks to Nick at NAMotorsports for getting me a deal on this piece, a pleasure to deal with as always, thanks Nick!
Hope this helps people decide! Motor On!
From first bolt off to last bolt on, it took 25 minutes. Now, this is obviosuly much easier to do when the car is in the air and you have the proper tools! I used my mechanic's air tools for the most part.
First things first, heres what the set looks like off the torque arm.
Second, went to the car and used PB Buster on the bolts, as they were very tight and rusted. Even with the air tool it was tough, so I sprayed it and it helped loosen the bolt. This stuff is great for loosening anything that seems super tight! Made it much easier.
So heres where the Torque arm goes, in this picture it is off the car.
Here are the tools I used. The assortment of tools was because the sockets I had were both big and small. For the bolt that is closest to the front of the car, it's a tight fit due to the DP. So a smaller 16mm socket is needed. The torque bar is also in this picture, however, the inserts are not yet installed.
The pry bar is also a huge help when trying to get it back in, as the fit is tighter and lining up the bolt holes by hand could be tricky. Something like this.
Now, with the torque bar off the car, the inserts are installed. This the simplest thing you could possibly do. All you need to do is stick the inserts in the bar in the proper place. It's just like playing with the blocks in kindergarten and trying to fit them in the right slots
Then, once you have both inserts in, you put it back on the car, line up the bolts, and bolt it tight to 80 foot lb torque. This is where the pry par could really come in handy, it did for me!
Thats it, the end! Lower the car off the lift and feel an immediate imrpovement in shifting and quicker transfer of power from engine to ground. Even after holding the bar in my hand and trying to move it after it was bolted up, it seemed much more solid than stock. The car felt crisper and more responsive on the throttle.
As for noise and vibration - NO VIBRATION AT ALL! Not in the steering wheel, pedals, or stick shift. Noise, well, at idle there is a slight noise. As soon as I put it into gear, it disappears. I may even need to tighten the bolts harder, I'm going to check tomorrow.
All in all, great bang for your buck and a worthwhile mod. Takes minutes to put in and you recieve immeidate results. Very happy with it and many Thanks to Nick at NAMotorsports for getting me a deal on this piece, a pleasure to deal with as always, thanks Nick!
Hope this helps people decide! Motor On!
Last edited by dtsoccer6; Apr 13, 2009 at 09:33 PM.

Just a tip for those that will be installing these....
There is no need to remove the entire torque arm as shown here...just loosen the front bolt, take the rear bolt out and rotate the arm down. Pop in the bushing insert and slide it back up, tighten bolts, you're done. Really a 5 min process!
Also, I'm probably just used to it now, but I don't notice it as much as I did when I first put it in ...oh well, I guess I'd really hate going back to stock though.
There is no need to remove the entire torque arm as shown here...just loosen the front bolt, take the rear bolt out and rotate the arm down. Pop in the bushing insert and slide it back up, tighten bolts, you're done. Really a 5 min process!
Also, I'm probably just used to it now, but I don't notice it as much as I did when I first put it in
...oh well, I guess I'd really hate going back to stock though.

Thread Starter
|
5th Gear
Joined: Oct 2007
Posts: 974
Likes: 0
From: Norwalk, CT
Just a tip for those that will be installing these....
There is no need to remove the entire torque arm as shown here...just loosen the front bolt, take the rear bolt out and rotate the arm down. Pop in the bushing insert and slide it back up, tighten bolts, you're done. Really a 5 min process!
Also, I'm probably just used to it now, but I don't notice it as much as I did when I first put it in...oh well, I guess I'd really hate going back to stock though.
There is no need to remove the entire torque arm as shown here...just loosen the front bolt, take the rear bolt out and rotate the arm down. Pop in the bushing insert and slide it back up, tighten bolts, you're done. Really a 5 min process!
Also, I'm probably just used to it now, but I don't notice it as much as I did when I first put it in
...oh well, I guess I'd really hate going back to stock though.

Trending Topics

Banned
Joined: Jul 2008
Posts: 636
Likes: 1
nice write up!
but uh lol err steve... loctite is an adhesive, not a product to loosen tight bolts haha, just thought i'd be an *** and point it out lol, loctite will basically make it impossible to take a nut off of a bolt of applied =\
a good use for it is ssk's, such as helix's, which only has one securing bolt.
i gotta get myself one of these soon, been on my list for a long time
Thread Starter
|
5th Gear
Joined: Oct 2007
Posts: 974
Likes: 0
From: Norwalk, CT
nice write up!
but uh lol err steve... loctite is an adhesive, not a product to loosen tight bolts haha, just thought i'd be an *** and point it out lol, loctite will basically make it impossible to take a nut off of a bolt of applied =\
a good use for it is ssk's, such as helix's, which only has one securing bolt.
i gotta get myself one of these soon, been on my list for a long time
but uh lol err steve... loctite is an adhesive, not a product to loosen tight bolts haha, just thought i'd be an *** and point it out lol, loctite will basically make it impossible to take a nut off of a bolt of applied =\
a good use for it is ssk's, such as helix's, which only has one securing bolt.
i gotta get myself one of these soon, been on my list for a long time
I never used Loctite before and thought they made an assortment of adhesives and loosening products. 
Hey, Loctite (threadlocker) comes in a variety of different grades and can make it easier to get a nut/bolt apart later. You can use blue/medium on just about everything, it'll prevent most fasteners from vibrating loose and keep the moisture out so they don't rust or seize together. Red is good for more critical applications, like the bolts holding your flywheel on, still not that hard to take apart, way easier than something that's rusted in place.
Thread Starter
|
5th Gear
Joined: Oct 2007
Posts: 974
Likes: 0
From: Norwalk, CT
Hey, Loctite (threadlocker) comes in a variety of different grades and can make it easier to get a nut/bolt apart later. You can use blue/medium on just about everything, it'll prevent most fasteners from vibrating loose and keep the moisture out so they don't rust or seize together. Red is good for more critical applications, like the bolts holding your flywheel on, still not that hard to take apart, way easier than something that's rusted in place.

Thread Starter
|
5th Gear
Joined: Oct 2007
Posts: 974
Likes: 0
From: Norwalk, CT
Nice!
I agree with Thumper though, once its on you get used to having it and you forget its there. Oh well, the thing is I know its there and it I can deff feel it everytime I shift. Motor on!
I agree with Thumper though, once its on you get used to having it and you forget its there. Oh well, the thing is I know its there and it I can deff feel it everytime I shift. Motor on!
2nd Gear
Joined: Oct 2008
Posts: 63
Likes: 0
From: Mexico City
Just a tip for those that will be installing these....
There is no need to remove the entire torque arm as shown here...just loosen the front bolt, take the rear bolt out and rotate the arm down. Pop in the bushing insert and slide it back up, tighten bolts, you're done. Really a 5 min process!
Also, I'm probably just used to it now, but I don't notice it as much as I did when I first put it in...oh well, I guess I'd really hate going back to stock though.
There is no need to remove the entire torque arm as shown here...just loosen the front bolt, take the rear bolt out and rotate the arm down. Pop in the bushing insert and slide it back up, tighten bolts, you're done. Really a 5 min process!
Also, I'm probably just used to it now, but I don't notice it as much as I did when I first put it in
...oh well, I guess I'd really hate going back to stock though.Greetings from Mexico


 .
.

2nd Gear
Joined: May 2008
Posts: 109
Likes: 0
One note, I have the Strat exhaust, and I had to disconnect at the downpipe in order to back the rear bolt out enough that the arm would swing down. That's kinda a pain...
Fig