

R56 Joey Mod Feedback needed

Joey Mod Feedback needed
Hey guys...
I am not shy about taking our cars apart to do mods however, I like to fully understand what I am getting myself into. Never took apart a headlight assy so looking for feedback from those who have done theirs and any tips or instructions that would help from the DIY'er.
I just priced a new set in case I destroy the headlights....over 1K for a set!!!! So this is no small matter if I screw them up...thats 1K of future mods throw away.
I saw some time ago a thread with good instructions for the R56 but can't find it. We have the Zenon's.....feedback would be appreciated.
After I get the project done I will do a full detailed write up with pictures

https://www.northamericanmotoring.co...y-mod-r56.html
which method are you doing... heat gun or oven?
It seems that people have been successful with plastidip without chipping. I used primer and krylon fusion and found that there is some chipping.
which method are you doing... heat gun or oven?
It seems that people have been successful with plastidip without chipping. I used primer and krylon fusion and found that there is some chipping.
I will be etch priming and then base coat then clear for the finish. I have some ideas on how I am going to tie in the DS and black...subtle but should look really nice when I am done. Got to get over the fear of the oven bake or heat gun process. Really want to hear from someone who did the R56 Xenon lights.
Please keep feedback coming.....Thanks all...
Last edited by Red Bull; Jan 20, 2009 at 08:40 AM.

My biggest concers besides throwing them in the oven is how much heat the light throws on the plastic bucket. Dont care for rattle can paint and plan on spraying them but have to check what temp it can hold up to.

 Going to start the joey mod in the morning. Hope for no surprises..
Trending Topics


I like the laminex a lot but, if I have the choice I would much rather have an item painted instead of covered. It is just more finished to me. The Laminex on the rear lights and side markers are perfect but there is something about the headlights. When I see a good joey mod I love it.
This is my post from the Joey-Mod thread. Overall it's much easier than I expected, even the 1st time doing it.
I did the Joey Mod today on my R56! Thanks to everyone in this thread for sharing their experiences, it was super easy to do it and the result looks fantastic!
Tools needed:
*10mm hex socket and ratchet [to remove headlights from car]
*T-10 torx to remove turn signal lens from headlight housing
*T-20 torx to remove headlight washer and bezel from housing
*large slotted screwdriver to pry off retainer clips and pry apart housing
*#00 steel wool
*spray paint for plastic [I used textured black finish]
Step 1: Remove headlights from car. 4 bolts per headlight, piece of cake

Step 2: Tear apart the headlight bits. Remove headlight and turn signal access panels, take out turn signal bulb, remove washer
Step 3: Remove two retaining clips [one on top, one behind headlight washer]
Step 4: Preheat kitchen oven. Put headlight into oven [I have a natural gas oven] at 250F for 5 minutes.
Step 5: Remove headlight with oven mitts and immediately pry apart polycarbonate lens from ABS housing, remembering to unclip the handful of plastic retainer clips. The RTV [sic] is super gooey. If you don't get the headlight warm enough the RTV will be very stringy. Don't get the headlight too hot as the polycarbonate will start to melt!


Step 6: Remove bezel from lens
Step 7: Remove turn signal housing from bezel
Step 8: Use steel wool to roughen chrome on bezel, wash with soapy water when finished. Repeat for headlight washer chrome.

Step 9: Paint bezels and headlight washers. Use 3 light coats as this type of paint loves to run when applies even slightly too thick. Let it all dry.

Step 10: Reassemble the bezel and turn signal and lens.

Step 11: Squish lens to housing and compress the RTV as much as possible
Step 12: Put assembly back into oven @ 250F for 4 minutes to reheat RTV.
Step 13: Remove with oven mitts and immediately compress the RTV as much as possible.
Step 14: Snap on the two retaining clips and bolt on the headlight washers

Step 15: Bolt headlights back into the car and perform headlight alignment with both headlight pattern and fitment against bonnet.
Taa Daa!
Here is my old setup: Lamin-X "gunsmoke" tint. Looked great but blocked WAY too much light. It looked like I had old dingy halogen headlights at night.

Now the new Joey-Mod!

Cheers!
Ryan
I did the Joey Mod today on my R56! Thanks to everyone in this thread for sharing their experiences, it was super easy to do it and the result looks fantastic!
Tools needed:
*10mm hex socket and ratchet [to remove headlights from car]
*T-10 torx to remove turn signal lens from headlight housing
*T-20 torx to remove headlight washer and bezel from housing
*large slotted screwdriver to pry off retainer clips and pry apart housing
*#00 steel wool
*spray paint for plastic [I used textured black finish]
Step 1: Remove headlights from car. 4 bolts per headlight, piece of cake
Step 2: Tear apart the headlight bits. Remove headlight and turn signal access panels, take out turn signal bulb, remove washer
Step 3: Remove two retaining clips [one on top, one behind headlight washer]
Step 4: Preheat kitchen oven. Put headlight into oven [I have a natural gas oven] at 250F for 5 minutes.
Step 5: Remove headlight with oven mitts and immediately pry apart polycarbonate lens from ABS housing, remembering to unclip the handful of plastic retainer clips. The RTV [sic] is super gooey. If you don't get the headlight warm enough the RTV will be very stringy. Don't get the headlight too hot as the polycarbonate will start to melt!
Step 6: Remove bezel from lens
Step 7: Remove turn signal housing from bezel
Step 8: Use steel wool to roughen chrome on bezel, wash with soapy water when finished. Repeat for headlight washer chrome.
Step 9: Paint bezels and headlight washers. Use 3 light coats as this type of paint loves to run when applies even slightly too thick. Let it all dry.
Step 10: Reassemble the bezel and turn signal and lens.
Step 11: Squish lens to housing and compress the RTV as much as possible
Step 12: Put assembly back into oven @ 250F for 4 minutes to reheat RTV.
Step 13: Remove with oven mitts and immediately compress the RTV as much as possible.
Step 14: Snap on the two retaining clips and bolt on the headlight washers
Step 15: Bolt headlights back into the car and perform headlight alignment with both headlight pattern and fitment against bonnet.
Taa Daa!
Here is my old setup: Lamin-X "gunsmoke" tint. Looked great but blocked WAY too much light. It looked like I had old dingy halogen headlights at night.
Now the new Joey-Mod!
Cheers!
Ryan
i used heatgun method. Lots of prying required. just heat, pry, heat, pry and eventually, the whole thing just popped off.
just be careful when you pry because my edges arent as smooth as it used to be...this is due to trying to pry using a flat head
just be careful when you pry because my edges arent as smooth as it used to be...this is due to trying to pry using a flat head

Auto on Sport Button guy
Joined: Apr 2007
Posts: 702
Likes: 2
From: Portland, OR
Here is my Joey Mod "how to" thread. Have fun!
https://www.northamericanmotoring.co...-to-do-it.html
https://www.northamericanmotoring.co...-to-do-it.html
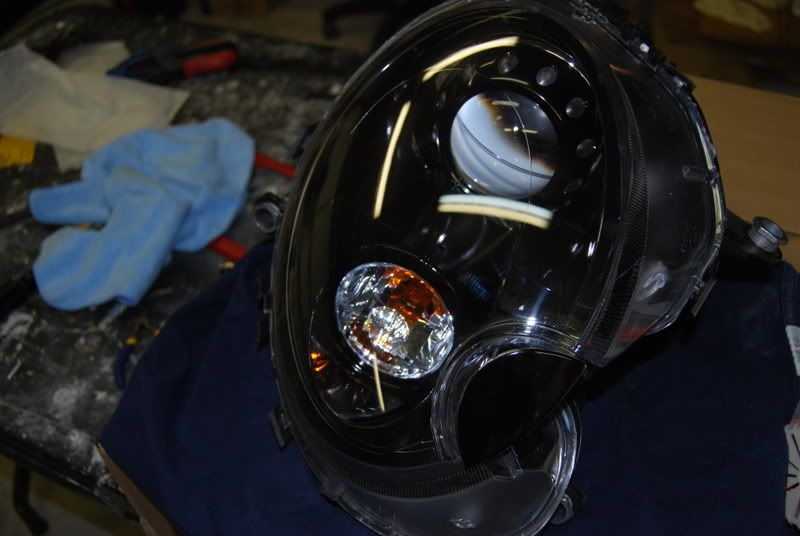
Just did the first side...took about 1 1/2 hours. I used a heat gun...really easy mod...The longest part was the paint drying. I will do a step by step in a couple of days. Here is a rough shot..

Er, let me get this straight, you guys painted the WHOLE inner surface black? Even the reflective part? I thought you had to leave that alone? I taped the shiny parts and plasti diped the long tube(turn signal) and painted the other "eye" red. I'll definitely redo them if I can paint the whole thing black though. Although since I have halogens(aka very low beam), I'm not sure if this will further dim things.
Er, let me get this straight, you guys painted the WHOLE inner surface black? Even the reflective part? I thought you had to leave that alone? I taped the shiny parts and plasti diped the long tube(turn signal) and painted the other "eye" red. I'll definitely redo them if I can paint the whole thing black though. Although since I have halogens(aka very low beam), I'm not sure if this will further dim things.

Thread
Thread Starter
Forum
Replies
Last Post
igzekyativ
MINIs & Minis for Sale
34
Jul 16, 2020 12:54 PM
iwant2knowwhois
1st Gen Countryman (R60) Talk (2010-2015)
11
Sep 19, 2015 12:18 PM
minipopkart
R50/R53 :: Hatch Talk (2002-2006)
2
Aug 13, 2015 05:22 AM
bc219
R50/R53 :: Hatch Talk (2002-2006)
13
Aug 10, 2015 11:22 AM