Navigation & Audio How to remove R56 Stock radio and swap for after market radio.
#1
How to remove R56 Stock radio and swap for after market radio.
Hi all. I'm sure there are numerous threads with this topic already, but here's a little contribution to the internet from my You Tube channel. I did this last week and it's working out great. I've since bought a magnetic phone mount and stuck it where the MID used to be.
Hope it helps some first timers.
Hope it helps some first timers.

The following 2 users liked this post by DinoTech:
cerberus (01-16-2023),
notch.johson (07-23-2017)
#2
Sheesh, I watched the entire nearly 32 minute video! Not with any intention whatsoever to replicate such a project but instead to see what's behind all those plastic panels and see if you were successful getting everything back in place and functioning. And yes you did! Well, almost with just one oversight. I've been procrastinating pulling any panels off, as I must do to locate a grounding point for 12V power receptacle I mounted on the passenger side console wall. Since the video was compressed, how long was that entire R&R process?
Oh BTW, how much caffeine did you ingest before shooting that? By time you were done, I felt as though I'd finished an entire pot of coffee!
Oh BTW, how much caffeine did you ingest before shooting that? By time you were done, I felt as though I'd finished an entire pot of coffee!

#3
Great video. Was there some space behind the speedo to hide the head unit?
I've been seeing references to doing this all over the place, but no photos.
I'm also going Double-DIN, but I'd like to keep the controls, so I'm going to:
1. Run separate hot and grounds from the fuse panel
2. Grab switched 12v from somewhere
3. Run separate speaker cables to the 6" in door, rear speakers (for subs) and replacement A-panel with tweeter pods for a completely stealth speaker install.
4. Leave the original head hooked up to "tweeter pods" in the doors (replaced with RF 4" coaxial drivers) for chimes and computer control.
To that end, I've secured a ribbon cable to extend the connection for the speedo up to 400 mm from its current location. We'll have to see how it all lines up. I'll make sure I do a build log here... or link to one on diymobileaudio.com...
#4
Great video, highly appreciated!
I am still confused about the OEM CD unit. Does it need to be moved behind the speedo or to the secret compartment to keep a fully functional electronics in case of a service? Or is it solved by using the Axxess LC-BMRC-01 interface?
I am still confused about the OEM CD unit. Does it need to be moved behind the speedo or to the secret compartment to keep a fully functional electronics in case of a service? Or is it solved by using the Axxess LC-BMRC-01 interface?
#5
I'm doing the same install tomorrow, close to the same radio and all. The instructions are confusing me on the yellow fused wire. It says to connect from the battery to the yellow wire on the harness. But how do I get it connected to the yellow wire on the radio? Do I tee the 3 wires together? I'm assuming because the chime needs constant power?
#7
Great video. Was there some space behind the speedo to hide the head unit?
I've been seeing references to doing this all over the place, but no photos.
I'm also going Double-DIN, but I'd like to keep the controls, so I'm going to:
1. Run separate hot and grounds from the fuse panel
2. Grab switched 12v from somewhere
3. Run separate speaker cables to the 6" in door, rear speakers (for subs) and replacement A-panel with tweeter pods for a completely stealth speaker install.
4. Leave the original head hooked up to "tweeter pods" in the doors (replaced with RF 4" coaxial drivers) for chimes and computer control.
To that end, I've secured a ribbon cable to extend the connection for the speedo up to 400 mm from its current location. We'll have to see how it all lines up. I'll make sure I do a build log here... or link to one on diymobileaudio.com...
I've been seeing references to doing this all over the place, but no photos.
I'm also going Double-DIN, but I'd like to keep the controls, so I'm going to:
1. Run separate hot and grounds from the fuse panel
2. Grab switched 12v from somewhere
3. Run separate speaker cables to the 6" in door, rear speakers (for subs) and replacement A-panel with tweeter pods for a completely stealth speaker install.
4. Leave the original head hooked up to "tweeter pods" in the doors (replaced with RF 4" coaxial drivers) for chimes and computer control.
To that end, I've secured a ribbon cable to extend the connection for the speedo up to 400 mm from its current location. We'll have to see how it all lines up. I'll make sure I do a build log here... or link to one on diymobileaudio.com...
Trending Topics
#8
Great video, highly appreciated!
I am still confused about the OEM CD unit. Does it need to be moved behind the speedo or to the secret compartment to keep a fully functional electronics in case of a service? Or is it solved by using the Axxess LC-BMRC-01 interface?
I am still confused about the OEM CD unit. Does it need to be moved behind the speedo or to the secret compartment to keep a fully functional electronics in case of a service? Or is it solved by using the Axxess LC-BMRC-01 interface?
#9
I need help with my radio
Hi Guys,
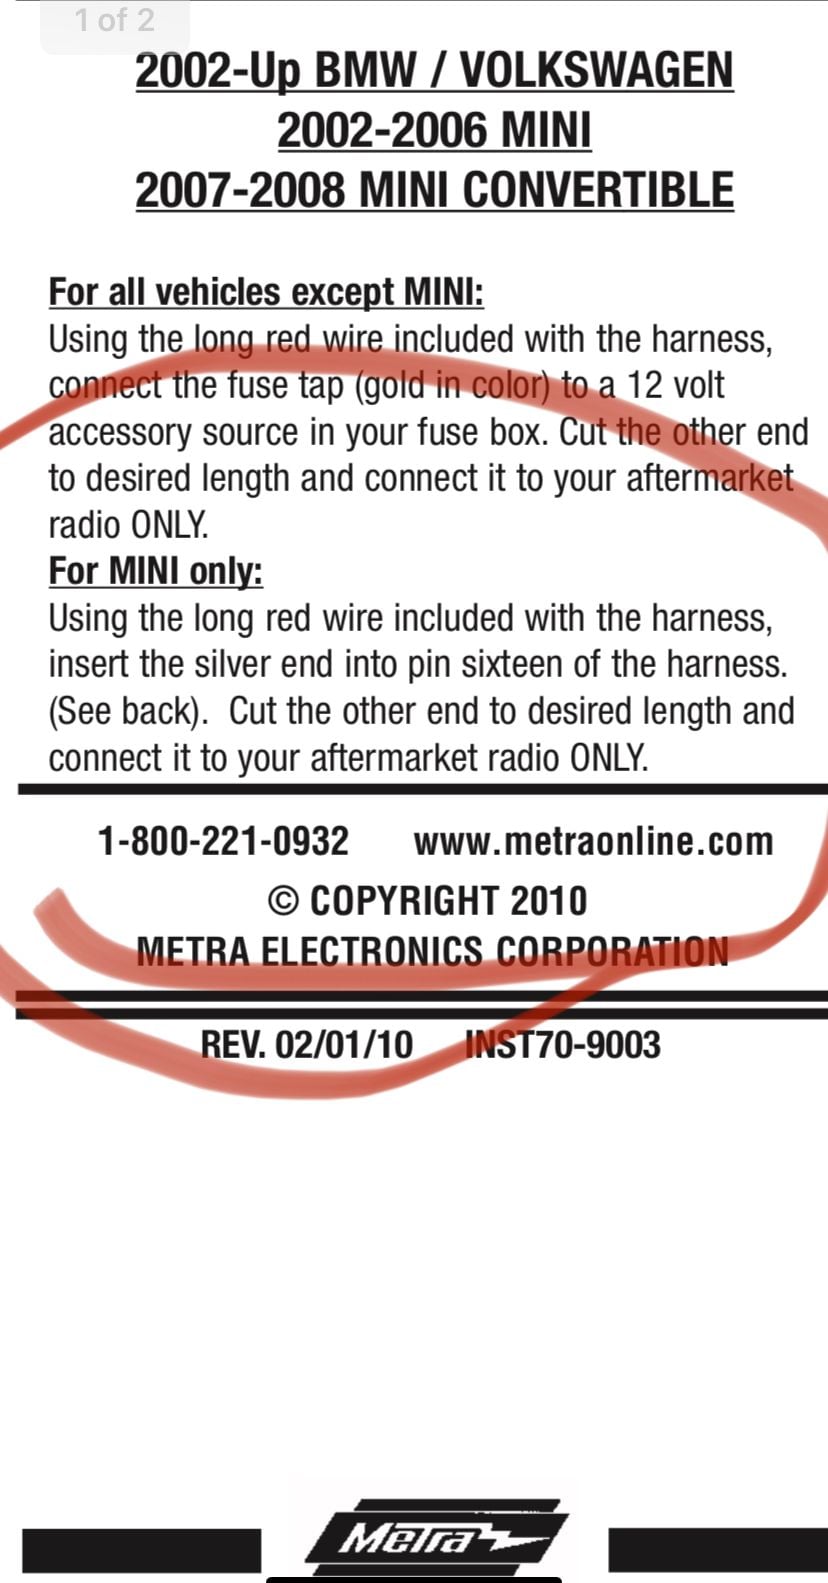
Could someone please guide me on how to correctly wire my aftermarket radio... Very recently I purchased my 08 R56 Mini, and I love it... I decided, after watching the video from DinoTech/HackaweekTV, I could swap out the original equipment for a touch screen with a backup camera. I very comfortably removed all the trim, and the original radio, I have the wiring harness, however; the red 12V was not plugged in, so i need to figure out where it goes. All the (+/-) Left/right, front/rear, I was comfortable wiring. then there are 3 wires already there on my harness and the red (see the attached pictures and my crude drawing).
I want to find out what I should have plugged into:
A9
A10
A11
A12
A13
A14
A15
Should I worry about the pins in the "B," section? I think there are wires going in there. and there are 2 wires that are plugged into the "C," section, do I need to do anything with them?
Also in the back of my new radio there is a rear view cam "IN." port, but I also need to find where to splice the power wire, for reverse.
Any help is greatly appreciated...
Thanks.
#10
Hi Guys,
Could someone please guide me on how to correctly wire my aftermarket radio... Very recently I purchased my 08 R56 Mini, and I love it... I decided, after watching the video from DinoTech/HackaweekTV, I could swap out the original equipment for a touch screen with a backup camera. I very comfortably removed all the trim, and the original radio, I have the wiring harness, however; the red 12V was not plugged in, so i need to figure out where it goes. All the (+/-) Left/right, front/rear, I was comfortable wiring. then there are 3 wires already there on my harness and the red (see the attached pictures and my crude drawing).
I want to find out what I should have plugged into:
A9
A10
A11
A12
A13
A14
A15
Should I worry about the pins in the "B," section? I think there are wires going in there. and there are 2 wires that are plugged into the "C," section, do I need to do anything with them?
Also in the back of my new radio there is a rear view cam "IN." port, but I also need to find where to splice the power wire, for reverse.
Any help is greatly appreciated...
Thanks.
Could someone please guide me on how to correctly wire my aftermarket radio... Very recently I purchased my 08 R56 Mini, and I love it... I decided, after watching the video from DinoTech/HackaweekTV, I could swap out the original equipment for a touch screen with a backup camera. I very comfortably removed all the trim, and the original radio, I have the wiring harness, however; the red 12V was not plugged in, so i need to figure out where it goes. All the (+/-) Left/right, front/rear, I was comfortable wiring. then there are 3 wires already there on my harness and the red (see the attached pictures and my crude drawing).
I want to find out what I should have plugged into:
A9
A10
A11
A12
A13
A14
A15
Should I worry about the pins in the "B," section? I think there are wires going in there. and there are 2 wires that are plugged into the "C," section, do I need to do anything with them?
Also in the back of my new radio there is a rear view cam "IN." port, but I also need to find where to splice the power wire, for reverse.
Any help is greatly appreciated...
Thanks.
#11
I bought both from Amazon. The harness is Metra 70-9003, with the red line left out, trying to figure out where to place it. The Radio is from Leadfan, it came with harnesses pre-pinned. I don't see the model number for it.
I figured out the wires that were going to the B-section from my drawing were for the AUX jack, So I will not need that anymore. Then there rear view plug I would love to figure out where to get the power from...
I do appreciate the help.
I figured out the wires that were going to the B-section from my drawing were for the AUX jack, So I will not need that anymore. Then there rear view plug I would love to figure out where to get the power from...
I do appreciate the help.
#13
So I spent tons of hours with my little multi-meter looking where to plug the red line. The speaker wires were pretty straight forward, they were all correctly color coded (e.g. purple&purple/black, white&white/black, etc). As I mentioned, the ones that were driving me nutty were Ground-black, Constant 12V (memory)-yellow, Accessories 12V (power)-RED. I kept trying to guess, and match, that kept leading me to believe that a black wire that was coming from the back of the dash was ground; the black wire was not ground, I guessed wrong. I kept trying every different combination that I could think of with A9-A16 (obviously only the ones that had wires going to them: black A16, green A12, orange A14, & two others).
Finally I read somewhere how to pin out the harness:
I set my multi-meter to continuity, plugged one rod to the NEGATIVE side of the battery, and found the ground wire on the harness by touching all the wires until I found the one that showed continuity [A13].
Knowing where ground was, I next fit my negative lead into the ground pin and with the multi-meter set to 20V & with the car off, I touch all the other wires until I found one that read 12V-ish and that one would be constant [A10].
Turned the car on, and with the same process as before I looked for 12V while the car is in accessories mode. The trick about my car is that the accessories power line is NOT on the harness. I had 5 wires to guess at, 2 of the wires I already knew were ground and constant. I asked a buddy of mine who is an expert at car modifications, the red wire comes long for a reason. I had to attach the red to the aftermarket radio-red wire and instead of attaching it to a pin in the harness, I ran it across/behind the glove box over to the fuse panel, and tapped off an already there fuse that gets power once the car is turned on. Just for safety I added another fuse to the red line before the tap.
That was the only way I was able to get it going. On the OEM radio I guess accessories mode is controlled by the CAN BUS, just like the chimes and everything else, which is why you have CAN+ and CAN- on the radio harness. The fiber optics line, I am convinced are only for the back light of the OEM radio, so I eliminated the two lines that go into the "C," section. I eliminated the wires that go into the "B," section as they were for the AUX plug beneath, no need for them. Plugged in my rear view camera, ran the wire behind the glove box, removed the panel where the fuse box is, removed the M30 torx screws holding the seat belts so the wire could go behind the panel. Pulled the wire up to the panel with access to the right side back light and tapped into the Blue/gray wire for power when reverse is selected. ran the wire up and accross to the middle where the rubber connects the main body to the hatch. removed the panels off the hatch and drilled holes into the exterior panel where the button that opens the hatch is and set my camera there. Put everything back together.
I had amazing fun time getting all this done. The red wire was really bothering me. Now I have review cam, GPS, Android 10.0, Radio, Google chrome, and lots of other functions on the radio It looks amazing, and sounds much better. Thanks for the help guys.
The following users liked this post:
ThatBratDamiana (02-15-2022)
#15
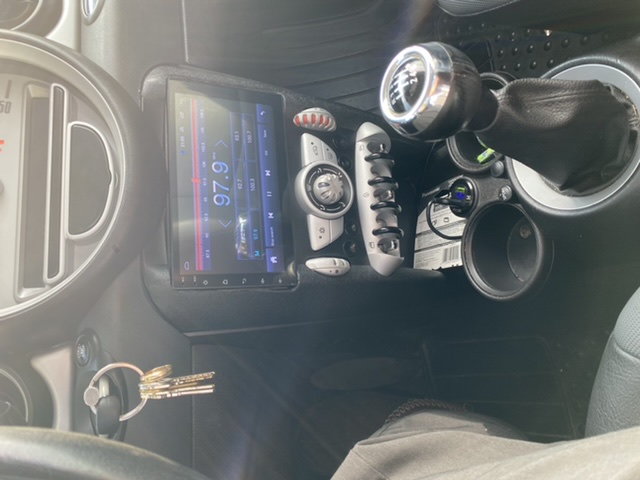
In Radio Mode.
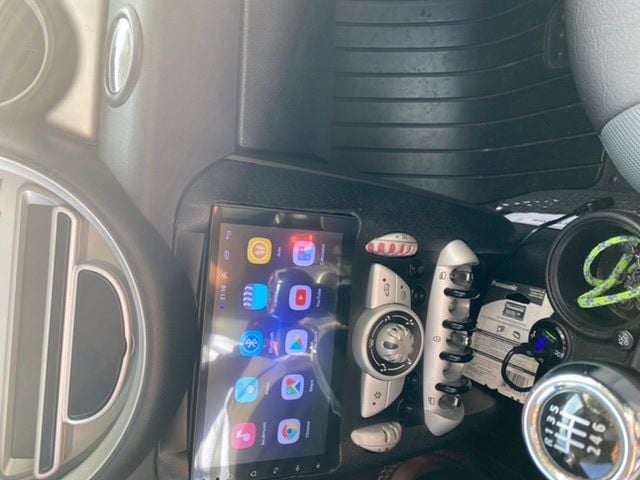
Some of the other functions.
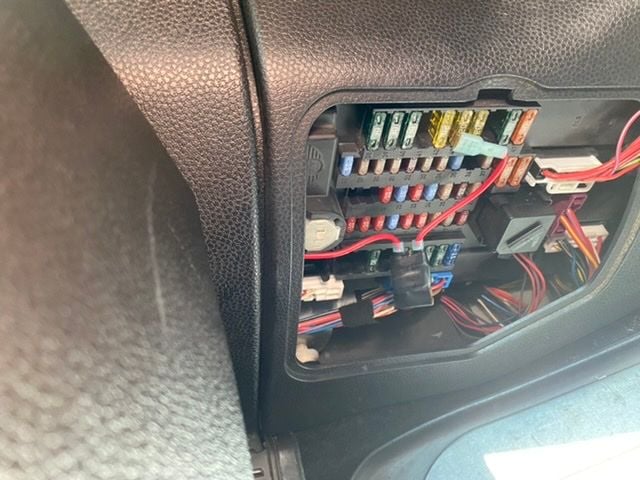
My infamous red wire, to the fuse panel with its own fuse tapped to another fuse that gets powered when the cars gets started up.
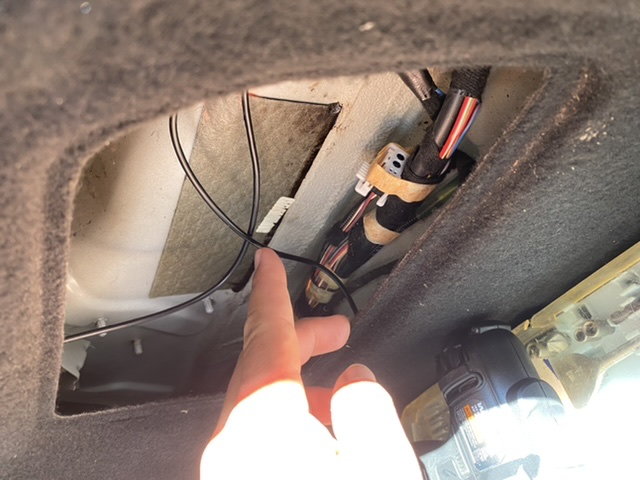
Back up camera wire. Taps into blue/gray wire, and gets power when reverse is selected.
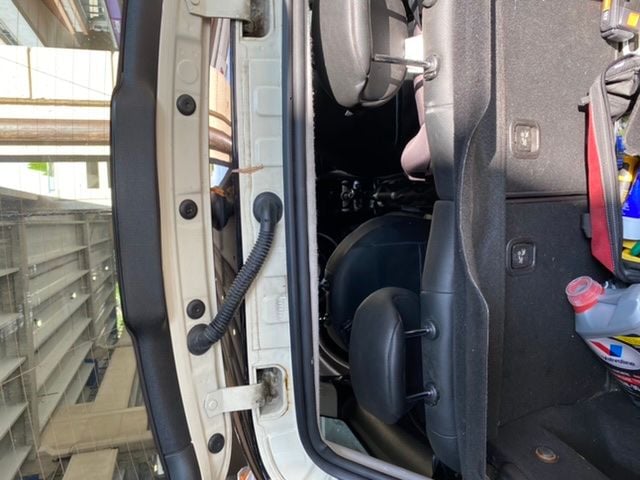
Getting the RCA through this piece was a pain. The rubber was barely thick enough to get the wire through.
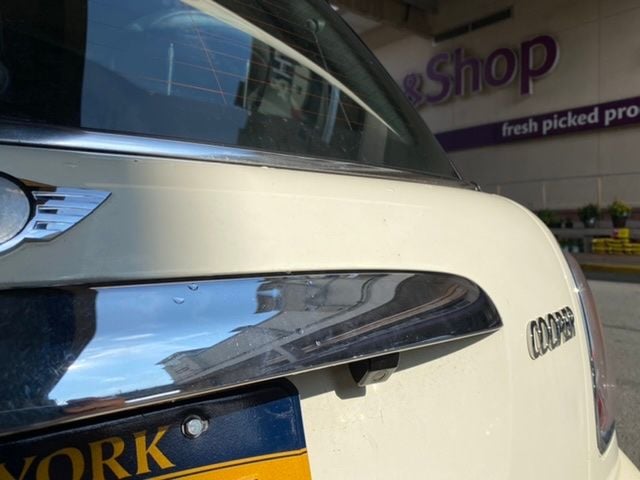
My little back up camera. Pulled this panel, only 4 screws. Plus pulling the chrome piece off the black part and drilled a hole into the black part to hold the camera.
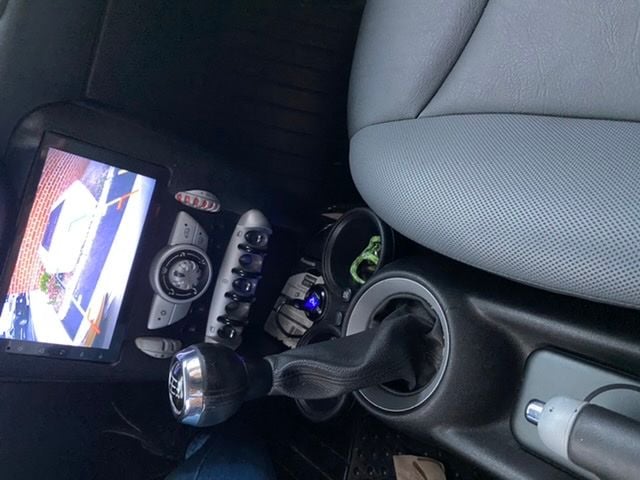
In reverse gear. Can also see the cigarette lighter that I replaced with a dual USB supply and a wireless charger that I plugged and ran the wire under the brake handle.
it was a wonderful project. Loads of challenges and fun. But very due-able. Just gotta get over the red wire problem.
Thread
Thread Starter
Forum
Replies
Last Post
Interior/Exterior HELP! How do I install this center console tray?
Squirrel724
Interior/Exterior
6
09-22-2016 05:27 PM


