
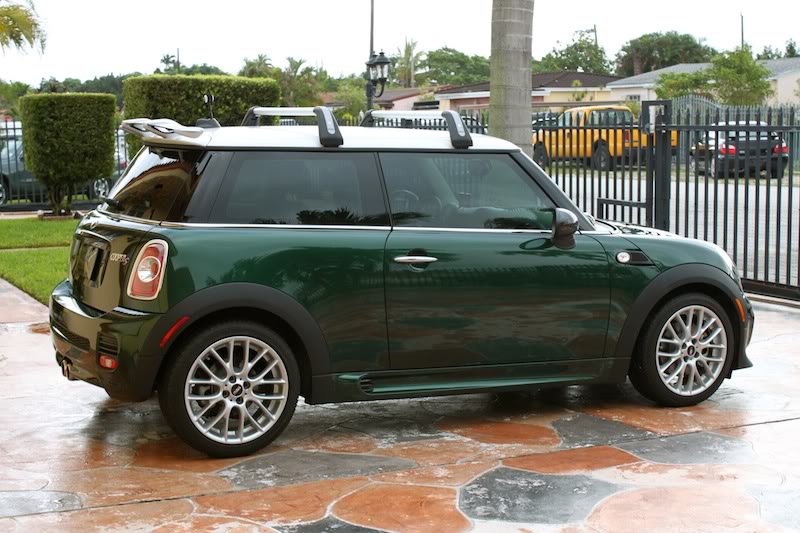
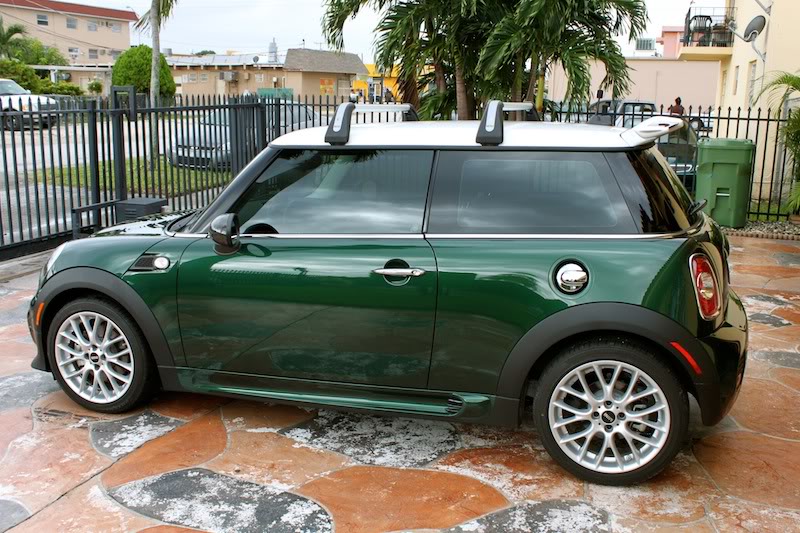
Interior/Exterior R56 roof rack


Keep us posted...
 I'll post pictures once I pick them up and get them on. Just worried my bike won't fit. :(
Got the bike racks home but I haven't got a chance to try my bike out on them yet. One problem I already had though wasn't with the bike racks it was with the roof rack itself. One of the screws that holds the crossbars to the brackets that go in the roof just randomly fell out (you can see the screws underneath the bars). I don't know why it fell out but now I'm missing two screws on each bar (the other screw was gone when I bought the rack). Does anyone know where I can get new ones?
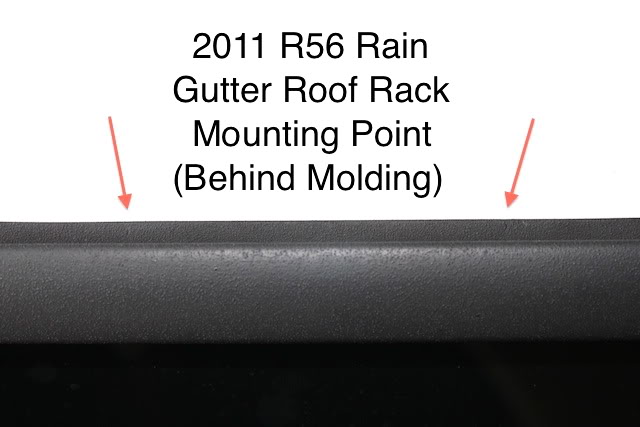
I just took this picture, I was having some difficulty trying to find where to cut the rain gutter to install the oem roof rack. I was under the impression you can cut where ever so long as the rack hooks to the roof. I did not do this because well it's wrong. You have to look very carefully for little indentations on the rain gutter. I was finally able to see them in sun. In the picture I'm pointing out the passenger side rear. When I look behind it, I can see the actual slot where the rack is supposed to attach to.
Last edited by blkonblk17; Oct 29, 2011 at 07:12 AM.
Ok, Just did some measurements. They were done on the passenger side but should be the same for drivers.
Starting from the edge of the window, Measure 8" to your left towards the rear of the car. You will then see the first notch. From 1 notch to the other there is 2 1/2". If you look behind the rain gutter where the notches are you would see little lines indicating where to cut.

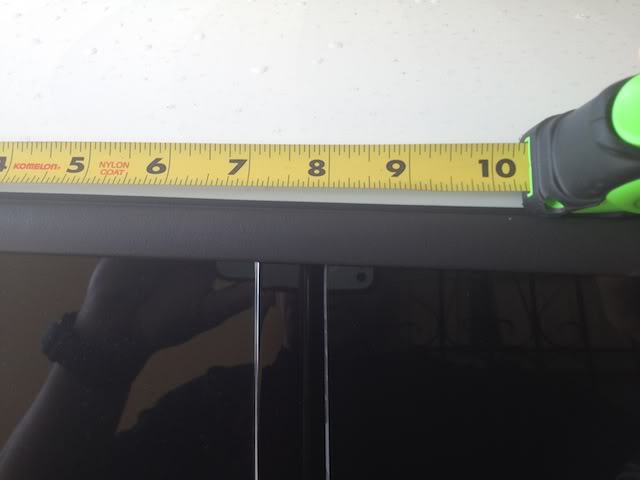
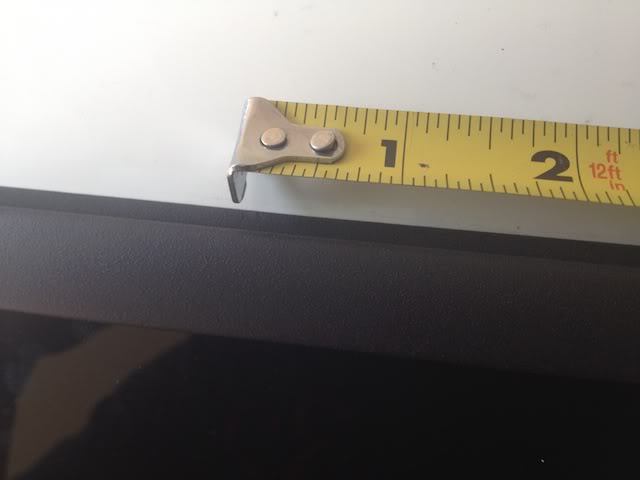
For the front, again measure from the edge of the window for 16 7/16" it will then reveal your first notch. The next on will be 2 1/2" away. For those that don't have all the little numbers next to the little lines in your measuring tapes 7/16 is the little notch before 1/2.

Hope this is able to help someone, Cheers!
Starting from the edge of the window, Measure 8" to your left towards the rear of the car. You will then see the first notch. From 1 notch to the other there is 2 1/2". If you look behind the rain gutter where the notches are you would see little lines indicating where to cut.
For the front, again measure from the edge of the window for 16 7/16" it will then reveal your first notch. The next on will be 2 1/2" away. For those that don't have all the little numbers next to the little lines in your measuring tapes 7/16 is the little notch before 1/2.
Hope this is able to help someone, Cheers!
Last edited by blkonblk17; Oct 29, 2011 at 07:29 AM.


6th Gear
Joined: Jun 2010
Posts: 1,800
Likes: 2
 I still haven't seen any BRG/white or EclipseGrey/Red cars on the street.
Now that you mention that, I haven't seen any BRGII around town.. Hmm, I guess it's rare lol. I see a lot of red, silver, white etc... The 2012 is sweet! Mine is a '11 I just couldn't wait. I've had a lot of cars in my lifetime. Maybe close to 20 and I must say the Mini is very fun and has been one of the ones I've liked the most...
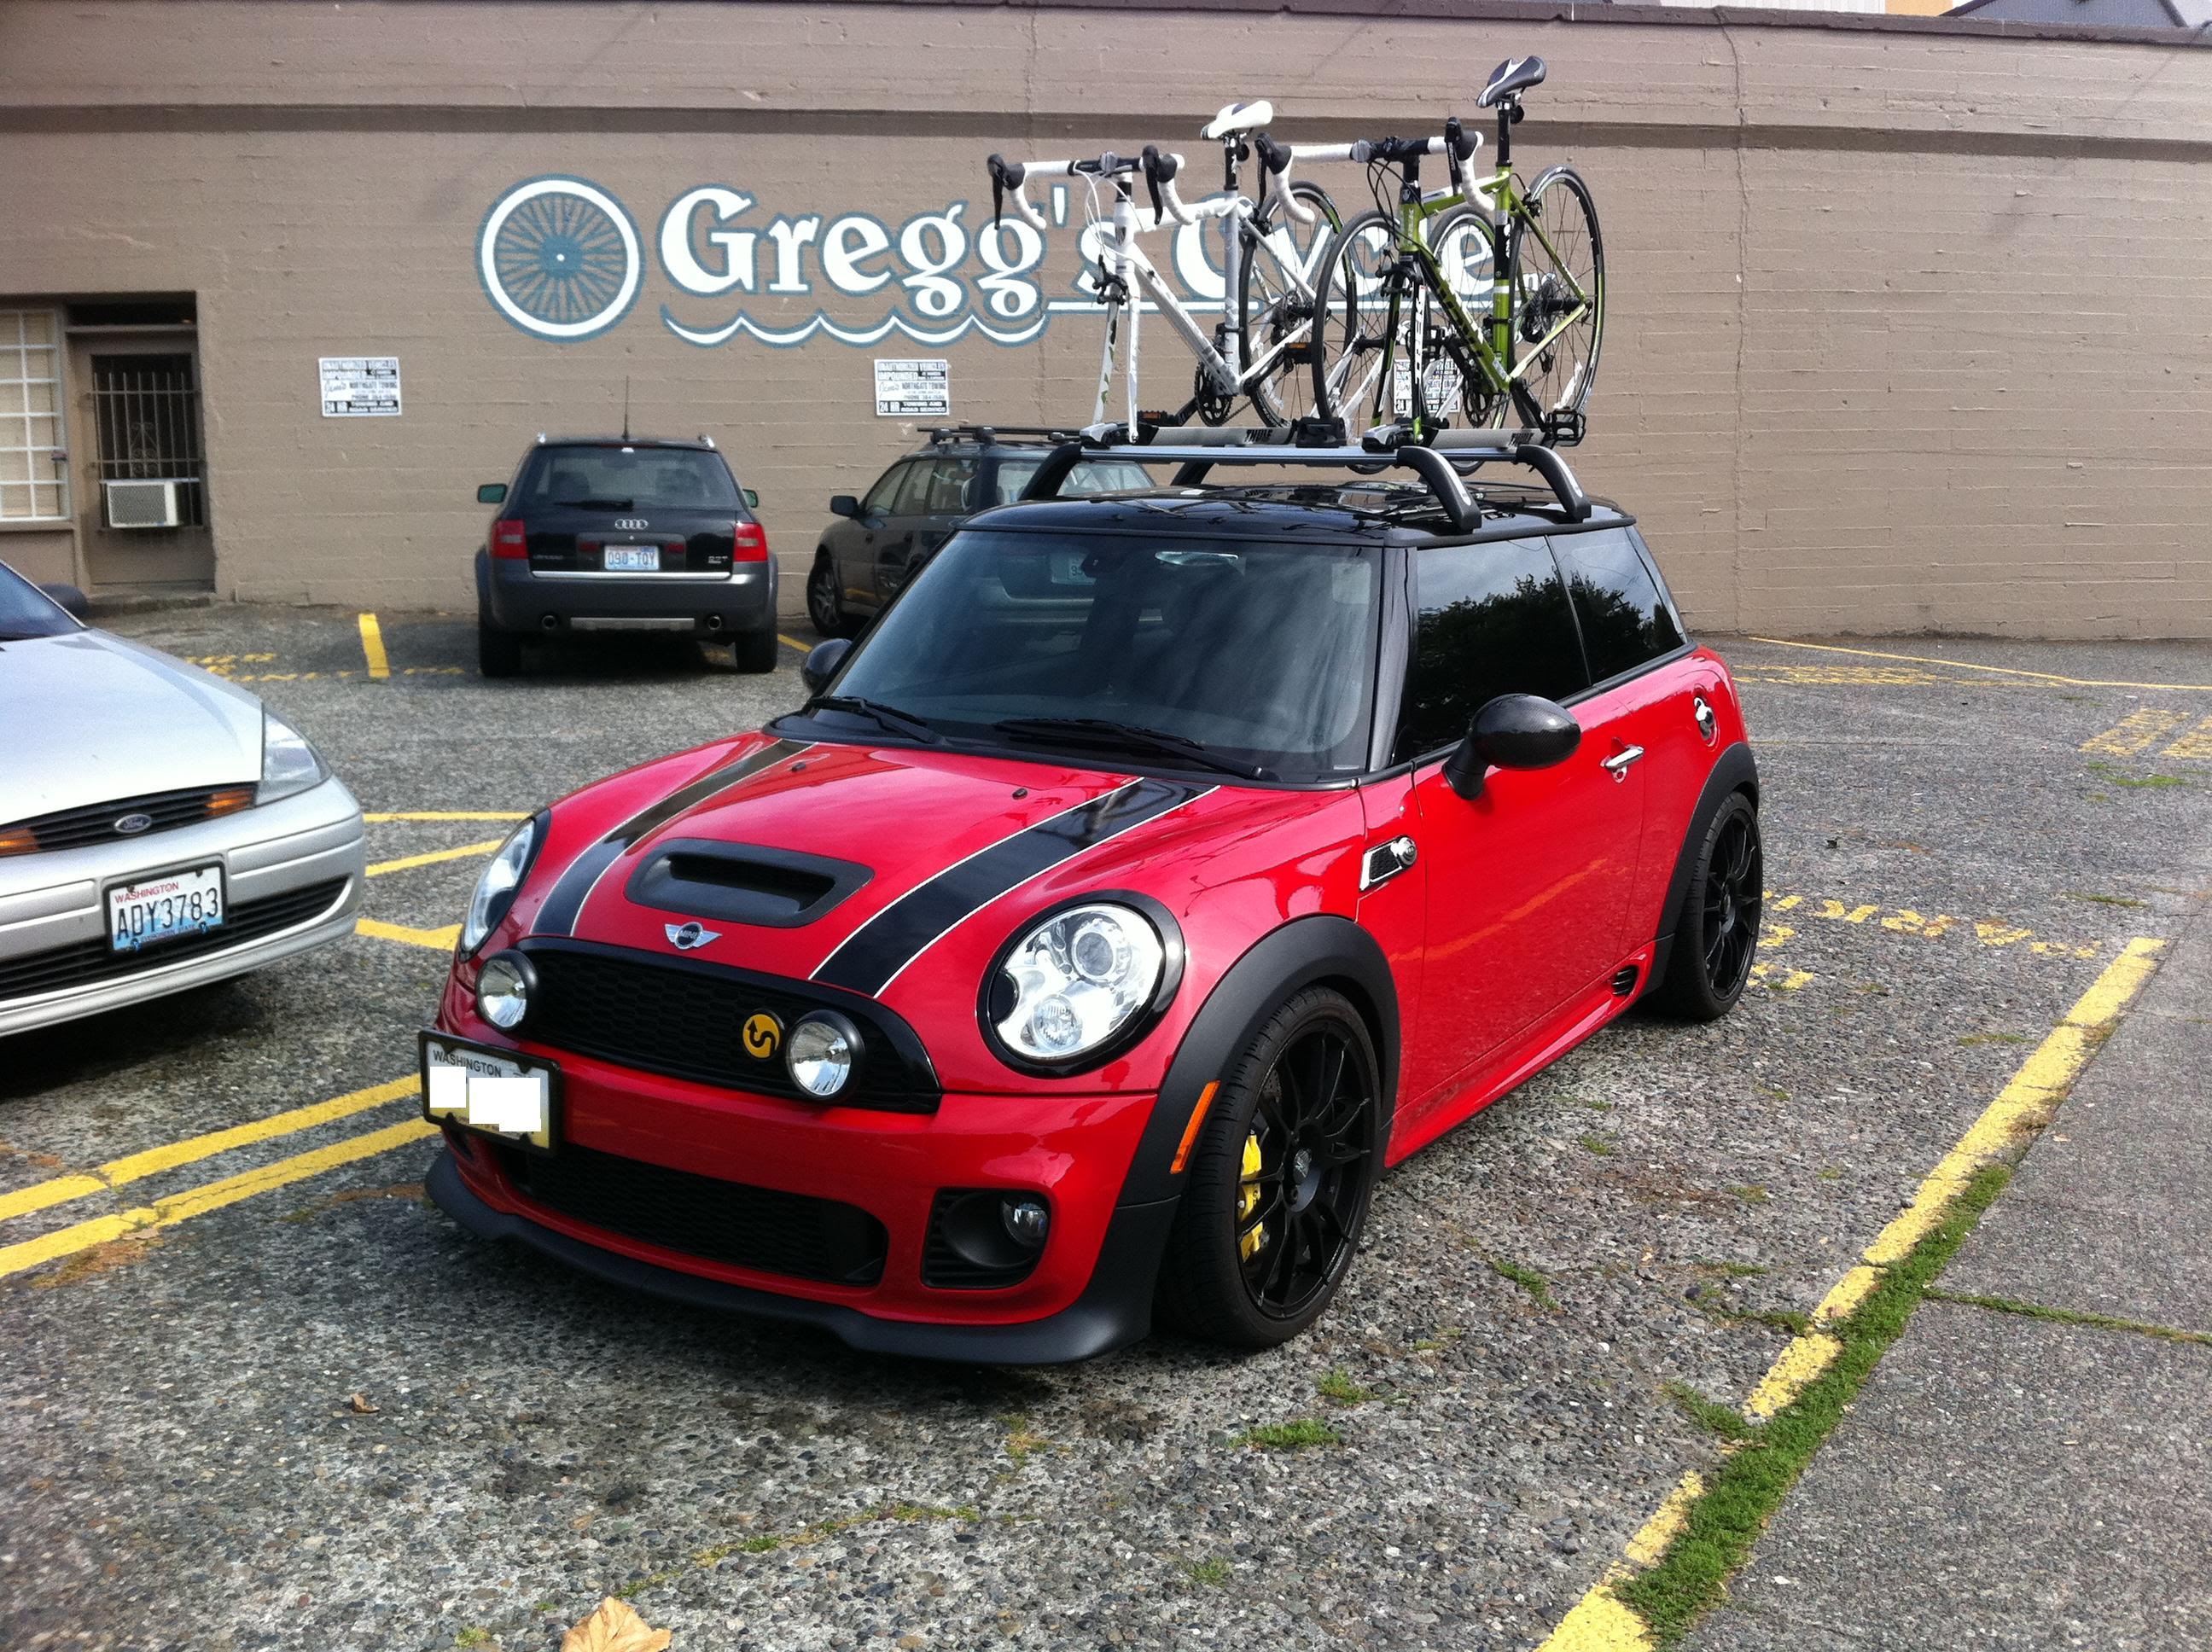

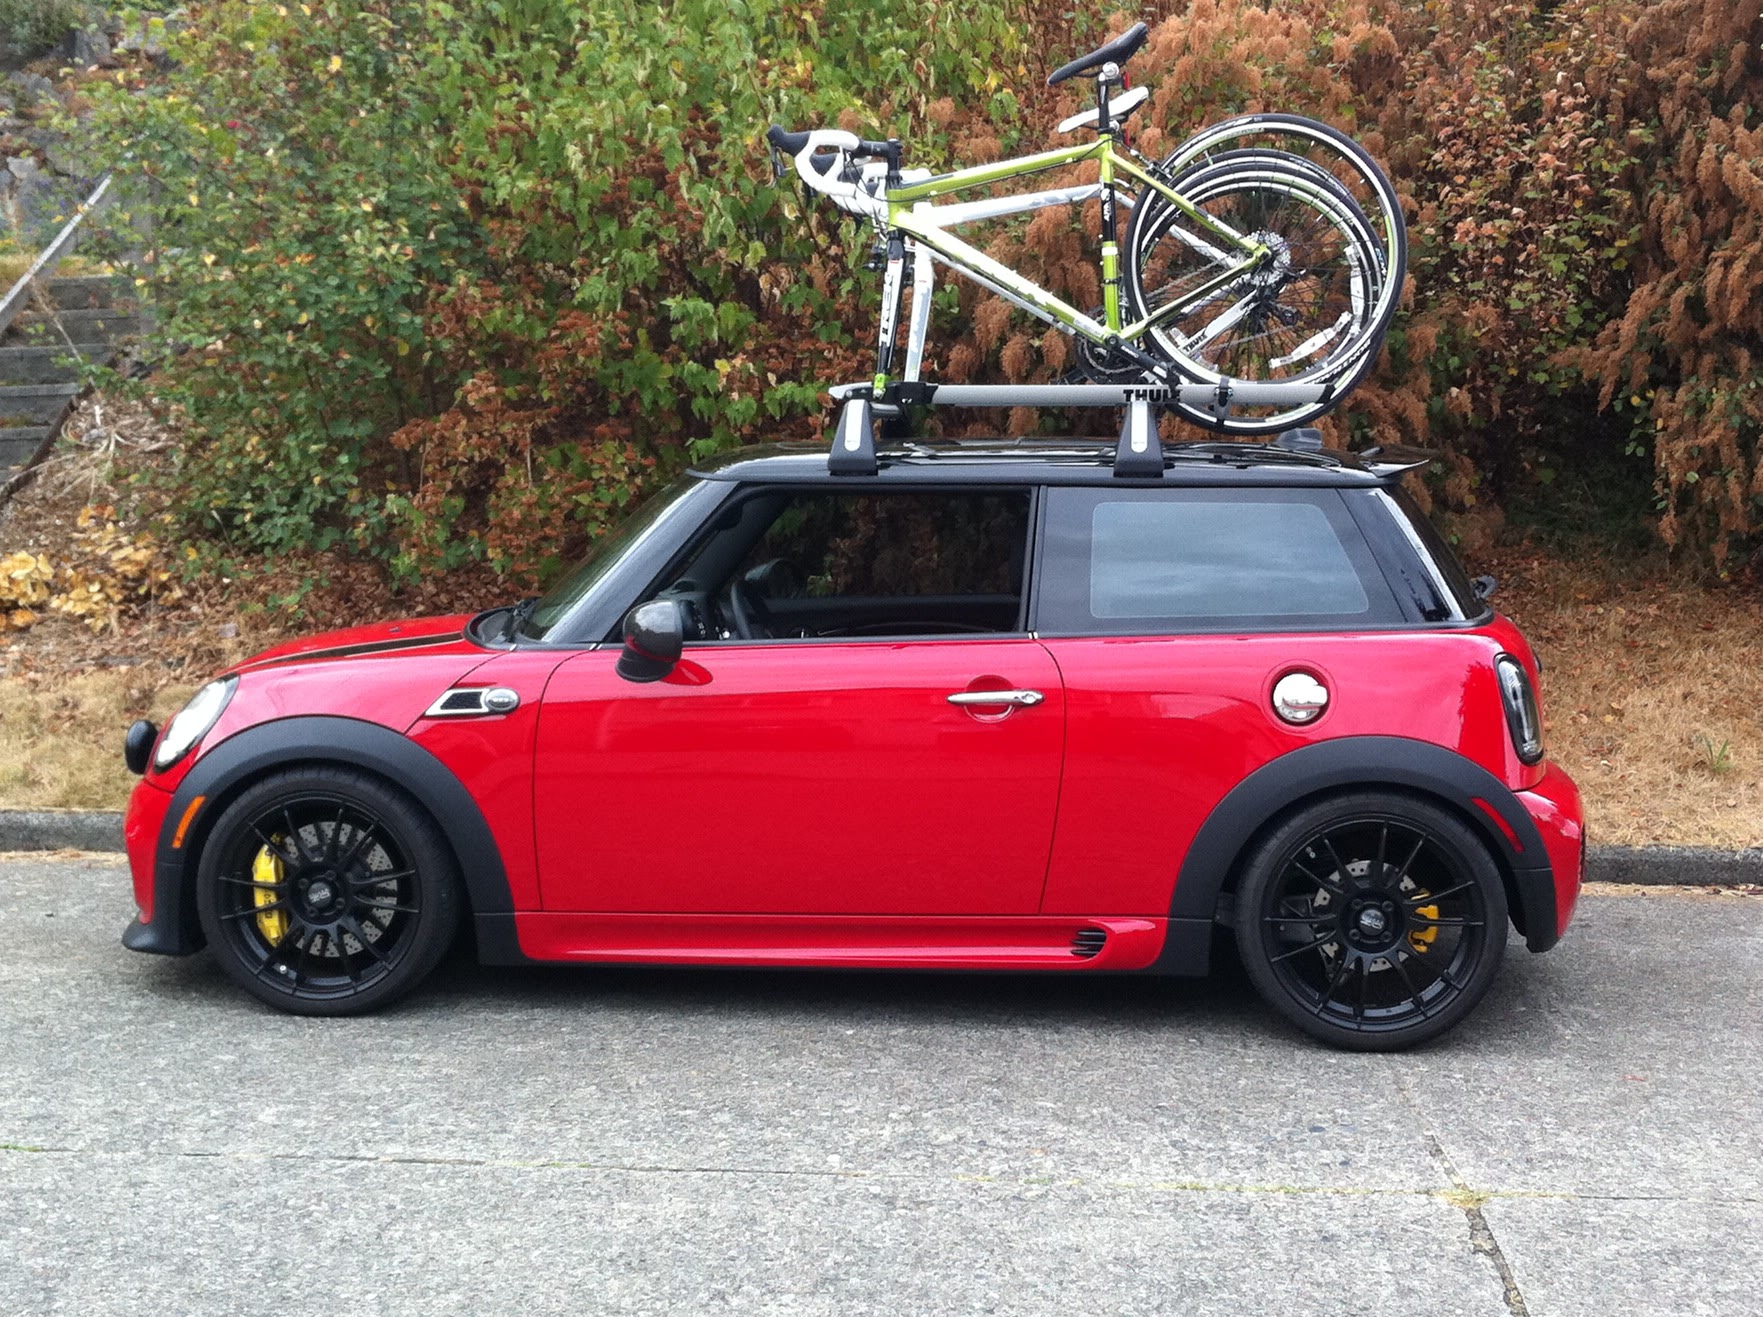
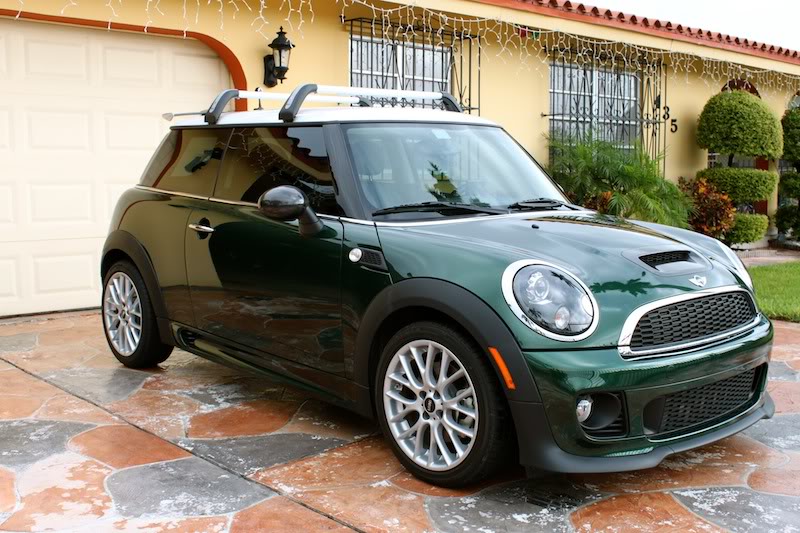
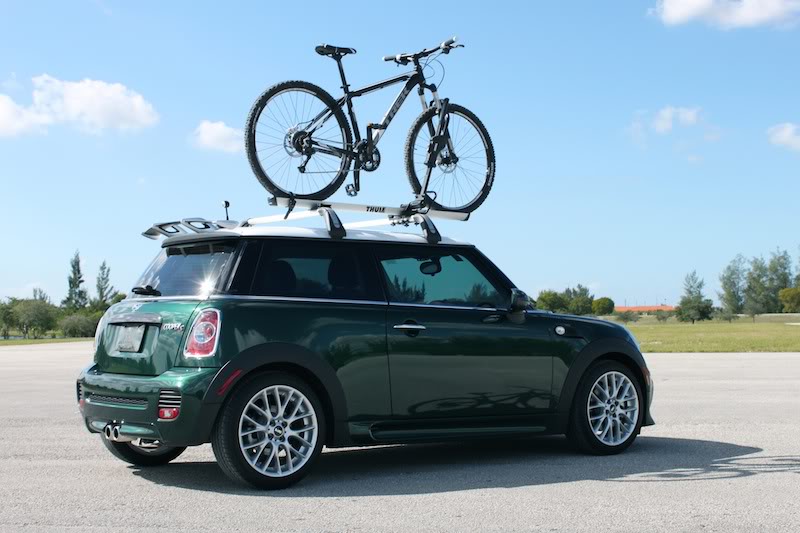
That is one sweet looking R56!! Keep up the good work. I see you used Thule fork mounts.. Any adaptors needed? Post as much information you can on them. I'm trying to get this thread a little more organized. I've read through all the pages and very little information as to what exactly you need to make certain racks / trays work.

2nd Gear
Joined: Jan 2006
Posts: 71
Likes: 0
From: Seattle, WA USA
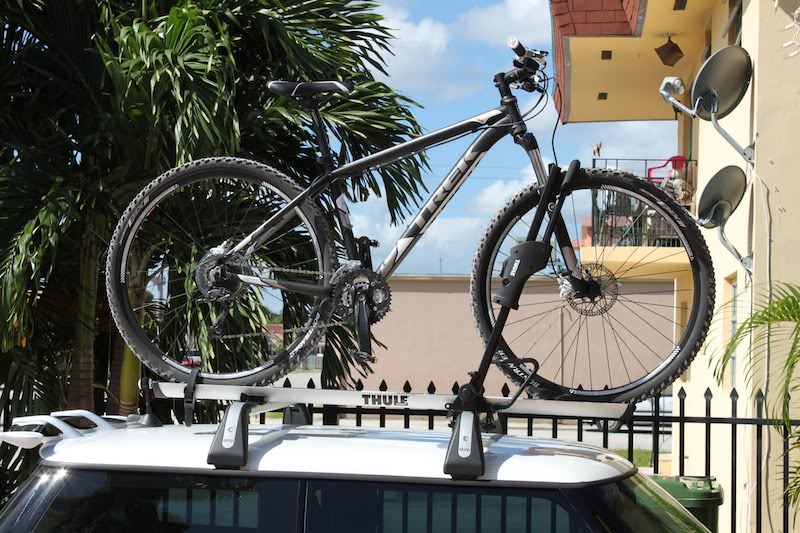
I am currently running Thule Echelon fork mounts and Thule wheel carriers. The Echelon are really nice since they have turn **** adjustablility in the front fork holder so that you wont over tighten one side light older fork mounts. As far as adapters, don't bother buying the Xadapt as people have previously stated... They are not wide enough to safely mount in the Mini Rail system. I ended up just going out and making custom washers with 1 inch wide by 3 inch long aluminum bars from my local hardware store (they fit perfectly in the rails and provide the piece on mind one would want if they are hauling around thousands of dollars worth of bikes on their roof). I tapped the washers for the front and back of the thule system because it's hard to get any tool within the Mini rails to tighten the bolts from up above the fork mount system. FYI, the front washers that attach to the fork mount has different threading compared to rear bolts of the thule system, so when you go to tap the washers remember check the threading. Sorry i don't have any pictures of the exact process due to the fact I created most of the adapters with my dad on the fly. Lastly, if you do get the the echelons, you have to cut about 6 inches off the end to clear the Mini roof spoiler. Just mount the system, mark the where the spoiler meets the rails, and test mount your bike before you make any cuts to make sure everything fits. Good luck!
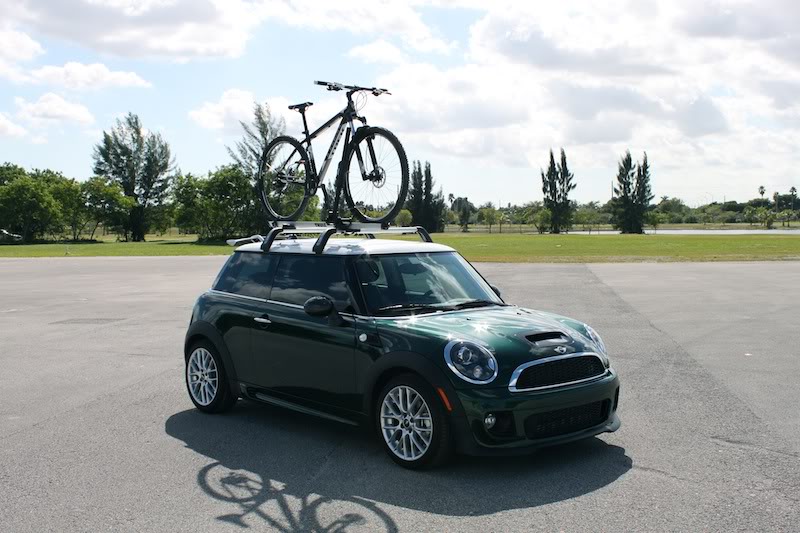
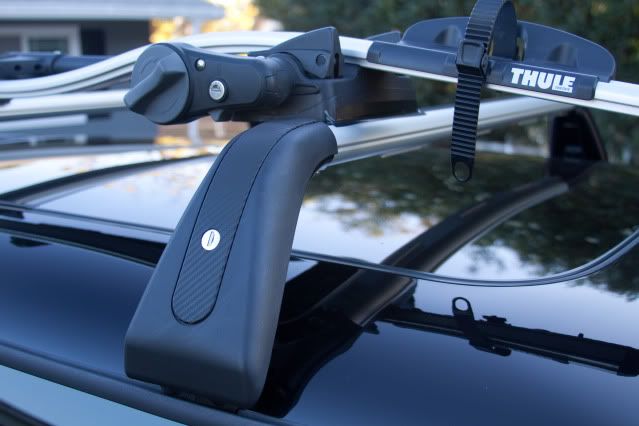
Here's my new setup, Thule Sidearm and Thule Xadapt1 adaptor kit for the rear. Both were $175 from amazon. I have amazon prime so received free 2 day shipping.

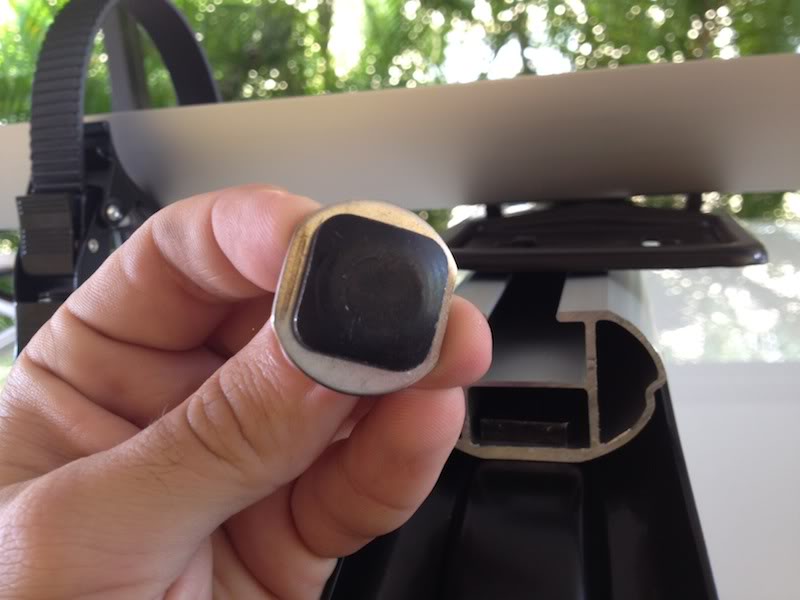
For the rear, I purchased a stainless steel washer and used my dremel tool to grind off two edges to make it square. The factory bolt that is included in the xadapt1 kit is too narrow and doesn't grip the inside of the mini factory cross bars. Here's the final result, total cost of the washer was .30 cents


What I also love about the Thule sidearm is that I didn't have to modify the tray and my boot opens just fine. No cutting necessary.
For the rear, I purchased a stainless steel washer and used my dremel tool to grind off two edges to make it square. The factory bolt that is included in the xadapt1 kit is too narrow and doesn't grip the inside of the mini factory cross bars. Here's the final result, total cost of the washer was .30 cents
What I also love about the Thule sidearm is that I didn't have to modify the tray and my boot opens just fine. No cutting necessary.
Last edited by blkonblk17; Nov 7, 2011 at 05:19 PM.


6th Gear
Joined: Jun 2010
Posts: 1,800
Likes: 2
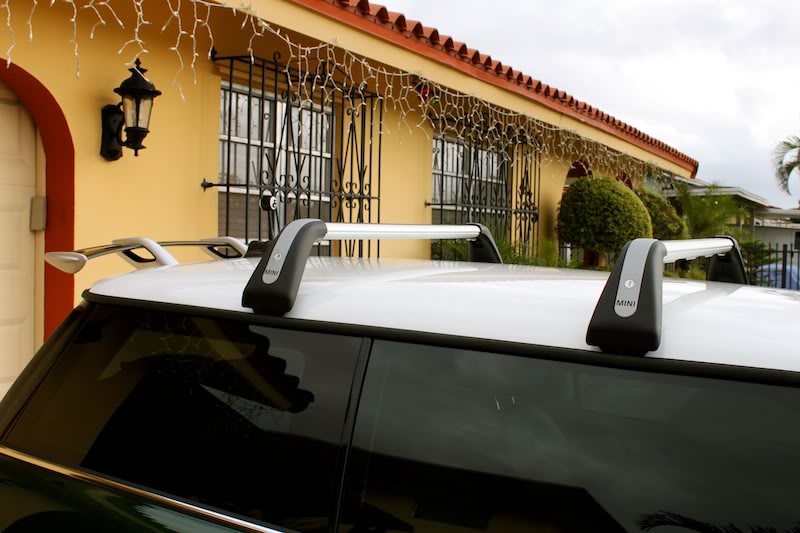
Has anybody considered painting the center aluminum rails or even the plastic covers over the support legs (the four black and silver bits with the "MINI" logo on it)?
Mine are a little scratched up as I purchased used and they got even more scratched up while in storage waiting for the JCW to arrive. I have since installed hooks in storage to keep them up and out of the way...
I started to do the install on my car this morning and got into an 'oh s$$$' moment five minutes later when I though I made a mistake in cutting out the gutters in my 1 week old JCW. Turns out everything was OK and I'll try again another day.
6th Gear
Joined: Jun 2010
Posts: 1,800
Likes: 2
I can't find it, but there is a posting on NAM that shows the kit contents... The posting includes an install instructional PDF for a Clubman OEM Rack Installation.
Anyways, I think you can buy the parts from MINI:
http://www.realoem.com/bmw/showparts...71&hg=82&fg=51
You probably need these:
05 TORQUE WRENCH 6NM / NUSS 1 82722230149
06 ASSEMBLING HOOK 1 82720430793 $3.25
07 Dismantling hooks and plugs SET 1 82720426987 $13.25
4th Gear
Joined: Nov 2009
Posts: 455
Likes: 0
From: Richmond, Va
Has anybody considered painting the center aluminum rails or even the plastic covers over the support legs (the four black and silver bits with the "MINI" logo on it)?
Mine are a little scratched up as I purchased used and they got even more scratched up while in storage waiting for the JCW to arrive. I have since installed hooks in storage to keep them up and out of the way...
I started to do the install on my car this morning and got into an 'oh s$$$' moment five minutes later when I though I made a mistake in cutting out the gutters in my 1 week old JCW. Turns out everything was OK and I'll try again another day.
Mine are a little scratched up as I purchased used and they got even more scratched up while in storage waiting for the JCW to arrive. I have since installed hooks in storage to keep them up and out of the way...
I started to do the install on my car this morning and got into an 'oh s$$$' moment five minutes later when I though I made a mistake in cutting out the gutters in my 1 week old JCW. Turns out everything was OK and I'll try again another day.
3rd Gear
Joined: Mar 2011
Posts: 279
Likes: 1
From: Simi Valley, CA
Has anybody considered painting the center aluminum rails or even the plastic covers over the support legs (the four black and silver bits with the "MINI" logo on it)?
Mine are a little scratched up as I purchased used and they got even more scratched up while in storage waiting for the JCW to arrive. I have since installed hooks in storage to keep them up and out of the way...
Mine are a little scratched up as I purchased used and they got even more scratched up while in storage waiting for the JCW to arrive. I have since installed hooks in storage to keep them up and out of the way...


1st Gear
Joined: Sep 2011
Posts: 11
Likes: 0
I bought a used rack that I later realized was missing two of the brass hex nuts. I bought a few stainless nuts but couldn't get them tight without stripping them. I used the torque wrench and never got them fully torqued. Now after reading this I see there is a bolt stop so I must have stripped the nuts when they went on. How much do you need to file down the bolts?
Once they're on, can you get them very tight? My rear rack (with brass nuts) is very stable but the front didn't feel as solid while I was tightening them.
6th Gear
Joined: Jun 2010
Posts: 1,800
Likes: 2
The "MINI" gray plastic covers pop out easily if you press in the tabs from behind. I wrapped mine with 3m carbon vinyl. IMO, the gray plastic covers cheapen the overall slick design of the racks. I just ordered another 1'x5' roll of 3M 1080 black carbon vinyl to wrap the cross bars. I'll be sure to post pics once I'm done.
Where did you order the vinyl? I am thinking I may just pay a local car vinyl guy - but the cost may not be worth it.
3rd Gear
Joined: Mar 2011
Posts: 279
Likes: 1
From: Simi Valley, CA
Please do post pics when done. I am thinking of the same thing (feet grey trim + rails) but in black as the silver does make it look a little low rent on darker car colours.
Where did you order the vinyl? I am thinking I may just pay a local car vinyl guy - but the cost may not be worth it.
Where did you order the vinyl? I am thinking I may just pay a local car vinyl guy - but the cost may not be worth it.
They're also on eBay but I find they're a tad cheaper through their site. You can also order a 4"x8" sample sheet of any color or brand for $2. One sample sheet of dark smoke taillight vinyl was enough for me to wrap both turn signal lens covers.

I am no pro but with a little practice I'm really happy with my results. I'd recommend a few test pieces then give it a go...you'll save yourself a bunch of $$$. They'll include an applicator card, but make sure you have a really good, sharp exacto knife.
http://www.metrorestyling.com/
6th Gear
Joined: Jun 2010
Posts: 1,800
Likes: 2
I am no pro but with a little practice I'm really happy with my results. I'd recommend a few test pieces then give it a go...you'll save yourself a bunch of $$$. They'll include an applicator card, but make sure you have a really good, sharp exacto knife.
http://www.metrorestyling.com/
http://www.metrorestyling.com/
The other thing is that the feet on my rack are a little scuffed and scratched... so I may want to cover or paint them too.
6th Gear
Joined: Feb 2011
Posts: 1,785
Likes: 0
From: Fairfax, VA
I should have my cross bars done next week, so I'll be sure to post pics when they're finished. Here's where I've been ordering my vinyl from. Great selection (just added new 3M 1080 glossy black!), fast shipping and you can get 10% off using code (winter10).
They're also on eBay but I find they're a tad cheaper through their site. You can also order a 4"x8" sample sheet of any color or brand for $2. One sample sheet of dark smoke taillight vinyl was enough for me to wrap both turn signal lens covers.
I am no pro but with a little practice I'm really happy with my results. I'd recommend a few test pieces then give it a go...you'll save yourself a bunch of $$$. They'll include an applicator card, but make sure you have a really good, sharp exacto knife.
http://www.metrorestyling.com/