
Interior/Exterior R56 Seats into my 04 R53: Installed and pics!


R56 Seats into my 04 R53: Installed and pics!
So I found a full seat of lounge leather R56 seats on CL recently. They were in great shape and were just about perfect...except the lack of butt heaters. I was going to go with an aftermarket set of heaters but I couldn't stand these seats sitting in our warehouse NOT in my mini. I might install the heaters at a future date but time will tell.
Overall this was an extremely easy job. There is also a lot of misinformation about this job. Granted my install went easier due the the 2004 m/y not having the weight sensors or heaters but I did the whole thing in about 2 hours. Onto the pics!
I'll reserve the next post and put up the install pics and how-to shortly. Just need to find a little spare time.
UNDER CONSTRUCTION
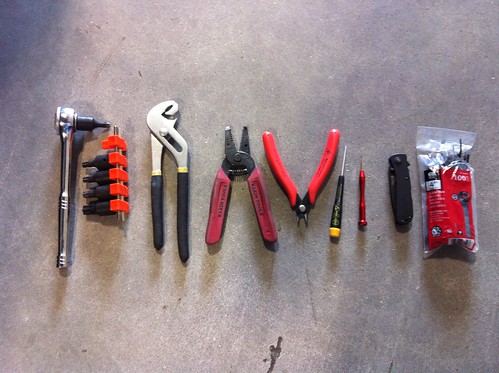
Tools needed
Torx Bits T40 and T60
3/8" Ratchet
Pliers
Wirestrippers (optional)
Diagonal Snips
Small Screwdrivers
Knife
Zip Ties
Beer (not shown)
***Remove you negative battery cable and let the car sit for 20-30 minutes. No use having an airbag deploy and ruin your new seats or having a permanently lit airbag light on your dash***
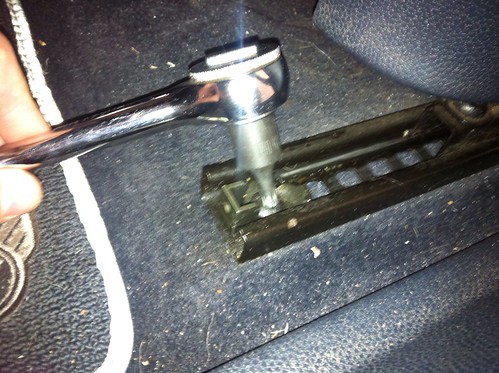
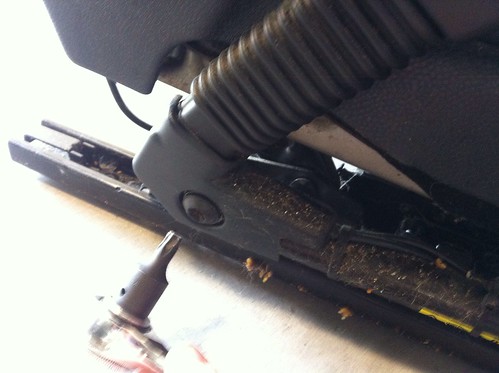
Grab that ratchet and T40 Torx bit and start removing the seat bolts, 4 per seat.
Now tilt the seat back and remove the electrical plugs for the Airbag (yellow) and seat belts (the other two). If you have heated seats there should be another black plug with some heavy gauge wiring. Pull those old seats out and be amazed at the years of crumbs and trash wedged in some of those areas. Take the time to really vacuum out this area. I've always thought I kept a clean car but apparently I dont have a small enough vacuum attachment to really get down in there...note to self!
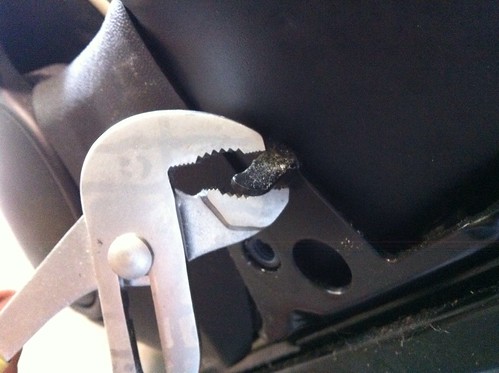
Mmm tasty...Now you're going to remove the seat belt assembly from your R53 seats. This will installed on the newer R56 seats as the new buckles are different than the earlier models. To remove, use the T60 torx bit. Remember to pull towards you so you dont rack your knuckles on something hard and or sharp. This bolt is held down with blue loctite. Don't worry about all the nastiness in this area, we're going to clean up in a minute.
Now that you have that seatbelt bolt out, it's time to run the wires out. This is easier if you remove the plastic trim on the front and middle portion of the seat. This will open that area enough to easily feed those wires through.
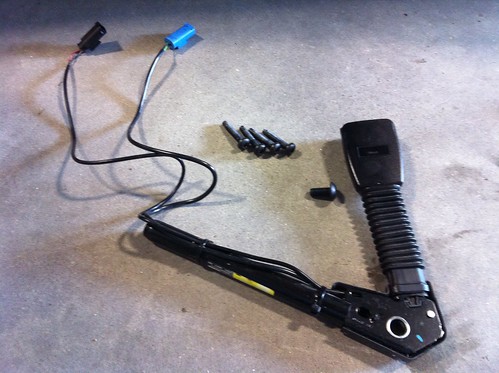
Here is everything you should have removed so far. Seatbelt assembly, bolt and 4 qty seat bolts. Be sure to save that seatbelt bolt, it's a little bit longer than the R56 version and will thread right into the new seats.
Here, we are removing the seatbelts from the R56 seats. Same as above, hold the seat down and prepare to crank on that loctited bolt.
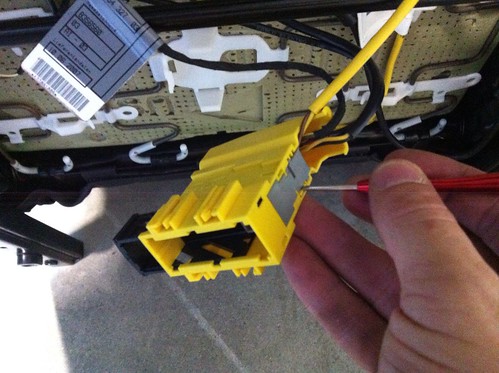
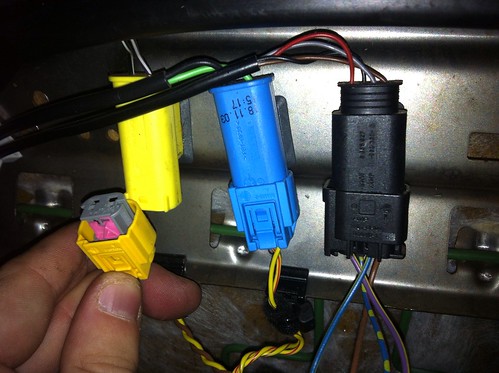
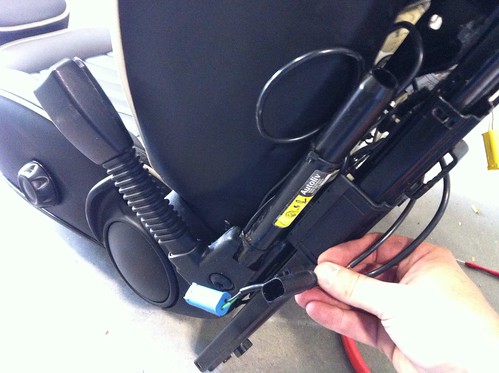
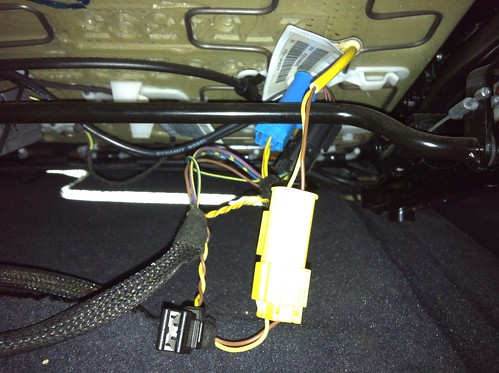
Moving on to the R56 seats. The 1st gen cars used multiple individual plugs, 2nd gen use this "all-in-one" plug. Fortunately the individual plugs are captive within this "master" plug. To separate, use a small flathead screwdriver and press the 2 retainers to slide out the plugs.

They'll come out just like this. You can toss that big ole' yellow plug now.
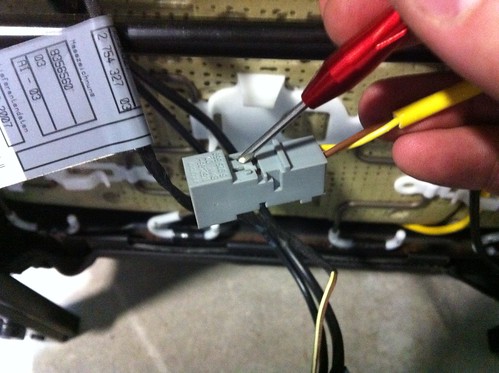
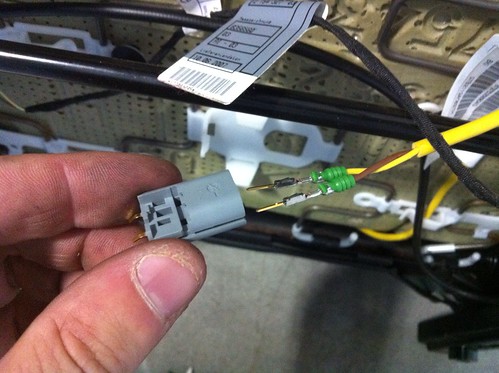
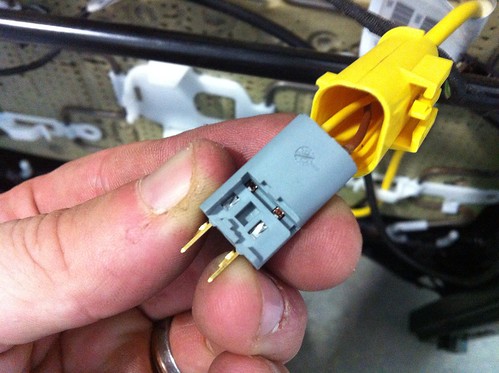
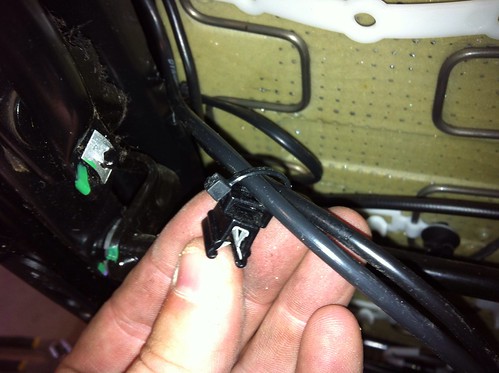
Now we're going to remove the airbag plug and replace with the plug from our 1st gen airbag. This allows the seat to plug right into the existing wire harness already in your car. There are 2 tiny little pin you press to remove the wires and their "pins".
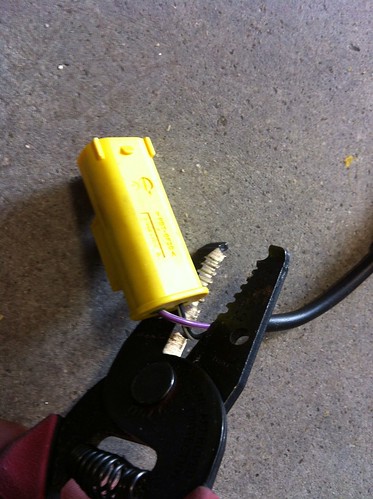
Cut your old yellow airbag plug from your old seats. In hindsight I should have mended the newer plug to the in-car wiring harness. This way you can sell your old airbags and recoup some of your costs. I wanted to retain as much "stock integrity" as possible so I went this route.
You want to press out the inner plug from your freshly cut airbag connector. Be careful NOT to put your hand or fingers near that open end. The copper contacts are hard and sharp and you will put that SOB right through your finger...ask me how I know
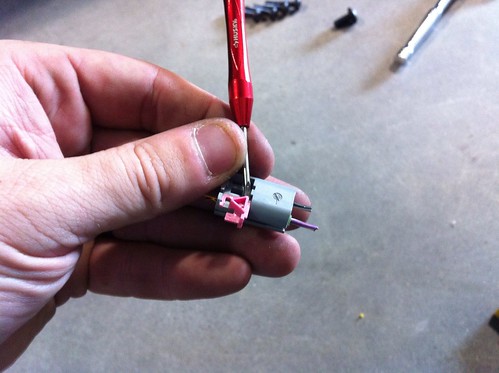
Now that you have that inner plug out, remove that little pink retainer. Set aside so you dont lose it.
We're going to grab that little screwdriver again and press the old pins out. This will open up the pug to accept the new wires. Thankfully Mini kept them the same for stoopid easy swappin' ***Notice those lil bastard copper contacts. Do you really want THAT going into your finger? Me thinks not.

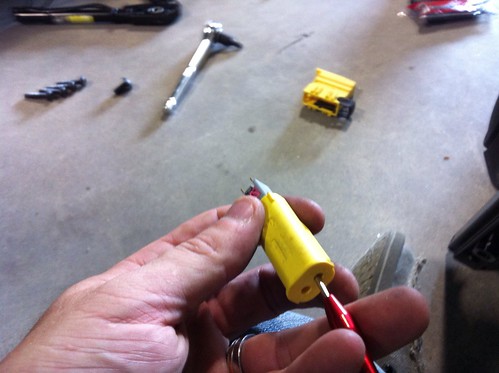
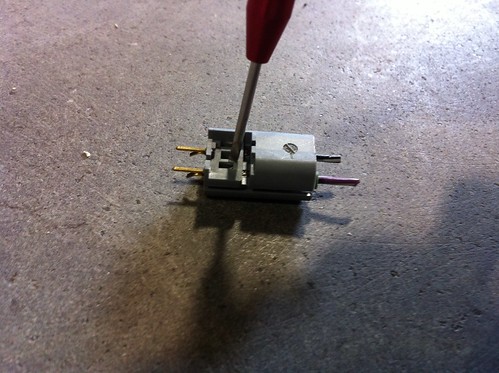
You'll want to trim some of that yellow sheathing from the airbag wire to give you enough room to install the pins. I used a knife and those wire strippers. Secondly, you want to align those pins so those detents grab and wont set your airbag light off in the future.
This is with the pins aligned and about to be installed back into the airbag connector. I left the gray portion out of the plug to ensure the connection would be made. You also want to re-install that little pink connector on the backside of that gray plug. I didn't take a pic because it was so small and easy.
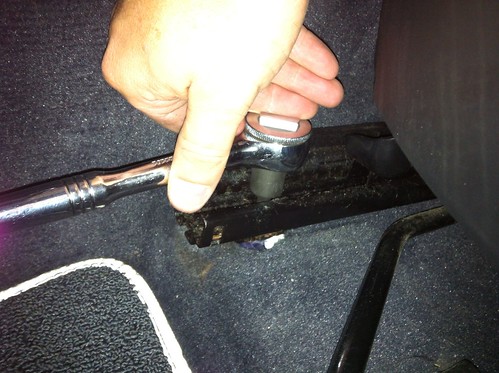
This is the part that will likely cause some some controversy here. On the R53 seat there is a bolt (previously removed) and a pin for alignment of the seat belt assembly. On the R56 seat there is a bent steel "pin" that aligns the seatbelt assembly. I simply bent this piece flat with a pair of pliers and made sure to really crank down on that bolt.
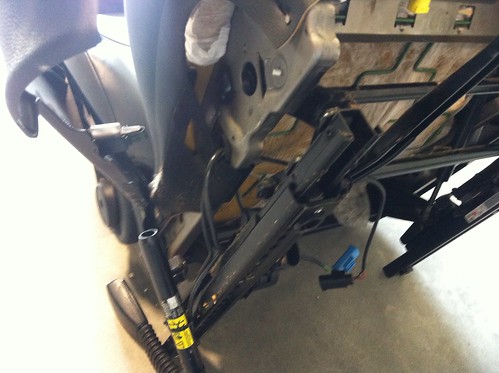
Here we have the bolt installed, feel free to add a drop or two of some loctite to button everything up. I didn't but I might be removing the seats shortly to install heaters and take care of that then. Take car routing the wires through the seat frame. This unit slides on the rails so making the wires taught will limit the seat travel and possibly mess up your plugs/wiring.
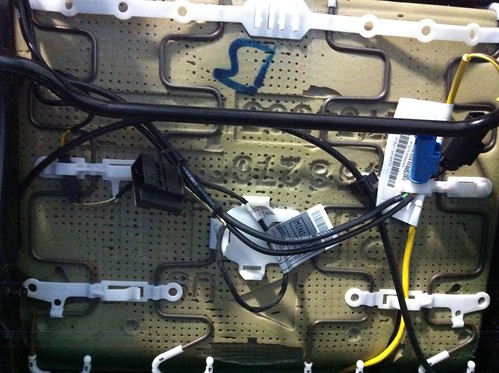
Here are a few shots of the wiring, note zip tie location. Now its time to get those fancy new seats in!!!
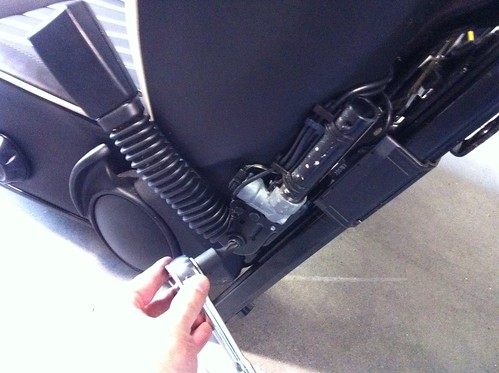
This is the new seat tilted back with the plugs all attached. Note the airbag plug is in front of the bar, move it behind with the rest of the plugs.
Almost done!!! Time to crank those bolts down. Please clean them before installing, mine had a decent amount of grease on them. Go ahead and reconnect that battery cable and...
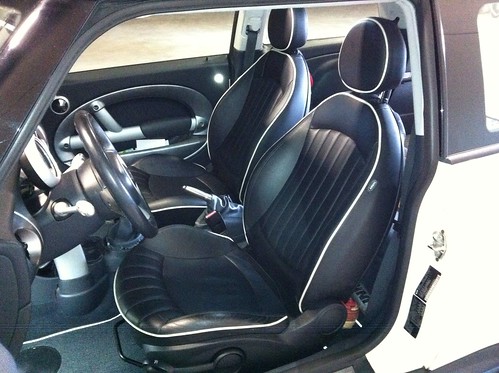
Revel in your new seat goodness. If you were used to the hard leatherette from the old seats like me, be prepared to sneak out at night and sit in your new seats naked...just kidding!
Please let me know if there are any questions.
Tools needed
Torx Bits T40 and T60
3/8" Ratchet
Pliers
Wirestrippers (optional)
Diagonal Snips
Small Screwdrivers
Knife
Zip Ties
Beer (not shown)
***Remove you negative battery cable and let the car sit for 20-30 minutes. No use having an airbag deploy and ruin your new seats or having a permanently lit airbag light on your dash***
Grab that ratchet and T40 Torx bit and start removing the seat bolts, 4 per seat.
Now tilt the seat back and remove the electrical plugs for the Airbag (yellow) and seat belts (the other two). If you have heated seats there should be another black plug with some heavy gauge wiring. Pull those old seats out and be amazed at the years of crumbs and trash wedged in some of those areas. Take the time to really vacuum out this area. I've always thought I kept a clean car but apparently I dont have a small enough vacuum attachment to really get down in there...note to self!
Mmm tasty...Now you're going to remove the seat belt assembly from your R53 seats. This will installed on the newer R56 seats as the new buckles are different than the earlier models. To remove, use the T60 torx bit. Remember to pull towards you so you dont rack your knuckles on something hard and or sharp. This bolt is held down with blue loctite. Don't worry about all the nastiness in this area, we're going to clean up in a minute.
Now that you have that seatbelt bolt out, it's time to run the wires out. This is easier if you remove the plastic trim on the front and middle portion of the seat. This will open that area enough to easily feed those wires through.
Here is everything you should have removed so far. Seatbelt assembly, bolt and 4 qty seat bolts. Be sure to save that seatbelt bolt, it's a little bit longer than the R56 version and will thread right into the new seats.
Here, we are removing the seatbelts from the R56 seats. Same as above, hold the seat down and prepare to crank on that loctited bolt.
Moving on to the R56 seats. The 1st gen cars used multiple individual plugs, 2nd gen use this "all-in-one" plug. Fortunately the individual plugs are captive within this "master" plug. To separate, use a small flathead screwdriver and press the 2 retainers to slide out the plugs.
They'll come out just like this. You can toss that big ole' yellow plug now.
Now we're going to remove the airbag plug and replace with the plug from our 1st gen airbag. This allows the seat to plug right into the existing wire harness already in your car. There are 2 tiny little pin you press to remove the wires and their "pins".
Cut your old yellow airbag plug from your old seats. In hindsight I should have mended the newer plug to the in-car wiring harness. This way you can sell your old airbags and recoup some of your costs. I wanted to retain as much "stock integrity" as possible so I went this route.
You want to press out the inner plug from your freshly cut airbag connector. Be careful NOT to put your hand or fingers near that open end. The copper contacts are hard and sharp and you will put that SOB right through your finger...ask me how I know
Now that you have that inner plug out, remove that little pink retainer. Set aside so you dont lose it.
We're going to grab that little screwdriver again and press the old pins out. This will open up the pug to accept the new wires. Thankfully Mini kept them the same for stoopid easy swappin' ***Notice those lil bastard copper contacts. Do you really want THAT going into your finger? Me thinks not.
You'll want to trim some of that yellow sheathing from the airbag wire to give you enough room to install the pins. I used a knife and those wire strippers. Secondly, you want to align those pins so those detents grab and wont set your airbag light off in the future.
This is with the pins aligned and about to be installed back into the airbag connector. I left the gray portion out of the plug to ensure the connection would be made. You also want to re-install that little pink connector on the backside of that gray plug. I didn't take a pic because it was so small and easy.
This is the part that will likely cause some some controversy here. On the R53 seat there is a bolt (previously removed) and a pin for alignment of the seat belt assembly. On the R56 seat there is a bent steel "pin" that aligns the seatbelt assembly. I simply bent this piece flat with a pair of pliers and made sure to really crank down on that bolt.
Here we have the bolt installed, feel free to add a drop or two of some loctite to button everything up. I didn't but I might be removing the seats shortly to install heaters and take care of that then. Take car routing the wires through the seat frame. This unit slides on the rails so making the wires taught will limit the seat travel and possibly mess up your plugs/wiring.
Here are a few shots of the wiring, note zip tie location. Now its time to get those fancy new seats in!!!
This is the new seat tilted back with the plugs all attached. Note the airbag plug is in front of the bar, move it behind with the rest of the plugs.
Almost done!!! Time to crank those bolts down. Please clean them before installing, mine had a decent amount of grease on them. Go ahead and reconnect that battery cable and...
Revel in your new seat goodness. If you were used to the hard leatherette from the old seats like me, be prepared to sneak out at night and sit in your new seats naked...just kidding!
Please let me know if there are any questions.
Last edited by ih8cornnuts; Sep 30, 2013 at 11:38 AM.


 I'm looking for the same set up for my2005


Bump to bring this back to the top!!
A GREAT mod for many gen1 cars with worn seats!! VERY doable IMO!!
A GREAT mod for many gen1 cars with worn seats!! VERY doable IMO!!
Trending Topics


Thanks, I'm still really digging these seats. Every once and I while I'll walk by the car and see them and smile. They could use a little more bolstering but with Mini seats they tend to be virtually no bolster (every stock seat) or too much bolster (JCW seats/racing).
Post pics if you've done this mod!
Post pics if you've done this mod!

5th Gear
Joined: Aug 2012
Posts: 1,056
Likes: 3
From: Bronx,NY
Very impressive , I get intimidated by the wires a bit but the instructions are excellent and the seats look beautiful, is a good thing that you don't have that weight mat sensor POS I just had mine unplugged yesterday and the lights were eliminated with the software so no more lights :-) if you don't mind me asking what deal did you get on the seats? Is hard to put a price on those I guess. Thanks


I skipped the rear seats. I never used them when I had them and always had the seats folded down 95% of the time. I sold them to recoup some of the cost.
I'm in the process of building a plywood rear seat delete where I can open the boards for small storage. I just got some really neat carpet samples from Mohawk that will be a little out of the box, but supremely cool.
I'm in the process of building a plywood rear seat delete where I can open the boards for small storage. I just got some really neat carpet samples from Mohawk that will be a little out of the box, but supremely cool.


The lounge leather R56 looks great in the R53.
__________________

MINI Guru/ MINI Owner Since 2004 | NEW Lifetime Part Replacement | Local Pickup
Milltek | Genuine MINI | Forge Motorsport | NM Engineering | ECS Performance | M7 Speed
Customer Service Hours: 8am-8pm EST|Sales Team Hours: 8am-11pm | SAT 10am-7pm 800.924.5172
MINI Guru/ MINI Owner Since 2004 | NEW Lifetime Part Replacement | Local Pickup
Milltek | Genuine MINI | Forge Motorsport | NM Engineering | ECS Performance | M7 Speed
Customer Service Hours: 8am-8pm EST|Sales Team Hours: 8am-11pm | SAT 10am-7pm 800.924.5172
The thread answers your question...
I read it. There was no reference on how or if rear seats fit. Luckily I found a how to with pictures on another forum.

1st Gear
Joined: Nov 2012
Posts: 47
Likes: 2
From: Toronto Ontario
R56 Rear seats in a R53
Centre support for R56 seats, my seats came with that.
Plasticky thingies to go into L bracket (from dealership).
I did this on my MCS04. Remove the r53 rear seats, replace the existing centre with the r56 centre. Remove both interior side panels to expose the metal L shape bracket on either side that support the outside upper rears. Unscrew the L shapes from the body and remove the little plasticky bits from the existing holes. Use the new plastic insert purchased from the dealership to measure out/mark the bigger holes. I used a jeweller's saw to enlarge the holes 'cause I had one kicking around but you can probably use a dremel (or whatever it is called). Insert the plastic on both sides, and put the car back together with your new seats! Voila, backseats!!
Now, if I could only figure out how to attach the heated seat connectors to the front seats?!?
 and my mini would be perfect!!!
 https://www.northamericanmotoring.co...o-2nd-gen.html
Last edited by Banana Plantana; Dec 17, 2014 at 09:46 AM.

FYI, I'm doing a heated seat install on these front seats any day now. I'll post a great how-to I found on nam and also show my pics too. It's going to be a rainy weekend time to work in the shop!
Good luck, I'm looking forward to it!
This is the thread I was talking about.
https://www.northamericanmotoring.com/forums/how-to/184775-interior-exterior-aftermarket-heated-seat-kit-install-2008-mcs-r56.html
Fortunately, it's already for a R56 and the seats I've already installed.
https://www.northamericanmotoring.com/forums/how-to/184775-interior-exterior-aftermarket-heated-seat-kit-install-2008-mcs-r56.html
Fortunately, it's already for a R56 and the seats I've already installed.
After druling over this post for months, I finally found a matching set of R56 leather out of a 2012 with 40K on the odometer. Luckily they were local too. $500 got me the fronts and rears. He threw in the bracket and bushings for the rears as well. As mentioned above the brackets on the side need to get drilled out to match the new bushing and the key cut with a dremell. Pretty easy. I opted to switch out the airbag plugs to new matching plugs from the hobby shop that have a highger amp load and are more reliable. Everything works. My next task will be installing seat warmers.
Last edited by gpwpat; Feb 7, 2015 at 05:32 PM.