
Interior/Exterior Stripe & SunRoof Decal DIY Install


Thread Starter
|
1st Gear
Joined: May 2009
Posts: 12
Likes: 0
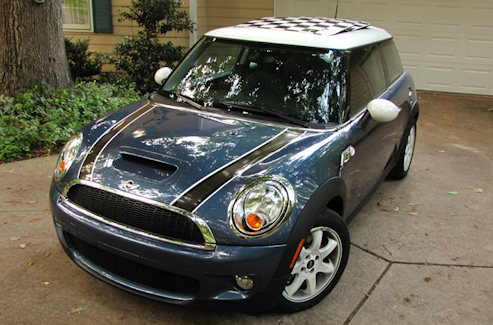
Stripe & SunRoof Decal DIY Install
My Mini should be arriving 2nd week in June and I was just going over the details of the decals with my MA. She then hit me with the $420 installation charge for the hood stripes and the sunroof graphic which they had never mentioned charging before.
How difficult is it to install these yourself?
Here are the stripes -
http://www.minimotoringgraphics.com/...w&ref=msst0048
The sunroof graphic is the checkerboard perf that goes on the glass.
How difficult is it to install these yourself?
Here are the stripes -
http://www.minimotoringgraphics.com/...w&ref=msst0048
The sunroof graphic is the checkerboard perf that goes on the glass.
4th Gear
Joined: Apr 2008
Posts: 375
Likes: 1
From: Ontario
I installed my checkerboard graphic myself. I used a wet vinyl application process. I believe there are posts explaining this but if you cannot find the wet vinyl application pm me and I will help you.
Just so you know-- I am a highschool French teacher and had absolutely NO knowledge of how to do the install. My checkerboard looks perfect. I daresay, I am happy I did it and not the dealership. They told me they would not be "confident" doing something like that.
Save your money. It takes a couple hours to do it perfectly... a lot of ppl will say a dry application is better but if you goof up you are screwed. Wet application requires a lot of TLC but you can adjust the vinyl as you go.
Like I said. My sunroof is perfect and I am happy I did it myself. Save your money.
Just so you know-- I am a highschool French teacher and had absolutely NO knowledge of how to do the install. My checkerboard looks perfect. I daresay, I am happy I did it and not the dealership. They told me they would not be "confident" doing something like that.
Save your money. It takes a couple hours to do it perfectly... a lot of ppl will say a dry application is better but if you goof up you are screwed. Wet application requires a lot of TLC but you can adjust the vinyl as you go.
Like I said. My sunroof is perfect and I am happy I did it myself.
Save your money.
Last edited by Carlisle; May 22, 2009 at 07:38 AM. Reason: changed the word "installation" to "application"
4th Gear
Joined: Apr 2008
Posts: 375
Likes: 1
From: Ontario
I made sure I was wearing clothes with no metal zippers, buckles, etc. so that when I stood on a small step stool to get a good look at the roof if I had to lean against the car I would not scratch it.
 It worked quite well! I did it in my parents garage, and from start to finish it took about 2 hrs. But you have to understand... I was very obsessed with making it perfect.
 Seriously man... don't take the sunroof apart! You can do it! I really know VERY LITTLE about cars and DIY installs. I am a complete novice. I am proud I did a good job.
I also installed the checkered mirror caps myself without breaking any of the tabs!
Thread Starter
|
1st Gear
Joined: May 2009
Posts: 12
Likes: 0
Roof Graphic is Installed Now
OK. I tackled the roof graphic install on my own this past weekend. I HAD to do the dry method - the instructions were VERY direct about this and once I started I realized why. I ordered the checkerboard graphic for the sunroof and when I opened it up it was not at all what I expected which caused slight disappointment. I ordered it through Mini back when I first ordered the car and since that time I have spend countless hours looking at other graphics places online, read forums and viewed finished pics. I assumed that the graphics would be two large sheets - one for each sunroof panel, and would be perforated. I was wrong on both accounts.
Instead of having a large sheet with the checkerboard design it was a semi-sheet filled with individual white square decals. If you use the wet method the alignment would be thrown totally off because each square would slide around. This also meant that you had to watch the placement of each square as you peeled back the coversheet. Very tough job to do alone. The first panel ended up with a couple of the squares having a few wrinkles. I smoothed it the best I could. The second roof panel was much easier since at this point I had experience and knew what worked and what didn't. No wrinkles in the second panel. I still wish it had been two solid sheets though instead of several dozed individual squares.
Surprise number two. The squares were solid, not perf. I was really upset about this at first but after baking under that massive glass roof I welcome anything to cut out some of those rays.
Overall it was a success with just a few wrinkles and the satisfaction of knowing I did it myself.
Now if the stripes would hurry up and get here.
4th Gear
Joined: Apr 2008
Posts: 375
Likes: 1
From: Ontario
Hey! Happy to hear of your success story! I bought my checkerboard sunroof from Morristown MINI, and it was installed in two pieces-- one for each part of the glass. As I mentioned before, I did the wet application and I didn't need to individually adjust the squares-- but that was because there was a top coating of plastic that kept them all in place...
I am happy the dry worked for you! I would never order a perforated graphic... I want to block the sun as a default, and control how much I let in when I choose to open the roof... my new car doesn't have ANYTHING on the roof so I am currently looking for a graphic. I might go the union jack route, but then I will have to change my mirror caps and review mirror cover which are all checkered! The checkered theme with my Laser Blue MCS looks even better than it did on my old Silver MC.
Thanks for letting me (us) know how your install went! I miss my checkered roof!
Thread Starter
|
1st Gear
Joined: May 2009
Posts: 12
Likes: 0
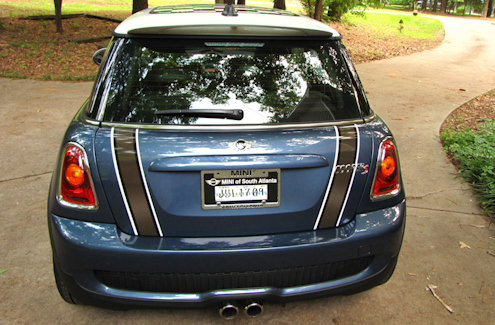
The stripes arrived and were VERY easy to install with the dry method. Getting the COOPER S letters back on perfectly was the hardest part.
Trending Topics

2nd Gear
Joined: Jun 2008
Posts: 65
Likes: 0
From: West Chester, PA
If the latter, what did you use? I'm going to try applying boot stripes this weekend, but I think I want to move the "Cooper S" from where the right bonnet stripe is going to go, to being centered below the license plate (spelling "Sooper").
Thread Starter
|
1st Gear
Joined: May 2009
Posts: 12
Likes: 0
The original adhesive tape was destroyed. Don't ever try to reuse it or you'll eventually end up mith missing letters).
I went to walmart and picked up a tube of adhesive in the auto section that is made for mounting these type badges. I used clear shipping tape to align the letters just right on our glass kitchen table. I then lifted the tape with the letters stuck to it, applied the adhesive and stuck the tape to the proper place on the Mini. Once it dried I peeled the tape off.
I went to walmart and picked up a tube of adhesive in the auto section that is made for mounting these type badges. I used clear shipping tape to align the letters just right on our glass kitchen table. I then lifted the tape with the letters stuck to it, applied the adhesive and stuck the tape to the proper place on the Mini. Once it dried I peeled the tape off.
Thread Starter
|
1st Gear
Joined: May 2009
Posts: 12
Likes: 0
btw...I recently had to take my Mini in with a nail in one of the run-flats. The entire shop came out to look at the graphics. They had never seen that design before and loved it. If you stand in front of the car the mesh in the stripes perfectly matches the grill mesh design.
Kudos to minimotoringgraphics.com!
(oh...as far as the tire goes...$331 for a new tire to replace the 1 month old original thanks to a single roofing nail. Thank goodness I had the road hazard insurance)
Kudos to minimotoringgraphics.com!
(oh...as far as the tire goes...$331 for a new tire to replace the 1 month old original thanks to a single roofing nail. Thank goodness I had the road hazard insurance)
2nd Gear
Joined: Jun 2008
Posts: 65
Likes: 0
From: West Chester, PA
Thanks for the info, quaestor! I looked around Walmart and other auto sections for adhesives but didn't find anything I was comfortable with putting on my car. In the end, decided to leave my MCS unbadged.
Just did boot stripes in early August, and it was SUPER easy:
Just did boot stripes in early August, and it was SUPER easy:
Thread Starter
|
1st Gear
Joined: May 2009
Posts: 12
Likes: 0
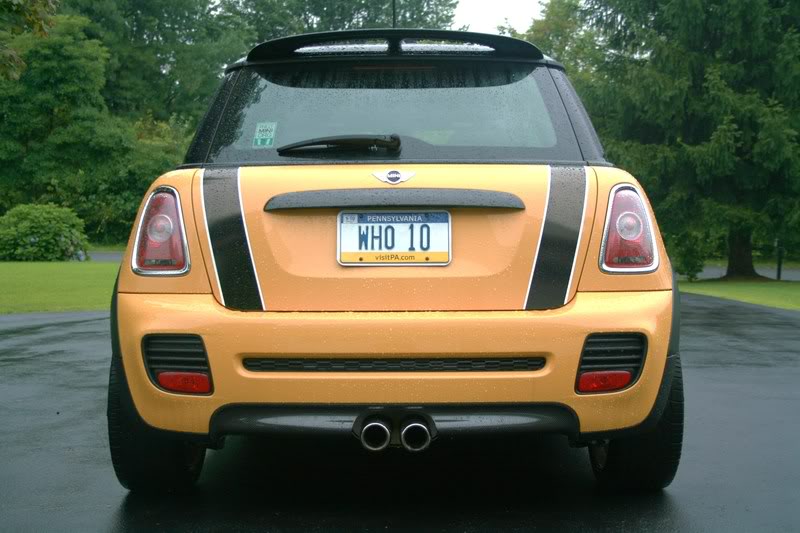
Looks great. That looks like a deeper yellow than normal. The stripes set off the black roof well. I'm still amazed how many come up to me about the car in parking lots and especially drive-thru windows.
They love the look and ask all about it. I just took it to Savannah 2 weeks ago and had a blast. So fun to drive and averaged 33.4 mpg. I love this car!!!!
They love the look and ask all about it. I just took it to Savannah 2 weeks ago and had a blast. So fun to drive and averaged 33.4 mpg. I love this car!!!!

6th Gear
Joined: Aug 2009
Posts: 1,552
Likes: 10
From: Des Moines, Iowa
Stripes
Looks great. That looks like a deeper yellow than normal. The stripes set off the black roof well. I'm still amazed how many come up to me about the car in parking lots and especially drive-thru windows.
They love the look and ask all about it. I just took it to Savannah 2 weeks ago and had a blast. So fun to drive and averaged 33.4 mpg. I love this car!!!!
They love the look and ask all about it. I just took it to Savannah 2 weeks ago and had a blast. So fun to drive and averaged 33.4 mpg. I love this car!!!!


4th Gear
Joined: Aug 2007
Posts: 339
Likes: 1
From: Palatine, IL
i paid a total of $150 for my vinyl stripes and roof checkers, and even that was too much. In hindsight, i should have bought the stripes (I got mine from mighty stripes) and just cut my own squares for the roof. The vinyl from mighty stripes is a bit thin for my liking, so on my dark colors, the white is a tiny bit obscured by the color underneath. You can get very thick 3M 1080 gloss white vinyl in 5 foot rolls from amazon for under $20 and cutting the squares wouldn't really be any more work than aligning and trimming them on the roof is.

Thread
Thread Starter
Forum
Replies
Last Post
squawSkiBum
MINI Parts for Sale
15
Oct 2, 2015 09:21 AM
bctf1
F55/F56 :: Hatch Talk (2014+)
9
Aug 6, 2015 12:55 PM

