
Interior/Exterior my $25 "anodized" engine bay dress up.

Thread Starter
|
4th Gear
Joined: Dec 2007
Posts: 555
Likes: 0
From: North Hollywood, California
my $25 "anodized" engine bay dress up.
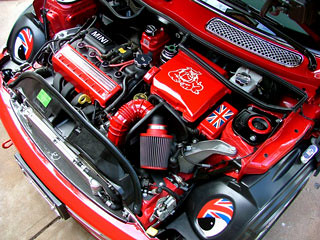
this is no biggie but, i had mentioned in another thread that i wanted to do this for "bling" purposes and hadn't found anyone else that has used "anodized" look paint. for some reason i'm a big fan of the anodized look and wanted to see if i could get a close look with a rattle can.
one day on a whim i google anodized spray paint and found duplicolor metalcast products. so i wanted to try them out. i finally bought some and these are the results.
1- soaked in simple green then scuffed and sanded- injector tube cover, battery box cover, fuse box cover and coolant reservoir cap. my dog knocked over the fuse box cover and it hit the ground so you will see in the pictures it was left silver for know since i used up the rest of the metalcast for additional coats on the other parts. will have to resand the fuse box cover again reprime and repaint with metalcast. for now i left it silver just so i could drive with a cover on the fuse box.
2- applied duplicolor adhesion promoter - supposed to be great for plastics and is a clear primer. about 3 coats per piece.
3- metal cast is a "tint" paint meaning it will allow the undercoat to show through. it is mainly used for painting chrome giving the anodized look. you can however use it on anything of any color and they make an undercaoting to use on colored items. i felt however that their undercoating has too large of a metal flake to it and makes the final job look more like a metallic paint job than anodized. so, i used duplicolor high heat silver engine paint. i was surprised at how smooth and silver it was and actually considered just going with it and not doing the metalcast spray. see fuse cover to get a rough idea. - 3 full coats.
4- then i applied the metalcast blue. at first it goes on faintly. you have to add coats to get it looking truly deep and "anodized". couple light coats then 3 full coats per piece.
5- duplicolor high heat engine clear coat. about 3 full coats.
you have to work semi fast. as per instructions on all the cans you want to allow 10 minutes between each coat and should be finished within 1 hour. after that you have to wait 7 days for it to fully cure. so essentially i worked on each piece after being sanded for 1 hour each from primer to final coat. let dry indoors overnight and then put them back on. i'm happy with the final results but, afer a week or so i will probably pull them off and buff them out after the paint has cured totally.
total cost = about $20 + tax and i would have had enough paint to do all th pieces totally if i hadn't dropped the fuse box cover. now i need to wait for the silver paint to fully dry so i can resand it, reprime in silver and repaint in metalcast blue.
colors available- green, yellow, purple, red, blue and smoke. the smoke looks cool and i am considering doing my dash, door ovals and downtubes and trim rings in it.
excuse the pics i took them in a rush and didn't compensate for the sun glare. as you can tell i'm slowly working towards a red and blue engine bay... end results :
Last edited by whiteyanderson; Feb 10, 2008 at 11:07 AM.


That looks excellent. Now we need to figure out a way to replace or paint the stock air intake hose. Since it is rubber, painting doesn't work well as it flexes and the paint discolors over time (has on mine anyway). Fellow NAM'er 03INDIGO actually pulled his engine mounts and painted those too. Looks really good, but a tad too much work for me to try.
One other thing I have found is that the temp in the engine bay is within the temp range of regular clear coat. I mention this because the high temp clear coat is much more brittle than the regular clear coat and if you put a good build up on you may find it flaking or cracking over time.
Looks great, keep us posted on your progress. Nice write-up too.
Chuck
Thread Starter
|
4th Gear
Joined: Dec 2007
Posts: 555
Likes: 0
From: North Hollywood, California
thanks for the comments. i'm happy with it so far and it seems so far to be holding up. after a couple days of being on at engine temps it is staying clean and seems to have cured a little faster to a nice richer, deeper color.
yeah 03indigo has an awesome engine bay and it was his bay that inspired me to take on the project but, try to give it the anodized look. i'm not pulling the engine mounts either though... too much work for my blood.
i hope the the high temp holds up. hoping since the pieces painted don't get near the temperature of say an exhaust manifold, they'll be ok.
i've toyed with the idea of doing the air inlet up front there. i just bought a new one since my tabs are broken. that, and the oil cap, power steering cap and brake fluid caps are next on the list. as well as finishing the fuse box cover.
i was also trying to figure out a way to do the intake hose. maybe someone will come out with a colored one. which would be nice.
i'll keep the thread updated as i do the remainder of the pieces which'll probably be a couple weeks from now. then i'll probably do radiator and vacuum hoses.
yeah 03indigo has an awesome engine bay and it was his bay that inspired me to take on the project but, try to give it the anodized look. i'm not pulling the engine mounts either though...
too much work for my blood.i hope the the high temp holds up. hoping since the pieces painted don't get near the temperature of say an exhaust manifold, they'll be ok.
i've toyed with the idea of doing the air inlet up front there. i just bought a new one since my tabs are broken. that, and the oil cap, power steering cap and brake fluid caps are next on the list. as well as finishing the fuse box cover.
i was also trying to figure out a way to do the intake hose. maybe someone will come out with a colored one. which would be nice.
i'll keep the thread updated as i do the remainder of the pieces which'll probably be a couple weeks from now. then i'll probably do radiator and vacuum hoses.
Here is what mine looks like right now. I did this during the summer and it has held up pretty well. The intake hose looked good at first, but has since turned darker. I used the color match rattle cans from minispeed over the duplicolor plastic primer.

Yeah I blame 03Indigo for this as well!
Yeah I blame 03Indigo for this as well!


Trending Topics


Thread Starter
|
4th Gear
Joined: Dec 2007
Posts: 555
Likes: 0
From: North Hollywood, California
now we're swinging! awesome! PGT did you use the metalcast paint? also love the trim rings. this is something else i want to do BUT, i have cordoba beige/black interior and coupled with the silver interior felt adding another color in there would just make it too much. digging on the craven strut plates though i have to get some.
Here they are larger.


and my bulldog too

I'm really liking that dark grey with the red - looks very hot PGT!
and my bulldog too
I'm really liking that dark grey with the red - looks very hot PGT!

https://www.northamericanmotoring.co...d.php?t=109404

Thread
Thread Starter
Forum
Replies
Last Post
Kimolaoha
R56 :: Hatch Talk (2007+)
70
Jul 5, 2023 01:04 PM
blackie
MINI Parts for Sale
36
Jan 18, 2017 09:57 PM
blackie
MINI Parts for Sale
31
Jan 18, 2017 09:56 PM
R50/53 Respray - Color Change?
chicohuahua
R50/R53 :: Hatch Talk (2002-2006)
22
Aug 20, 2015 11:17 AM