
How To Interior/Exterior :: Replacing Speedo and Tach Gauge Faces With Pics!


Thread Starter
|
6th Gear
Joined: Jun 2006
Posts: 5,692
Likes: 2
Interior/Exterior :: Replacing Speedo and Tach Gauge Faces With Pics!
Boilerplate Disclaimer: The steps outlined below worked fine for me, but I make no guarantees regarding your skills or your car. If you feel unease at anything described below, please do not attempt this modification. I am not responsible for any damage to your car or alteration/voiding of your warranty caused by attempting this modification. This How-to uses aftermarket gauge faces made by Outmotoring.com - your gauges may be shaped differently then the ones I used (unlikely but possible). No, I don't know when they will go on sale or how much they will cost - sorry - but I'll be sure to link to them as soon as I know.
** WARNING: According to some sources, disconnecting the speedo assembly can possibly lead to it having to be reprogrammed by a dealership. I, personally, did not have any issues - my oil service, odometer and idiot lighs all seem unaffected by the disconnect, but I'm mentioning it to be thorough. Also, the Bently manual mentions that if you tilt the speedo horizontally, that silicone can leak out - I had no such issue. If any of this worries you, do not disconnect the speedo from the car and replace the face with the speedo in the vertical position - it should be possible (if awkward) to do it without removing it entirely from the car. Good luck! **
Please read through this entire How-to at least twice before picking up any tools. That said, this was surprisingly easy (once I understood where everything was located) and resulted in a great-looking mod. If you have any questions about this How-to, please reply here or feel free to PM me. Good luck!
Tools required:
- Small flat-bladed screwdriver
- Torx screwdriver or torx set w/ #20 and #22 bits
- Phillips head screwdriver
- Electrical or masking tape
- Can of compressed air (not mandatory, but makes your life MUCH easier)
- Sharpie or permanent magic marker
+++++++++++++++++++++++++++++
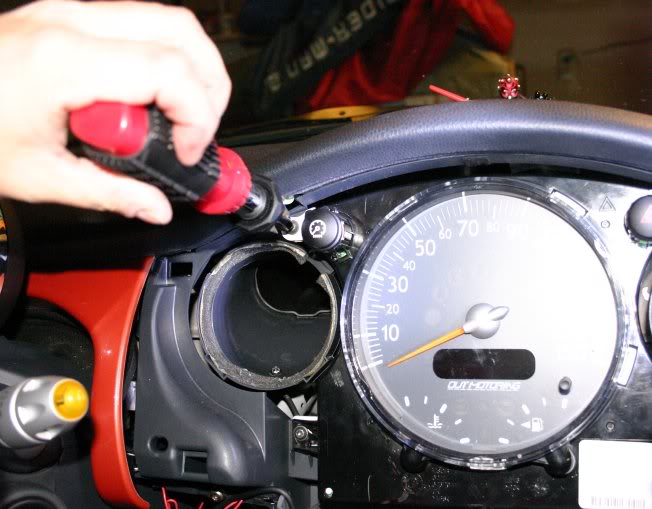
Step 1 - Tachometer removal (all models):
Begin by removing the tachometer. This will give you room to remove the dash pieces later.
1. Lower steering wheel to lowest possible position. Get above tach and look straight down.
2. Using a #20 torx screwdriver, remove the two screws you will see. These screws secure the tach to the steering column.
3. Slide tach towards you until it pulls clear of the steering column.
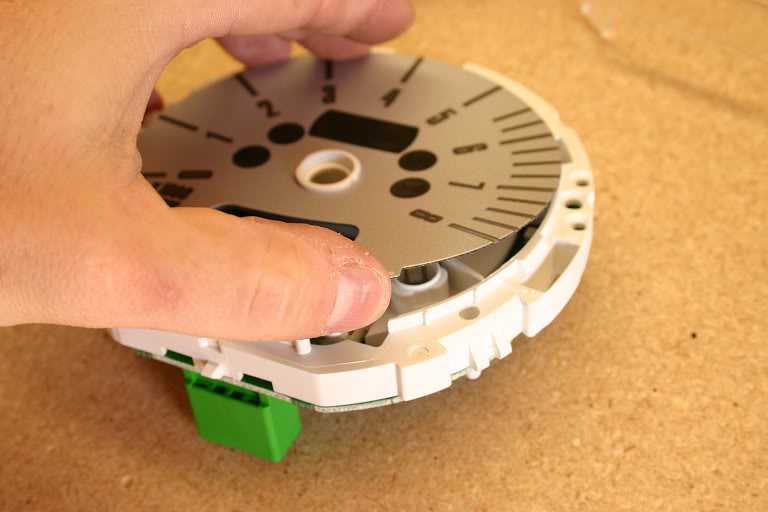
4. Tach is still plugged in – to remove, unlatch green plastic wiring harness. Use a fingertip - no tool is necessary.
5. The tach is now ready to be opened and swapped, but set it aside for the moment. Move on to step #2A for 2002-2004 models, or #2B for 2005-2006 models.
Step 2A - for 2002-2004 models (2-piece dash) Dashboard removal:
1. Place masking or electrical tape over small flat-bladed screwdriver. You will be doing a bit of prying and the tape will prevent marring of plastic pieces.
2. Remove driver’s side dashboard side cover w/ tape-covered screwdriver. Start at the bottom edge (there’s a tab there to insert the screwdriver) and slide the tool up along to seam to pop the cover free.
3. Remove the #20 torx screws (x2).
4. Repeat steps 2-3 on passenger side.
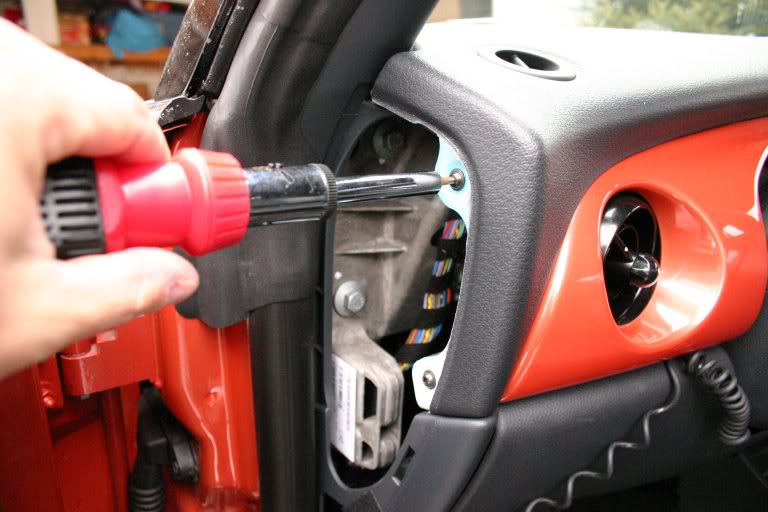
To free the dash, remove these torx screws from either side of the car...
5. Lift the dashboard up from the front edge, then pull the rear edge free. Set aside dashboard.
6. Open glove box and look upwards. You should see 3 torx screws. Remove all 3 and set aside.
7. Remove #20 torx screws (x2) next to the hazard and dimmer buttons. If you have to remove the rings to get to them, they just pop straight off.
8. Remove painted plastic center instrument cluster cover.
9. The speedometer mounting screws are now exposed and is ready for removal (proceed to “Removing the speedometer”)
Step 2B - for 2005-2006 Models (1-piece dash) Instrument panel decorative trim removal
1. On 2005-2006 cars, the dashboard is not removed, only the painted interior panels surrounding the instrument cluster.
2. Remove emergency blinker and dimmer switch rings – just pull straight out and they pop right off
3. Remove #20 torx screws (x2) next to the hazard and dimmer buttons. These screws go UP into the bottom of the dashboard.
4. Open glove box. Grasp bottom of passenger-side decorative trim at lower edge and pop it off. It is held in place with cloth-covered friction clips, so you’ll need to tug firmly. Carefully remove the trim piece and set aside.
5. Open driver’s-side knee bolster (grab at top edge and pull down firmly to pop it open - the hinges are on the bottom edge of the bolster). When the bolster is open, grasp lower edge of driver’s-side trim panel and remove.
6. Grasp lower edge of center trim panel and pull out from bottom. The trick to removing the center piece is that both the painted (outer) and black (inner) pieces, including both center air vents and the silver speedo ring are all in one piece. Do not attempt to separate painted trim piece from black piece surrounding the speedo ring. You’ll have to work the top edge of the center panel out from under the dashboard – be gentle and work slowly.
7. If the clear speedometer lens did not come off with the center panel, remove it and set it aside.
8. The speedometer is now exposed and is ready for removal (proceed to “Removing the speedometer”)
Step 3 -Removing the speedometer:
These 4 torx screws hold in the speedo assembly..
1. Unscrew the #20 torx screws (X4) that secure the corners of the speedometer cluster.
2. Pull speedo assembly out. There are two wiring harnesses attached to the back of the speedo cluster.
3. To remove both wiring harnesses, flip the light gray levers holding them in place upwards. This will pop the wires free from the back of the speedo.
4. The speedo is now removed and is ready to be swapped.
5. Please see "Warning" at top of the How-to for a note on possible damage that can be caused to the speedo as a result of the wiring harnesses being disconnected. While the author had no such issues or problems, we offer the info freely and openly. If this makes you uncomfortable, please do not proceed.
Step 4 - Opening and swapping the tachometer gauge face:
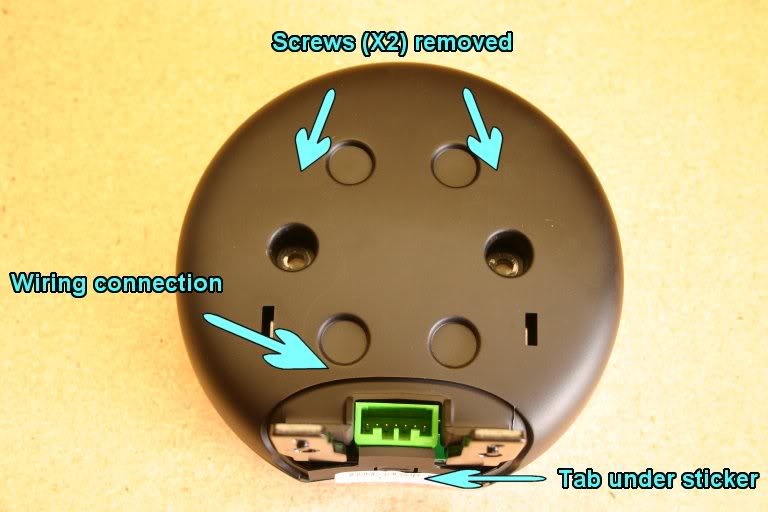
Here's a diagram of the back of the tachometer...
1. To open the tach casing, first place masking or electrical tape over small flat-bladed screwdriver. You will be doing a bit of prying and the tape will prevent marring of plastic pieces.
2. Remove Phillips-head screws (X2) on back of tach.
3. Open the securing clip on the bottom of the tach. There might be a white sticker with a bar code over the securing clip – if so remove or cut the sticker first.
4. Using your tape-covered flat screwdriver, begin GENTLY prying open the tach starting close to the bottom securing clip. Once the two halves begin to separate, the black back piece pops away pretty easily. Set aside the back piece.
5. Remove front silver/chrome ring by freeing the perimeter clips. Use a finger – no tool should be necessary.
6. Remove clear lens by freeing the clips. No tool should be necessary. The tach is now open and ready to swap.
7. Remove needle by gently prying up from CENTER with your tape-covered screwdriver. Try not to rotate the needle when removing – if you do by accident, see the “Checking gauges” section at the end for how to reset the gauge prior to reinstalling the needle.
8. Using your fingernail, gently pry up the tach number plate. You may have to use your tape-wrapped screwdriver to gently pop off the center of the gauge face.
Gently pry up the OEM gauge face...
9. Replace OEM face with new face.
10. Reinstall needle.
11. Check face for fingerprints or dust. Having a can of compressed air really helps here, as you do NOT want any dust or hairs inside the gauge.
12. Replace clear lens.
13. Replace outer silver/chrome ring
14. Replace tachometer back. Be sure the securing clip on the bottom is securely closed.
15. Replace Phillips-head screws (x2).
16. Reconnect green tachometer wiring harness but do not screw the assembly in for now.
17. Congrats – you’re done with the first gauge!

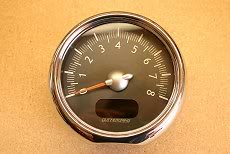
Completed tachometer...
Step 5 - Opening and swapping the speedometer gauge face:
1. The speedometer is held closed by clips around the perimeter. Using your finger, open the clips one-by-one until the speedo pops open. If the clips keep popping closed, a Popsicle stick or other smooth, rounded tool is helpful as an extra finger.
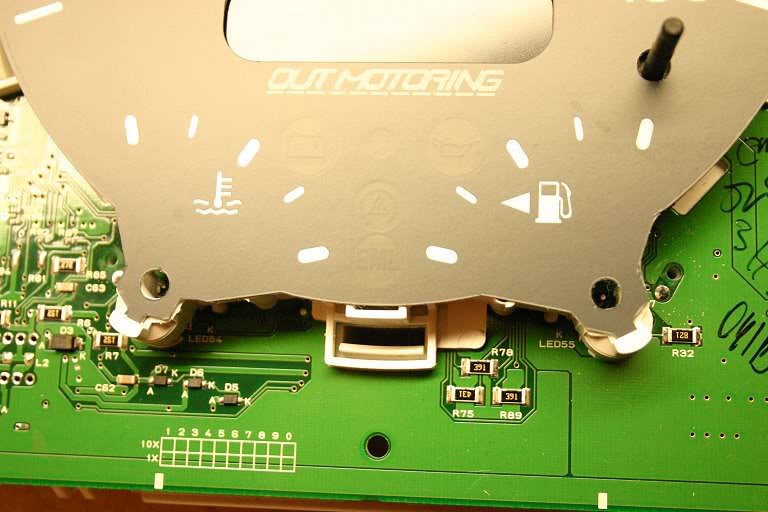
2. Using a Sharpie or magic marker, make a mark on the outer edges of the engine temp and gas gauge needles (the hidden clear base part, NOT the orange visible part), carrying the mark down onto the body of the speedo panel – this will be your calibration mark when you replace the needles.
18. Using your tape-wrapped flat screwdriver, remove the speedo needle by prying gently up from the center. Try not to rotate the needle when removing – if you do by accident, see the “Checking gauges” section at the end for how to reset the gauge prior to reinstalling the needle.
3. Remove speedometer needle and the engine temp/gas gauge needles the same way as you did the speedo needle.
4. Remove the rubber cover from the end of the clock/tripometer set post.
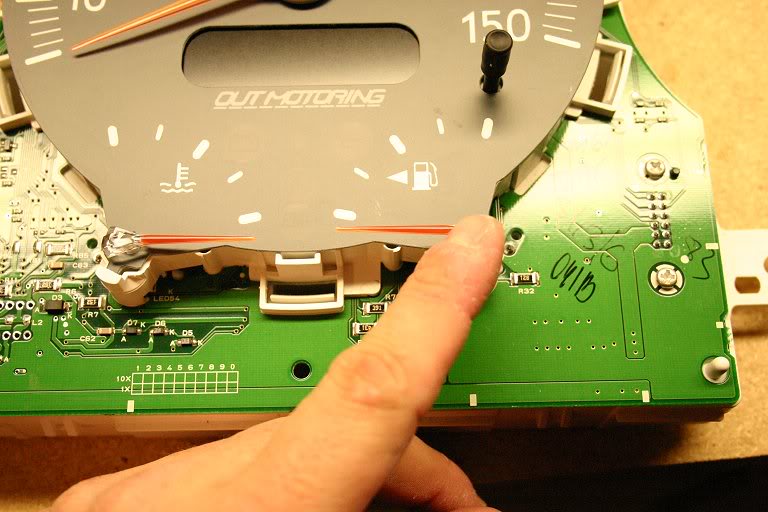
5. Remove OEM face, starting with the clips on the lower edge. You may need to use a eyeglass screwdriver or very small screwdriver to get under the clips, or just use a fingernail.
Free these tabs at the lower edge of the speedo face first. Be sure to slide them into place when replacing the face...
6. Replace gauge face with new face.
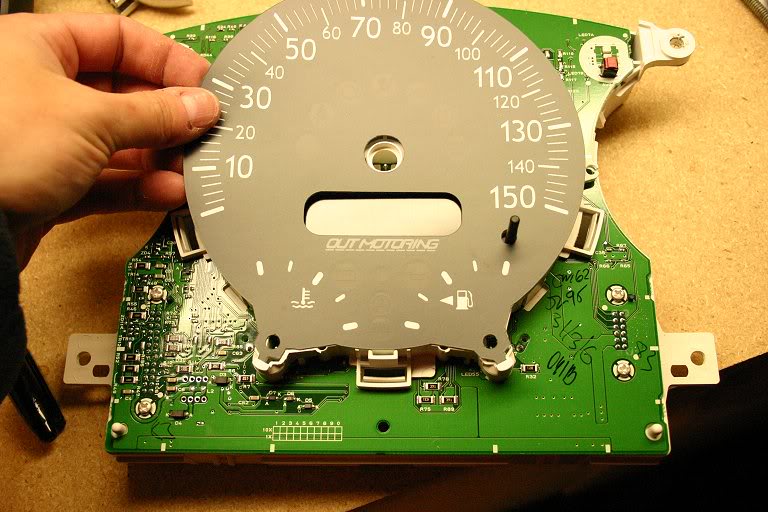
Fitting the new gauge face – note the rubber set post tip and all needles have been removed…
7. Replace speedo needle and engine temp/gas gauge needles. Replace rubber tip to set post.
Use your calibration marks to properly align the fuel and temp gauge needles...
8. Check new gauge face for fingerprints and dust. Use canned air to remove dust from gauge face and inside of clear lens – you don’t want dust in there, trust me.
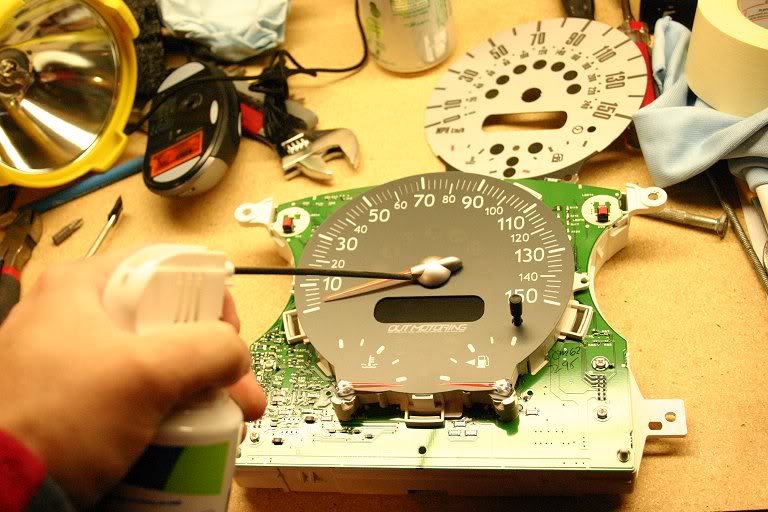
A quick shot of compressed air REALLY helps with the final assembly - dust inevitably gets trapped against the face and inside the lens...
9. Replace outer tachometer fascia, making sure all clips are securely closed.
10. Replace wiring harnesses (X2) to back of speedo.
11. Replace clear cover
12. Congrats, you’re done with the speedo.
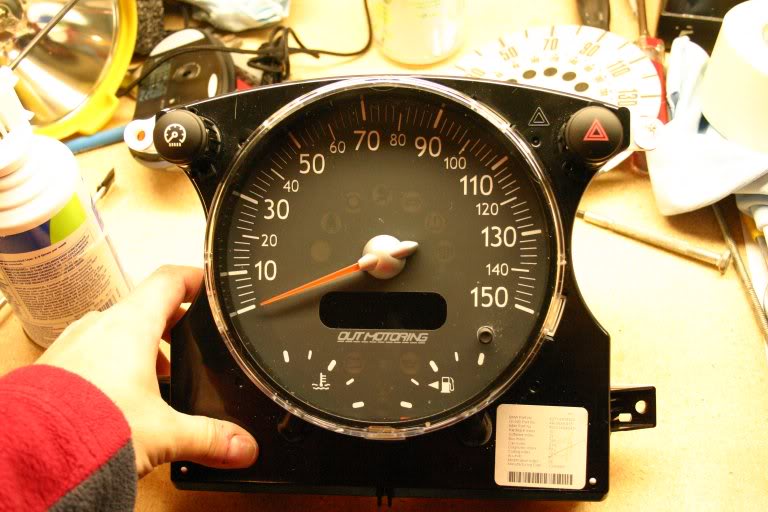
The final reassembled speedo assembly - don't worry, all the dust specs you see are on the OUTSIDE...
Step 6 - Checking gauges:
Before you re-attach everything, now is a good time to make sure that you put the needles back on properly – sometimes you accidentally rotate the needle shaft when removing the needles, resulting in mis-calibrated needles. This can easily be fixed – fear not! To check to see if they’re correct, turn on the electrical with the key (but do not actually start the car). Is your spedo on “0” precisely? Is your tach needle exactly on “0” or does it move above or below "0" when you turn the ignition on? If so, your gauges are off slightly. Follow the steps below to reset them. Alternately, you can do these steps after you replace the needles but before you re-assemble everything, if you don't want to hassle with re-opening the gauges:
1. Take the gauge off the car. Remove the outer section(s) and remove the center needle. Leave the gauge face on, however.
2. WITH THE NEEDLES OFF THE GAUGE and with the gauge still disassembled, plug the electrical connection(s) for the gauge into the car. You’ll hear the gears inside the gauge turning as they recalibrate.
3. When the noise stops and with the gauge still plugged in, turn the key on but do not start the car. The tach and speedo should now be powered (calibrated) and at the proper "0" position. With the key still on, push the needle(s) onto the gauges pointing at the “0” position.
5. Disconnect the gauge, take out the key and reassemble the tach and/or speedo. The needle should now be properly set to “0”.
Buttoning up:
1. For 2002-2004: Replace center decorative panel and replace all screws. Replace dash, starting with the rear edge. Replace X4 torx screws on the dash corners and screws you removed from inside the glove compartment. Replace side dash covers.
2. For 2005-2006: Replace decorative trim panels, starting with the center panel. Push the top edge in and up with your thumbs first to slide upper edge inside the dashboard. Replace X2 torx screws beside the hazard/dimmer switches. Replace button rings. Replace driver’s side and passenger-side trim panels.
3. For all models, replace tachometer and secure with X2 torx screws.
 You’re all done! Go for a nice drive and admire your spiffy new gauges!

3rd Gear
Joined: Oct 2005
Posts: 231
Likes: 0
From: Savannah GA USA
I was under the impressions that if you disconnect the speedo from the wiring harness, you will have to have it re-synchronized and programmed by a MINI dealer. Both Bentley Manuals and Mitchels Manuals state this as do Cockpitspecialties.com in their install instructions.... The Speedo is the gateway to the CAN, K and D buses after all.
User Title's are Silly
Joined: Jul 2003
Posts: 2,022
Likes: 0
From: Arvada, Colorado
they look great. Too bad OutMotoring had to put their logo in the middle of the speedo and tach...blech :( . Would have been nice if they did not "advertise" right out in the open like that. Otherwise, I really like them. The print font is interesting and the fact that they left off the kph numbers.
2nd Gear
Joined: Jun 2006
Posts: 109
Likes: 1
From: new york
Trending Topics
Thread Starter
|
6th Gear
Joined: Jun 2006
Posts: 5,692
Likes: 2
I checked and my odometer, scheduled service and all other settings seem fine, even though I disconnected the speedo from the wiring harness. Not sure what the busses you describe are for. I also did not see anyhitng leaking from the speedo as a result of being tipped horizontally. I'm editing the main post to give fair warning, however, as this might be an issue with different models of MINI.
I'm going to be shooting "beauty shots" later tonight, and I'll definitely shoot some with the idiot lights illuminated. They show up very well, day or night.
I think it looks fine - it's not obtrusive. With the indicator lights all visually hidden, the gauge is almost TOO sparse, compared to the OEM. I DO like the font used for the numbers - it feels sort of "retro", especially compared to the OEM font (which I always thought felt very "techno").
I think it looks fine - it's not obtrusive. With the indicator lights all visually hidden, the gauge is almost TOO sparse, compared to the OEM. I DO like the font used for the numbers - it feels sort of "retro", especially compared to the OEM font (which I always thought felt very "techno").
Thread Starter
|
6th Gear
Joined: Jun 2006
Posts: 5,692
Likes: 2
Warnings regarding the disconnection of the speedo added in red. I had no issues as far as I can see on a 2006 cabrio, but your mileage may vary.
If you feel uncomfortable, please do not proceed or plan to install the speedo gauge face with the unit connected to the car and in the vertical position. Seeing as how some people totally re-wire the speedo with blue LEDs with no reported issues, I think it's safe, but those warnings must exist for SOME reason.
Good luck all!

Thread Starter
|
6th Gear
Joined: Jun 2006
Posts: 5,692
Likes: 2
Well, volunteering a leased MINI for risky, unproven and experimental surgery is the first pre-req.  Shhhh.... don't tell my wife, OK?
Shhhh.... don't tell my wife, OK?


Those are nice looking face plates. I was waiting to see what outmotoring was going to put out vs. the other one's I've seen recently. Looks like I'll be spending the extra cash for the other one's because I particularly don't care for the logo.


Ditto. I like the font on these better, but the other ones dont have shameless self promotion written all over them...
I abought the other ones a couple weeks ago, but still
Also, great writeup! Thanks!
I abought the other ones a couple weeks ago, but still
Also, great writeup! Thanks!
4th Gear

Joined: Nov 2004
Posts: 526
Likes: 2
From: DFW Texas
Nice write-up!
Aaron's a great guy and I like what he does at OutMotoring. I do like the new faceplates but the logo is a bit too obvious for my tastes. If the logo were 50-75% smaller I could probably live with it being there. Nothing else on my car (easily visible) screams the vendor's name so I guess I'll wait to see if it changes, or go elsewhere.
Aaron's a great guy and I like what he does at OutMotoring. I do like the new faceplates but the logo is a bit too obvious for my tastes. If the logo were 50-75% smaller I could probably live with it being there. Nothing else on my car (easily visible) screams the vendor's name so I guess I'll wait to see if it changes, or go elsewhere.
I have nothing against Aaron or Outmotoring plus I'm glad to see him produce those face plates. I would have been all over them but the logo is just a bit too extreme in my tastes. I'm sure that many people feel the same way as I do which in lie will hold them from buying the plates.
btw....thanks for the great write up ImagoX
btw....thanks for the great write up ImagoX

I was under the impressions that if you disconnect the speedo from the wiring harness, you will have to have it re-synchronized and programmed by a MINI dealer. Both Bentley Manuals and Mitchels Manuals state this as do Cockpitspecialties.com in their install instructions.... The Speedo is the gateway to the CAN, K and D buses after all.
(Hell! I've been driving around for the last three weeks WITHOUT my Tach installed! I HAVE drivin my MINI without the SPEEDO in for about 10 miles..)
ImagoX - Great writeup! Got night shots of them?

Me.
Theyre normal error codes which you can clear with a data logger, right?
(I don't know what they're called. I only know my local shop let me play around with theirs, I got to clear my codes and change a few customizable settings..)However, if you HAVE error codes thrown, it in no way affects the car's operation at all. No sudden knocks, no sudden airbag deployments (well.. unless you hit something!), no lights on the dash that won't go out. No sudden loss of cabin air pressure. [Edit: I AM only speaking for 02-06 models. ot having an 07, I can't say anything 'bout them.]
As an aside, I really like the 'empty' design - and don't like the name. Like someone else said, nowhere else am I advertising for any mods on my car (The MR exhaust's name is on the side, up under the car. You'd never see it unless you knew where to look) and wouldn't want someone else's name on my MINI.
 Now if a logo was customizable, THAT would be cool..