
How To Interior/Exterior :: Replacing Speedo and Tach Gauge Faces With Pics!

Vendor - 15 Years

Joined: Feb 2003
Posts: 1,933
Likes: 39
From: Knoxville TN
__________________
865-223-6335

OutMotoring.com: Home of the finest MINI Parts + Accessories.
Shop online at www.OutMotoring.com
OutMotoring.com: Home of the finest MINI Parts + Accessories.
Shop online at www.OutMotoring.com

Will be (pre)ordering mine within days. Would it be possible to change if/when I see other colors? 
Great job, tho. If anyone wants their dash LEDs changed to another color, let me know, I can install these for you while I take care of it..
Great job, tho. If anyone wants their dash LEDs changed to another color, let me know, I can install these for you while I take care of it..
Vendor - 15 Years
Joined: Feb 2003
Posts: 1,933
Likes: 39
From: Knoxville TN
We should have color samples within a week and I am sure we can arrange to change your order if you see something better after you order...
__________________
865-223-6335
OutMotoring.com: Home of the finest MINI Parts + Accessories.
Shop online at www.OutMotoring.com
OutMotoring.com: Home of the finest MINI Parts + Accessories.
Shop online at www.OutMotoring.com


Got my OutMotoring faces in today, and I must say... Beyond excellent quality. I've only installed my Tach (on lunch, at work), and it looks great with my green dash. I kinda miss the slightly larger half-tick marks on the tach, but of all the things to nitpik at, that's a tiny, tiny thing. The sticky on the back works wonderfully, another great detail point.
Thanks Aaron!
Me.
Thanks Aaron!
Me.

Just installed my new Out Motoring face plates:
So easy. Matt, your instructions were excellent.
I found a little note left over from the builders - anyone else?

Thanks again ImagoX and Aron from OutMotoring. I think they look very nice.
Chuck
So easy. Matt, your instructions were excellent.
I found a little note left over from the builders - anyone else?
Thanks again ImagoX and Aron from OutMotoring. I think they look very nice.
Chuck

How-to for column-mounted tach and speedo!
Aaron was kind enough to let me test the fitment of his production samples of the column mount tach and speedo pair - for cars with the Cockpit Chrono Pack or Nav. These should be available soon from Outmotoring.
If you reviewed Matt's outstanding how-to in post #1, you would be able to figure this out yourself - but here are a few pointers and pics.
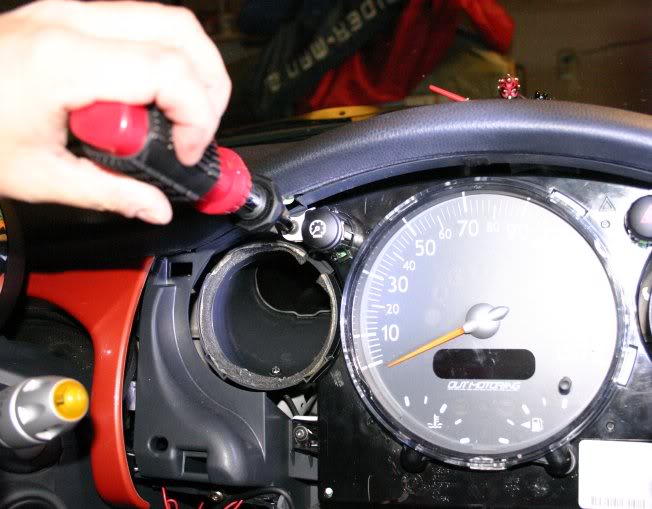
The gauge cluster comes off just like the single tach - lower the steering column to the lowest position, remove two screws behind the gauges (on mine, they were T-25 torx), and unplug the wiring harness. Now you can take the gauges to a counter or workbench to complete the mod.
Here is the "before" view:

The back has FOUR Phillips head screws - remove these:

And on the bottom, there are TWO clips - one may be covered by a sticker.

Gently pry these up (ideally with the tape-covered small screwdriver Matt mentions) and the back "shell" will pull right off. You end up with this:

Now it gets a LITTLE trickier - the front bezel assembly is held on by FOUR black spring clips. Mine was ALSO held on by a strip of double-stick tape between the two gauges. So you'll gently release the clips and the sides will start to pull apart, but then you'll meet some pretty strong resistance. I looked, and looked, and looked for something else that might be holding it - but after finding no other clips or screws that did anything, I held my breath and pulled harder (with the clips still released) and it came apart. I don't think the tape really does anything... except make you hold your breath when taking it apart...
Once apart, you have this:

From here on out, it's EXACTLY like the tach installation, except doubled. The clear "domes" and the black rings just lift off. You GENTLY pry the needles off (another breath holding moment, as mine were stuck on there quite tightly), and the faces easily peel off. The new faces slip on snugly over the needle "hub". With half the prying and peeling done, and one side completed, it looks like this:

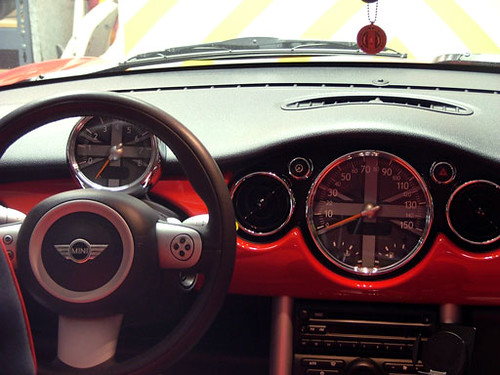
With the second face and needle replaced, you have this:

And after reversing the disassembly of the shell, you have your completed gauges.

Now, while it was quite easy and fulfilling to put this back together the first time on the counter, in my experience, it's IMPOSSIBLE to do this without slightly rotating one or both of the needles - which will make your "zero" point off when reinstalled in the car...
So the most efficient approach to reassembly would be:
1) strip down to the gauge faces
2) install the new faces - NOT the needles or anything else
3) take it back to your car - with the needles - and plug in the wiring harness.
4) turn on the car to "reset" the gauges to their zero location
5) turn off the car
6) carefully slide on the needles, precisely pointing at zero
7) turn on the car - ensure that the needles still point to zero
8) turn off the car
9) unplug the harness (making sure NOT to bump the needles)
10) carefully reassemble the gauge shell, making sure NOT to bump the needles.
11) reinstall the gauge cluster and test once more. All should be well.
I LOVE the improvement in appearance and readability that this provides!


If you reviewed Matt's outstanding how-to in post #1, you would be able to figure this out yourself - but here are a few pointers and pics.
The gauge cluster comes off just like the single tach - lower the steering column to the lowest position, remove two screws behind the gauges (on mine, they were T-25 torx), and unplug the wiring harness. Now you can take the gauges to a counter or workbench to complete the mod.
Here is the "before" view:
The back has FOUR Phillips head screws - remove these:
And on the bottom, there are TWO clips - one may be covered by a sticker.
Gently pry these up (ideally with the tape-covered small screwdriver Matt mentions) and the back "shell" will pull right off. You end up with this:
Now it gets a LITTLE trickier - the front bezel assembly is held on by FOUR black spring clips. Mine was ALSO held on by a strip of double-stick tape between the two gauges. So you'll gently release the clips and the sides will start to pull apart, but then you'll meet some pretty strong resistance. I looked, and looked, and looked for something else that might be holding it - but after finding no other clips or screws that did anything, I held my breath and pulled harder (with the clips still released) and it came apart. I don't think the tape really does anything... except make you hold your breath when taking it apart...
Once apart, you have this:
From here on out, it's EXACTLY like the tach installation, except doubled. The clear "domes" and the black rings just lift off. You GENTLY pry the needles off (another breath holding moment, as mine were stuck on there quite tightly), and the faces easily peel off. The new faces slip on snugly over the needle "hub". With half the prying and peeling done, and one side completed, it looks like this:
With the second face and needle replaced, you have this:
And after reversing the disassembly of the shell, you have your completed gauges.
Now, while it was quite easy and fulfilling to put this back together the first time on the counter, in my experience, it's IMPOSSIBLE to do this without slightly rotating one or both of the needles - which will make your "zero" point off when reinstalled in the car...
So the most efficient approach to reassembly would be:
1) strip down to the gauge faces
2) install the new faces - NOT the needles or anything else
3) take it back to your car - with the needles - and plug in the wiring harness.
4) turn on the car to "reset" the gauges to their zero location
5) turn off the car
6) carefully slide on the needles, precisely pointing at zero
7) turn on the car - ensure that the needles still point to zero
8) turn off the car
9) unplug the harness (making sure NOT to bump the needles)
10) carefully reassemble the gauge shell, making sure NOT to bump the needles.
11) reinstall the gauge cluster and test once more. All should be well.
I LOVE the improvement in appearance and readability that this provides!
Last edited by BlimeyCabrio; Feb 29, 2008 at 05:25 PM.

5th Gear
Joined: May 2006
Posts: 923
Likes: 1
From: Southern IL
Any idea which colour is closest to the colour of the fuel gauge on the chronos package? I really like the way those look but being a chronos owner I'd like to have my dash gauges tie in at least a little with the center gauge package.
The CHARCOAL GRAY dials (like the ones I installed) are pretty much an EXACT match for the color and texture of the fuel gauge on the chrono - That helps tie the look together.
I'm going to work with Aaron to see if any aftermarket solution is practical for the chrono pack itself... But it's nice that the black gauges match the fuel gauge.
I'm going to work with Aaron to see if any aftermarket solution is practical for the chrono pack itself... But it's nice that the black gauges match the fuel gauge.
Last edited by BlimeyCabrio; Aug 12, 2007 at 05:07 AM.

6th Gear
Joined: Mar 2006
Posts: 1,114
Likes: 0
From: Kansas City
I didn't like the green color so I exchanged them for black and installed over the weekend. Wow, not a job for the timid. It turned out fine, but I think as a DIY, it's risky. I cringed a lot. If several people got together, the 2nd and 3rd installs would be pretty safe, though. Man... It defies my sense of logic that you yank like Hel$l on a dash panel to remove it. I would have thought there would be a few #20 Torx anchoring these parts. And with the knee bolster, I found it difficult to find any topside area to hold onto in order to pop it loose.
ImagoX, great write up... You safely guided me through an elevated blood-pressure DIY.
ImagoX, great write up... You safely guided me through an elevated blood-pressure DIY.

Thread Starter
|
6th Gear
Joined: Jun 2006
Posts: 5,692
Likes: 2
Honestly, if you just use firm, contasnt pressure on the LOWER edge of the trim pnels, they pop right off - they're held on by felt-wrapped friction clips. Once the lower edge is free, wiggle the top edge out - the padded top of the dash holds it in. I find it easiest to remove them in the following order:
1. Passenger side
2. Driver's side (pop off bottom ONLY but leave the top-half still installed - it's a pain to get back in if you totally remove it)
3. Center
With the driver's side free, the center can be popped out completely. Also remember when removing the centere panel to FIRST remove the torcx screws on the top and THEN be sure to pull out the painted AND the black center part of the panel - it's actually 2 layers clipped together. The first time I did this MOD I didn't realize that and pulled the painted center peice away from the black part with the air vents and had to glue it back together. Not a biggie, I guess, but why hassle if you don't have to right?
Reinstalling is the reverse (Center, then pop back the driver's side, then passenger last). I also find that having a set of these PLASTIC TRIM TOOLS FROM HARBOR FREIGHT made the reinstallation a snap - not surprising, really, as these little $5 tools make almost EVERY job I do involving trim peices much, much easier - HIGHLY RECOMMENDED that you get a set or two. Honest...
I've found that if you do this repeatedly (like I have) that the "sockets" for the hazard and dimmer buttons start to gouge the bottom edge of the dash pad... If you remove the four torx screws that secure the dash pad under the passenger side dash panel, that helps the pad move just enough to ease removal and replacement of the center panel. At least it does for me on my 2006.
Thread Starter
|
6th Gear
Joined: Jun 2006
Posts: 5,692
Likes: 2
Interesting - I've not had that problem despite repeated removals and re-installations. You could also put a peice of low-tack painter's tape on that spot durng the process as well, I'd assume - use a double or triple thickness if you think it will gouge. I do this instinctively all the time, anyplace where I think one object might scrape against another, and it's saved me every time. haven't done it on that spot though, as I don't seem to have any scraping going on. Odd...
6th Gear
Joined: Mar 2006
Posts: 1,114
Likes: 0
From: Kansas City
Truth be known, I scuffed the vinyl upper dash pad either in removal or reassembly of the gauge cluster. Fortunately they're such small boo-boos that only I can see 'em. I don't know about the rest of you, but I'm pretty conservative with new toys (under warranty). I'm thankful for the pioneers of these mods. Simple things removing the dimmer & hazard bezels--they could just as easily have been twist-offs rather than pull-outs.
The scan label on the bottom of the Tach hides the flange release--which I broke off, because I was pushing the release, rather than pulling out. If in doubt with this part, remove the OEM parts label on the bottom to reveal how the clip works.
The scan label on the bottom of the Tach hides the flange release--which I broke off, because I was pushing the release, rather than pulling out. If in doubt with this part, remove the OEM parts label on the bottom to reveal how the clip works.

2nd Gear
Joined: Mar 2008
Posts: 75
Likes: 0
has anybody found the LED's on the circuit board (both tach and speedo) to not light up? I know that there are different LED's behind the tach markings for a variable red line, but it seems that at least one on my speedo is out (at the top between 70 and 80 MPH. I have a MCC, and my red line is at 6500 RPM or so, and some of the markings are not illuminated just under the red line. Anyone?
has anybody found the LED's on the circuit board (both tach and speedo) to not light up? I know that there are different LED's behind the tach markings for a variable red line, but it seems that at least one on my speedo is out (at the top between 70 and 80 MPH. I have a MCC, and my red line is at 6500 RPM or so, and some of the markings are not illuminated just under the red line. Anyone?
Thread Starter
|
6th Gear
Joined: Jun 2006
Posts: 5,692
Likes: 2
That reminds me... I'm going to try that tach MOD using a soldering iron instead of the Dremel or clippers - lots of people on my car MODding forums use the iron to remove plastic from areas that are dust-sensitive. Using nippers like BLimey did seems like the next best alternative, followed last by the Dremel - lots of dust will be tossed EVERYPLACE with a Dremel.
Yeah... I definitely would NOT recommend the dremel for this mod... the soldering iron would work fine if you removed the white bezel from the tach... but I wouldn't want that much heat that close to the LEDs underneath there if I were cutting it in place...