
How To Interior/Exterior :: Replacing Speedo and Tach Gauge Faces With Pics!


2nd Gear
Joined: Mar 2008
Posts: 75
Likes: 0
thanks for all the help - I am so much happier with the new faces when they are all lit up. I did the clip method - I don't trust myself with a soldering iron all that much. One project down, and a CravenSpeed short shift to go.
Again, without the help of this forum I would have really botched this - Thanks to all.
Again, without the help of this forum I would have really botched this - Thanks to all.

Thread Starter
|
6th Gear
Joined: Jun 2006
Posts: 5,692
Likes: 2
thanks for all the help - I am so much happier with the new faces when they are all lit up. I did the clip method - I don't trust myself with a soldering iron all that much. One project down, and a CravenSpeed short shift to go.
Again, without the help of this forum I would have really botched this - Thanks to all.
Again, without the help of this forum I would have really botched this - Thanks to all.


2nd Gear
Joined: Mar 2008
Posts: 75
Likes: 0
hey - this was my first project, so you'll have to excuse not having the digital camera at the ready while I was sweating the imminent voiding of my warrantee, but I'll get some "afters" for you. I am a novice - be gentle.
Thread Starter
|
6th Gear
Joined: Jun 2006
Posts: 5,692
Likes: 2
LOL... I'll let you off the hook. THIS time. 
Actually, this is a great first project/first MOD - exacting but not ludicrously so; reversible; low-risk... Kudos to you for taking the plunge - I know it can be hard to start putting screws into your baby.
Actually, this is a great first project/first MOD - exacting but not ludicrously so; reversible; low-risk... Kudos to you for taking the plunge - I know it can be hard to start putting screws into your baby.

6th Gear
Joined: Mar 2006
Posts: 1,114
Likes: 0
From: Kansas City
thanks for all the help - I am so much happier with the new faces when they are all lit up. I did the clip method - I don't trust myself with a soldering iron all that much. One project down, and a CravenSpeed short shift to go.
Again, without the help of this forum I would have really botched this - Thanks to all.
Again, without the help of this forum I would have really botched this - Thanks to all.
Thread Starter
|
6th Gear
Joined: Jun 2006
Posts: 5,692
Likes: 2
I always get MUCH more nervous when the MOD actually connects to a moving part or DOES something beyond look different. But hey - that's a GOOD thing, right? Keeps you from getting lazy and forgetting to reinstall crucial bolts or somehting...
But hey - that's a GOOD thing, right? Keeps you from getting lazy and forgetting to reinstall crucial bolts or somehting...
2nd Gear
Joined: Mar 2008
Posts: 75
Likes: 0
The short shifter isn't the problem - it's not having a good place to squeeze my fat head under the car and crack open the bolts on the exhaust. I have images of the newspaper article with a picture of my feet sticking out from under my not-so-well supported mini. I don't seem to have any neighbors with a level driveway or garage. I guess it's time to move.


6th Gear
Joined: Jan 2005
Posts: 1,231
Likes: 0
From: RVA
Those look great! I've got the black ones coming; should be delivered tomorrow, but I won't have time to install them before next week. :-( I'm wondering if I should have gotten the charcoal faces, however. My car is black and red inside and out (body color dash, tartan red/panther black seats, red body, black roof, etc.), and I'd like to continue the theme, but I'm wondering if the charcoal wouldn't look better. Anyone have any pics of the black gauge faces? Or suggestions? :-)
6th Gear
Joined: Mar 2006
Posts: 1,114
Likes: 0
From: Kansas City
blalor-
I just installed black ones on my BRG MCS w/black old english panther leather (or whatever they're called) and anthracite trim. Black looks great and will look great on yours, too. I think the difference between charcoal faces and black is pretty subtle. Sorry, I don't have pix.
Take your time on the install if you haven't torn into a dash and gauages before.
6th Gear
Joined: Jan 2005
Posts: 1,231
Likes: 0
From: RVA
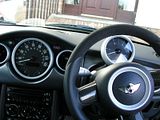
Well, I just finished installing my gauge faces. I started with the tach yesterday, and basically started over this evening. Matt's instructions were great for the big picture, and Paul's were fantastic for showing me what to cut to get the light distribution more-or-less even. I did just the tach last night so I could get a feel for how they look, and tonight I reinstalled the tach face so that I could remove the light walls for the lower rev range. I also removed the wall on the top of the speedo where the Canadian high-beam indicator is so that that region would be properly lit, too (right at about 75mph). Putting everything back together was much easier than I thought it would be, and the whole process wouldn't have been possible without Matt's initial post. I did struggle with getting the needles lined back up, but I fully expected that. An illustration of how to mark the temperature and fuel gauges would have been handy for me to see, but I think I managed to get it right in the end.
I like the gauge faces very much. I love the minimalist look of not being able to see the idiot lights unless they're illuminated, and the markings are much cleaner and clearer than stock, I think. I also love not having the clutter of both KPH and MPH on the same gauge.
They aren't perfect, however. At night the backlighting appears to be pretty uniform, but I tend to run with my headlights (or at least the running lights) on, and last night before sunset it was pretty obvious where the individual LEDs are. I spent a bit of time tonight trying to come up with a way to diffuse the light coming from the individual LEDs to more evenly light the gauge but didn't come up with anything. Also, the indicator (idiot) lights don't show as brightly as before. I guess that's probably a given, since they're practically invisible until lit, but driving around today, I wasn't able to even see the high-beam indicator when they were on. I also wish the face weren't quite so shiny; in direct sunlight the coarse texture of the material makes it look a bit like hard black plastic. None of these is really a show-stopper, but they do make the gauges look a bit more "aftermarket" than I'd like.
At some point I'm going to attempt to paint the centers of the speedo and tach needles. I'm not crazy about the contrasting colors (black vs. light grey) and I'm thinking I might try to do a satin or flat black on them. I'd also now like to change the color of the trim rings. Possibly chrome, but I'm not sure...
It's too late to take pictures, but I'll try to get some this weekend. I'm going to be doing a lot of driving this weekend and I'm looking forward to looking at them! Thanks again to Matt and Paul for their excellent instructions!
6th Gear
Joined: Oct 2006
Posts: 1,511
Likes: 3
From: Las Vegas
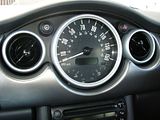
your temp and fuel needles are not lighting up, the lower tabs are blocking the LEDs behind them that illuminate the needle bases. I had the same issue with my CD face plates...I cut the tabs at the middle of the holes, now they light up like OEM, and the plate stays in place like it should....no issues

1st Gear
Joined: Mar 2008
Posts: 48
Likes: 0
From: Co Down, Northern Ireland
I have a searched the forum but have been unable to find an answer to my query.
When you split you gauges to change the faces how do you change the colour of the needles?
I'm happy with the orange lighting, but I would like clear needles.
Is it as simple as just scraping off the orange paint from the needles?
When you split you gauges to change the faces how do you change the colour of the needles?
I'm happy with the orange lighting, but I would like clear needles.
Is it as simple as just scraping off the orange paint from the needles?

They are not painted lights. You have to replace the LED's with white one's.
This vendor in the UK replaces them: http://www.essentialmini.co.uk/
This vendor in the UK replaces them: http://www.essentialmini.co.uk/
1st Gear
Joined: Mar 2008
Posts: 48
Likes: 0
From: Co Down, Northern Ireland
They are not painted lights. You have to replace the LED's with white one's.
This vendor in the UK replaces them: http://www.essentialmini.co.uk/
This vendor in the UK replaces them: http://www.essentialmini.co.uk/
Its the orange plastic needles I want to change, so in day light they look clear.
(The speedo, temp, fuel & rev needles)
I sent my guages to a member to have the lights changed out for white ones, and the led display and needles for blue. aswell as the black faces.. cant wait to get them back.
really makes the car look slick!
really makes the car look slick!
1st Gear
Joined: Mar 2008
Posts: 48
Likes: 0
From: Co Down, Northern Ireland
I took the plunge today and took my dials apart
I finally opted for the factory look faces in dark grey/black and then I modified my needles so they are white, though it all still glows an even orange at night.
I would like a few additional gauges, but I can't find any that resemble my new faces.
I like the look of the additonal gauges either side of the rev-counter, so I to decide on which mounting system I should use
I finally opted for the factory look faces in dark grey/black and then I modified my needles so they are white, though it all still glows an even orange at night.


I would like a few additional gauges, but I can't find any that resemble my new faces.
I like the look of the additonal gauges either side of the rev-counter, so I to decide on which mounting system I should use
6th Gear
Joined: Mar 2006
Posts: 1,114
Likes: 0
From: Kansas City
Andy Simpson-
Your gauges look great! What brand of faceplates did you use? I like them more than mine, which are by OutMotoring. I also like the white needles. How did you do that?
I think the toughest part of this DIY is pulling the needles off their armatures. Very delicate parts that seem likely to break easily.
It appears as though your faceplates have better functioning idiot lights, yet discreet. During daylight hours, my idiot lights, including Cruise Control and High Beams, are difficult (near impossible) to see. For me, it's a fair trade for the cleaner graphic look.
6th Gear
Joined: Jan 2005
Posts: 1,231
Likes: 0
From: RVA
Andy Simpson- ... It appears as though your faceplates have better functioning idiot lights, yet discreet. During daylight hours, my idiot lights, including Cruise Control and High Beams, are difficult (near impossible) to see. For me, it's a fair trade for the cleaner graphic look.
youre not going to miss anything important...the idiot lights can still be seen through the gauge face when/if they illuminate. they are only hidden when off.
6th Gear
Joined: Mar 2006
Posts: 1,114
Likes: 0
From: Kansas City
Blimey and MUShad, you're both right, but if the idiot lights don't show up any better than the highbeam or cruise control lights, it would be easy to miss them during dalylight hours.
Again, I'm not worried about it and would rather have the clean graphic design. Andy Simpson's faceplates appear to offer both clean design and better visibility of the idiot lights, though. Anyone know what brand his are?
Again, I'm not worried about it and would rather have the clean graphic design. Andy Simpson's faceplates appear to offer both clean design and better visibility of the idiot lights, though. Anyone know what brand his are?
6th Gear
Joined: Jan 2005
Posts: 1,231
Likes: 0
From: RVA
Do you have them installed? I do, and it's *easy* to miss the lights on the speedometer. Like the flat tire indicator. You have to really look for it during the daytime.