
How To R53 Supercharger Oil Change - HOW TO


Thread Starter
|
1st Gear
Joined: Aug 2011
Posts: 12
Likes: 0
R53 Supercharger Oil Change - HOW TO
Hey guys! So I've been gathering a lot of useful information off these forums for some time now, and when I decided to dive into changing my supercharger oil, I couldn't find a how-to. So, here's my best attempt at providing one for everyone!
- Gary
You will need:
- Roughly 6 hours
- Two 4-oz. bottles of supercharger oil: http://www.summitracing.com/parts/NAL-12345982/ - $8.95ea
- SC Input gasket from throttle body duct (green rubber) 11610020836 - $18.02
- Throttle body o-ring (orange rubber) 13547509045 - $13.04
- Water pump to block O-ring (black rubber) - only need one but come in pack of two 11517509186 - $2.54
(Thanks to ellingtj for the last three)
Please, if I left anything out (I don't think I did...) Please part an update below. Thanks!
Step 1:
Remove front bumper cover. As I know this is on many other how-to's, I won't get into detail on this, but there are several screws on the underside, one in each fender well, and two Torx (T30, I think) screws in the front under the hood. Be careful when removing, and make sure all the light connectors are unplugged, as well as the outdoor temp sensor.
Step 2:
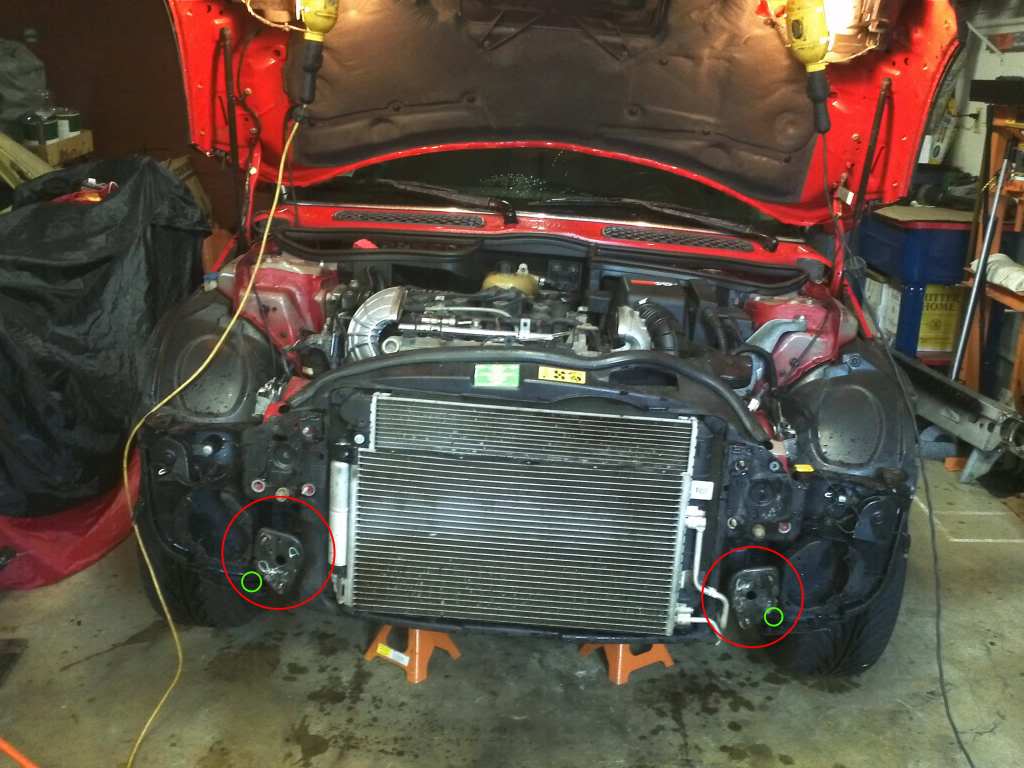
Remove front bumper. See image below. Remove the four nuts and one bolt on each side (circled in yellow). Do NOT remove the one bolt with spacer on each side. It doesn't need to come out. Remove front bumper. Remove the square-shaped spacers (if applicable) from each mounting point. Remember how many are on each side, they aid in proper alignment.

Step 3:
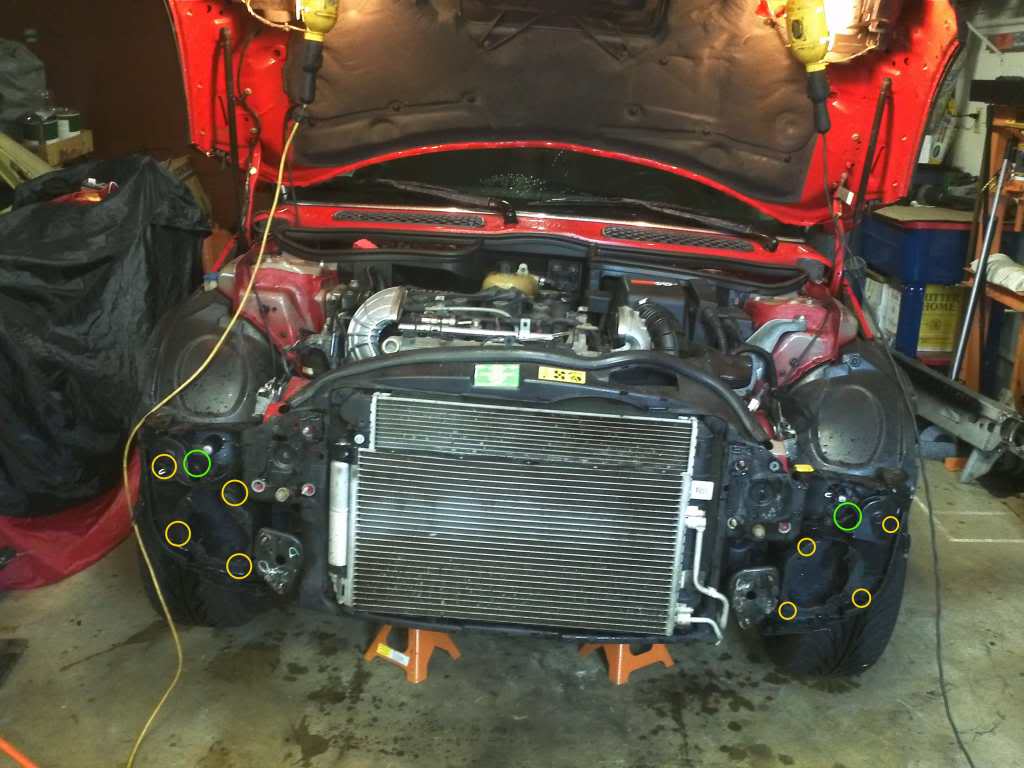
Remove bumper supports. In red in the below image, remove the front bumper supports. There is one bolt on the front, in green, which attaches them to the plastic radiator shroud. There are also two bolts on each which connect to the subframe (not pictured).
Step 4:
Drain radiator. Make sure car is not too hot; you could burn yourself. Locate the radiator hose on the driver's side of the radiator, on the bottom back corner. With a drain pan underneath, un-clip and slide off the hose. Wait for the fluid to stop draining.
Step 5:
Swing A/C condenser out of the way. Remove the two bolts holding the A/C condenser to the radiator. Lift the coil up and lift off the radiator. Allow it to safely swing out of the way (it doesn't get too far out of the way).
Step 6:
Remove radiator/shroud. Remove the top radiator hose on the passenger's side top of the radiator. Unplug the two connectors on the driver's side top of the radiator. Remove intake hose from shroud. Remove the four plastic clips connecting the shroud to each inner-fenders (circled in yellow in picture below). Unclip the horn on each side (circled in green). When removing the shroud, slowly pull the wires and clips for the lights etc. from the hole on each side. Slowly remove shroud, being careful not to damage the A/C condenser.
Step 7:
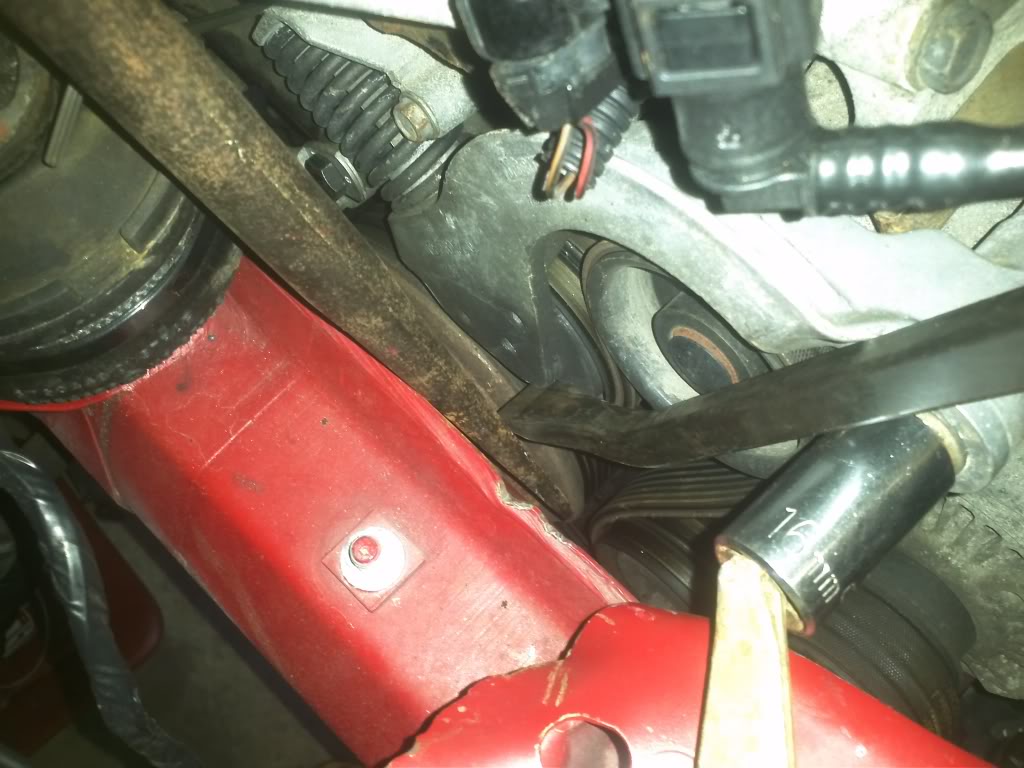
Remove serpentine belt. While it is easy to do this if you have the belt removal tool... that tool is expensive and not all of us have one. Below is an image of my setup, which wasn't perfect, but worked OK. Vise-grip pliers holding a socket on the pivot-bolt. A long prybar against this socket and under the idler mount. A wedge between the prybar and frame, so it doesn't slip off. Sorry if this is confusing... your own creativity is encouraged here.
Step 8:
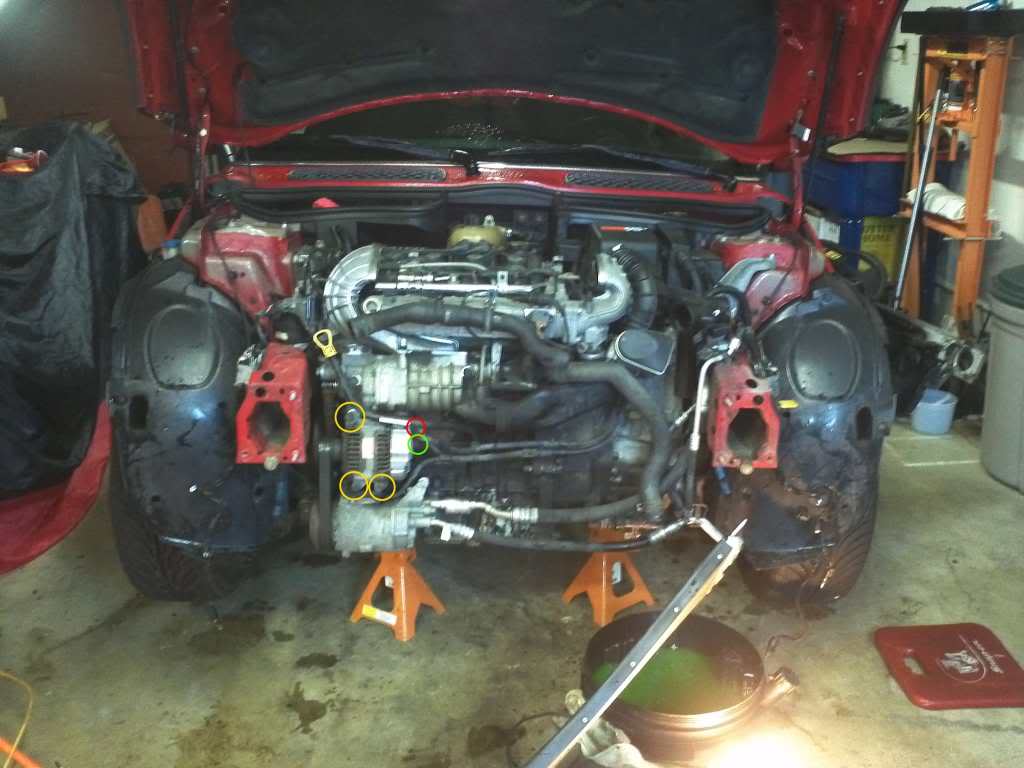
Remove alternator. Disconnect the negative terminal of the battery. Be sure you allow yourself access to the trunk to reconnect the battery after... the trunk switch won't work without power! Disconnect positive cable (red) and the plug (green) going to the alternator. Remove the three mounting bolts (yellow), remove alternator.
Step 9:
Remove intercooler. Four screws on diffuser. Two screws on each rubber boot clamp. Two screws on each black mounting bracket. Remove intercooler.
Step 10:
Disconnect throttle body. Remove intake tube from throttle body and airbox. Remove four bolts on throttle body. Remove throttle body from supercharger intake tube. No need to remove plug or small hose going to throttle body, just move it out of the way a bit.
Step 11:
Remove dipstick/guide. Remove two bolts attaching dipstick to engine. Remove wires from clips on bottom bracket. Wiggle dipstick guide out. Be sure to PLUG the hole left behind. When you remove the supercharger, antifreeze will come out of the waterpump, and will end up going directly into your oil if it's not plugged up. You should move your drain pan to accommodate this spill.
Step 12:
Remove supercharger. Carefully disconnect the vacuum line from supercharger (yellow). The little red plastic retainer can be fragile, and if it breaks, it can be expensive to replace (sold as part of a kit, not separately). Remove intake tube bolt (red). Remove belt tensioner bolt (green). This will have some tension, but not a lot. Be careful, still. Remove radiator hose mounting clamp bolt (blue). Unclip smaller hose clamp and slide backwards onto hose from waterpump (light blue/cyan). Remove the four supercharger mounting bolts (pink). That's it! Carefully slide out the supercharger. It's easiest if you move the tensioner bracket out of the way, and wiggle the left side of the S/C away from the motor first. The intake tube is stubborn to come off. Be careful not to over stress the two vacuum lines going into the intake tube. Also, be careful not to put to much stress on the vacuum line you removed. It''s molded plastic and I can only imagine it isn't too hard to break if you over-flex it.

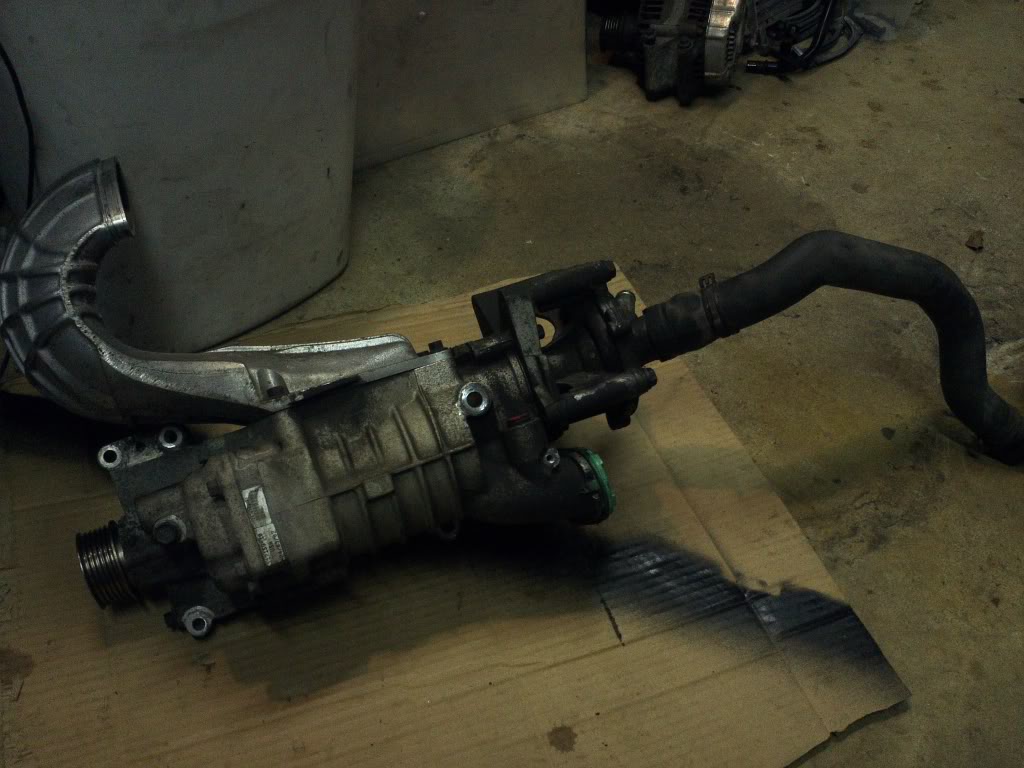
And here is what the S/C will look like when it's out:
Step 13:
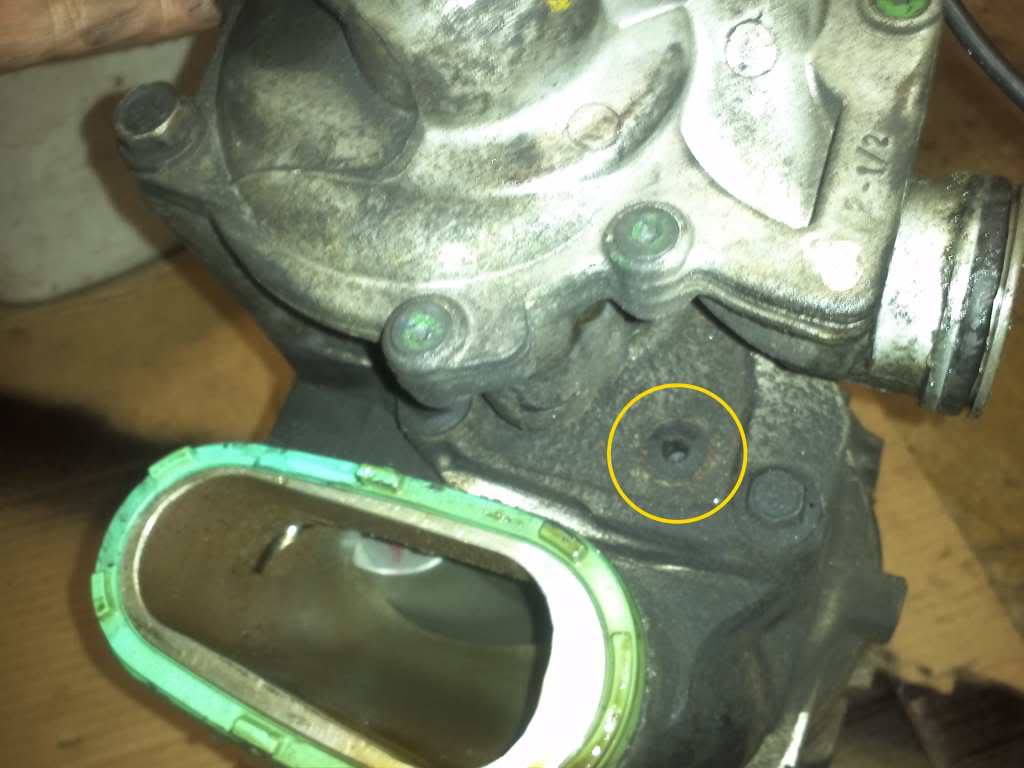
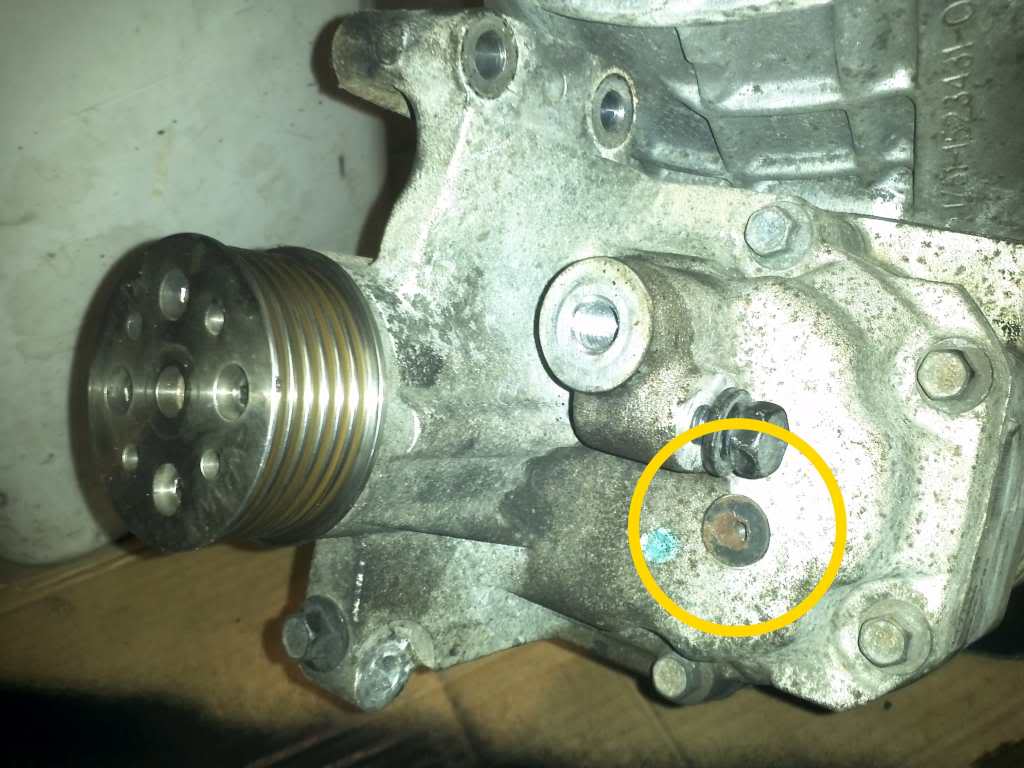
Drain oil. Drain oil (if there's any left in there ) from both holes on the supercharger. Two images below, each bolt circled in yellow.
Step 14:
Add new oil. While keeping the S/C level, fill each hole until the oil just seeps out, then cap it up. Make sure you use oil made specially for superchargers. GM makes S/C oil that's readily available for about $9 for a 4 oz. bottle. You will need two bottles (well, one and a half). It's easy to do if you put a tube on the bottle so you can keep the S/C level. I think it's 50mL in the back, and 250mL in the front... But I'm not sure. I filled until it seeped out, which, if you pay careful attention, is about how full they were before.
Step 15:
Reverse! Following these instructions backwards, put your car back together. Take your time, be careful, and make sure you reconnect everything. Make sure the vacuum lines are all WELL connected. You should clean the line you removed and ensure a good connection.
I hope this helps!
- Gary
You will need:
- Roughly 6 hours
- Two 4-oz. bottles of supercharger oil: http://www.summitracing.com/parts/NAL-12345982/ - $8.95ea
- SC Input gasket from throttle body duct (green rubber) 11610020836 - $18.02
- Throttle body o-ring (orange rubber) 13547509045 - $13.04
- Water pump to block O-ring (black rubber) - only need one but come in pack of two 11517509186 - $2.54
(Thanks to ellingtj for the last three)
Please, if I left anything out (I don't think I did...) Please part an update below. Thanks!
Step 1:
Remove front bumper cover. As I know this is on many other how-to's, I won't get into detail on this, but there are several screws on the underside, one in each fender well, and two Torx (T30, I think) screws in the front under the hood. Be careful when removing, and make sure all the light connectors are unplugged, as well as the outdoor temp sensor.
Step 2:
Remove front bumper. See image below. Remove the four nuts and one bolt on each side (circled in yellow). Do NOT remove the one bolt with spacer on each side. It doesn't need to come out. Remove front bumper. Remove the square-shaped spacers (if applicable) from each mounting point. Remember how many are on each side, they aid in proper alignment.
Step 3:
Remove bumper supports. In red in the below image, remove the front bumper supports. There is one bolt on the front, in green, which attaches them to the plastic radiator shroud. There are also two bolts on each which connect to the subframe (not pictured).
Step 4:
Drain radiator. Make sure car is not too hot; you could burn yourself. Locate the radiator hose on the driver's side of the radiator, on the bottom back corner. With a drain pan underneath, un-clip and slide off the hose. Wait for the fluid to stop draining.
Step 5:
Swing A/C condenser out of the way. Remove the two bolts holding the A/C condenser to the radiator. Lift the coil up and lift off the radiator. Allow it to safely swing out of the way (it doesn't get too far out of the way).
Step 6:
Remove radiator/shroud. Remove the top radiator hose on the passenger's side top of the radiator. Unplug the two connectors on the driver's side top of the radiator. Remove intake hose from shroud. Remove the four plastic clips connecting the shroud to each inner-fenders (circled in yellow in picture below). Unclip the horn on each side (circled in green). When removing the shroud, slowly pull the wires and clips for the lights etc. from the hole on each side. Slowly remove shroud, being careful not to damage the A/C condenser.
Step 7:
Remove serpentine belt. While it is easy to do this if you have the belt removal tool... that tool is expensive and not all of us have one. Below is an image of my setup, which wasn't perfect, but worked OK. Vise-grip pliers holding a socket on the pivot-bolt. A long prybar against this socket and under the idler mount. A wedge between the prybar and frame, so it doesn't slip off. Sorry if this is confusing... your own creativity is encouraged here.
Step 8:
Remove alternator. Disconnect the negative terminal of the battery. Be sure you allow yourself access to the trunk to reconnect the battery after... the trunk switch won't work without power! Disconnect positive cable (red) and the plug (green) going to the alternator. Remove the three mounting bolts (yellow), remove alternator.
Step 9:
Remove intercooler. Four screws on diffuser. Two screws on each rubber boot clamp. Two screws on each black mounting bracket. Remove intercooler.
Step 10:
Disconnect throttle body. Remove intake tube from throttle body and airbox. Remove four bolts on throttle body. Remove throttle body from supercharger intake tube. No need to remove plug or small hose going to throttle body, just move it out of the way a bit.
Step 11:
Remove dipstick/guide. Remove two bolts attaching dipstick to engine. Remove wires from clips on bottom bracket. Wiggle dipstick guide out. Be sure to PLUG the hole left behind. When you remove the supercharger, antifreeze will come out of the waterpump, and will end up going directly into your oil if it's not plugged up. You should move your drain pan to accommodate this spill.
Step 12:
Remove supercharger. Carefully disconnect the vacuum line from supercharger (yellow). The little red plastic retainer can be fragile, and if it breaks, it can be expensive to replace (sold as part of a kit, not separately). Remove intake tube bolt (red). Remove belt tensioner bolt (green). This will have some tension, but not a lot. Be careful, still. Remove radiator hose mounting clamp bolt (blue). Unclip smaller hose clamp and slide backwards onto hose from waterpump (light blue/cyan). Remove the four supercharger mounting bolts (pink). That's it! Carefully slide out the supercharger. It's easiest if you move the tensioner bracket out of the way, and wiggle the left side of the S/C away from the motor first. The intake tube is stubborn to come off. Be careful not to over stress the two vacuum lines going into the intake tube. Also, be careful not to put to much stress on the vacuum line you removed. It''s molded plastic and I can only imagine it isn't too hard to break if you over-flex it.
And here is what the S/C will look like when it's out:
Step 13:
Drain oil. Drain oil (if there's any left in there
) from both holes on the supercharger. Two images below, each bolt circled in yellow.Step 14:
Add new oil. While keeping the S/C level, fill each hole until the oil just seeps out, then cap it up. Make sure you use oil made specially for superchargers. GM makes S/C oil that's readily available for about $9 for a 4 oz. bottle. You will need two bottles (well, one and a half). It's easy to do if you put a tube on the bottle so you can keep the S/C level. I think it's 50mL in the back, and 250mL in the front... But I'm not sure. I filled until it seeped out, which, if you pay careful attention, is about how full they were before.
Step 15:
Reverse! Following these instructions backwards, put your car back together. Take your time, be careful, and make sure you reconnect everything. Make sure the vacuum lines are all WELL connected. You should clean the line you removed and ensure a good connection.
I hope this helps!
Last edited by GW 2002 MCS; Apr 6, 2012 at 04:00 PM. Reason: Estimated time for completion, parts needed, vacuum line retainer caution.


1st Gear
Joined: Nov 2011
Posts: 11
Likes: 0
From: PDX
Wow, great job! I may tackle this in the near future.
I'm quite the n00b, so, is there a big problem with high mileage failures of S/C components due to lack of oil?
Drain oil (if there's any left in there )
)
Thread Starter
|
1st Gear
Joined: Aug 2011
Posts: 12
Likes: 0
Thanks! From what I have read, the main cause of failures is from the driver's side reservoir running dry sure to a bad internal seal. Not sure on the numbers of how many failed, but I saw enough horror stories to scare me into changing my oil lol.
6th Gear
Joined: Nov 2004
Posts: 2,607
Likes: 316
From: Arnold, MO.
Basiclly the seals don't fail as much as they just become worn over time and the oil from the W/P gear housing seeps into the S/C, it's not a problem for the S/C itself (it just burns in the combustion process) but the lack of oil will cause the W/P gears to go bad, which inturn requires the S/C to then need to be rebuilt or replaced. Avg. time for this to become a problem is between 110,000 & 130,000 miles.
Either changing the oil or just making sure it stays full should considerably extend the life of the S/C.
And yes, great how to for those that have been afraid to tackle this job.
Either changing the oil or just making sure it stays full should considerably extend the life of the S/C.
And yes, great how to for those that have been afraid to tackle this job.
Last edited by BlwnAway; Apr 3, 2012 at 08:15 AM.
4th Gear
Joined: Dec 2007
Posts: 543
Likes: 8
From: Raleigh, NC
Trending Topics
Thread Starter
|
1st Gear
Joined: Aug 2011
Posts: 12
Likes: 0
As far as I know... no. I don't think it can be purchased as a direct replacement part. Perhaps if you could get through to Eaton you could order it, but Mini does not sell it. Maybe you could find one in McMaster Carr or Grainger or something that would fit too...
Great write up. Remember to use some sort of lube on the water pump to block o rings. and if you change the water pump, you will need to loosen the water pump to block union bolts. fit the unit then torque them back down. As far as lube I used Angle Love grease which is a dow lube for paintball guns. check your local PB field for such.

I hope you went ahead and changed your crankshaft positions sensor o ring. That's alot of build up. The front of my engine looked almost as dirty as yours. I spent about an our with a degreaser and steel brush to remove all the gunk when I serviced my S/C.
Thread Starter
|
1st Gear
Joined: Aug 2011
Posts: 12
Likes: 0
I hope you went ahead and changed your crankshaft positions sensor o ring. That's alot of build up. The front of my engine looked almost as dirty as yours. I spent about an our with a degreaser and steel brush to remove all the gunk when I serviced my S/C.
Well, the good news is, you can fix it without having to pull the entire front end off again. You should be able to reach it from under the car while it's lifted.

If you have big meat hooks, you can undo the lower engine mount and use a tie down ratchet strap on the exhaust brace and the engine mount bolt that you put back in for this purpose. You can ratchet a couple inches for up front work.
1st Gear
Joined: Nov 2011
Posts: 11
Likes: 0
From: PDX
And, no, I'm not affiliated with this website or product, just seemed like a worthwhile bookmark.


4th Gear
Joined: Dec 2007
Posts: 543
Likes: 8
From: Raleigh, NC
http://atlanta.craigslist.org/atl/pts/2925975763.html


Thread Starter
|
1st Gear
Joined: Aug 2011
Posts: 12
Likes: 0
I may not know enough about replacing a water pump, but I'm pretty sure you can't do that without removing the s/c either... I looked to find the drain screw after I did the oil change... There doesn't seem to be a way around it. Maybe if you take the intake off you could pull the waterpump and do the oil, but to be honest I think pulling the s/c is easier at that point
Last edited by GW 2002 MCS; Apr 6, 2012 at 04:03 PM. Reason: typo's
Better off pulling the S/C. You don't have to replace the water pump but you do want to replace the seals. You're better off removing the S/C and water pump one you're that at into it. You are literally just a few bolts away.

4th Gear
Joined: Dec 2008
Posts: 525
Likes: 1
This is so awesome. I'm replacing my supercharger and water pump next weekend. Thanks so much for posting. You have made my life easier.
**EDIT**
Also, you might want to add to your post above that the red piece at the end of the vacuum tube can break easily. From what I hear they don't make them anymore, but I guess WMW can source them for about $125. In any case, it's probably worth noting to be extra careful.
**EDIT**
Also, you might want to add to your post above that the red piece at the end of the vacuum tube can break easily. From what I hear they don't make them anymore, but I guess WMW can source them for about $125. In any case, it's probably worth noting to be extra careful.
Last edited by Act_04; Apr 6, 2012 at 09:40 AM.
Thread Starter
|
1st Gear
Joined: Aug 2011
Posts: 12
Likes: 0
This is so awesome. I'm replacing my supercharger and water pump next weekend. Thanks so much for posting. You have made my life easier.
**EDIT**
Also, you might want to add to your post above that the red piece at the end of the vacuum tube can break easily. From what I hear they don't make them anymore, but I guess WMW can source them for about $125. In any case, it's probably worth noting to be extra careful.
**EDIT**
Also, you might want to add to your post above that the red piece at the end of the vacuum tube can break easily. From what I hear they don't make them anymore, but I guess WMW can source them for about $125. In any case, it's probably worth noting to be extra careful.
4th Gear
Joined: Dec 2008
Posts: 525
Likes: 1
I finished my maintenance two weeks ago and everything is running smooth again. I replaced the supercharger, serpentine belt, water pump, thermostat, several gaskets, and a bunch of radiator hose.
Some quick notes, pulling the water pump dumps a bunch of radiator fluid, so be ready for that.
You might as well replace every radiator hose you can reach because you have already drained the fluid and the hoses are staring you in the face.
The thermostat is not much extra work while you are in there, and again, while you have the radiator drained. Make sure you install it in the right direction otherwise you will overheat your engine.

NAPA is now supplying alot of parts for the R53 Mini's, including O.E. thermostat and housing. We also just started carrying the waterpump which is brand spanking new, not reman'd ( had to order from factory) and the coolant hoses all made by Gates. We have the part number for the O.E. water pump, but our company hasen't stocked them yet. I'm getting ready to tackle this in the coming weeks...I'm very ****, and paranoid about something going wrong on my wifes car. Here's a few part numbers if you guys would like to order this stuff at NAPA, and would take a couple days to get in.
Water Pump - 43534 ( Made by Gates, very reliable pumps!)
Water Pump - 11517520123 - O.E. style ( Not officially in system yet)
Thermostat - 11531485847 - Facet O.E. ( Comes with gasket)
Therm. Housing - 11537512733 - O.E.
Upper Hose 1 - 16115
Upper Hose 2 - 16116
Lower Hose (Auto Trans) - 16112
Lower Hose (Manual Trans) - 16113
Last edited by Noir2005; May 2, 2012 at 12:15 PM.
By the way, though there doesn't appear to be a legit rebuild company, has anyone here open the rear of their supercharger, and found numbers on the seal? If you could find them, I will try to cross them over, and find availablility on them.
Either a standard number like 28756, or in some cases, the part number is the measurements in mm ( i.e. 16X7X38) or some wierd number like that, and that may be the more common one since lately I've had a few people have some sort of a pump and those were the style part numbers.
Either a standard number like 28756, or in some cases, the part number is the measurements in mm ( i.e. 16X7X38) or some wierd number like that, and that may be the more common one since lately I've had a few people have some sort of a pump and those were the style part numbers.

3rd Gear
Joined: Jun 2009
Posts: 227
Likes: 8
From: Conyers, Ga.
Remove supercharger. Carefully disconnect the vacuum line from supercharger (yellow). The little red plastic retainer can be fragile, and if it breaks, it can be expensive to replace (sold as part of a kit, not separately).