

Official MINI DRLs Fitted


6th Gear
Joined: Jul 2008
Posts: 1,174
Likes: 13
From: Ohio
Ok, so I got my car all buttoned up with the LED DRLs in there... but I can't get the ring light to work (the fog and parking light functions work fine; just not the full ring). I'll thrown NCSExpert at it later, but it's not as simple as de-selecting the DRLs in the user-accessible options menu.
6th Gear
Joined: Jul 2008
Posts: 1,733
Likes: 1
From: Chandler, AZ
Ok, so I got my car all buttoned up with the LED DRLs in there... but I can't get the ring light to work (the fog and parking light functions work fine; just not the full ring). I'll thrown NCSExpert at it later, but it's not as simple as de-selecting the DRLs in the user-accessible options menu.

2nd Gear
Joined: Apr 2013
Posts: 65
Likes: 0
From: Wales
Its the blue wire that turns the DRLs on. As a test, connect that directly to the 12V socket in front of the gear lever. That should be an ignition switched 12V source.
I gave up on the footwell module Pin 12 connection and used the 12V socket. It is both easier and less disruptive to hook it up.
The coding of the car has nothing to do with the operation of the LED DRLs.
I gave up on the footwell module Pin 12 connection and used the 12V socket. It is both easier and less disruptive to hook it up.
The coding of the car has nothing to do with the operation of the LED DRLs.

Neutral
Joined: Apr 2010
Posts: 1
Likes: 0
UK MODEL different
Hi, I am from Mexico, and just install them this weekend, the instructions are very different from the totalmini forum, the blue cable has to be installed as the original instructions are, no matter the language German or English. The problem is to identify the X14261 plug , this one has a black color and the x14260 is grey, the pins have the number in the socket. S this means that the guide from the uk user will be different from the right handed minis, NO MATTER if is LCI or previous models, mine is an LCI and a user no LCI found The same conclusion. ALSO the battery is on the other side. Hope this helps some one, I discover this because the retrofit driving lamps are connected to the X14260 and was installed on the dealer , so the cable was on the other one, different from the uk guide.
Last edited by andreslf; Jun 3, 2013 at 06:31 PM.
6th Gear
Joined: Jul 2008
Posts: 1,174
Likes: 13
From: Ohio
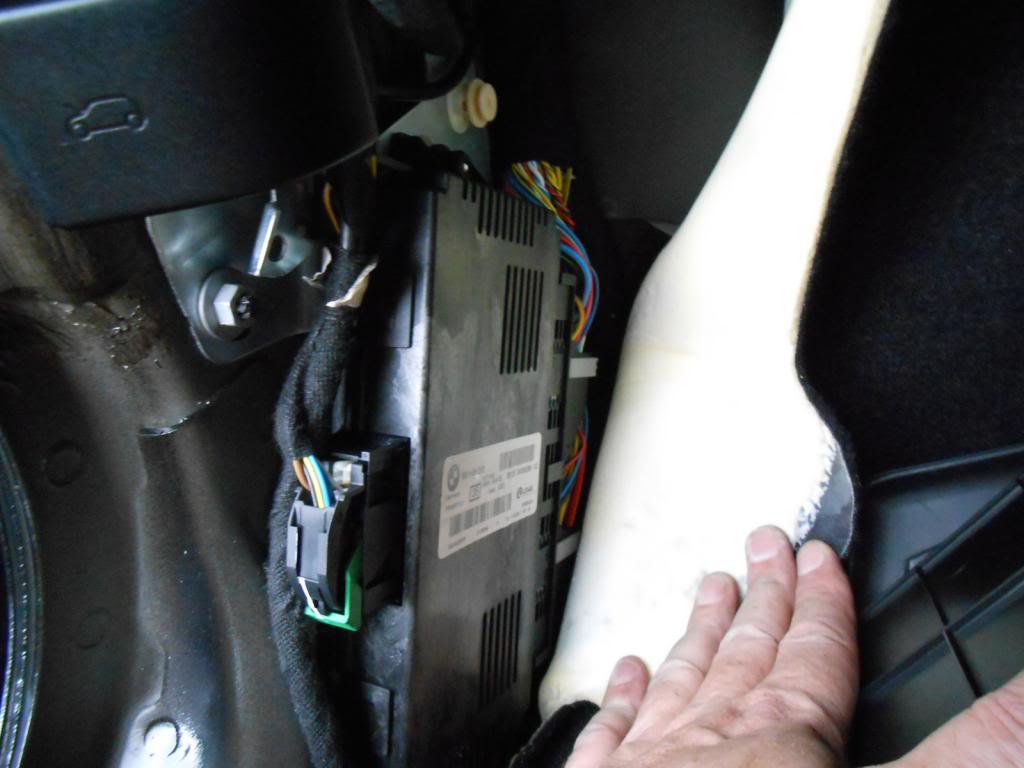
Yeah, the drawing in the instructions is weird... it shows the wires coming up out of the floor (it doesn't), and the target connector being further from the wire bundle (it's not). So, the drawing in the instructions and the correction in the guide on totalmini are both wrong.
The correct connector is as you described. Of the two larger connectors at the back of the module (as shown below), it's the one on top.
The correct connector is as you described. Of the two larger connectors at the back of the module (as shown below), it's the one on top.
6th Gear
Joined: Jul 2008
Posts: 1,174
Likes: 13
From: Ohio
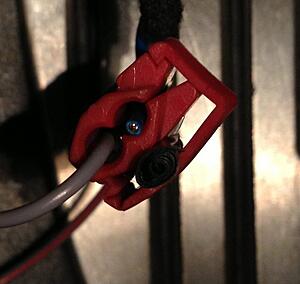
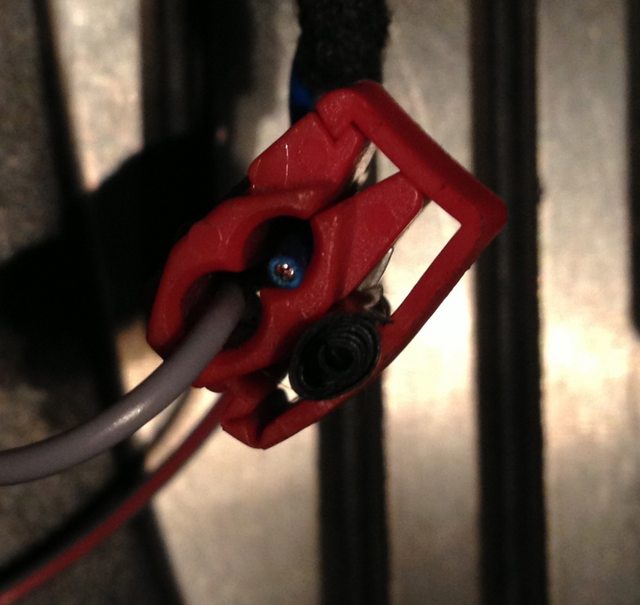
Ok, I got my issue figured out.
Turns out the blade of that red crimp clip that joins the blue wire with the gray one wasn't pushed in far enough to make a good connection between the two wires. I un-latched the red crimp clip, used some pliers to push the blade down as far as it would go, then rolled up some electrical tape to wedge between the top of the blade and the swinging door of the crimp clip so the blade wouldn't work itself back out over time.
A multimeter confirmed that where there wasn't any continuity between the two wires before, there was now.

Last edited by fishbert; Jun 4, 2013 at 10:02 PM. Reason: made images smaller
6th Gear
Joined: Jul 2008
Posts: 1,733
Likes: 1
From: Chandler, AZ
Ok, I got my issue figured out.
Turns out the blade of that red crimp clip that joins the blue wire with the gray one wasn't pushed in far enough to make a good connection between the two wires. I un-latched the red crimp clip, used some pliers to push the blade down as far as it would go, then rolled up some electrical tape to wedge between the top of the blade and the swinging door of the crimp clip so the blade wouldn't work itself back out over time.
A multimeter confirmed that where there wasn't any continuity between the two wires before, there was now.
2nd Gear
Joined: Apr 2013
Posts: 65
Likes: 0
From: Wales
And this is why I hat scotch-lok connectors, tee taps are ehh too. I have recently tried different connectors from posi-lock. They seem to work great and you know there is continuity. http://www.posi-lock.com/posiplug.html

6th Gear
Joined: Jul 2008
Posts: 1,733
Likes: 1
From: Chandler, AZ

2nd Gear
Joined: Apr 2013
Posts: 65
Likes: 0
From: Wales
You would need at least the mounting bracket that holds the old fog/side light assembly as this needs to be used with the new DRL LED light assembly.
I would expect it to work even if you don't have fog lights from an electrical point of view. It would be exactly the same as if you didn't switch the fog lights on.
I would expect it to work even if you don't have fog lights from an electrical point of view. It would be exactly the same as if you didn't switch the fog lights on.

6th Gear
Joined: Jul 2008
Posts: 1,174
Likes: 13
From: Ohio
You would need at least the mounting bracket that holds the old fog/side light assembly as this needs to be used with the new DRL LED light assembly.
I would expect it to work even if you don't have fog lights from an electrical point of view. It would be exactly the same as if you didn't switch the fog lights on.
I would expect it to work even if you don't have fog lights from an electrical point of view. It would be exactly the same as if you didn't switch the fog lights on.
The instructions for the LED DRLs say the kit is only for use on vehicles with the front fog light option. But that doesn't mean there's not a way to make it work.
Parking lights I believe only use 1 connector on the wire harness down there, while the fog lights use 2 (fog and sidemarker/parking). If cars with parking lights don't have that 2nd connector on the wire harness, that's a problem. If they do have both connectors, you retro-fitting fogs would also probably require some re-coding of your vehicle options in the FRM and CAS modules.
Though maybe... just maybe... you could hook up the LED DRL units and you'd get 2 of the 3 functions they provide (full-ring DRLs and partial-ring sidemarker/parking lights)... maybe.

2nd Gear
Joined: Feb 2013
Posts: 51
Likes: 0
From: Italy
6th Gear
Joined: Jul 2008
Posts: 1,733
Likes: 1
From: Chandler, AZ
Here it's less expansive:
http://www.bmw-kirsch.de/onlineshop/...D-R55-R61.html
http://www.bmw-kirsch.de/onlineshop/...D-R55-R61.html
6th Gear
Joined: Jul 2008
Posts: 1,733
Likes: 1
From: Chandler, AZ
I'm looking for a deal on these. I really want to get them.
6th Gear
Joined: Jul 2008
Posts: 1,174
Likes: 13
From: Ohio
Here it's less expansive:
http://www.bmw-kirsch.de/onlineshop/...D-R55-R61.html
http://www.bmw-kirsch.de/onlineshop/...D-R55-R61.html