When you click on links to various merchants on this site and make a purchase, this can result in this site earning a commission. Affiliate programs and affiliations include, but are not limited to, the eBay Partner Network.
Cylinder 3 blew up without warning. I have questions
Stock Problems/IssuesDiscussions related to warranty related issues and repairs, or other problems with the OEM parts and software for MINI Clubman (R55), Cooper and Cooper S(R56), and Cabrio (R57).
Cylinder 3 blew up without warning. I have questions
Car was running great without issues for about 3years now. I smogged the car (California) and it passed with no issues. The next day the car just gave up while on freeway without warning. Cylinder 3 had zero compression. A huge chunk blew off exhaust valve and spark plug electrode also just gone. Again this happened without warning. How did this happen? Is there an underlying issue that I need to fix. I don�t want to do a valve job and have this happen again in 6 months.
Also, I�m noticing a significant difference in price on the valves between factory and aftermarket. Anyone have experience or recommendations on the valves? I�ve had good luck with aftermarket valves for other makes. Where can I find all the service limits for the valves, valve seats and guides? What are the limits for checking cylinder head for flatness ? .002� 05mm? After grinding valve seats the valve sits deeper but with hydrolic lifters the valve clearances aren�t adjustable so do I not need to worry about valve length? Is it a 30 45 60 3 angle grind for intake and exhaust seats?
Last edited by shanksamillion; Mar 17, 2018 at 03:47 PM.
Reason: Add content
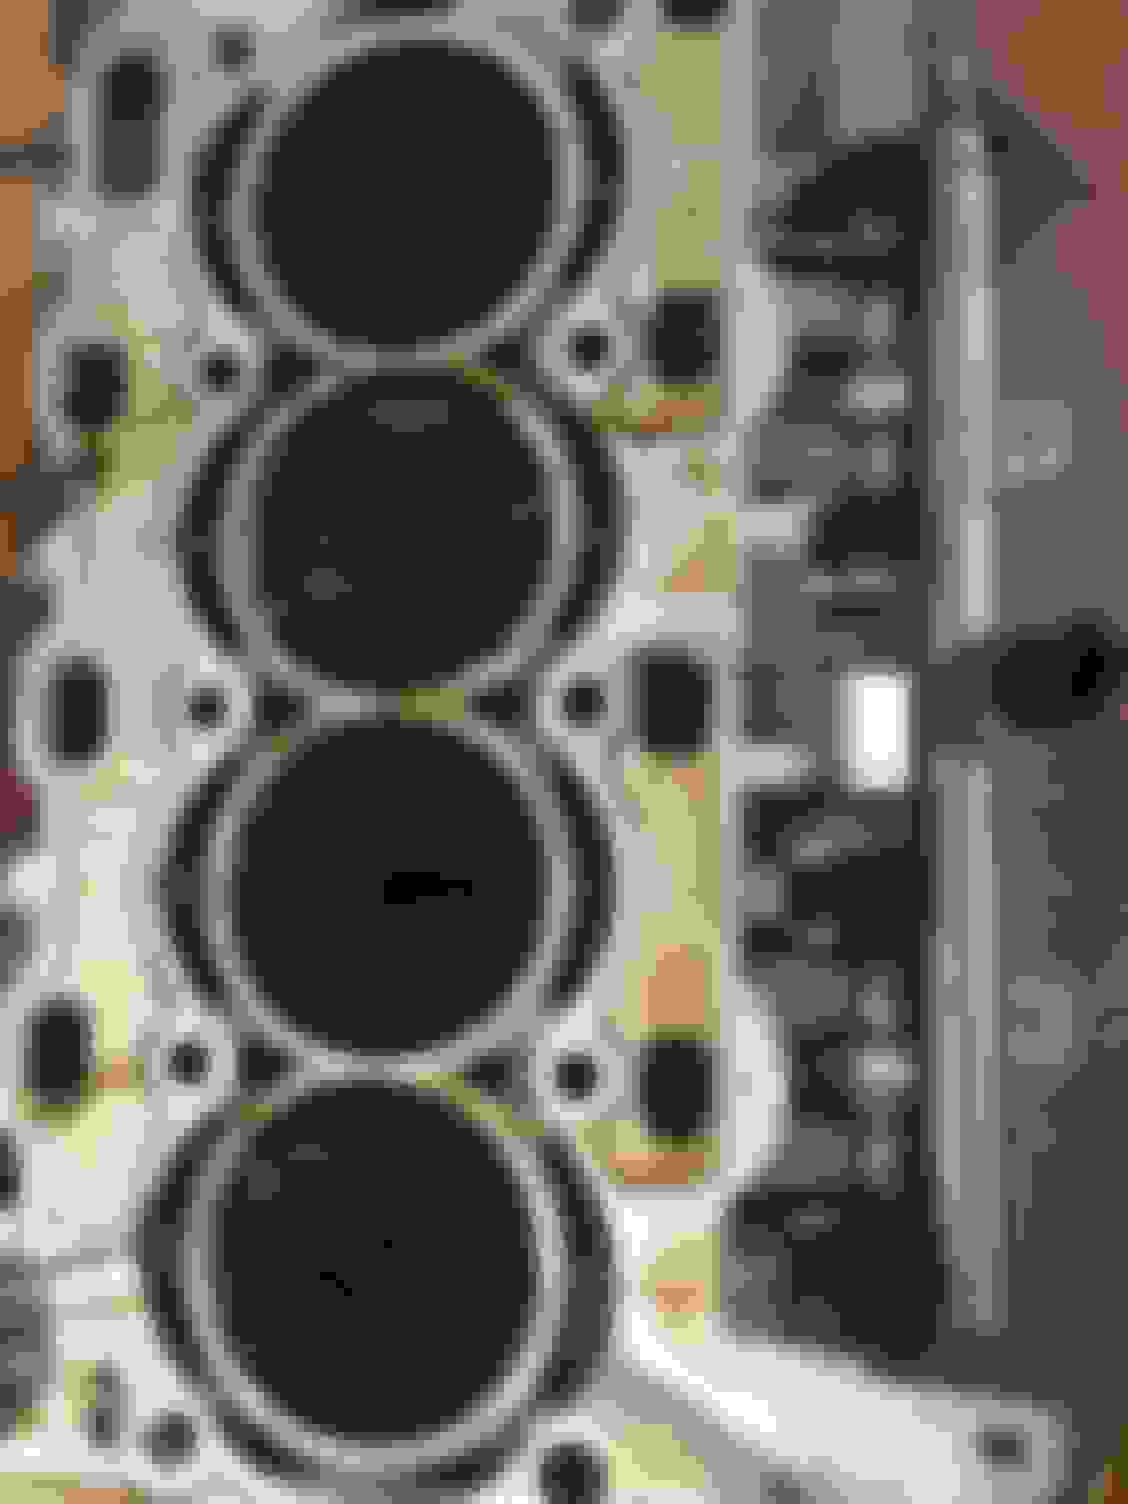
compression was low in 1,2, and 4 at 115psi. Cold dry test with intake manifold removed. 3 was zero of course. Here�s a look at the cylinders. There appears to be debris stuck between piston and cylinder wall. You can see light scoring near the tips of cylinder walls. See the vertical marks? Number 3 appears to have the most debris. I think a lot of the debris is carbon but if you look close you will see shiny metal debris as well. Just like one small piece in every cylinder. Number one is the most clean.
Does this mean I need to pull the pistons? And if so would replacing rings and a light hone be all that�s needed?
I feel your pain. I just got my car back this week and I don't want to drive it. That happened beginning of Jan., drove it 2K and it just happened again. Mine is an '09 R55 JCW, I have a Frankenturbo on it with a tune from etuners. I drove the car 27K with this setup before the first failure. No one can definitively say why this happened. What engine is yours?
I feel your pain. I just got my car back this week and I don't want to drive it. That happened beginning of Jan., drove it 2K and it just happened again. Mine is an '09 R55 JCW, I have a Frankenturbo on it with a tune from etuners. I drove the car 27K with this setup before the first failure. No one can definitively say why this happened. What engine is yours?
2008 all stock N14. I think the carbon build up inside the cylinder on the face of the valve played a role. The carbon cakes on the face of the valve and it can�t dissipate heat. Eventually it just blows. Also very possible something (a chunk of carbon) prevented the valve from seating properly. These cars are notorious for carbon build up. The carbon cleaning procedure only gets the back of intakes. Seafoam just doesn�t work well enough for inside cylinder. I guess oil catch can helps.
In your case, with your mods I�m betting a lean condition is causing your burned/blown valves. With that turbo you might need to have bigger injectors so they can keep up with the fuel demand. Remaping the ecu with factory injectors might work but I still think you need bigger injectors if you don�t have them. I�m not a big mod guy so this is pit of my expertise. I�m sure you can find help here though.
I have a 2010 Clubman S with 112K miles. It has very minor tweaks, like intake muffler delete and noise maker delete. I just had same issue with #3 exhaust valve. Had the all the exhaust valves replaced and drove it about 1000 miles. I was moving it into the garage and it had no throttle response. I was able to idle it into the garage. The idiot light on the dash shows criuse control failure. Now, it won't start and have 9 codes. P0300, P0304,P3100, P0316, P0103, P0203, P0103, , U3FFF, and U3F00. The P0316 and the last two aren't even listed in my Benttley book. I really hope I don't have to go through this again. My wife keeps telling my yo sell the damn thing, but I have so enjoyed driving the car. Any help is appreciated.
It was a lean condition. What doesn't make sense to me is how it could go 27K with no problems, do that, and 2K later the same. I don't think it's a need for bigger injectors, the mod is minimal compared to what most have done when they do injectors. (I could of course be wrong, but neither the turbo maker or tuner suggested it)
You might want to double check the tune then. Too much too fast could lean it out. The pulse width on the injectiors might be off. Or you could have a bad injector in that cylinder. Have them bench test your injectors. Keep in mind with the direct injection those injectors get carbon on them too. There are places online you can send them your injectors and the clean them out throughly, put new o-rings and bench test them.
compression was low in 1,2, and 4 at 115psi. Cold dry test with intake manifold removed. 3 was zero of course. Here�s a look at the cylinders. There appears to be debris stuck between piston and cylinder wall. You can see light scoring near the tips of cylinder walls. See the vertical marks? Number 3 appears to have the most debris. I think a lot of the debris is carbon but if you look close you will see shiny metal debris as well. Just like one small piece in every cylinder. Number one is the most clean.
Does this mean I need to pull the pistons? And if so would replacing rings and a light hone be all that�s needed?
So for me "keep in mind I'm a mechanic 10 hours a day" I would really have a hard time not tearing the engine down the rest of the way. The scoring is not the worst I've ever seen but if this was my daily I would want it right. just my 2 cents.
Tore my engine apart. Cylinder 3 - ate the rings - piston shot. Scored the wall.
I keep seeing cylinder 3 as a problem area in several threads. Then just today someone mentioned cylinder 3 as a known issue with the N14. Is this a widely known fact and I missed it up to this point? If so, why just #3?
So for me "keep in mind I'm a mechanic 10 hours a day" I would really have a hard time not tearing the engine down the rest of the way. The scoring is not the worst I've ever seen but if this was my daily I would want it right. just my 2 cents.
So do you think a simple hone will do? Recommended size flex hone and grit? I�ve got a 400 grit stone hone fro my last job. Any idea where I can get all the specs? I understand rings come pregapped but I would like to know all the service limits for the both the lower end and cylinder head.
Tore my engine apart. Cylinder 3 - ate the rings - piston shot. Scored the wall.
I keep seeing cylinder 3 as a problem area in several threads. Then just today someone mentioned cylinder 3 as a known issue with the N14. Is this a widely known fact and I missed it up to this point? If so, why just #3?
Wow! That�s crazy. What the heck is going on here? Do you do any of the work yourself or do you send it out to machine shop? Do you know where I can find service limits on everything? Rig gaps? Cylinder diameter and deviation? Piston clearance to cylinder wall? And for cylinder head internals too.
Yep. I tear it down and rebuild it. Machine shop cleans it and checks it for cracks and hones/bores. Check out newtis for tolerances.
Thanks! I got almost everything I need on newtis. Someone else mentioned it but I just didn�t see what I needed before. I didn�t see anything on honing. Do you know what size and grit flex hone? I know the diameter is 77mm but shouldn�t the hone be a bit bigger? 3 1/4 inches 400grit?
So do you think a simple hone will do? Recommended size flex hone and grit? I�ve got a 400 grit stone hone fro my last job. Any idea where I can get all the specs? I understand rings come pregapped but I would like to know all the service limits for the both the lower end and cylinder head.
That score in the top photo looks kind of deep I would probably get my machinist involved. you may have to bore that out. Sorry but if it wasn't for that top photo would tell you a ball hone might do it but I think based on that one photo you will need to bore it out at least 1 thousandths.
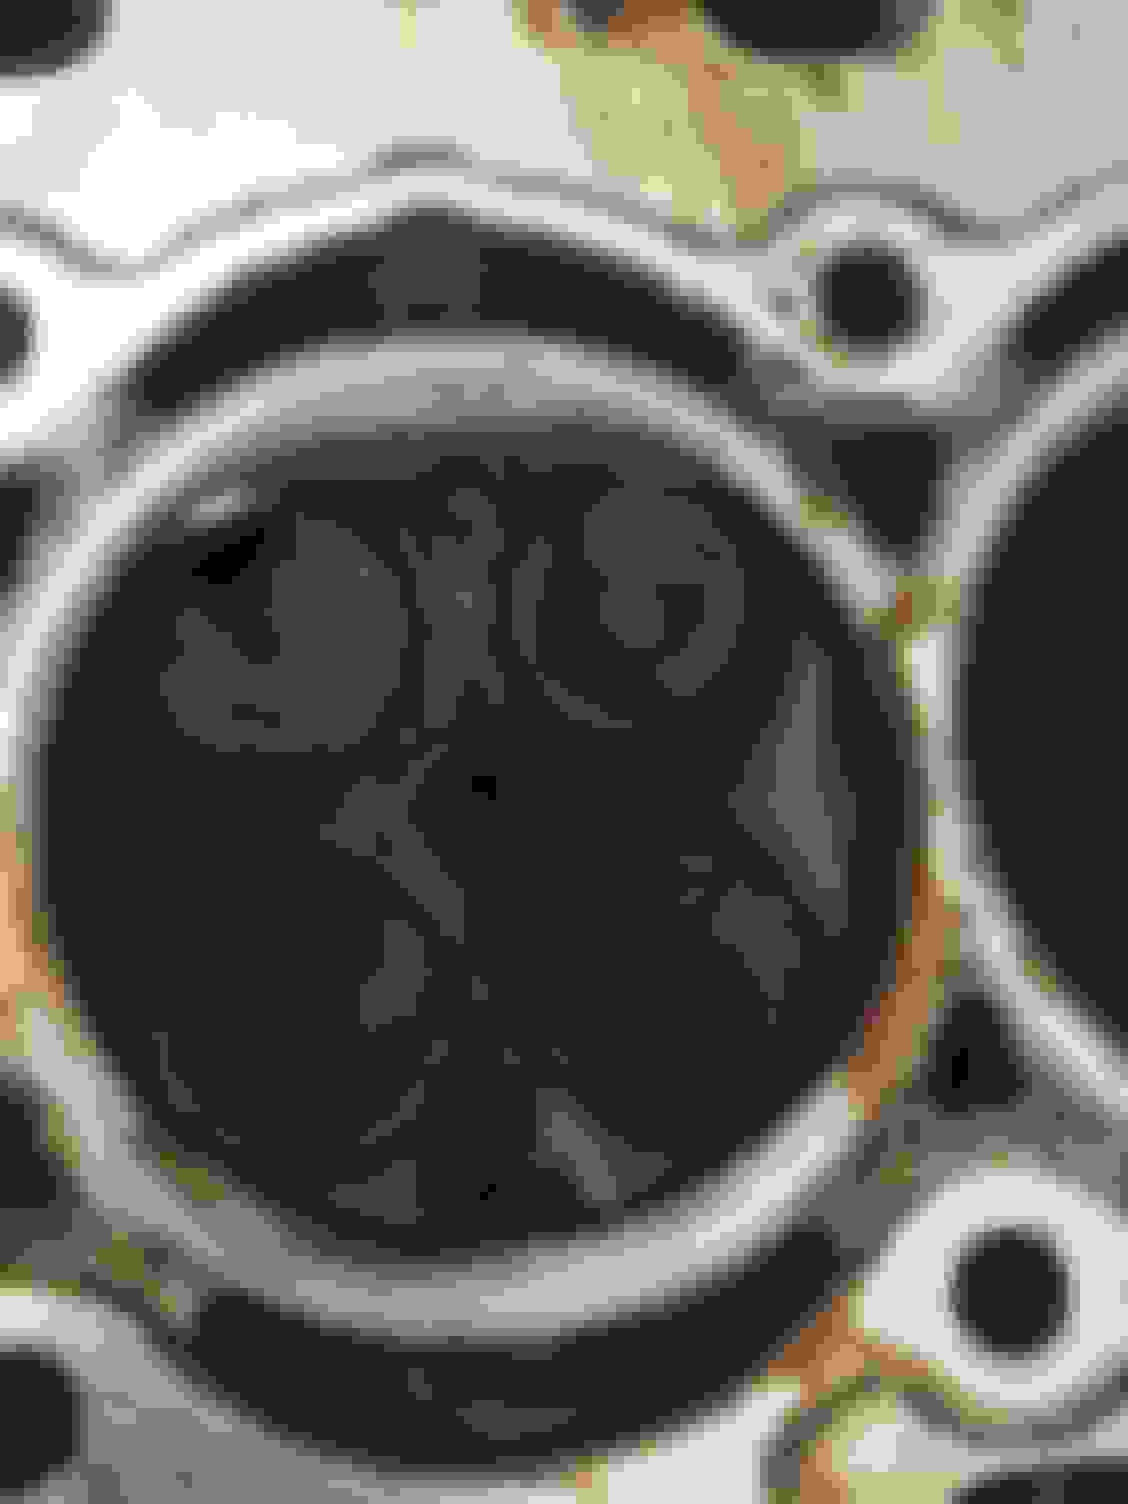
What I see in the closeup of #3 chamber is a valve seat hammered out to a diameter larger than the valve-head diameter. This suggests that the valve may be slightly bent. The seat also looks like it may have been cut to a diameter larger than the valve head, resulting in too little seat contact area. Could you take another picture directly above the valve axis of rotation? That would eliminate any parallax.
Given that this failure occurs at all (irrespective of the actual failure rate), my takeaway is that Mini used really cheap valves or they sometimes bought from reputable suppliers and sometimes not, take your pick of possible explanations.
If you have gone to the expense of pulling the head off it makes sense to me to use aftermarket valves.
Shop around for a shop that has a solid reputation for head work....
Are you the original owner?[/QUOTE
I am original owner. Head was done like 40k ago. They had trouble with it then but I forget exactly. I�m trying to find the record. So I�m seeing a bit of extra valve seat area around all the valves. My understanding is that is the part of the seat the valve doesn�t seat on. It�s supposed to seat on the part of the seat at 45� with seat width of 1.2-1.6. This looks pretty close. You may be on to something though because just by appearance that broken valve, both valves in that cylinder actually, looks like they are sitting deeper in the seat. Hmmmmmm🤔 Also, I�m only seeing 2 angles. NewTIS shows 4 angles. Are the intakes 4angles and exhaust only 2 angles? Cyl 4 is best one 3 2 1