

R56 minidomore Hitch Install on R56


Thread Starter
|
4th Gear
Joined: Dec 2010
Posts: 450
Likes: 0
From: New York, NY
minidomore Hitch Install on R56
First off, I want to let people know, be prepared to wait for this hitch. I waited for 1 month for this hitch. Communication from this company is non-existent. After about 1.5 weeks of no response or shipping update email from the company, I emailed Brent and his response was "Sorry this won't ship out until .... you should have been informed earlier. I am a patient guy, so I replied back, "that is fine, just keep me posted." I also ordered a bike rack from minidomore because the price seemed reasonable and I liked the simplicity factor of the xport slip stream. I received the bike rack more than a week later but still no hitch. When I called in, he replied, "oops we forgot to send you the hitch." Besides the "goofiness" of actually getting the hitch, it seems like it is pretty solid.
This write up isn't a complete "how to" of the install, just a look at what you will be dealing with if you get this product.
With the help of my boy - tintman718... we first set up on some Rhino Ramps.

Then there was the process of removing the bumper. It was actually pretty simple but some of the snaps/screws are at hard to reach spots. The guide does a mediocre job with pictures of explaining the dismantling. I would recommend a "mini rachet" for the screws that attach the rear part of the side fenders. In this way, you won't have to risk pulling the fender too much and breaking clips. There was also 1 screw directly underneath the bumper to the right of the exhaust. And 2 more PITA clips on the inside peripheries of the bumper.
Pulling back the fender lining... you will see the PITA clips

A close up of the clip:

Bumper removed, lights disconnected (very easy)

Now is a good time to polish up your tips if you've been needing to..

We had to cut some of the "foam" behind the steel bumper subframe in order to let the hitch fit snugly in between the steel bumper and the car... (the guide also states to do this)

Another cut piece...

Put the hitch and steel bumper subframe back on...

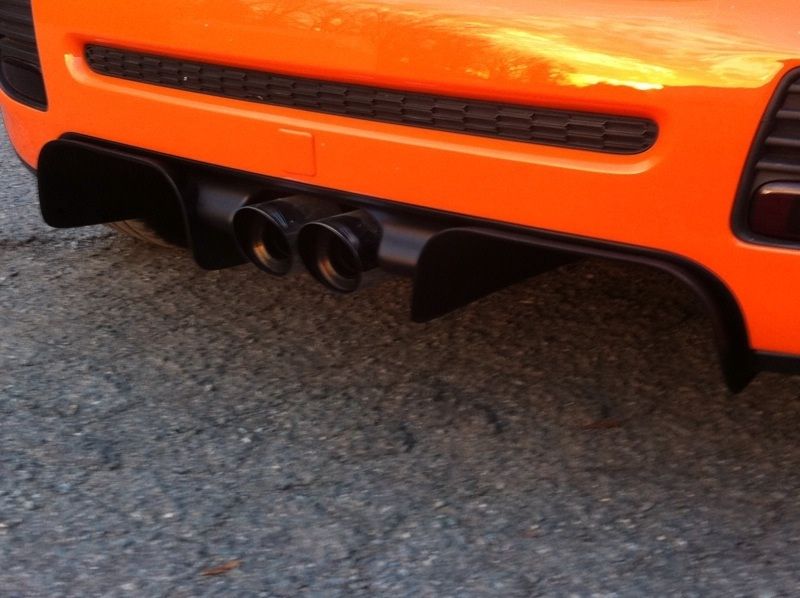
Now the fun part of cutting into your rear valence. We used a dremel, worked like a charm, but be careful not to slip and cause unwanted hash marks. They provide the cut-out.

And Voila... (we sanded down the edges to make it smoother after this picture was taken) I am pretty sure they make the square cut out smaller than the actual black cap, but do make sure you start out with your square a bit smaller and do some test fitting... so the cap does not fall out while driving.

Final product (sorry for the gloominess/iphone pics)


Hope its helpful to some of you. The hitch seems pretty solid. Rated tongue weight is about 200 lbs, with 1400 lb towing capacity I believe. The 3-bike rack is pretty sick too.
Cheers,
Doc
Besides the "goofiness" of actually getting the hitch, it seems like it is pretty solid.This write up isn't a complete "how to" of the install, just a look at what you will be dealing with if you get this product.
With the help of my boy - tintman718... we first set up on some Rhino Ramps.
Then there was the process of removing the bumper. It was actually pretty simple but some of the snaps/screws are at hard to reach spots. The guide does a mediocre job with pictures of explaining the dismantling. I would recommend a "mini rachet" for the screws that attach the rear part of the side fenders. In this way, you won't have to risk pulling the fender too much and breaking clips. There was also 1 screw directly underneath the bumper to the right of the exhaust. And 2 more PITA clips on the inside peripheries of the bumper.
Pulling back the fender lining... you will see the PITA clips
A close up of the clip:
Bumper removed, lights disconnected (very easy)
Now is a good time to polish up your tips if you've been needing to..
We had to cut some of the "foam" behind the steel bumper subframe in order to let the hitch fit snugly in between the steel bumper and the car... (the guide also states to do this)
Another cut piece...
Put the hitch and steel bumper subframe back on...
Now the fun part of cutting into your rear valence. We used a dremel, worked like a charm, but be careful not to slip and cause unwanted hash marks. They provide the cut-out.
And Voila... (we sanded down the edges to make it smoother after this picture was taken) I am pretty sure they make the square cut out smaller than the actual black cap, but do make sure you start out with your square a bit smaller and do some test fitting... so the cap does not fall out while driving.
Final product (sorry for the gloominess/iphone pics)
Hope its helpful to some of you. The hitch seems pretty solid. Rated tongue weight is about 200 lbs, with 1400 lb towing capacity I believe. The 3-bike rack is pretty sick too.
Cheers,
Doc

I got one for my 2011 MCS and have nothing but compliments to say about the company. FAST shipping for me, and most important, the hitch is WELL BUILT. I've towed a 5x10 trailer with a garden tractor on it (total weight about 1400 lbs.) with no problems.
Thread Starter
|
4th Gear
Joined: Dec 2010
Posts: 450
Likes: 0
From: New York, NY
Im in Manhattan, you? If you are interested in NYC runs/meets, send a request to join NYC Motoring on Facebook.
Trending Topics

1st Gear
Joined: Jun 2011
Posts: 47
Likes: 0
Curious... How much foam did you have to remove to make it fit? I'm assuming this foam is meant to absorb impact in a rear-ender, so I hope it's not too much.
The 2011 instructions say to simply discard the foam:
http://www.minidomore.com/pdf/2011%2...structions.pdf

The 2011 instructions say to simply discard the foam:
http://www.minidomore.com/pdf/2011%2...structions.pdf
Last edited by Aether; Aug 8, 2011 at 06:15 PM.


Looks great, seems like it wasn�t an easy process for you from the time you ordered to the time you got it installed. Sorry to hear that...
I had great success with Brent and I�ve installed 3 minidomore hitches on the last 3 of my 4 minis.
I don�t know what they changed on yours but the only thing I had to cut was the plastic plug, nothing on the body.
Each install took less than an hour... (minus the time to smooth out the plug the first time)
First one on a laser blue.

Then I decided to smooth it out for the JCW kit.

When I sold the car, I cheated again and reuse the kit for my next one...lol.

Some stuff never changes...well, maybe the color...lol.
BTW, I�m not sure where I saw it but I swear I saw a plug made out of the mesh grille design so when you placed the plug in, you couldn�t even tell it was there. I�ll take a look and see if I can find it again.
Great job bud!
Mark
I had great success with Brent and I�ve installed 3 minidomore hitches on the last 3 of my 4 minis.
I don�t know what they changed on yours but the only thing I had to cut was the plastic plug, nothing on the body.
Each install took less than an hour... (minus the time to smooth out the plug the first time)
First one on a laser blue.
Then I decided to smooth it out for the JCW kit.
When I sold the car, I cheated again and reuse the kit for my next one...lol.
Some stuff never changes...well, maybe the color...lol.
BTW, I�m not sure where I saw it but I swear I saw a plug made out of the mesh grille design so when you placed the plug in, you couldn�t even tell it was there. I�ll take a look and see if I can find it again.
Great job bud!
Mark
Thread Starter
|
4th Gear
Joined: Dec 2010
Posts: 450
Likes: 0
From: New York, NY
Curious... How much foam did you have to remove to make it fit? I'm assuming this foam is meant to absorb impact in a rear-ender, so I hope it's not too much.
The 2011 instructions say to simply discard the foam:
http://www.minidomore.com/pdf/2011%2...structions.pdf
The 2011 instructions say to simply discard the foam:
http://www.minidomore.com/pdf/2011%2...structions.pdf
The only reason you have to cut it is because when you put the Hitch on and the steel bumper behind it, you have to use the OEM bolts to go through BOTH pieces. These bolts are long enough but you have to put in some elbow grease to compress the foam and then bolt it at the same time. We cut out maybe a bit more than 1/2 inch thick all the way across to make it easier to bolt the two pieces to the car.
Haha, thanks for noticing. I got some Motegi Racing wheels with Hankook summer tires. I am loving them, the ride quality is drastically improved. I used Lamin-X to smoke out the tails. I am saving up for an Intercooler which I should have done a year ago and Air Suspension!
Looks great, seems like it wasn’t an easy process for you from the time you ordered to the time you got it installed. Sorry to hear that...
I had great success with Brent and I’ve installed 3 minidomore hitches on the last 3 of my 4 minis.
I don’t know what they changed on yours but the only thing I had to cut was the plastic plug, nothing on the body.
Each install took less than an hour... (minus the time to smooth out the plug the first time)
First one on a laser blue.
Then I decided to smooth it out for the JCW kit.
When I sold the car, I cheated again and reuse the kit for my next one...lol.
Some stuff never changes...well, maybe the color...lol.
BTW, I’m not sure where I saw it but I swear I saw a plug made out of the mesh grille design so when you placed the plug in, you couldn’t even tell it was there. I’ll take a look and see if I can find it again.
Great job bud!
Mark
Dude that looks really smooth! I see that you had to paint the caps to color match, very sexy. I'd love to know where I could get that mesh pattern cap if you do run across it!
Thanks
Make sure you PM when you get that done, I'd love to see what a Mini looks like with air suspension.
Keep up the good work. I'll look for that mesh cover... I wouldn't be a bit surprised if the person that had it modified it themselves. That's what I'd try to do...
Mark

1st Gear
Joined: Jul 2011
Posts: 30
Likes: 0
From: New Braunfels, Texas
Doc, here's another little thing to keep in the back of your mind. The weight on your hitch, will, over time, create torqe and actually bend the reciever tube and possibly loosen the bolts holding it to the body. I didn't believe this myself until after a trip and I had my 2010 MCS up on a lift and we noticed that the valiance was pushed out of alignment and began to check. It turned out that the hitch had been bent about 8-10 degrees down (south) from the original position. This is created from the leverage placed on the tongue by the rack and associated weight. It's fixable, but is a PITA after the fact. One solution suggested by my hitch installer (27 years experience) was to do a mod to the original installation which places a small "L" shaped bracket (custom made nat) that lends support and gives the tube a slight (2-3 degree) upward angle at time of installation. It won't change the tongue weight or tow capacity, but it may save a future user from having the same issue. I keep an eye on mind like a hawk now.
Doc, here's another little thing to keep in the back of your mind. The weight on your hitch, will, over time, create torqe and actually bend the reciever tube and possibly loosen the bolts holding it to the body. I didn't believe this myself until after a trip and I had my 2010 MCS up on a lift and we noticed that the valiance was pushed out of alignment and began to check. It turned out that the hitch had been bent about 8-10 degrees down (south) from the original position. This is created from the leverage placed on the tongue by the rack and associated weight. It's fixable, but is a PITA after the fact. One solution suggested by my hitch installer (27 years experience) was to do a mod to the original installation which places a small "L" shaped bracket (custom made nat) that lends support and gives the tube a slight (2-3 degree) upward angle at time of installation. It won't change the tongue weight or tow capacity, but it may save a future user from having the same issue. I keep an eye on mind like a hawk now.
1st Gear
Joined: Jul 2011
Posts: 30
Likes: 0
From: New Braunfels, Texas
"someone was going to ask" LMAO! Yup, you're right, I should have expected that. No, I don't have the pictures with me (I'm traveling for 2 weeks), but as soon as I get my skinny butt back to Texas I'll dig them out and post them. My bad, I've been here long enough now that I should have known better. Having said that, it sounds like your bracket is build with the design built in...mine was an earlier version perhaps?
Thread Starter
|
4th Gear
Joined: Dec 2010
Posts: 450
Likes: 0
From: New York, NY
Doc, here's another little thing to keep in the back of your mind. The weight on your hitch, will, over time, create torqe and actually bend the reciever tube and possibly loosen the bolts holding it to the body. I didn't believe this myself until after a trip and I had my 2010 MCS up on a lift and we noticed that the valiance was pushed out of alignment and began to check. It turned out that the hitch had been bent about 8-10 degrees down (south) from the original position. This is created from the leverage placed on the tongue by the rack and associated weight. It's fixable, but is a PITA after the fact. One solution suggested by my hitch installer (27 years experience) was to do a mod to the original installation which places a small "L" shaped bracket (custom made nat) that lends support and gives the tube a slight (2-3 degree) upward angle at time of installation. It won't change the tongue weight or tow capacity, but it may save a future user from having the same issue. I keep an eye on mind like a hawk now.
Thanks for the heads up man!, I will look out for that. We used an airgun to torque the bolts, I just hope it was enough torque. As the others have already stated, would love to see a pic or something of that bracket you are talking about.

6th Gear
Joined: Aug 2011
Posts: 2,064
Likes: 15
From: Silly-con Valley
It looks like a couple of gussets would work well to prevent or at least greatly lessen that effect. Those would be triangle-shaped supports running from horizontal parts to vertical parts. It gives the load a broader area to spread over so the metal does not bend.
It might be a good idea to use loc-tite (one of the milder ones!) on the bumper bolts, or at least some lock-washers. That should help keep the bolts from backing out.
It might be a good idea to use loc-tite (one of the milder ones!) on the bumper bolts, or at least some lock-washers. That should help keep the bolts from backing out.
6th Gear
Joined: Aug 2005
Posts: 1,258
Likes: 3
From: H-town
You know how we all are, someone was going to ask. Do you have any pics of the "L" shaped braket? the 2011 came with the reciever welded to the crossbar AND some angle iron on top welded to both. just wondering if this was on the other designs. And before somebody asks me, NO I do not have a picture of the angle iron welded to both.

Thread
Thread Starter
Forum
Replies
Last Post
igzekyativ
MINIs & Minis for Sale
34
Jul 16, 2020 12:54 PM
squawSkiBum
MINI Parts for Sale
15
Oct 2, 2015 09:21 AM
flredmini
MINI Parts for Sale
2
Sep 3, 2015 07:15 PM