
R50/53 I got lucky / first oil change


Thread Starter
|
5th Gear
Joined: Apr 2013
Posts: 731
Likes: 5
From: Near Portland, OR, USA
I got lucky / first oil change
With all the reading I do on NAM, I fear the worst every time I start work on the MINI. Haven't really done much yet, changed the plugs a while back, -no problems.
Yesterday I changed my oil. Had my breaker bar (pipes) on stand by, though I didn't need them. Lucky I guess -I've encountered filters in my day that are near impossible to get off.
18 ft pounds didn't seem like a lot putting it back together, but it doesn't leak. ::thumbsup
I especially wanted to thank Braminator for posting this article (below) for me to read last month. I feel good understanding what the potential problems are, and the correct oil filter for the right year.
Anyone in Portland Oregon, Discount Import Parts has Mann oil filters in the shelf for $9. It's nice to not have to order on line and wait for shipping.
This article below was great for me. Only thing I would add is a pair of heavy work gloves -after breaking loose the filter, it's hot so the gloves help. I barely got dirty! Thanks Braminator!
This article applies to the Gen 1 2002-2006 R50 MINI Cooper and R53 Cooper S Hatchback.
A Little Background...
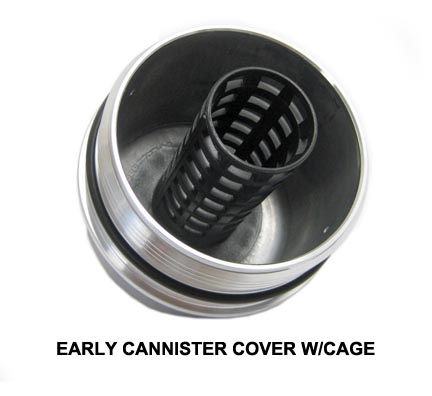
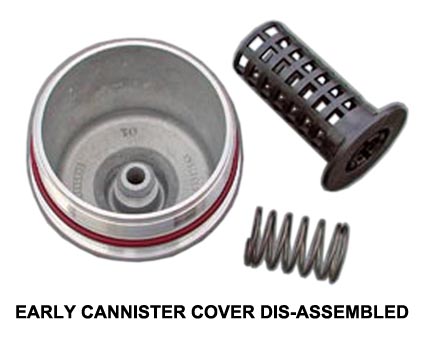
The early MINI with production dates up to 07/2004 has a couple extra pieces inside the oil filter cannister cover - a spring and plastic cage. These items were eliminated on the later models after 07/2004.
The oil filter specification with the initial production of the MINI required a 'paper filter' which necessitated a plastic cage in the cannister cover to prevent the filter from collapsing under pressure. For this reason, the early production MINIs have a spring loaded plastic 'cage' built into the oil filter cannister cover. This 'cage' provides a rigid structure within the filter to maintain its shape under pressure. The cage also helps to 'seal' the top of the filter for proper oil circulation thru the filter.
The early 'all paper' oil filters designed for use with the caged cover did not have any internal support structure (or 'built-in' cage). BE CAREFUL when purchasing aftermarket oil filters as there are still some of these 'uncaged' filters in the market.
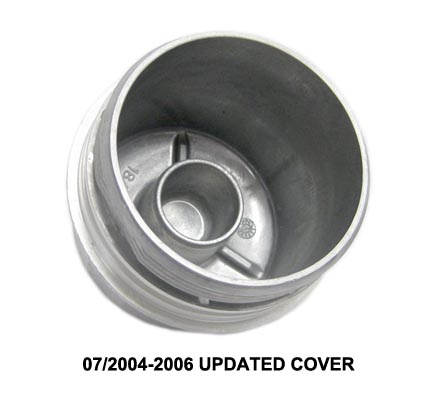
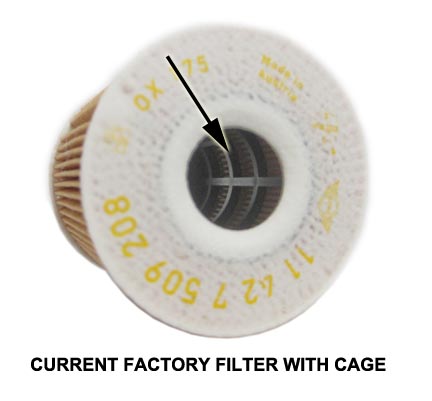
Beginning with the 07/2004 production, they changed the filter specification and a plastic 'cage' was built into the filter itself, eliminating the need for the cage in the cannister cover.
The potential problem...
A potential problem arises with your 2002-2004 MINI during a filter change when the plastic cage 'detaches' from the cannister cover and gets pulled out with the oil filter, allowing the spring to pop free. If the technician is not familiar with the early filter setup - the plastic cage gets thrown out with the dirty oil filter. (You can find replacement cannister covers here.) Without the spring and cage in the early cannister, the filter fails to seal against the cover resulting in 'low oil pressure' warining light.
Since the cannister cover is built differently for the 'cage version' vs. the later version, the filter will not seal properly without the cage, allowing unfiltered oil to circulate around the filter. Circulating unfiltered oil is NOT good for your engine...
Another problem arises if you should happen to purchase an early 'un-caged' oil filter. If you use this filter with the later 'uncaged' cannister cover, the filter will collapse affecting filtration and oil pressure.

The solution...
If you find a loose spring with the oil filter without the plastic cage, MINI recommends replacing the entire Oil Filter Housing module with the newer style housing.
Make sure the new oil filter has the plastic cage 'built-in'. You will be safe with the factory filter (NME1050 ) or the MANN filter (NME1056 ).
Note:
We've had occasional reports of the oil light staying on at idle and going off as soon as the rev's are up. We have seen a couple issues that have caused this:
1. One of the valves inside the filter base is damaged (missing pieces).
2. Aftermarket oil filter with inadequate 'stiffness' on the ends of the filter causing oil to bypass the filter (Wix filter caused this problem for one customer). The factory oil filter has a rigid black plastic base on the bottom to press against the valves at the base of the oil flter housing.
Helpful Hints for changing the oil...
Frequently, the cannister cover will be very difficult to break free. Use a breaker bar with CAUTION! You may need a 'low profile' socket due to the limited space available.
If you loosen the filter cannister cover enough to break the seal, it will help drain the oil from the filter as you drain the oil pan. Less mess later!
When replacing the O-ring (which is included with the new factory filter), save the old one just in case (will explain later).
When replacing the O-ring on the cannister cover, make sure you lubricate the O-ring with PLENTY of fresh oil before you install it, and lubricate again after it is in place on the cannister cover. If you fail to do this, the O-ring will bunch up and cause a leak!
The new oil filter should be 'pre-seated' into the base and cover before installation. Take the filter (plastic side down) and press firmly into the base until it is fully seated. Remove and do the same into the cannister cover. This reduces the resistance from initial seating. You can leave the filter seated into the cover and screw the cover back onto the base, or you can leave the filter in the base fully seated and screw the cover back onto the base.
Getting the Cannister Cover started into the base is a little tricky - having the O-ring well lubricated will make it a little easier. Start the cover onto the base carefully, confirming the cover is 'square' with the base to prevent cross-threading. Once you have it started, you will still have slight resistance from the new O-ring, but you should be able to get the cover well onto the base by hand.
Torque the cannister cover to 18 lb-ft.
The factory Drain Plug gasket is a plastic gasket that is molded into the Drain Plug. Best to replace the drain plug at every oil change. The cost is minimal compared to headaches from a leaky plug! (The linked filter part numbers above includes a new drain plug.)
Torque the Drain Plug to 18 lb-ft as well.
You can also use a magnetic drain plug that will help trap microscopic metal debris and can be re-used.
Fill with a name brand FULL SYNTHETIC motor oil. It should take close to 5 quarts. MINI recommends oils in SAE classes 5W-40 and 5W-30. MINI likes Castrol Synthetic, many MINI owners use Mobile 1 Synthetic.
After you confirm everything is buttoned up, and you have fresh oil in the engine, start the engine. The red Engine Oil Pressure warning light should go off in a couple seconds. After a running the engine for 15 seconds or so, shut off the engine and let sit for a few minutes. Check for leaks, and re-check the oil level. If everything is dry and the dip stock shows 'full' - go for a drive!
If you run the car and find a puddle of oil under the engine, there is a good chance the O-ring was damaged when you installed the cannister cover. Take the old O-ring that you saved, and re-install - with care!
To reset the oil service reminder,
1. Push the Trip Button
2. Turn ignition key to position 1 and 51A will appear to left of mileage
3. Release trip button
4. Wait 3 seconds
5. Push trip button
6. Wait (5-8 seconds) for RST to appear in left corner
7. Release trip button
8. Push trip button
9. 15000 will appear as new service interval
10. Release trip button
ADDENDUM
We have also had reports of 'oil pressure warning light' and customers finding a 'small spring' loose at the bottom of the base.
Here is a photo of what the Filter Cannister Base should look like:
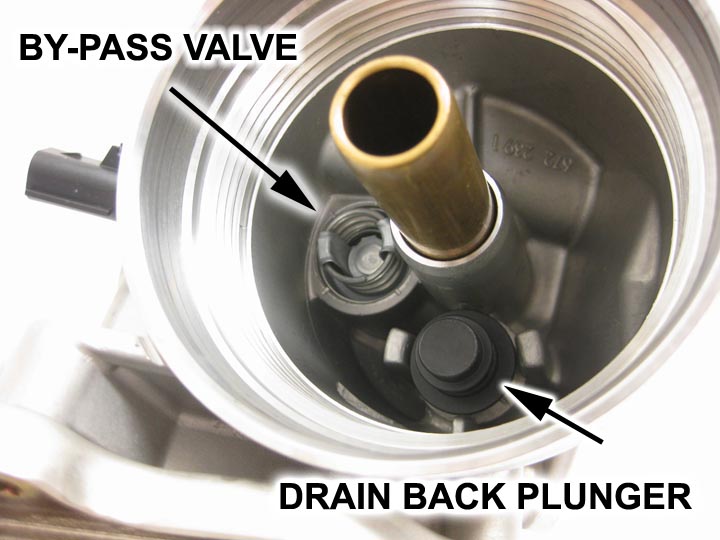
If either of these valves are damaged, you will need to replace the entire housing.
A Little Background...
The early MINI with production dates up to 07/2004 has a couple extra pieces inside the oil filter cannister cover - a spring and plastic cage. These items were eliminated on the later models after 07/2004.
The oil filter specification with the initial production of the MINI required a 'paper filter' which necessitated a plastic cage in the cannister cover to prevent the filter from collapsing under pressure. For this reason, the early production MINIs have a spring loaded plastic 'cage' built into the oil filter cannister cover. This 'cage' provides a rigid structure within the filter to maintain its shape under pressure. The cage also helps to 'seal' the top of the filter for proper oil circulation thru the filter.
The early 'all paper' oil filters designed for use with the caged cover did not have any internal support structure (or 'built-in' cage). BE CAREFUL when purchasing aftermarket oil filters as there are still some of these 'uncaged' filters in the market.
Beginning with the 07/2004 production, they changed the filter specification and a plastic 'cage' was built into the filter itself, eliminating the need for the cage in the cannister cover.
The potential problem...
A potential problem arises with your 2002-2004 MINI during a filter change when the plastic cage 'detaches' from the cannister cover and gets pulled out with the oil filter, allowing the spring to pop free. If the technician is not familiar with the early filter setup - the plastic cage gets thrown out with the dirty oil filter. (You can find replacement cannister covers here.) Without the spring and cage in the early cannister, the filter fails to seal against the cover resulting in 'low oil pressure' warining light.
Since the cannister cover is built differently for the 'cage version' vs. the later version, the filter will not seal properly without the cage, allowing unfiltered oil to circulate around the filter. Circulating unfiltered oil is NOT good for your engine...
Another problem arises if you should happen to purchase an early 'un-caged' oil filter. If you use this filter with the later 'uncaged' cannister cover, the filter will collapse affecting filtration and oil pressure.
The solution...
If you find a loose spring with the oil filter without the plastic cage, MINI recommends replacing the entire Oil Filter Housing module with the newer style housing.
Make sure the new oil filter has the plastic cage 'built-in'. You will be safe with the factory filter (NME1050 ) or the MANN filter (NME1056 ).
Note:
We've had occasional reports of the oil light staying on at idle and going off as soon as the rev's are up. We have seen a couple issues that have caused this:
1. One of the valves inside the filter base is damaged (missing pieces).
2. Aftermarket oil filter with inadequate 'stiffness' on the ends of the filter causing oil to bypass the filter (Wix filter caused this problem for one customer). The factory oil filter has a rigid black plastic base on the bottom to press against the valves at the base of the oil flter housing.
Helpful Hints for changing the oil...
Frequently, the cannister cover will be very difficult to break free. Use a breaker bar with CAUTION! You may need a 'low profile' socket due to the limited space available.
If you loosen the filter cannister cover enough to break the seal, it will help drain the oil from the filter as you drain the oil pan. Less mess later!
When replacing the O-ring (which is included with the new factory filter), save the old one just in case (will explain later).
When replacing the O-ring on the cannister cover, make sure you lubricate the O-ring with PLENTY of fresh oil before you install it, and lubricate again after it is in place on the cannister cover. If you fail to do this, the O-ring will bunch up and cause a leak!
The new oil filter should be 'pre-seated' into the base and cover before installation. Take the filter (plastic side down) and press firmly into the base until it is fully seated. Remove and do the same into the cannister cover. This reduces the resistance from initial seating. You can leave the filter seated into the cover and screw the cover back onto the base, or you can leave the filter in the base fully seated and screw the cover back onto the base.
Getting the Cannister Cover started into the base is a little tricky - having the O-ring well lubricated will make it a little easier. Start the cover onto the base carefully, confirming the cover is 'square' with the base to prevent cross-threading. Once you have it started, you will still have slight resistance from the new O-ring, but you should be able to get the cover well onto the base by hand.
Torque the cannister cover to 18 lb-ft.
The factory Drain Plug gasket is a plastic gasket that is molded into the Drain Plug. Best to replace the drain plug at every oil change. The cost is minimal compared to headaches from a leaky plug! (The linked filter part numbers above includes a new drain plug.)
Torque the Drain Plug to 18 lb-ft as well.
You can also use a magnetic drain plug that will help trap microscopic metal debris and can be re-used.
Fill with a name brand FULL SYNTHETIC motor oil. It should take close to 5 quarts. MINI recommends oils in SAE classes 5W-40 and 5W-30. MINI likes Castrol Synthetic, many MINI owners use Mobile 1 Synthetic.
After you confirm everything is buttoned up, and you have fresh oil in the engine, start the engine. The red Engine Oil Pressure warning light should go off in a couple seconds. After a running the engine for 15 seconds or so, shut off the engine and let sit for a few minutes. Check for leaks, and re-check the oil level. If everything is dry and the dip stock shows 'full' - go for a drive!
If you run the car and find a puddle of oil under the engine, there is a good chance the O-ring was damaged when you installed the cannister cover. Take the old O-ring that you saved, and re-install - with care!
To reset the oil service reminder,
1. Push the Trip Button
2. Turn ignition key to position 1 and 51A will appear to left of mileage
3. Release trip button
4. Wait 3 seconds
5. Push trip button
6. Wait (5-8 seconds) for RST to appear in left corner
7. Release trip button
8. Push trip button
9. 15000 will appear as new service interval
10. Release trip button
ADDENDUM
We have also had reports of 'oil pressure warning light' and customers finding a 'small spring' loose at the bottom of the base.
Here is a photo of what the Filter Cannister Base should look like:
If either of these valves are damaged, you will need to replace the entire housing.
Thread Starter
|
5th Gear
Joined: Apr 2013
Posts: 731
Likes: 5
From: Near Portland, OR, USA
Cheers,

4th Gear
Joined: May 2012
Posts: 378
Likes: 1
Ooo wow interesting
You have me worried I changed my oil in my 03 and don't remember seeing a cage?
I haven't had any problems though
Should I be ordering spare cage for just in casey next oil change it's actually not in there?
You have me worried I changed my oil in my 03 and don't remember seeing a cage?
I haven't had any problems though
Should I be ordering spare cage for just in casey next oil change it's actually not in there?
4th Gear
Joined: May 2012
Posts: 378
Likes: 1
Does this apply to mini cooper s, seems to be a lot
Of conflicting info... I'm pretty positive my 03 didn't have the plastic or spring.... But for all I know now I might of thrown it out with the old filter
Anyone else have insight?
Of conflicting info... I'm pretty positive my 03 didn't have the plastic or spring.... But for all I know now I might of thrown it out with the old filter
Anyone else have insight?
Thread Starter
|
5th Gear
Joined: Apr 2013
Posts: 731
Likes: 5
From: Near Portland, OR, USA
I guess you'll have to see which canister cover you have, and if the filters you get have the built in cage.
Trending Topics
Thread Starter
|
5th Gear
Joined: Apr 2013
Posts: 731
Likes: 5
From: Near Portland, OR, USA
Depends on which of these you find when you open it if I understand correctly.

2nd Gear
Joined: Aug 2012
Posts: 137
Likes: 6
From: VA
I am curious about the date stated for the updated cover (07/04).
http://www.minimania.com/images/articles/filter3.jpg
I have an 04 with an 09/03 build date and it has the updated cover. While it COULD have been changed over at some point, I have all of the detailed service records and none show this to be the case. In addition, last year I ordered 5 filters from Rockauto.com using the 09/03 build date and received the caged filters in the picture below. For anyone interested in potential money savings (Not currently the case as it was for me last year), I ordered the Beck Arnley 041-0811 filter and in box was the Mahle stock filter as pictured below and requisite replacement O-ring.
http://www.minimania.com/images/articles/filter4.jpg
Last edited by 04_Indi_Mini_S; Aug 19, 2013 at 06:33 AM.

3rd Gear
Joined: Apr 2010
Posts: 181
Likes: 0
Side note for those tha find this thread in a search. I have a new oil drain plug and while making sure it was 13mm while off the car I found that a 13mm wrench fits but it has some play. A 1/2" wrench is tight. I read it somewhere else on the forum so I'd say use a 1/2" wrench so you don't damage the drain plug.

Neutral
Joined: Dec 2013
Posts: 1
Likes: 0
What a great forum !!!!!! I have the common problem of the drain plug in my '06 S being stuck. In case anyone knows, how much heat can you put on the drain plug without melting the pan? It's my understanding that the pan is a mixture of aluminum and something else. Normally adding heat to a stuck bolt really helps a lot but I've been afraid because I didn't want to melt the oil pan. My plug has really been rounded off a lot. I know there is another thread dealing with my problem but my heat issue wasn't mentioned. Any help would be appreciated
Bill
Bill


Thread
Thread Starter
Forum
Replies
Last Post
Kimolaoha
R56 :: Hatch Talk (2007+)
70
Jul 5, 2023 01:04 PM