
ND's MCS R53 JCW build/progress

Thread Starter
|
6th Gear
Joined: Jun 2020
Posts: 1,146
Likes: 313
From: The Netherlands
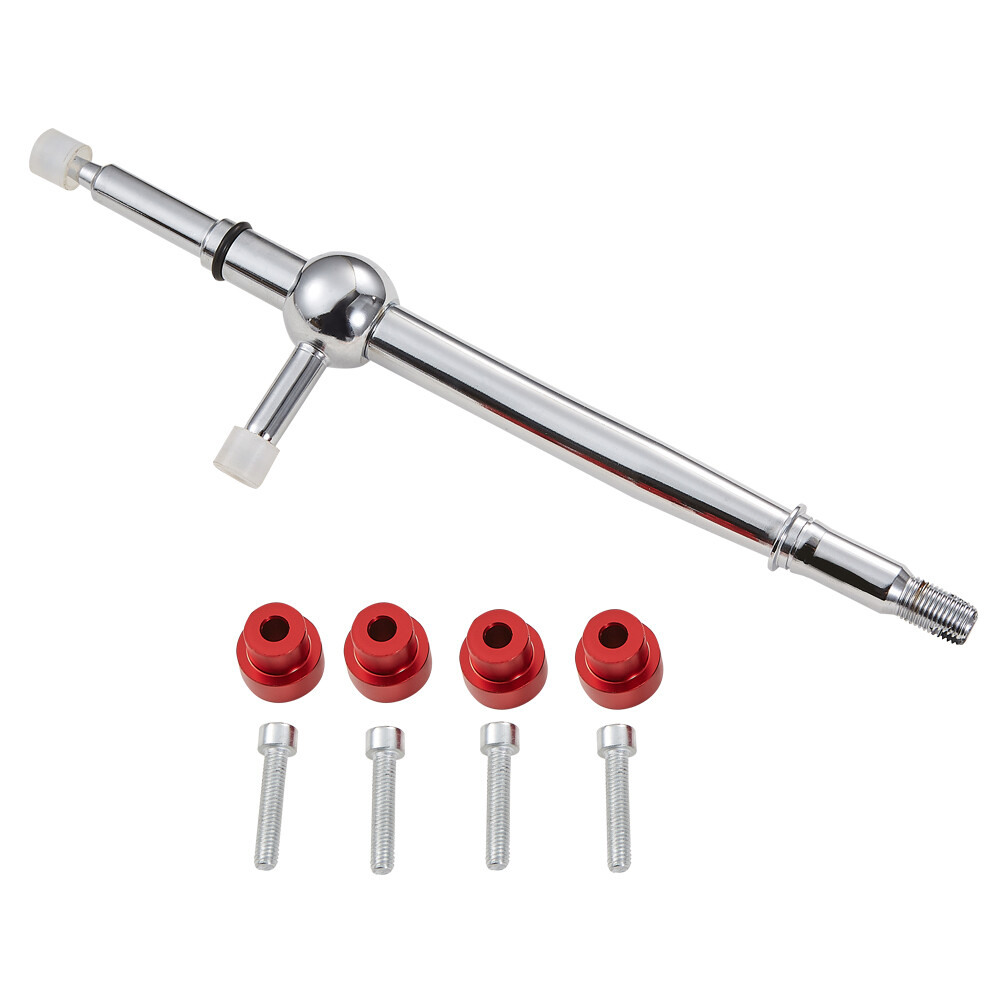
Spend a couple hours stretched over 2 evenings to remove the shifterbox to upgrade to a short shifter, only to find out that the part doesn't fit....AHHHHHHHHHH
It looks like I have a R56 shifter? It has the bigger ball and also the arm is thicker and the bottom ball is bigger. Fresh coat of lube, replaced the rubber bushings with the aluminium bushings and put everything back together (so 3 evenings in total lol)

Also the first time I used my ramps, they worked like a treat. Currently riding on temporary R87 wheels, as I probably have a new set of wheels upcoming weekend. More on that when we arrive there.

It looks like I have a R56 shifter? It has the bigger ball and also the arm is thicker and the bottom ball is bigger. Fresh coat of lube, replaced the rubber bushings with the aluminium bushings and put everything back together (so 3 evenings in total lol)
Also the first time I used my ramps, they worked like a treat. Currently riding on temporary R87 wheels, as I probably have a new set of wheels upcoming weekend. More on that when we arrive there.

Thread Starter
|
6th Gear
Joined: Jun 2020
Posts: 1,146
Likes: 313
From: The Netherlands
Aha! Off course, the compatibility which is listed by sellers is not always correct. And this particular one should have been compatible with LCI cars (but its not!).
I saw this one for 2000-2003 cars

And this one for 2004-2006. Notice the difference in angles? I thought that was the difference, but I was wrong.
Now that I search again on eBay, i see correct options, something I didnt see before. Strange...
https://www.ebay.com/itm/233892588845
https://www.ebay.com/itm/123586640007
https://www.ebay.com/itm/273263158521
I saw this one for 2000-2003 cars
And this one for 2004-2006. Notice the difference in angles? I thought that was the difference, but I was wrong.
Now that I search again on eBay, i see correct options, something I didnt see before. Strange...
https://www.ebay.com/itm/233892588845
https://www.ebay.com/itm/123586640007
https://www.ebay.com/itm/273263158521
Thread Starter
|
6th Gear
Joined: Jun 2020
Posts: 1,146
Likes: 313
From: The Netherlands
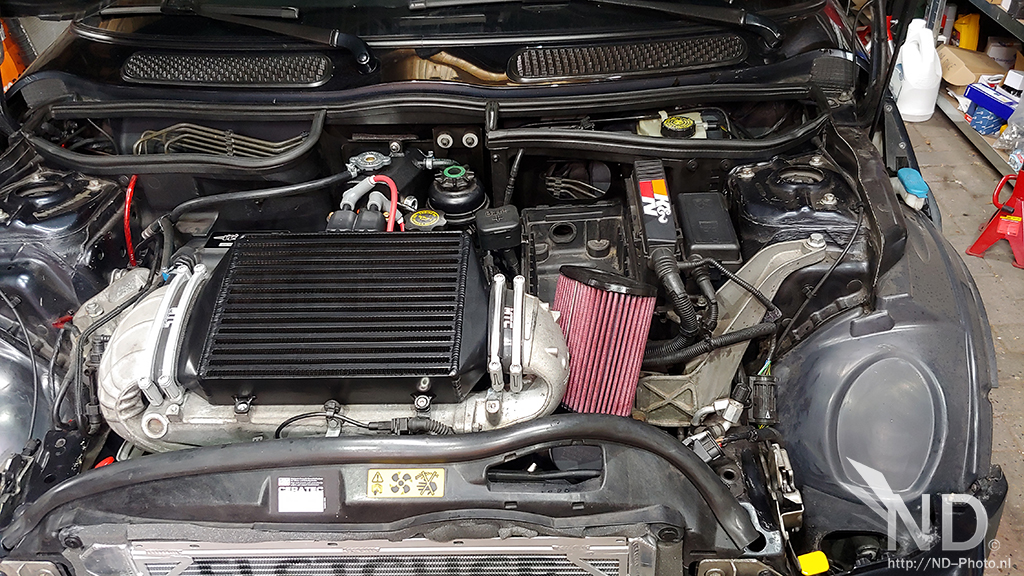
After the fiasco with the short shifer, it was time for some success  I noticed this thread about an easy bolton upgrade and gave it a try > https://www.northamericanmotoring.co...ttle-body.html
30 Euros inc shipment is a bargain! Left the BMW TB, right the OEM JCW TB


Differences:
Intake side (inside diameter)
OEM JCW: 60mm
BMW 13541439580: 66mm
Difference: 6mm
Intake side (outside diameter)
OEM JCW: 68mm
BMW 13541439580: 74mm
Difference: 7mm
Outgoing side
OEM JCW: 60mm
BMW 13541439580: 65mm
Difference: 5mm


I noticed this thread about an easy bolton upgrade and gave it a try > https://www.northamericanmotoring.co...ttle-body.html30 Euros inc shipment is a bargain! Left the BMW TB, right the OEM JCW TB
Differences:
Intake side (inside diameter)
OEM JCW: 60mm
BMW 13541439580: 66mm
Difference: 6mm
Intake side (outside diameter)
OEM JCW: 68mm
BMW 13541439580: 74mm
Difference: 7mm
Outgoing side
OEM JCW: 60mm
BMW 13541439580: 65mm
Difference: 5mm


Thread Starter
|
6th Gear
Joined: Jun 2020
Posts: 1,146
Likes: 313
From: The Netherlands
Tested the car today, happy to report that max pressure has been raised with 0.1 BAR by adding the bigger throttle body (1.1 > 1.2 BAR at redline). Bang for buck level is high!
Thread Starter
|
6th Gear
Joined: Jun 2020
Posts: 1,146
Likes: 313
From: The Netherlands
Made a litte trip today to pick up some new wheels, Japan Racing JR3 in 16x7. They weigh 6.6kg, which is very light 
Went to the barber yesterday after 4 months, so a mandatory selfie was made again :P

Sneak peak

Weighed them, with Vredestein Snowtrac 3 winter tyres in 195/55/16, they only weigh 13.12 kg

Weighed the R87 again with 175/60/16 tyres and they only weigh 13.80kg

I weighed them before with 205/55/16 tyres and they weighed 15.32kg

The big difference with the Team Dynamics (18kg) is 5 kg per corner in unsprung weight, which is major difference!

Made some pics with the DSLR.


Very happy with them!
Went to the barber yesterday after 4 months, so a mandatory selfie was made again :P
Sneak peak
Weighed them, with Vredestein Snowtrac 3 winter tyres in 195/55/16, they only weigh 13.12 kg
Weighed the R87 again with 175/60/16 tyres and they only weigh 13.80kg
I weighed them before with 205/55/16 tyres and they weighed 15.32kg
The big difference with the Team Dynamics (18kg) is 5 kg per corner in unsprung weight, which is major difference!
Made some pics with the DSLR.
Very happy with them!
Thread Starter
|
6th Gear
Joined: Jun 2020
Posts: 1,146
Likes: 313
From: The Netherlands
Small update, replaced the old Japan Racing hubcap with new RAYS hubcaps. The red ties in great with the red/black theme I have going. Also, the Japan Racing JR3 is a copy of the well known Rays Engineering Volk TE37 wheel, so its a bit of an hommage

Before

And after

Before
And after
Thread Starter
|
6th Gear
Joined: Jun 2020
Posts: 1,146
Likes: 313
From: The Netherlands
I just found out the Gravity exhaust drones quite a bit on the highway, which sucks...I added Noico Solutions aluminium butyl anti drone mats to see if that would solve it.

Starting situation

Work in progress. Finally did the boot lid, boot and under the backseat. The rest of the material will be applied in the doors (later).

Did a small test run, makes quite a difference. But unfortunately, the drone on the highway is still there. So I will probably get another exhaust...
Starting situation
Work in progress. Finally did the boot lid, boot and under the backseat. The rest of the material will be applied in the doors (later).
Did a small test run, makes quite a difference. But unfortunately, the drone on the highway is still there. So I will probably get another exhaust...
Last edited by nd-photo.nl; May 3, 2021 at 07:58 AM.
Thread Starter
|
6th Gear
Joined: Jun 2020
Posts: 1,146
Likes: 313
From: The Netherlands
And after a good wash, the boot decided it didnt want to open anymore. Almost bought a new boot lid switch (100 euros), but searched and found a thread here, which fixed my issue > https://www.northamericanmotoring.co...utton-fix.html
Micro switch in "off" position

Micro switch in "on" position

Work in progress

Micro switch in "off" position
Micro switch in "on" position
Work in progress
4th Gear


Joined: May 2020
Posts: 600
Likes: 120
From: North Carolina
LOVE those wheels man! Best setup I've seen on your car so far! I currently have the rear seat out of mine because I've been hauling a lot of crap for work. It's crazy how much just having seats quiet it down.
I see you got the PC680 in! Let me know how it works out, I still have the Braille to install in mine.
I see you got the PC680 in! Let me know how it works out, I still have the Braille to install in mine.
Thread Starter
|
6th Gear
Joined: Jun 2020
Posts: 1,146
Likes: 313
From: The Netherlands
I also love these wheels! I wanted the known ET20 (deep dish) setup, but to be honest, this looks just as nice. Very happy with the "filled" wheel look with the 294mm discs.
The PC680 works great! Zero issues so far, you will only need to work out how to fasten the battery down tight as their is a height difference with the normal battery. I use the car 1 or 2 times a week.
The PC680 works great! Zero issues so far, you will only need to work out how to fasten the battery down tight as their is a height difference with the normal battery. I use the car 1 or 2 times a week.
4th Gear
Joined: May 2020
Posts: 600
Likes: 120
From: North Carolina
I also love these wheels! I wanted the known ET20 (deep dish) setup, but to be honest, this looks just as nice. Very happy with the "filled" wheel look with the 294mm discs.
The PC680 works great! Zero issues so far, you will only need to work out how to fasten the battery down tight as their is a height difference with the normal battery. I use the car 1 or 2 times a week.
The PC680 works great! Zero issues so far, you will only need to work out how to fasten the battery down tight as their is a height difference with the normal battery. I use the car 1 or 2 times a week.
The first set of aftermarket wheels I had on my car were et20. They rubbed. I had a 205/60 tire though. May have been ok with a 50 series.
And I have the fancy aluminum Braille mount. So I'm good there. I also use mine daily, high miles so maintaining a charge should be a non issue. Actually the 14th (Wednesday) will be the one year anniversary of purchase. I've put over 40,000 miles on it so far! Or 64,374 kilometers 😯

I just found out the Gravity exhaust drones quite a bit on the highway, which sucks...I added Noice Solutions aluminium butyl anti drone mats to see if that would solve it.
Starting situation
Work in progress. Finally did the boot lid, boot and under the backseat. The rest of the material will be applied in the doors (later).
Did a small test run, makes quite a difference. But unfortunately, the drone on the highway is still there. So I will probably get another exhaust...
Here are some photos of what I did, and do it as if sealng out water, leave no area open and overlap the pieces of dynomat a bit.
There are two rear flaps behind bumper cover purposely designed into the area above the tips of the exhaust to bring in the sound. ( These type of vents are there typically to help eliminate cabin pressure ) but were put in this specific area of exhaust for that reason ) Got that from a BMW / MINI engineer.

Need to pop off the rear inner panel. #2. You will see two rubber flaps in the body of the car that correspond with the openings in this rear panel. Just seal up the back of this panel with the dynamat and don't worry. I did this a long time ago with no issues except drastically reducing the exhaust note......


Then take off the hatch inner panel and do the rear hatch. Try not to brake any clips

Then enjoy the peace and tranquility of the car stereo once again, or just talking on your cell phone....
Thread Starter
|
6th Gear
Joined: Jun 2020
Posts: 1,146
Likes: 313
From: The Netherlands
Nice, I will try this out asap. I noticed the gaps. Also stuck some material in that area, but left the holes open as I thought they were for the cabin pressure thing.
Thanks a lot for sharing!
Thanks a lot for sharing!
Last edited by nd-photo.nl; Apr 13, 2021 at 04:42 AM.
Thread Starter
|
6th Gear
Joined: Jun 2020
Posts: 1,146
Likes: 313
From: The Netherlands
I had this

And I added this

I had to remove the cloth sound insulation which was already on the hatch inner panel. I also added sound insulation over the 2 big holes behind the inner panel. Is that ok, or should I only do insulation on the inner panel itself?
I have driven it a little, and the drone has been reduced significantly. It was too busy to do a proper test, will try again soon. Thanks again Eurotrasher!
And I added this
I had to remove the cloth sound insulation which was already on the hatch inner panel. I also added sound insulation over the 2 big holes behind the inner panel. Is that ok, or should I only do insulation on the inner panel itself?
I have driven it a little, and the drone has been reduced significantly. It was too busy to do a proper test, will try again soon. Thanks again Eurotrasher!
Thread Starter
|
6th Gear
Joined: Jun 2020
Posts: 1,146
Likes: 313
From: The Netherlands
Had to wait 2 weeks, but then it was finally delivered!
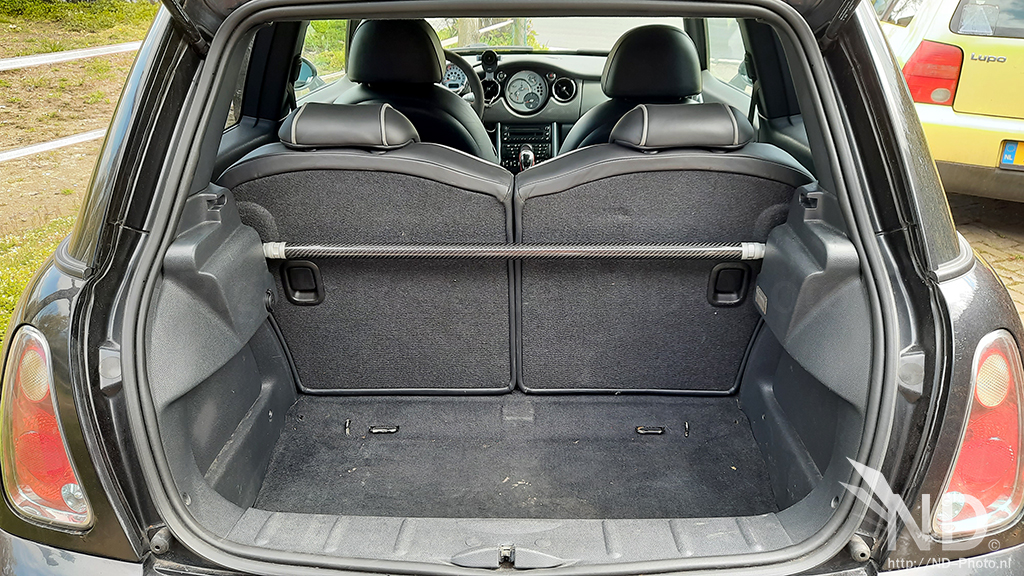
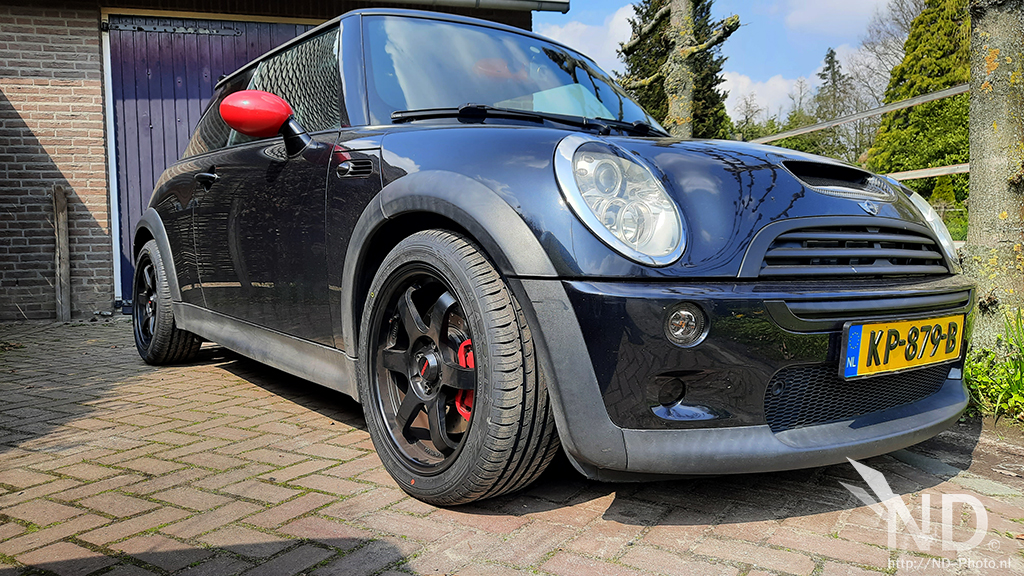
Front and back carbon strut bars from M2 Motorsport. They look absolutely amazing I found out later that the carbon front strut is not intended to be used on a R53, but I will use it anyway. The top cap of the ECU does not fit anymore, but I will make that work.
Good upgrade, less bodyroll can be felt for sure.
Front: https://www.m2motorsport.co.uk/cgi-b...%2Ehtml#SID=49
Rear: https://www.m2motorsport.co.uk/cgi-b...%2Ehtml#SID=49

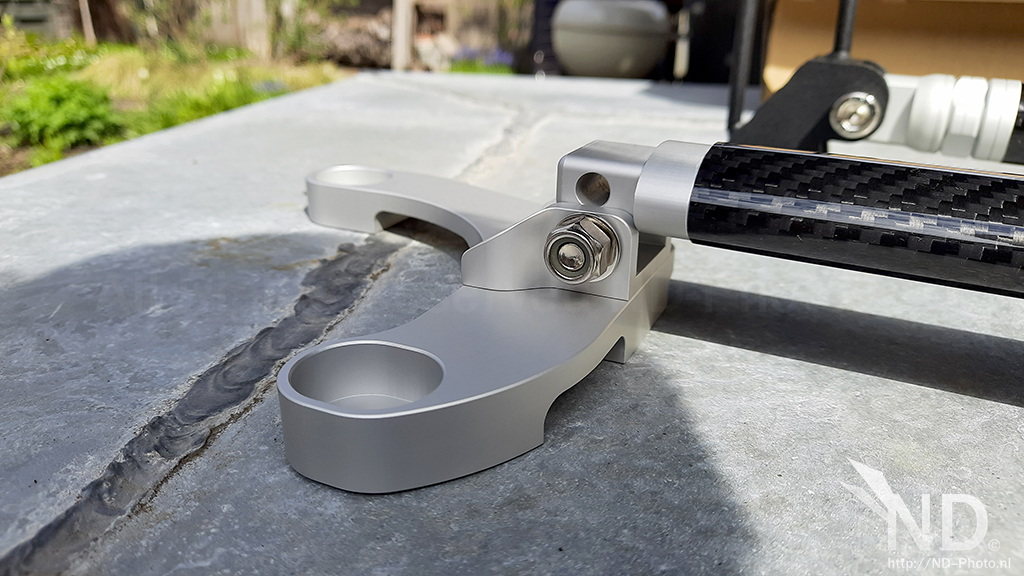
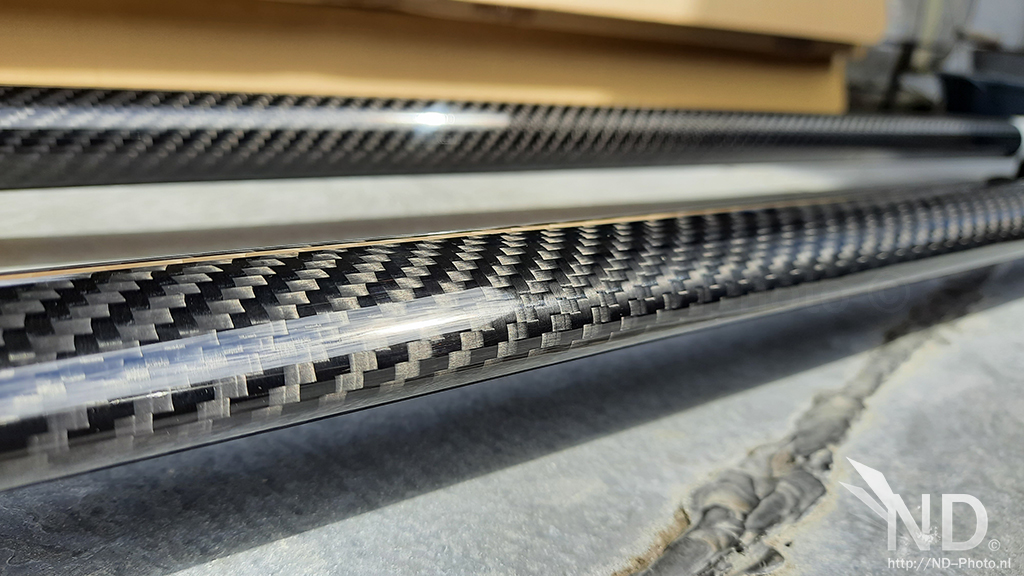
Nice carbon weave

Backseats can be used normally
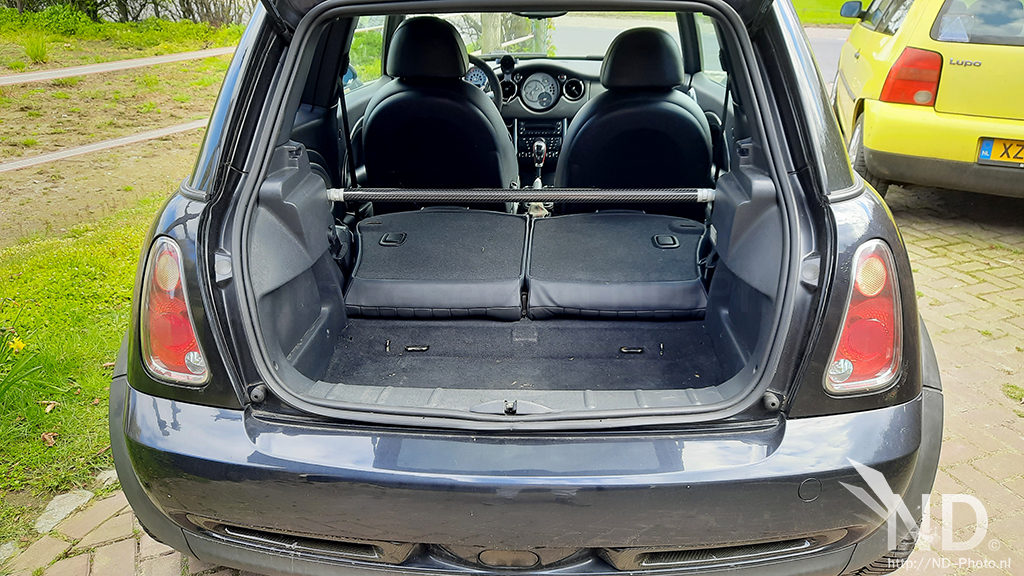


Frontside upgraded


Front and back carbon strut bars from M2 Motorsport. They look absolutely amazing
I found out later that the carbon front strut is not intended to be used on a R53, but I will use it anyway. The top cap of the ECU does not fit anymore, but I will make that work.Good upgrade, less bodyroll can be felt for sure.
Front: https://www.m2motorsport.co.uk/cgi-b...%2Ehtml#SID=49
Rear: https://www.m2motorsport.co.uk/cgi-b...%2Ehtml#SID=49
Nice carbon weave
Backseats can be used normally
Frontside upgraded
Last edited by nd-photo.nl; Jul 8, 2021 at 07:43 AM. Reason: M7 Tuning was M2 Motorsport
Thread Starter
|
6th Gear
Joined: Jun 2020
Posts: 1,146
Likes: 313
From: The Netherlands
Got me some new summer tyres, Maxxis Premitra HP5. Decided to go with something completely different, the tyrereviews youtube review from not too long ago sold it for me. Also they are quite cheap, so a perfect opportunity to try something new.
I went with 205/45/16 instead of the 195/55/16 winter tyres which were fitted (and 10 years old btw!). Looks very good on the wheel, but the car needs to be lowered, as it looks like I'm driving with high travel suspension now haha

For the people who are unaware what the yellow circle and red dot mean, check > https://www.toyotires.com.au/news/seeing-spots
I went with 205/45/16 instead of the 195/55/16 winter tyres which were fitted (and 10 years old btw!). Looks very good on the wheel, but the car needs to be lowered, as it looks like I'm driving with high travel suspension now haha
For the people who are unaware what the yellow circle and red dot mean, check > https://www.toyotires.com.au/news/seeing-spots
Thread Starter
|
6th Gear
Joined: Jun 2020
Posts: 1,146
Likes: 313
From: The Netherlands
Weighed the wheels again , which resulted in 13.52kg. Nice and light, just a tad bit heavier than the 10 year old worn Vredestein Wintrac 3 tyres (13.1kg). Happy with the results!
 [/url]
Performed a double check, because I couldnt spot the counterweights. I was happy to find out it only needed so little weight, plus the tire guy hid them behind the spokes for a clean look!
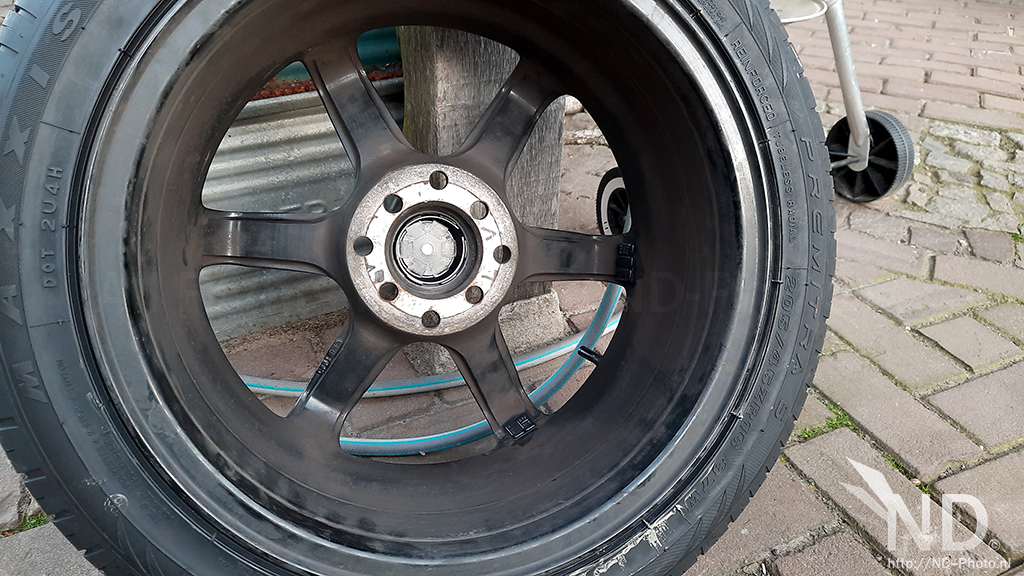
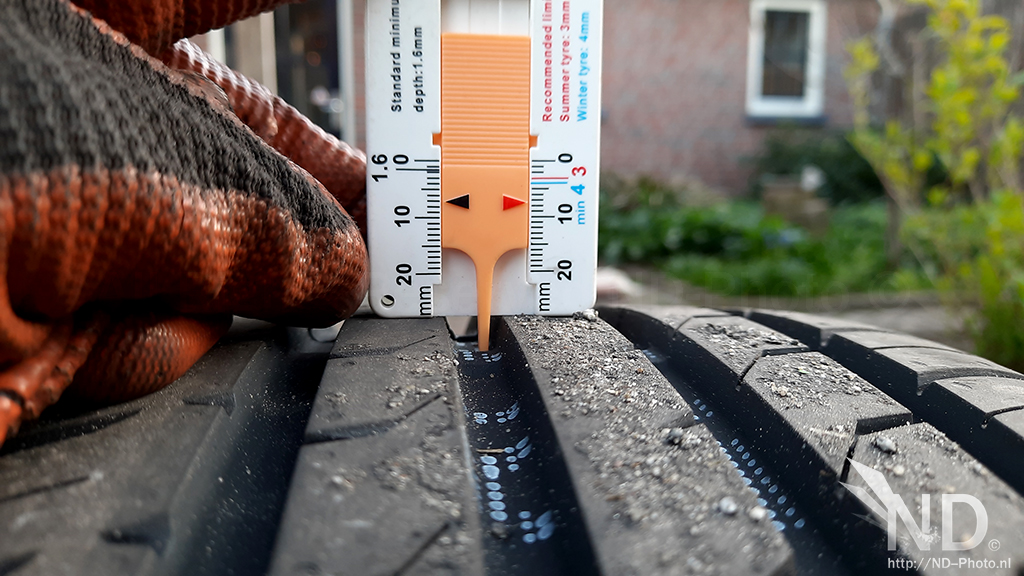
New Maxxis Premitra HP5 has 7.5mm profile depth, which is good
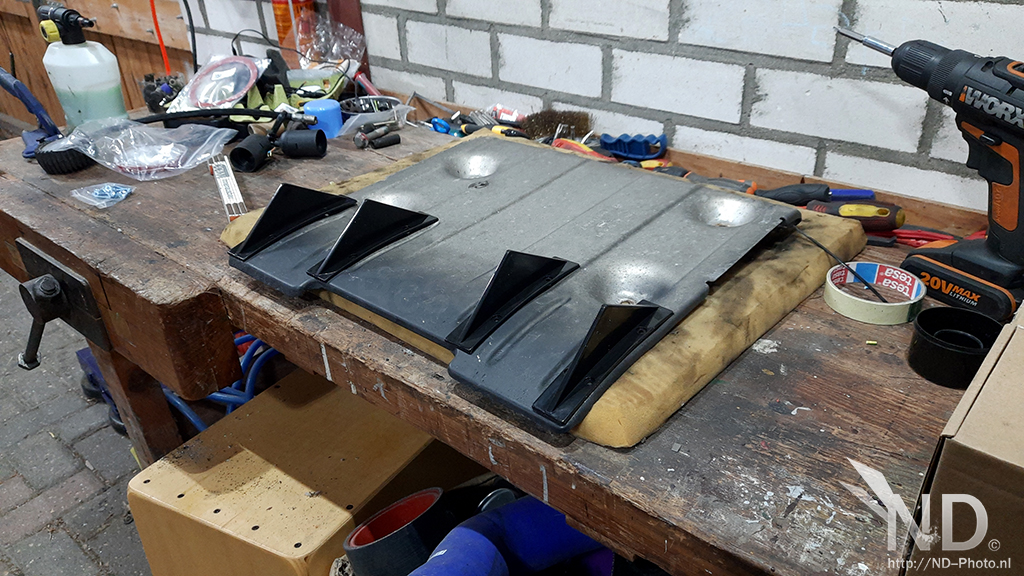
And added some diffuser fins on the rear plate. Nice Aliexpress mod


[/url]Performed a double check, because I couldnt spot the counterweights. I was happy to find out it only needed so little weight, plus the tire guy hid them behind the spokes for a clean look!
New Maxxis Premitra HP5 has 7.5mm profile depth, which is good
And added some diffuser fins on the rear plate. Nice Aliexpress mod
I also added sound insulation over the 2 big holes behind the inner panel. Is that ok, or should I only do insulation on the inner panel itself?
I have driven it a little, and the drone has been reduced significantly. It was too busy to do a proper test, will try again soon. Thanks again Eurotrasher!
I have driven it a little, and the drone has been reduced significantly. It was too busy to do a proper test, will try again soon. Thanks again Eurotrasher!
These two areas ( hatch and rear lower panel in boot ) help significantly with reducing the decible level of exhaust note.
Thread Starter
|
6th Gear
Joined: Jun 2020
Posts: 1,146
Likes: 313
From: The Netherlands
I covered the holes from the boot and it already helped a lot (I would say 70-80%)! I will probably do it again and put some foam behind it and close it again with the alubutyl. Thanks again!