When you click on links to various merchants on this site and make a purchase, this can result in this site earning a commission. Affiliate programs and affiliations include, but are not limited to, the eBay Partner Network.
You were right about the front fender liners deepgrey, mine didn't have nuts on the top on one side and had no nuts on the other so I didn't realize you can't get to the upper nut without pulling at least part of the liner down. The thread cutting nuts I got from the hardware store were the wrong size anyway so I'll have to figure something else out.
I did snap a pic though.
If you remove the two plastic retaining clips that are visible in that pic you can pull the liner enough to remove the light.
I've driven 80 miles on these springs so far. A good mix of highway, back country roads, and city. It does absolutely everything better. I've felt since I bought this car that the springs needed to be a little stiffer due to the lack of available travel. That lack of travel is also why I was so hesitant to put lowering springs on the car. But even with less travel its WAY smoother over all surfaces I regularly drive on. Granted I was alone so the true test will be with the whole family in the car. They are very well matched to the Bilsteins. There is less body roll in the corners, significantly less understeer, its more stable and less twitchy. I feel like they tie everything I've done so far with the suspension together quite nicely. These springs are rated at 1.2" drop in the front and 1.1" drop in the rear. I got 1" at both ends. I'm very happy. The rates Tein lists on their site for these springs are 224 lbs/inch front and 246 lbs/inch rear. I read somewhere on NAM that the factory springs all show within a few pounds of 165 lbs/inch on a independent spring dynometer...IIRC, someone correct me if that is not the factory spring rate.
Anyway I'm happy so far. I'll update this thread if I change my mind or find something I don't like about them as I drive more.
As far as the fender lights go, I agree. I noticed a lot of the Euro spec cars don't have them and I'm guessing THAT was the look the designers were going for. I think there a DOT requirement here. Andy wants the lights on his car, I should have just traded fenders with him lol. I probably would have if he was in the US.
Its the difference between Euro & US laws. Thats why we also dont have running lights here (we refer to them as "US lights" in the Netherlands), and everybody wants them here because they look cool.
Cops tolerate them, but you will fail MOT, unless its stated in the car papers (only happens for US imported cars, same goes for the small US licenses you guys have (which look better!)). A car here needs Euro spec licenses, unless its a US import and then it can have the smaller front license plate.
I have some interesting information about my car for you (at least I found it interesting) related to "country spec" (is that a thing??) My car is a fairly early US car so it has the hood release on the passenger side (would be drivers side in other countries). Newer models I've been in have it on the drivers side. After doing a tiny bit of research it was an aspect that was either overlooked or there wasn't time to fix prior to import. Don't take those reasons as gospel though as I got that info from an unreliable source lol. Also, my car has a Euro front plate mount that they simply bolted a US spec plate mount over. I live in NC and we don't have front plates so I removed the US spec plate mount because I think it looks better.
On the inside, I also have to open it on the passenger side. When I need to release the bonnet on the outside, its on the driver side.
Regarding the plate on the front, in the NL if you run into a speedtrap, you need to be able to be photographed on either the front (who is driving) or rearside. The license plate is then part of the evidence off course.
I always assumed the hood release location on the first gen was a result of the Rover design versus the later BMW designs.
Like I said I got MY info from an unreliable source lol. I don't know the real reason, just what I've heard/read. And yeah Andy inside the car the hood release is on the passenger side but its on the drivers side under the hood.
Like I said I got MY info from an unreliable source lol. I don't know the real reason, just what I've heard/read. And yeah Andy inside the car the hood release is on the passenger side but its on the drivers side under the hood.
Well I've put about 250 miles on these Tein springs so far and I have the same opinion as before. I think the ride they offer is a improvement over stock. It is stiffer but you only notice on really harsh bumps. It doesn't bottom out though, it kind of bounces instead...if that makes sense. It bottomed out a lot before even with the Bilsteins. It doesn't unsettle the car on big bumps, it just kind of hops over it where before it would bottom out so hard it'd make you cringe. Other than the few sorry excuses for what they claim is pavement, everything else is smoother. The rear springs are much stiffer than oem which helps reduce understeer because they compliment my 19 mm RSB quite well. I was rather underwhelmed with the performance of the upgraded RSB before because I read SOOOO much about what a miracle part it was. It helped but not like I was expecting. Stiffer springs did the trick. I'm happy. I have a 1000 mile round trip coming up for work followed almost immediately by a 700 mile round trip with the family so that should tell me how they perform in any/every given scenario on public highways. I'll report back if I find anything worth mentioning.
I drove from NC to Long Island NY and back and I'm very happy with the suspension. It's just about perfect for my preferences and style of driving. Big dips in the road are a little harsh but they were with the stock suspension too so it is what it is. I ended up behind a modded R53 on the way home from Long Island which made the trip fun. The R53's definitely have some more pull and run a lot lower rpm than the 5 speed does. I got the new radiator fan resistor in and replaced a torn CV boot. Fan comes on at a much lower temperature and speed which is good. When the fan would kick on before it'd come on on high which put a terrible load on the car.
In other news, my beautiful wife decided to name the mini "mini truck" because I use it for work. I have historically driven trucks and the boss got used to that. So naturally when I travel for work now he expects me to be able to take parts to the different locations with me. I took two 30" steel auger flanges and 10 gaskets for said flanges to NY with me. I'm headed to Waynesboro VA next and have to take a dust collector motor with me.
Look ma, I made the mini a hybrid!!
That little gold motor is stupid heavy. It's a 10 hp 480 volt 3 phase industrial motor. Some things are still made like they used to lol.
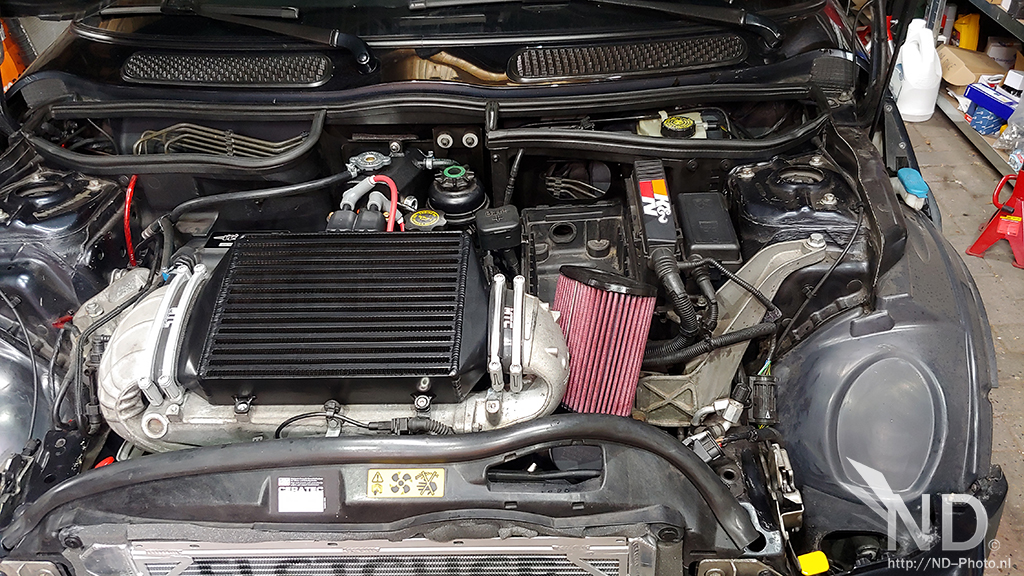
I also was looking at the general area of the intake when I replaced the fan resistor. I had originally planned on putting the battery in the trunk and installing a R53 type CAI that pulls air from the cowl. But after close inspection I think there is enough room to run a hose/tube down to where the fog lights would be if I had some. It'll take a little cutting but I'm pretty sure it's doable. See pictures below. If anyone has tried this I'd love to see pictures of your setup.
And one final thing: Is this a fluid filled motor mount?? It's definitely leaking something nasty.
About the intake, if you would run a pipe from the fog area to your intake. It would be worth testing with a closed type airfilter, this way the air can be pressurized (as much as possible) into the intake, pushing itself into the engine (ie forced induction).
Another option would be relocation of the pod filter in that area, where its able to pick up as much cold air as possible. Possible water ingress is then your biggest enemy
If I change out the pseudo DDM then I'll replace it with something like a BCM CDA. I don't normally run the pod filter, that's my stand in while the Uni filter is drying. I cleaned it, twas super nasty.
This is my primary intake. The purple thing is just a stand in.
The listed dimensions are pretty small. Almost to the point where I would question its effectiveness. This is only a 1600cc NA motor though so it only uses so much air. I read an article on grassroots website on intakes. It was very interesting. They used a flow bench to see what kind of CFM at @ 28" of vacuum different intakes flowed and a dyno to see the corresponding HP. Interestingly enough, a big K&N clamped right onto the TB did the best. Cool air didn't offset the reduced flow that was created by all the piping required to access cool air. LOTS of variables though. Dyno's also don't take ram air into account. AND the car in the article was a MG with a supercharged Miata motor swapped into it. For the most part comparing the car in the article to mine is like comparing apples to cheeseburgers. I did however still find the concepts intriguing.
And I noticed you mentioned ingesting water. I actually got to thinking about that. If the intake is super low and sealed then any flooded surface with more than a couple inches of standing water could be detrimental to the motor. I may just run a hose from the lower bumper to the filter to force more air into the general area...or not lol. In all reality I doubt any changes to the existing intake would result in any noticeable or measurable changes. Its a hobby though and I love to fiddle with this car so I may change it up at some point. Exhaust, battery relocation, and a tune are all on my list and probably all better mods than excessive intake tampering.
I have seen those intakes but never tested one myself (before project Mini). For the price it might be worth testing.
Its important that air can be sucked into the engine with the least amount of restriction, that is also why I tested the Hot Air Intake setup, which worked great btw
I ordered a header. My OEM header is cracked near the cat. Stainless steel eBay special. It came with a "test pipe", some call it a decat. I'm going to try it with no cat for grins and giggles but I also have some v-bands coming and I'm going to use the main oem cat behind the eBay header.
This piece worries me though. That flange looks crazy crooked. I suppose it could be by design to make up some of these strange angles but somehow I doubt it. Crap like this makes me glad I can weld stainless!
The inside of the decat portion looks like a resonator, there is no packing behind that screen.
And last but not least, my super s**** wrap job. I used a highly recommended, name brand, titanium wrap and IMHO the stuff is garbage. I don't have a ton of experience wrapping headers but I've also never had it come out so bad before! Not to mention it looked like I had slept in a bed made of fiberglass insulation by the time I was done. It got everywhere.
Well I put the header on. It's a POS I'm not gonna lie. There's a reason they only cost $75 shipped lol. The welds are beautiful, and the flange lined up perfect. But both o2 bungs are welded in the wrong spot which makes getting the upstream installed almost impossible. And the "test pipe" is just all wrong. I put it on because my factory manifold is starting to crack but once the v-bands show up I'm welding my factory cat in. I can fix the poor alignment of the lower portion then but the upstream o2 is what it is. The titanium wrap is complete garbage. It probably insulates well but it doesn't conform to the pipe AT ALL. It'll be old school fiberglass next time around for sure. The metal zip ties that came with it are crap too! I ended up replacing some of them with the thick ties I already had but I think when I pull the header to add the cat and fix the alignment issue I'm going to re wrap it. Oh one more thing, I couldn't get the header in without dropping the subframe. I was working on jack stands so I think if I could have gotten the car higher I'd have enough angle to get it in. That's not a big deal either but it does add to the project. Just completely remove the control arm bushing bolts, then loosen the 3 rear subframe bolts on each side. I was only shy a half inch or so but it was enough.
I cut the flange off the back of the factory manifold near where it was leaking because the upper nut was too far gone to remove with a socket. Since I'm removing the cat anyway it just made it easier. A sawsall cuts right through the pipe with no problem. View from the top. The view from the bottom. I'll grab another pic before I put it on the ground so you can see how tight the o2 sensor is. The bolts aren't tight in this pic, but there was a gap on the bottom that I had to draw tight with the bolts. I don't like that because it's putting stress on the flex pipe.