
JCW Factory Jcw 2009 Build And Tuning Guide / Input / Explained


Thread Starter
|
1st Gear
Joined: May 2009
Posts: 41
Likes: 0
Factory Jcw 2009 Build And Tuning Guide / Input / Explained
FACTORY JCW 2009 BUILD AND TUNING GUIDE / INPUT / EXPLAINED
Hi to everyone reading this.
Im making this thread or guide to show what I have done since I bought my car in april 2009. and then I will continue to the current build, that will resume in January 2011.
Im using my archive photos that I have saved over time and not every detail has been saved over time. But most thing heve been recorded and documented.
Ive been a silent member for 2 years and have not really been involved or posted much before. So I thought ill contribute my adding the thread.
I want to give a quick shout out to a few people who have either helped my directly or indirectly through their posts and findings. Who have been active in the mini community and have shared their knowledge.
There are many names I would have forgotten, but to name a few, my brother RIZ, for the vinyl and black paint work, TDLC, POPEYE, steve at lohen. Chris at Derek woodmans mini(blackpool), peter at m7 tuning, dpmperformance and soo many others but I cant remember from the top of my head.
Please guys, feel free to comment on what you like and dislike. On any further tips and mods.
Now for the nitty gritty:
PART 1.
The build focues on a 4 main things.
1. aesthetic mods to body and interior.
2. performance mods to engine.
3. performance mods to handling.
4. feedback and testing on all performance mods.
And ill start in chronological order from purschase to now.
Bought car in april 2009.
Specs: mini factory jcw 2009
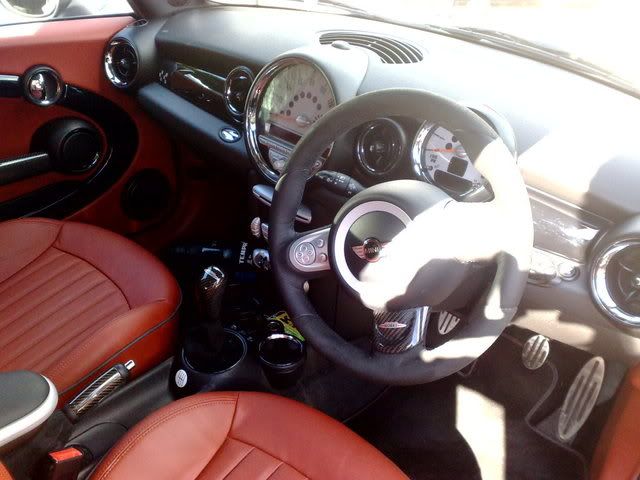
some quick options: lea lounge red leather interior with red lined trim.
Hifi package, full Bluetooth. Sports suspension. Chrome interior
Got a call to pick up car. Paid and off I went.
I had to drive conservatively for the first 1000 miles or so.
After a few weeks. Was really eager to test the car and see what its made out off.
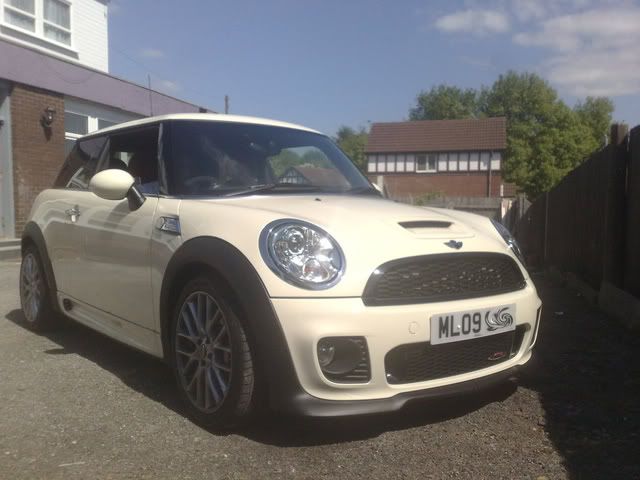
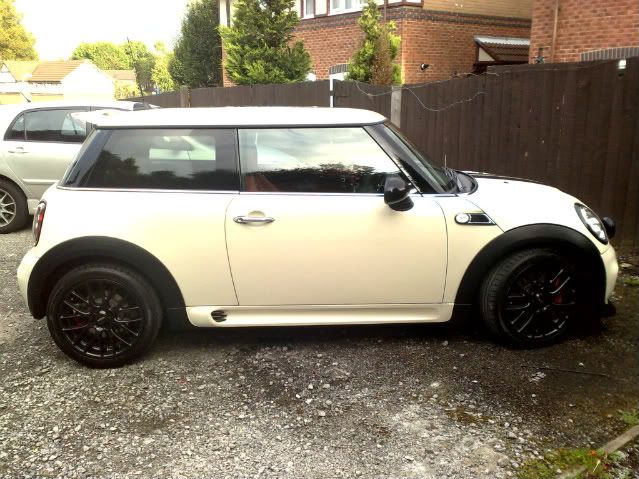
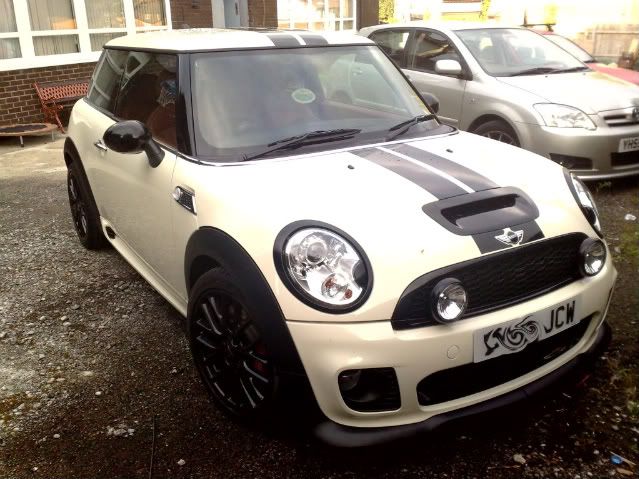
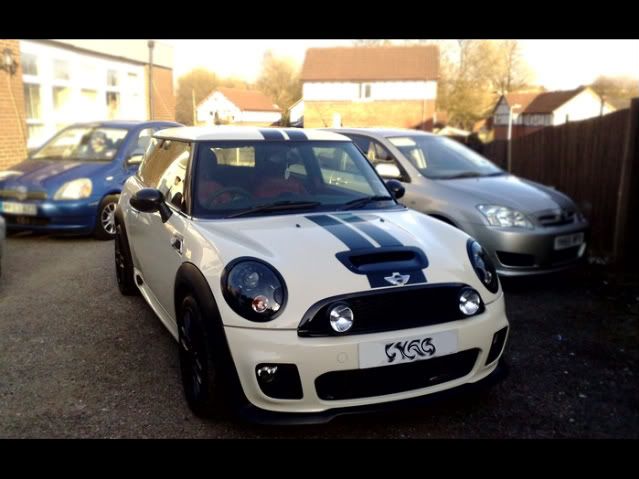
In the lead up to the bedding in period. I got on the phone to chris at Derek woodmans mini. And ordered a some parts to enhance the image the baby. I had always in my mind of how I want it too look, and went for an aggressive style. With the sports stripes
I also ordered the following:
Jcw strut brace.
Jcw carbon & alcantara gear **** and gaiter
Matching carbon & alcantara jcw handbrake.
Jcw carbon steering wheel insert.
Carbon interior door handles.
Jcw side scuttles.
Front additional lights/fog. With black surround.

Stuck some jcw badges on seat.
And I occupied myself with this whilst I waited.
I also ordered some plasti dip black spray paint.
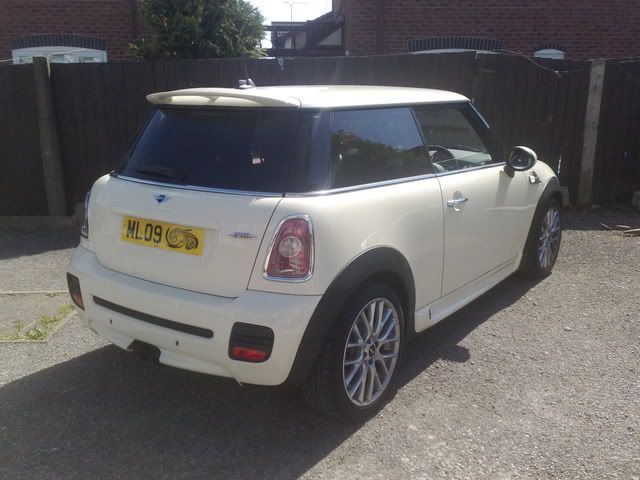
And went about de-chroming most of the chrome. To match the sports stripes and the fog lights. My brother RIZ done the painting and vinyl work. blacked out the headlight rings and the washer lid, also the rear light surrounds. Then I blacked out the bonnet scoop and the rear diffuser.
Blacked the side mirror covers too.
I then logged onto dvla and ordered myself a matching JCW plate.

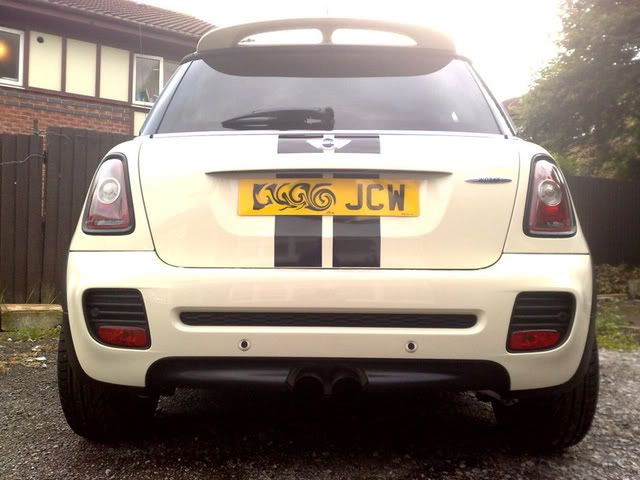
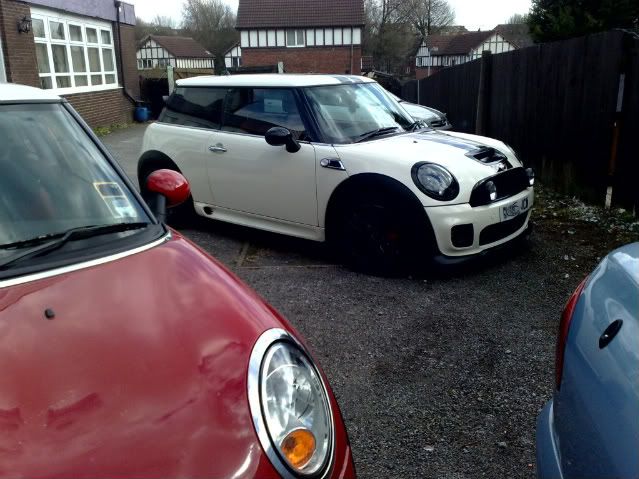
Loving the look of the car now. Really aggressive. Since I was giving the car a black accent. The next step was inevitable. May 2009………
Booked myself in at diamond wheels in stockport. Luckily I didn’t curb them yet, so was straight forward powder coated in gloss black. Looks soo cool!!!


Next had the jcw strut brace installed and testing
Felt a nice difference straight away at higher speeds.
Like on dual carriage ways and country drives.
The transition from left to right was a lot tighter and predictable. Eliminating something like 10% boddy roll at the front end. A good mod and a must in my books.
After many months of enjoying, learning things about the beast. i was looking at different this to further improve the balance, handling and power of the jcw.
before that......
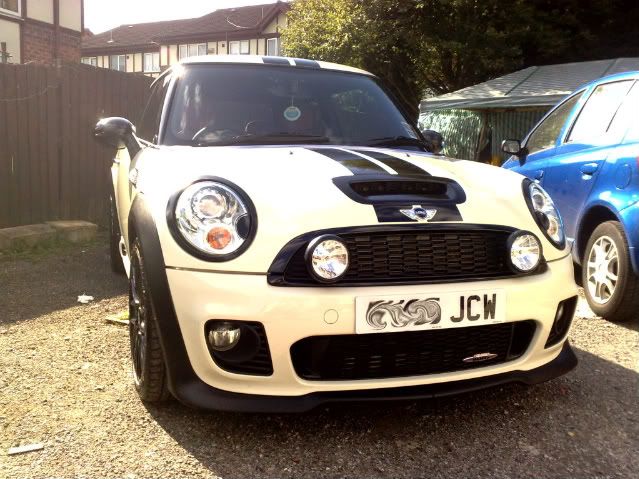
i decided to take the plunge and do the JOEY mod and RIZ got onto it: approx august 2009
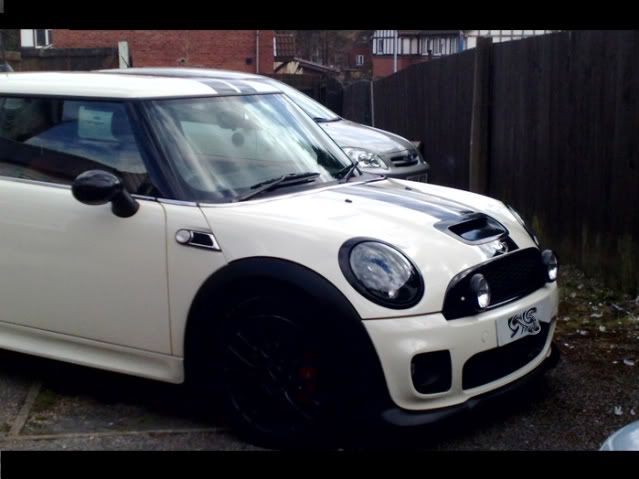
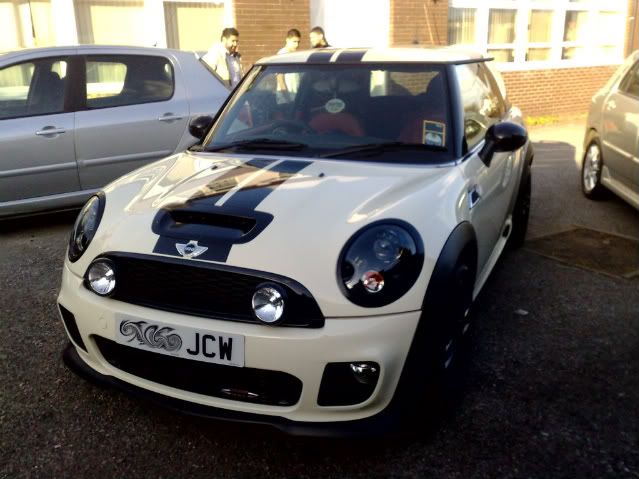
WOW! LOOKIN GOOOWD! Go for it guys. I took of the lights. Heated the sides and prised opened the lenses. Roughed up the chrome film.
Coated with primers and then used a heat resiatant paint.
Niiiiice!!!!!
I will continue in updating this thread as I have done more to the car and haven’t had the time to do all the write up. If you need further help or advice, please comment. Some modding services may also be available if local.
Also more mods and stuff in the pipeline too as we speak. Waiting on delivery for some really juicy mouth watering bits. I want to make this THE ultimate mini in terms of my finances and ability.
**********UPDATE********
QUICK NAVIGATION ADDED FOR EASIER ACCESS TO POSTS IN THIS THREAD.
JUST CLICK THE RELEVANT INFO REQUIRED TO QUICKLY SKIP TO IT:
PART 2.1 & 2.2 ITG panel filter and tyres.
PART 2.3 Forge FMIC &samco silicone hoses. Inc resonator delete hose.
PART 2.4 Forge spacer B.O.V
PART 2.5 RED DOT RACING. Live custom remap session.
PART 2.6 & 2.7 Forge undertray & Autosport module
Hi to everyone reading this.
Im making this thread or guide to show what I have done since I bought my car in april 2009. and then I will continue to the current build, that will resume in January 2011.
Im using my archive photos that I have saved over time and not every detail has been saved over time. But most thing heve been recorded and documented.
Ive been a silent member for 2 years and have not really been involved or posted much before. So I thought ill contribute my adding the thread.
I want to give a quick shout out to a few people who have either helped my directly or indirectly through their posts and findings. Who have been active in the mini community and have shared their knowledge.
There are many names I would have forgotten, but to name a few, my brother RIZ, for the vinyl and black paint work, TDLC, POPEYE, steve at lohen. Chris at Derek woodmans mini(blackpool), peter at m7 tuning, dpmperformance and soo many others but I cant remember from the top of my head.
Please guys, feel free to comment on what you like and dislike. On any further tips and mods.
Now for the nitty gritty:
PART 1.
The build focues on a 4 main things.
1. aesthetic mods to body and interior.
2. performance mods to engine.
3. performance mods to handling.
4. feedback and testing on all performance mods.
And ill start in chronological order from purschase to now.
Bought car in april 2009.
Specs: mini factory jcw 2009
some quick options: lea lounge red leather interior with red lined trim.
Hifi package, full Bluetooth. Sports suspension. Chrome interior
Got a call to pick up car. Paid and off I went.
I had to drive conservatively for the first 1000 miles or so.
After a few weeks. Was really eager to test the car and see what its made out off.
In the lead up to the bedding in period. I got on the phone to chris at Derek woodmans mini. And ordered a some parts to enhance the image the baby. I had always in my mind of how I want it too look, and went for an aggressive style. With the sports stripes
I also ordered the following:
Jcw strut brace.
Jcw carbon & alcantara gear **** and gaiter
Matching carbon & alcantara jcw handbrake.
Jcw carbon steering wheel insert.
Carbon interior door handles.
Jcw side scuttles.
Front additional lights/fog. With black surround.
Stuck some jcw badges on seat.
And I occupied myself with this whilst I waited.
I also ordered some plasti dip black spray paint.
And went about de-chroming most of the chrome. To match the sports stripes and the fog lights. My brother RIZ done the painting and vinyl work. blacked out the headlight rings and the washer lid, also the rear light surrounds. Then I blacked out the bonnet scoop and the rear diffuser.
Blacked the side mirror covers too.
I then logged onto dvla and ordered myself a matching JCW plate.
Loving the look of the car now. Really aggressive. Since I was giving the car a black accent. The next step was inevitable. May 2009………
Booked myself in at diamond wheels in stockport. Luckily I didn’t curb them yet, so was straight forward powder coated in gloss black. Looks soo cool!!!
Next had the jcw strut brace installed and testing
Felt a nice difference straight away at higher speeds.
Like on dual carriage ways and country drives.
The transition from left to right was a lot tighter and predictable. Eliminating something like 10% boddy roll at the front end. A good mod and a must in my books.
After many months of enjoying, learning things about the beast. i was looking at different this to further improve the balance, handling and power of the jcw.
before that......
i decided to take the plunge and do the JOEY mod and RIZ got onto it: approx august 2009
WOW! LOOKIN GOOOWD! Go for it guys. I took of the lights. Heated the sides and prised opened the lenses. Roughed up the chrome film.
Coated with primers and then used a heat resiatant paint.
Niiiiice!!!!!
I will continue in updating this thread as I have done more to the car and haven’t had the time to do all the write up. If you need further help or advice, please comment. Some modding services may also be available if local.
Also more mods and stuff in the pipeline too as we speak. Waiting on delivery for some really juicy mouth watering bits. I want to make this THE ultimate mini in terms of my finances and ability.
Last edited by shams1924; Feb 13, 2011 at 03:45 PM. Reason: updating thread
Thread Starter
|
1st Gear
Joined: May 2009
Posts: 41
Likes: 0
reply to headlight mod
the only real difficulty was the patience needed to wait between each coat.
once the headlight was off the car.
my bro riz, got a heat gun, held at a nice distance, so as not too hot, after removing the retaining clips, carefully prised open the casing by slowly melting the black tar like glue. took about 20 mins for that. DONT RUSH THAT. it WILL come off.
once done. locate all screws, undo them, and slowly take out the reflective bit out. sand or rough it up. and then prime it with 2-3 coats. and use a suitable black paint.3-4 coats.
very very nice mod. u can even do the little ring to another color if u wish.
to wait between each coat.once the headlight was off the car.
my bro riz, got a heat gun, held at a nice distance, so as not too hot, after removing the retaining clips, carefully prised open the casing by slowly melting the black tar like glue. took about 20 mins for that. DONT RUSH THAT. it WILL come off.
once done. locate all screws, undo them, and slowly take out the reflective bit out. sand or rough it up. and then prime it with 2-3 coats. and use a suitable black paint.3-4 coats.
very very nice mod.
u can even do the little ring to another color if u wish.
Thread Starter
|
1st Gear
Joined: May 2009
Posts: 41
Likes: 0
part 2.1 and 2.2
PART 2.
Im going to post in smaller increments rather than with big chunks at a time. That way, we can all appreciate and comment at a more stable and steady pace on each tip or upgrade/mod.
2.1 ITG pro filter (panel)

I Installed this to keep the stock look at to keep it as close to factory.
To improve the air flow and intake air passing through the system.
Just found this link for �41 here
Vecchio do it for �55 special offer!!! (that�s where I bought mine)
2.2 TYRES
It was finally time to change the tyres. After reading many reviews about runflats.(Dunlop sp sport) they were good tyres. But prone to many many punctures for some reasons. Like once a month.
I decided to ditch them on the first possible chance.
I went for the TOYO T1R 205 45 R17. here


What can I say. The grip is phenomenal. Amazing. Like a track car.
The speed and confidence they give you is soo true like in their reviews.
But the holy grail of these tyres are:
The WET.
10/10. its like driving on slick tyres in the dry. The tyres come into their own. With the traction off and 250bhp in the front wheels. Wet weather. The just STICK. Little wheel spin.
Ive just seen this review with toyo themselves:
The Proxes T1-R is the natural choice for enthusiastic drivers and is now available in an even wider range of sizes. The Proxes T1-R boasts a special performance compound and tread pattern which gives which gives incredible road holding in all conditions, especially in the wet. The V-Shaped grooves in the tread pump water away allowing the rubber to grip the road. These are bounded by circumferential grooves which allow the Proxes T1-R to give you even better wet grip whilst being quieter and longer lasting. These design elements are not just practical, they also make the tyre look spectacular on any car.
My findings agree.
And now the downside. On my third set now. From what I remember. They last like 7-8000 miles per set. Like they are some sort of super soft.
They cost me �306 for a set. Overall rating: 9/10
More to come��..
Im going to post in smaller increments rather than with big chunks at a time. That way, we can all appreciate and comment at a more stable and steady pace on each tip or upgrade/mod.
2.1 ITG pro filter (panel)
I Installed this to keep the stock look at to keep it as close to factory.
To improve the air flow and intake air passing through the system.
Just found this link for �41 here
Vecchio do it for �55 special offer!!! (that�s where I bought mine)
2.2 TYRES
It was finally time to change the tyres. After reading many reviews about runflats.(Dunlop sp sport) they were good tyres. But prone to many many punctures for some reasons. Like once a month.
I decided to ditch them on the first possible chance.
I went for the TOYO T1R 205 45 R17. here
What can I say. The grip is phenomenal. Amazing. Like a track car.
The speed and confidence they give you is soo true like in their reviews.
But the holy grail of these tyres are:
The WET.
10/10. its like driving on slick tyres in the dry. The tyres come into their own. With the traction off and 250bhp in the front wheels. Wet weather. The just STICK. Little wheel spin.
Ive just seen this review with toyo themselves:
The Proxes T1-R is the natural choice for enthusiastic drivers and is now available in an even wider range of sizes. The Proxes T1-R boasts a special performance compound and tread pattern which gives which gives incredible road holding in all conditions, especially in the wet. The V-Shaped grooves in the tread pump water away allowing the rubber to grip the road. These are bounded by circumferential grooves which allow the Proxes T1-R to give you even better wet grip whilst being quieter and longer lasting. These design elements are not just practical, they also make the tyre look spectacular on any car.
My findings agree.
And now the downside. On my third set now. From what I remember. They last like 7-8000 miles per set. Like they are some sort of super soft.
They cost me �306 for a set. Overall rating: 9/10
More to come��..
6th Gear
Joined: Aug 2005
Posts: 1,258
Likes: 3
From: H-town
I have tried several sets of performance tires on my MINIs, including T1R's, Sumitomo HTR-Z's, Falken Azenis RT-615's, and currently Hankook Ventus V-12's. All worked pretty good in dry, only the Sumi's were downright scary when wet. And none of them lasted much more than around 10-12K miles. The good news is good tires are relatively cheap in MINI sizes. Got the Ventus's from TireRack for $94 each with a factory $60 rebate making them only $79 a piece. Makes the quick wear more palatable.
Thread Starter
|
1st Gear
Joined: May 2009
Posts: 41
Likes: 0
I have tried several sets of performance tires on my MINIs, including T1R's, Sumitomo HTR-Z's, Falken Azenis RT-615's, and currently Hankook Ventus V-12's. All worked pretty good in dry, only the Sumi's were downright scary when wet. And none of them lasted much more than around 10-12K miles. The good news is good tires are relatively cheap in MINI sizes. Got the Ventus's from TireRack for $94 each with a factory $60 rebate making them only $79 a piece. Makes the quick wear more palatable.
im going to try some new tyres after this set of toyos
only because of the wear rate.(probably my driving)
interesting that u mentioned the hankook v12.
i heard of good reviews about the too.
if you can ellaborate on the a bit more. comapre them to the toyos. how do they compare to the toyos in wet/ dry.
and how was the wear rate compared to the toyos.
lastly. what d u mean by factory rebate. do they excahnge them?
regards
shams
Last edited by shams1924; Jan 12, 2011 at 06:30 AM. Reason: update
Trending Topics
6th Gear
Joined: Aug 2005
Posts: 1,258
Likes: 3
From: H-town
I've only got 2K miles on my new 2011 so can't really speak for the wear of the Hankooks yet. Both wet and dry traction seem superb for spirited street driving, have not get taken them to the autocross or track but I suspect they would excell there too. I picked them because of a comparison test in Car and Driver last year where they came in a close second behind Dunlop Star Specs. The Dunlops were almost $50 more per tire at TireRack so I figured I could be happy with number 2.
The $60 rebate was a mail-in offer. Buy the tires for full price ($94 each), mail in the rebate form with a copy of the sales receipt, then Hankook mails you a check for $60. Don't know if it's still running.
The $60 rebate was a mail-in offer. Buy the tires for full price ($94 each), mail in the rebate form with a copy of the sales receipt, then Hankook mails you a check for $60. Don't know if it's still running.
Thread Starter
|
1st Gear
Joined: May 2009
Posts: 41
Likes: 0
I've only got 2K miles on my new 2011 so can't really speak for the wear of the Hankooks yet. Both wet and dry traction seem superb for spirited street driving, have not get taken them to the autocross or track but I suspect they would excell there too. I picked them because of a comparison test in Car and Driver last year where they came in a close second behind Dunlop Star Specs. The Dunlops were almost $50 more per tire at TireRack so I figured I could be happy with number 2.
The $60 rebate was a mail-in offer. Buy the tires for full price ($94 each), mail in the rebate form with a copy of the sales receipt, then Hankook mails you a check for $60. Don't know if it's still running.
The $60 rebate was a mail-in offer. Buy the tires for full price ($94 each), mail in the rebate form with a copy of the sales receipt, then Hankook mails you a check for $60. Don't know if it's still running.
i think i kno which review your talking about. but in this one they came a very close second to goodyear f1s.
http://www.billswebspace.com/ABV12.htm
Thread Starter
|
1st Gear
Joined: May 2009
Posts: 41
Likes: 0
Part 2.3
PART 2.3
Now we`re starting to get things a little interesting.
PARTS FITTED:
FORGE MOTORSPORTS Front mounted intercooler.
SAMCO SILICONE TUBO HOSES in black(stealth look) inc resonator straight delete pipe
I next decided to upgrade the stock tiny intercooler. Because I knew that when more power is needed. You need better cooling properties.
So the intercooler combined with uprated straighter silicone hoses was the needed for future power upgrades. And not forgetting the muffler/resonator delete pipe.
I took it to woodlands garage(my uncles place)
And with his help. Went about installing these parts.
Pretty straight forward except for a few things.
When putting the lower turbo pipe on the intercooler. It was a real pain to get it on.
Also the upper turbo pipe near towards the firewall/brake resivour side. Towards the left.
The black bumper trim needed a bit of trimming to the inside as the FMIC was touching it. With a dremmel like tool(grinder) shaped it a little so it fitted nicely.
Review:
I try to be critical in reviewing stuff. But at the same time, if somethings good. Then I will say so and try to explain why.
Before: so inside history beforehand. Just before I purchased the jcw.
I hired out a turbo cooper s for a few days. And tested it for whats its worth. Nice and nippy for 170bhp. But one thing I noticed was. After a 10mins thrashing. The power just went dooown. Unlike the the R53 supercharged version. The power stayed more steady. I guess that was down to the R56 relying more on cooler air for the turbo, whereas the R53 relies more on a mechanically driven supercharger. Correct me if im wrong.
But I know for sure. When you thrash the turbo`ed R56, and I don’t mean you go all out gunz ablaze. 10mins of workout. And the power drops like 10-15%. And you do notice this.
Check this. The R56 COOPER S has in the region on 170 bhp. And the factory JCW has 210 bhp. BUT. And I say again. BUT. They have the same intercooler!!!
Not good for performance.
After: definetly sounds a little louder from the engine. And instantly noticed a 10bhp increase on the butt dyno (later on. The butt dyno proved to be correct)
There was now a rasp from the engine as you build up revolutions. (the resonator delete pipe) niiiice. And I noticed little or no turbo lag from a bigger intercooler. But more power, and its more willing to dart towards the redline.
After a good few weeks of testing. I have to say. I noticed very little loss in power when the going gets tough, and the power is always there. The turbo has finnaly got what it deserves. Better cooling properties. A big plus for the FMIC and equally for the delete pipe for the noise and freeing up maybe a couple of horses.
Very good for street use and a MUST.
FORGE MOTORSPORTS Front mounted intercooler.

PIC FOR ILLUSTRATION ONLY. Approximately double the size of the stock one.

resonator straight delete pipe. I got mine in the complete samco turbo set. Like this forge one

As you can see. The restrictive muffler and bottleneck.
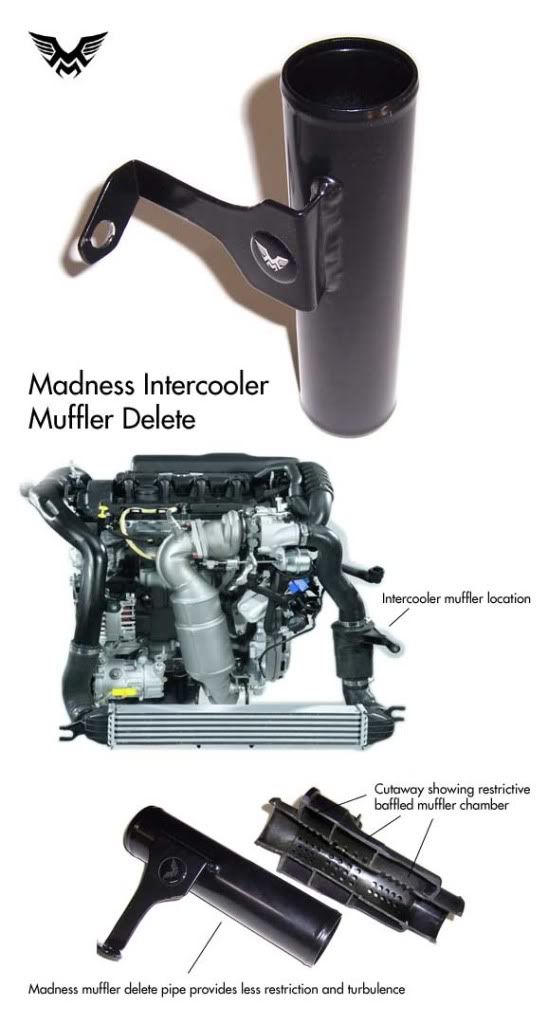
Turbo piping diagram, part no.9 is the muffler

Now we`re starting to get things a little interesting.
PARTS FITTED:
FORGE MOTORSPORTS Front mounted intercooler.
SAMCO SILICONE TUBO HOSES in black(stealth look) inc resonator straight delete pipe
I next decided to upgrade the stock tiny intercooler. Because I knew that when more power is needed. You need better cooling properties.
So the intercooler combined with uprated straighter silicone hoses was the needed for future power upgrades. And not forgetting the muffler/resonator delete pipe.
I took it to woodlands garage(my uncles place)
And with his help. Went about installing these parts.
Pretty straight forward except for a few things.
When putting the lower turbo pipe on the intercooler. It was a real pain to get it on.
Also the upper turbo pipe near towards the firewall/brake resivour side. Towards the left.
The black bumper trim needed a bit of trimming to the inside as the FMIC was touching it. With a dremmel like tool(grinder)
shaped it a little so it fitted nicely.Review:
I try to be critical in reviewing stuff. But at the same time, if somethings good. Then I will say so and try to explain why.
Before: so inside history beforehand. Just before I purchased the jcw.
I hired out a turbo cooper s for a few days. And tested it for whats its worth. Nice and nippy for 170bhp. But one thing I noticed was. After a 10mins thrashing. The power just went dooown.
Unlike the the R53 supercharged version. The power stayed more steady. I guess that was down to the R56 relying more on cooler air for the turbo, whereas the R53 relies more on a mechanically driven supercharger. Correct me if im wrong. But I know for sure. When you thrash the turbo`ed R56, and I don’t mean you go all out gunz ablaze. 10mins of workout. And the power drops like 10-15%. And you do notice this.
Check this. The R56 COOPER S has in the region on 170 bhp. And the factory JCW has 210 bhp. BUT. And I say again. BUT. They have the same intercooler!!!
Not good for performance.
After: definetly sounds a little louder from the engine. And instantly noticed a 10bhp increase on the butt dyno (later on. The butt dyno proved to be correct)
There was now a rasp from the engine as you build up revolutions. (the resonator delete pipe) niiiice. And I noticed little or no turbo lag from a bigger intercooler. But more power, and its more willing to dart towards the redline.
After a good few weeks of testing.
I have to say. I noticed very little loss in power when the going gets tough, and the power is always there. The turbo has finnaly got what it deserves. Better cooling properties. A big plus for the FMIC and equally for the delete pipe for the noise and freeing up maybe a couple of horses. Very good for street use and a MUST.
FORGE MOTORSPORTS Front mounted intercooler.
PIC FOR ILLUSTRATION ONLY. Approximately double the size of the stock one.
resonator straight delete pipe. I got mine in the complete samco turbo set. Like this forge one
As you can see. The restrictive muffler and bottleneck.
Turbo piping diagram, part no.9 is the muffler
Last edited by shams1924; Jan 12, 2011 at 12:49 PM. Reason: updating thread
Thread Starter
|
1st Gear
Joined: May 2009
Posts: 41
Likes: 0
PART 2.4. Forge B.O.V sandwich adapter.

After being so impressed with the forge intercooler. I browsed what else they made for the R56. and came across this.
It supposed to act like a traditional B.O.V. whereas is vents out any excess air. And they claim that cause the mini just recycles the air. That in turn can stall the turbo and give u lag.
So I thought ok. Lets go for it.
Heard some reveiews that it was loud and hissed like a stedded up snake.
Anyway. Easy install. Took 20 mins.
Went on the oem stuff.
Went for a spin.
Hisssssssssssssssssss
Chhhhhhhsssssssssssssssssssssssssssssssshhhhhh
Chhhhhhhhhhhhhsssss ssssssssssshhhhhshshhshss
WOW! That was loud.
Annoying too.
I tried to ignore the sound and instead focused all my brain power into seeing if it really was a performance mod.
The lag in the turbo had increased. By 10-15% IMO.
And tested it and tested it with my heart sunken. No. no good. Too loud. Too annoying and worst of all, it detracted in performance. Not what it says on the tin.
I did like the little chirps it gives of occasionally. Heard them on evos and skylines.
Anywayz. About an hour or so later. It was off. Took it off and put it on fleabay.
Got sold within 2 days buy it now for �38. a chap in Ireland. Good luck mate.
So I didn’t really lose out too much. Like a tenner.
forge have released another one. similar thing. but i quess its only a fix for the engine light that used to come on mainly on the cooper s turbo`s.
if some one ones a bov. i personally think that this kind of system is not right.
im sure someone with a bit more tech info can elaborate
My rating 2/10 for the lift off chirps
Last edited by shams1924; Jan 25, 2011 at 08:21 AM. Reason: updating thread
Thread Starter
|
1st Gear
Joined: May 2009
Posts: 41
Likes: 0
coming soon.......
********************update*******************
im sure some of you guys will love this.....
im sure some of you guys will love this.....
me and riz have been working on this recently. its just a sneak peak at whats to come. its been hard work soo far
 but its coming on great. looks awesome imo.
i will post soon once complete and tested.

stop it mr pacman!!! 
Last edited by shams1924; Jan 27, 2011 at 07:14 PM.


Thread Starter
|
1st Gear
Joined: May 2009
Posts: 41
Likes: 0
thanks man
by tune do you mean ecu remap???
if yes: its been done. just writing it up and will post soon
by tune do you mean ecu remap???
if yes: its been done. just writing it up and will post soon
Thread Starter
|
1st Gear
Joined: May 2009
Posts: 41
Likes: 0
yes. blue lcd display looks cool 
also if you notice.
a red speedo needle (not orange) together with a gloss black needle holder.
ice white dials with the the redline in..... yes u guessed it. RED.
NOT THE ORANGEY RED FROM FACTORY.
i had to add a little mod there to get that effect. as most plp who do this. they dont separate the redline from the base colour(white in this case) in the speedo. so it would have looked a mixture between red and white = pink i think
but. i will keep you guys holding on for this one. more todo yet. including the main speedo.
sports buttons. start/stop. mfsw buttons and heater buttons, and lastly the top reading light cluster. most is done tho. looks sooooooooo

Thread Starter
|
1st Gear
Joined: May 2009
Posts: 41
Likes: 0
Part 2.5 Ecu Remap
PART 2.5
ECU REMAP

So nows the time for the big one.
A remap.
Not just a remap or an ecu flash or some geezer raising the boost and fuel.
But a fully custom live remap session at RED DOT RACING! READ ON���..
As you may or may not know. The turbo minis are a bit harder to map than most tradition cars. You need special software with some special training. And it�s not for your average tuner. So you may suspect that with this in mind. Those Tuners that can do this will charge high rates. And most do. Because they know you need them.
Anyway. It all started about 4 years ago.
I was looking for a remap for my Peugeot 307 hdi 110. I looked around and found some good offers and prices. But very few of the places I found done a remap to your liking. To your exact spec and expectations.
Most I rang said they get a general but great map from other tuner. And they simply flash it on your ecu.
I came across red dot racing. Based in Watford at that time. Spoke to a chap called augosto. Italian geezer. Who went through their methods and how they do it.
As expected, I was impressed. And the price of �200 was good too. But I had to travel like 200 miles from Manchester. Anyway, I booked in.
Met oggy(augosto) and the team at red dot racing. There were skylines and evos and some nice bmw`s parked outside. I thought. Holy ****. I thought this stuff only exists in the movies like fast n furious. Damn, theses guys mess about with some niiiice motors. My Peugeot looked a bit stupid now. Hahahahaha
ok, got it on the rollers. Checked the map and also the dyno run. 112 bhp!
Oggy pinched the map and done his magic. And then we did another run. 142Bhp. Not bad.
He took it for a run. Done some checks and said now you drive it. So I did.
There was an improvement there, but I wanted more for some reason, I convinced myself that there was more in this engine. And a greater amount of torque.
So I came back from the run and said hey oggy, I need more pull in the mid range rev band. With a little grin, from a man whose customers say the same thing. He went back in.
Modified some parameters and Walla!
Loaded it on the car. Said that�s it. Im not going to push anymore. You�re going to risk the engine and components. I went for a nice run, and was amazed. Nice pull and instant throttle compared to the original. Came back with a massive grin! My man oggy. Paid him and thanked for the great service and versatility they offered in there work. Great guys too.
A year later I came back to them, this time with a ford, yes a ford mondeo tdci 130 bhp.
I said, hey oggy, do your tang g. so they did. 170bhp on the dyno. I said to him, can I have a lil more. Just a lil bit. Like 50 cent says. So he mapped it again. Looked pretty simple when comparing it to the mini. BOOM BOOM. Damn this mondeo had some serious swagger to it now. The torque was BADASS. Wow!!!
Two years later. I ended up with this jcw beast. I rang oggy. And asked him about the jcw.
He said that he was getting the software for it and it will take him some time to implement it. And before he can start to map these minis.
So 4 months later, I rang him and he was ready.
By this time oggy wasn�t around as much. They had moved to Enfield, bigger premises.
And he was running to and from Italy (Turin) every week, working some big tuners who had recognized his skill. And now he was training his apprentice �poalo�
Anyway, met the guys (july 2010), they had a niice 135i outside running around 400bhp.
Poalo got it on the rollers. 232bhp @flywheel. Nice for the mods I mentioned before.

Oggy got down to work. I followed him to the lab. And I wanted to help him with the input. After I few mins looking at what he was doing, I had a brain fart (hehehe sharper you kno wot I mean) it was too complicated.
He was looking at soo many parameters. Fuel, throttle open/close. Angles of input. Off boost, on boost. Air to turbo, air to fuel, close of maf. Too many things to remember. I thought I could start tuning. Guess I have to go back to college for that.
He told me that because of the ediff and the front wheel drive nature of the mini. The car was losing some power on the dyno as the wheels were slipping slightly from left to right.
Oggy doesn�t go with all our power and boost. Instead. He aims for nice usable power.
Poalo loaded the map, got it on the rollers. 258bhp! A healthy 26bhp gain. He explained that was the limits on safety and longevity of the engine.

He took it for a test. All good. He told me too test it. I came back asking for a bit more midrange, maybe at the sacrifice of the top end. He went again and modified the map. Took it for a spin. Ok. And then my turn,
There was better response and acceleration in the midrange. And the rollers showed an increase on the top at 260 bhp. It was feeling fantastic. The boost came in a little earlier but much more noticeable. Its got about 280 ft-lb nm at around 2-3000rpm. Very tasty and very useable.
I thanked the again guys for a fantastic live custom remap session. All the best for the New Year.
Price?
A trip from Manchester.
And because im a regular good customer. Augosto sorted me out with a not so pocket draining �250! Amazing value.
If you want one doing. Im sure he will do the same or similar price. Just let me know here on the forum and ill email him for you to sort it out
Some pics and website here:
http://www.reddotracing.co.uk/guest/...P_HeadingID=26
Heres a quick review I found of reddotracing by someone on another forum
http://www.detailingworld.co.uk/foru...d.php?t=124517
ECU REMAP
So nows the time for the big one.
A remap.
Not just a remap or an ecu flash or some geezer raising the boost and fuel.
But a fully custom live remap session at RED DOT RACING! READ ON���..
As you may or may not know. The turbo minis are a bit harder to map than most tradition cars. You need special software with some special training. And it�s not for your average tuner. So you may suspect that with this in mind. Those Tuners that can do this will charge high rates. And most do. Because they know you need them.
Anyway. It all started about 4 years ago.
I was looking for a remap for my Peugeot 307 hdi 110. I looked around and found some good offers and prices. But very few of the places I found done a remap to your liking. To your exact spec and expectations.
Most I rang said they get a general but great map from other tuner. And they simply flash it on your ecu.
I came across red dot racing. Based in Watford at that time. Spoke to a chap called augosto. Italian geezer. Who went through their methods and how they do it.
As expected, I was impressed. And the price of �200 was good too.
But I had to travel like 200 miles from Manchester. Anyway, I booked in.Met oggy(augosto) and the team at red dot racing. There were skylines and evos and some nice bmw`s parked outside. I thought. Holy ****. I thought this stuff only exists in the movies like fast n furious. Damn, theses guys mess about with some niiiice motors. My Peugeot looked a bit stupid now. Hahahahaha
ok, got it on the rollers. Checked the map and also the dyno run. 112 bhp!
Oggy pinched the map and done his magic. And then we did another run. 142Bhp. Not bad.
He took it for a run. Done some checks and said now you drive it. So I did.
There was an improvement there, but I wanted more for some reason, I convinced myself that there was more in this engine. And a greater amount of torque.
So I came back from the run and said hey oggy, I need more pull in the mid range rev band. With a little grin, from a man whose customers say the same thing. He went back in.
Modified some parameters and Walla!
Loaded it on the car. Said that�s it. Im not going to push anymore. You�re going to risk the engine and components. I went for a nice run, and was amazed. Nice pull and instant throttle compared to the original. Came back with a massive grin! My man oggy. Paid him and thanked for the great service and versatility they offered in there work. Great guys too.
A year later I came back to them, this time with a ford, yes a ford mondeo tdci 130 bhp.
I said, hey oggy, do your tang g. so they did. 170bhp
on the dyno. I said to him, can I have a lil more. Just a lil bit. Like 50 cent says. So he mapped it again. Looked pretty simple when comparing it to the mini. BOOM BOOM. Damn this mondeo had some serious swagger to it now. The torque was BADASS. Wow!!!Two years later. I ended up with this jcw beast. I rang oggy. And asked him about the jcw.
He said that he was getting the software for it and it will take him some time to implement it. And before he can start to map these minis.
So 4 months later, I rang him and he was ready.
By this time oggy wasn�t around as much. They had moved to Enfield, bigger premises.
And he was running to and from Italy (Turin) every week, working some big tuners who had recognized his skill. And now he was training his apprentice �poalo�
Anyway, met the guys (july 2010), they had a niice 135i outside running around 400bhp.
Poalo got it on the rollers. 232bhp @flywheel. Nice for the mods I mentioned before.
Oggy got down to work. I followed him to the lab. And I wanted to help him with the input. After I few mins looking at what he was doing, I had a brain fart (hehehe sharper you kno wot I mean) it was too complicated.
He was looking at soo many parameters. Fuel, throttle open/close. Angles of input. Off boost, on boost. Air to turbo, air to fuel, close of maf. Too many things to remember. I thought I could start tuning. Guess I have to go back to college for that.
He told me that because of the ediff and the front wheel drive nature of the mini. The car was losing some power on the dyno as the wheels were slipping slightly from left to right.
Oggy doesn�t go with all our power and boost. Instead. He aims for nice usable power.
Poalo loaded the map, got it on the rollers. 258bhp! A healthy 26bhp gain. He explained that was the limits on safety and longevity of the engine.
He took it for a test. All good. He told me too test it. I came back asking for a bit more midrange, maybe at the sacrifice of the top end. He went again and modified the map. Took it for a spin. Ok. And then my turn,
There was better response and acceleration in the midrange. And the rollers showed an increase on the top at 260 bhp. It was feeling fantastic. The boost came in a little earlier but much more noticeable. Its got about 280 ft-lb nm at around 2-3000rpm. Very tasty and very useable.
I thanked the again guys for a fantastic live custom remap session. All the best for the New Year.
Price?
A trip from Manchester.
And because im a regular good customer. Augosto sorted me out with a not so pocket draining �250! Amazing value.
If you want one doing. Im sure he will do the same or similar price. Just let me know here on the forum and ill email him for you to sort it out
Some pics and website here:
http://www.reddotracing.co.uk/guest/...P_HeadingID=26
Heres a quick review I found of reddotracing by someone on another forum
http://www.detailingworld.co.uk/foru...d.php?t=124517
Thread Starter
|
1st Gear
Joined: May 2009
Posts: 41
Likes: 0
Part 2.6 & 2.7 Forge Undertray & Autosport Module
PART 2.6 & 2.7
2.6 Forge under tray
After all the power mods. I decided to concentrate on other aspects regarding the dynamics of a car. And looked at ways to improve the aero and airflow balance around the car. I ordered a bunch of bits and this was the first one.
The forge sump guard. Or under tray.

Installed to keep the air underneath the engine more free flowing. Creating less drag and turbulence and a smoother transition from front to rear.
It was a little tricky install. As the holes didn�t quite line up with the OEM holes. Little bending of the forge bracket done the trick.
I got to some testing next. I noticed not much on street driving. But on the highway(motorway) I started to notice a little more smoothness in the road holding and under acceleration. Nothing major.
Not a bad mod, also protects your sump at the bottom if your live in areas with speed bumps for breakfast.
6/10 not needed, yet��. but Adds extra protection and the car is smoother on the highway.
2.7 AUTOSPORT/DTC MODULE
Done this a few months ago.
And I only wish it came standard on all cars.
I mean. With the car in normal mode. As in when you fire it up. (With no dtc light on or all off ediff light on in the rev meter.)
The car feels dangerous. The super cautious bmw nanny just kicks in for joke. Like half way through a corner. If it feels like it. it will brake or pull power from the car. Resulting in unpredictable and unstable vehicle behaviour. i felt that on too many occasions this happened. I can explain further. But want to keep it short. I hope plp know what im trying to address here.
Anyway. I only drove with the dtc button pushed on, in the speedo. Allowing more slip before nanny comes to the rescue. Or with it pressed down for 5 secs. Allowing a lot more power to be laid down, whilst still very good in the wet.
Sometimes im driving and I noticed that I didn�t press it. sort off cursing, I would press it immediately.
I done that for over a year. UNTIL I came across this.
The autosport module with dtc control.

I thought. That�s the one. Its for me. I purchased it there and then and waited patiently for it to arrive from the states. Installation was very easy when I finally figured out which way round the circuit diagram was facing. All taps and screws provided in the kit.
Cost $50 I think.
Now I just have set the dtc button to be pressed automatically with this device. And I have set the sport button to stay off. Unless needed.
After 5 secs of the car starting, ping! It comes on automatically. Its now second nature I don�t know it, but it feels good knowing that its always pressed.

This control module has it all:
Brilliant mod.
9/10 again, I think it�s a must for like minded plp.
2.6 Forge under tray
After all the power mods. I decided to concentrate on other aspects regarding the dynamics of a car. And looked at ways to improve the aero and airflow balance around the car. I ordered a bunch of bits and this was the first one.
The forge sump guard. Or under tray.
Installed to keep the air underneath the engine more free flowing. Creating less drag and turbulence and a smoother transition from front to rear.
It was a little tricky install. As the holes didn�t quite line up with the OEM holes. Little bending of the forge bracket done the trick.
I got to some testing next. I noticed not much on street driving. But on the highway(motorway) I started to notice a little more smoothness in the road holding and under acceleration. Nothing major.
Not a bad mod, also protects your sump at the bottom if your live in areas with speed bumps for breakfast.
6/10 not needed, yet��. but Adds extra protection and the car is smoother on the highway.
2.7 AUTOSPORT/DTC MODULE
Done this a few months ago.
And I only wish it came standard on all cars.
I mean. With the car in normal mode. As in when you fire it up. (With no dtc light on or all off ediff light on in the rev meter.)
The car feels dangerous. The super cautious bmw nanny just kicks in for joke. Like half way through a corner. If it feels like it. it will brake or pull power from the car. Resulting in unpredictable and unstable vehicle behaviour. i felt that on too many occasions this happened. I can explain further. But want to keep it short. I hope plp know what im trying to address here.
Anyway. I only drove with the dtc button pushed on, in the speedo. Allowing more slip before nanny comes to the rescue. Or with it pressed down for 5 secs. Allowing a lot more power to be laid down, whilst still very good in the wet.
Sometimes im driving and I noticed that I didn�t press it. sort off cursing, I would press it immediately.
I done that for over a year. UNTIL I came across this.
The autosport module with dtc control.
I thought. That�s the one. Its for me. I purchased it there and then and waited patiently for it to arrive from the states. Installation was very easy when I finally figured out which way round the circuit diagram was facing. All taps and screws provided in the kit.
Cost $50 I think.
Now I just have set the dtc button to be pressed automatically with this device. And I have set the sport button to stay off. Unless needed.
After 5 secs of the car starting, ping! It comes on automatically. Its now second nature I don�t know it, but it feels good knowing that its always pressed.
This control module has it all:
- Auto Sport Mode
- Auto Start/Stop defeat
- Auto DSC Mode Control
- Stealth Mode Accessory Control
Brilliant mod.
9/10 again, I think it�s a must for like minded plp.

Thread Starter
|
1st Gear
Joined: May 2009
Posts: 41
Likes: 0
Part 2.8 & 2.9
2.8
2.8
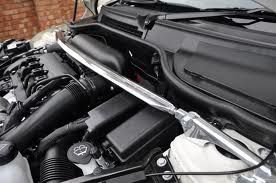
M7 strut brace
I decided now to look for a better brace than the jcw already installed

The jcw brace added stiffness and greater stability through fast corners and sweeping bends. A good upgrade for the spirited cross country driver.
After reading some stories about the mushrooming effect on the top of the strut towers.
I decided that the best brace was the m7 j brace. To fit around the jcw airbox.

It cures the problem. Whilst adding more rigidity and looks the business.
Finding it hard to source. I found one with coastal racing. �215

I must say. Its wonderfully made. The engineering and thought gone into is fantastic. And it even has a diverting channel for the bonnet cable under the strut plate. And also there is a little recess for the electrical plug.


Testing: it feels really nice and planted in the front end. And going around roundabouts has now added extra fun to it. car feels solid and responsive. Smoother and more flowing.
8/10 a must for serious modders. Price a bit high.
2.9 Dos noise maker delete
The stock noise maker makes a nice hiss on lift off. Not loud. But its there.
I read that the dos noise maker delete pipe adds a wee amount of extra boost and as a consequence, gets rid of the noise. hence. noise maker delete pipe.

was Easy install. Little fiddly.

After many weeks of driving. I found no power. Bit disappointed. May need a very precise dyno session to see if it does. Very minimal at best this mod. You wont notice it. the sound from the noisemaker has gone down a little too. :-(
i loved the slight lift off sound the engine makes, so with all that
I will remove this soon. edit***(now removed)

remember to put that cloth type material back inbetween the airbox mounts and hose.

1/10 but may be a better mark if I get a dyno result, with and without. Maybe then a 3/10
2.8
M7 strut brace
I decided now to look for a better brace than the jcw already installed
The jcw brace added stiffness and greater stability through fast corners and sweeping bends. A good upgrade for the spirited cross country driver.
After reading some stories about the mushrooming effect on the top of the strut towers.
I decided that the best brace was the m7 j brace. To fit around the jcw airbox.
It cures the problem. Whilst adding more rigidity and looks the business.
Finding it hard to source. I found one with coastal racing. �215
I must say. Its wonderfully made. The engineering and thought gone into is fantastic. And it even has a diverting channel for the bonnet cable under the strut plate. And also there is a little recess for the electrical plug.
Testing: it feels really nice and planted in the front end. And going around roundabouts has now added extra fun to it. car feels solid and responsive. Smoother and more flowing.
8/10 a must for serious modders. Price a bit high.
2.9 Dos noise maker delete
The stock noise maker makes a nice hiss on lift off. Not loud. But its there.
I read that the dos noise maker delete pipe adds a wee amount of extra boost and as a consequence, gets rid of the noise. hence. noise maker delete pipe.
was Easy install. Little fiddly.
After many weeks of driving. I found no power. Bit disappointed. May need a very precise dyno session to see if it does. Very minimal at best this mod. You wont notice it. the sound from the noisemaker has gone down a little too. :-(
i loved the slight lift off sound the engine makes, so with all that
I will remove this soon. edit***(now removed)
remember to put that cloth type material back inbetween the airbox mounts and hose.
1/10 but may be a better mark if I get a dyno result, with and without. Maybe then a 3/10