
Interior/Exterior The Union Jack-ification Thread


Joined: Sep 2006
Posts: 8,773
Likes: 9
From: Holly Springs, NC
OK, OK, I didn't get as many pix as I wanted, but I have a few:
First, Blimey's bling:
His custom Blimey stripes, by Aesthetic Creations

Blimey's new security system, Boddington the Bulldog:

And some other notable UJ-ification:
Xiek

A Knockout GP:

And the fantasmic SprogII:

I saw someone's cabrio with awesome UJ flags down the side in a video of the parade - but somehow I missed seeing that car!!!!
I have some super secret ideas already for MOTD6.... start filling the penny jar...
First, Blimey's bling:
His custom Blimey stripes, by Aesthetic Creations
Blimey's new security system, Boddington the Bulldog:
And some other notable UJ-ification:
Xiek
A Knockout GP:
And the fantasmic SprogII:
I saw someone's cabrio with awesome UJ flags down the side in a video of the parade - but somehow I missed seeing that car!!!!
I have some super secret ideas already for MOTD6.... start filling the penny jar...
Hey Blimey, at the Dragon I meant to show you Gromit's newest UJ, but kept forgetting.

It's little hard to do Union Jack-ification if red/white/blue doesn't match your car's colors, so I had several of these made up. I found homes for two of them while at MOTD, and still have one left for another Hot Orange MINI. I have since come up with a better version, but don't have a prototype yet. When I get it, I'll post pics.
It's little hard to do Union Jack-ification if red/white/blue doesn't match your car's colors, so I had several of these made up. I found homes for two of them while at MOTD, and still have one left for another Hot Orange MINI. I have since come up with a better version, but don't have a prototype yet. When I get it, I'll post pics.


2nd Gear
Joined: Feb 2007
Posts: 90
Likes: 0
From: Jacksonville, Florida
Thanks Blimey! Absolutely LOVE your new stripes and security system. I finally did my build yesterday and should go to production next week. Started off simple with just a UJ roof. I had been debating back and forth though about doing a MINI like SprogII though but decided it was too much. Thanks for sharing the photos! I think I saw pics of the cabrio with the UJ wavy flag on his sides that you were talking of. It looked sweet!

Joined: Sep 2006
Posts: 8,773
Likes: 9
From: Holly Springs, NC
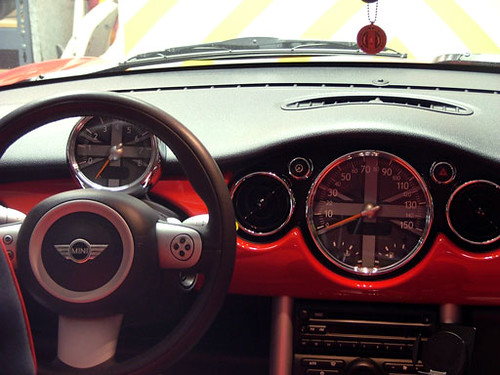
Chuck- hard to tell from the photo - are those the Cockpit Specialties faces? Are they the black/gray UJ ones, or are they orange custom? Look good no matter what! 
I'm gonna do a set soon - I have cockpit chrono pak - so I'm still trying to figure out what to do for the chrono guages... May get a decal printed just to cover the "outer" face on it and leave the guages silver...
I'm gonna do a set soon - I have cockpit chrono pak - so I'm still trying to figure out what to do for the chrono guages... May get a decal printed just to cover the "outer" face on it and leave the guages silver...

Joined: Sep 2006
Posts: 8,773
Likes: 9
From: Holly Springs, NC
All I've seen are the speedo/tach faces for when you have cockpit chrono - but I haven't seen any pix of faces for the actual chrono cluster.... where can I see these???
Yeah, sorry about the quality of the picture. I'm not much of a photographer. I got mine from Outmotoring. They are the gray/black UJ.
I was actually really surprised how easy they were to install. I also learned that with your dash pieces out you can detail them nicely as well as secure any loose wires from the Dice install. I Velcro'd my Dice unit on to the aluminum dash structure. Taking out the dash pieces was so easy that I think it will be come part of my detailing routine. Makes it much easier to put Nero on and Epic the painted parts.
Oh and I just noticed that the picture was before I re-zero'd the tach and speedo - no worries though they are alright now.
.JPG) [
[Joined: Sep 2006
Posts: 8,773
Likes: 9
From: Holly Springs, NC
Heh, Heh, Heh...
Yeah, I wimped out on my door handles and sold them to someone else... Didn't like the way they contrasted with the Cool Blue...
AND knew they would be a bear to install...
Jason - it was a treat to see Xiek at MOTD!
Yeah, I wimped out on my door handles and sold them to someone else... Didn't like the way they contrasted with the Cool Blue...
AND knew they would be a bear to install...
Jason - it was a treat to see Xiek at MOTD!

5th Gear
Joined: Jan 2006
Posts: 1,069
Likes: 0
From: Midland, Ontario, Canada
Did you have someone hold it up to the car and you stand back.. with all the other UJ on the car... May not have been so bad....
At least I will have something pretty unique then... :D

... and they are still sitting on my workbench waiting for someone to come along with the proper attitude to install them. I've heard/read that are are not fun to put on so I need the right frame of mind before attempting. I also need a window of opportunity which will require a back-up car should things take longer than the allotted weekend.
Xiek - I think they look great. Do you have a better side-shot you can share?
6th Gear
Joined: Jun 2006
Posts: 5,692
Likes: 2
Be on the lookout for Outmotoring's version of the UJ gauges soon as well... I should be getting a set just as soon as they go to production and I'll definitely shoot pics, as usual.
5th Gear
Joined: Jan 2006
Posts: 1,069
Likes: 0
From: Midland, Ontario, Canada
here you go.
.JPG)
.JPG)
the second pic is where I drilled another hole into the door to have better access to the bolt that holds the handle on..
if you flip up the rubber, there is one, but not a straight enough line... even the one I drilled was hard.. there is not a straight line due to the window up/down track, and door lock.
IF You change them, I suggest getting a set of allan keys that have the ball end....
When I first drilled the hole, I thought it was behind the door panel.. but it was the weather stripping line that I was seeing, not the panel cover line... he he oops...
the cap that is there, is what the lube shops uses to cover the holes they drill to install KROWN undercoating.

1st Gear
Joined: Jul 2006
Posts: 13
Likes: 0
From: Aurora, IL
quick question... anyone ever seen the silver jack up close and personal? im thinkin about it for my royal grey...
http://www.cooperflags.com/ProductDetail.cfm?ID=39
http://www.cooperflags.com/ProductDetail.cfm?ID=39