
Interior/Exterior Mini LED fog light


OVERDRIVE
Joined: May 2005
Posts: 8,233
Likes: 127
From: San Francisco

4th Gear
Joined: Jul 2009
Posts: 560
Likes: 6
From: (Old) England
But you should see this excellent photo/write-up on a British Mini site by someone who has fitted them themself:
2nd Gen DRL Fitting Guide
Ah, but of course your car will be left-hand drive, so you may need to remove the wiper motor and not the battery - see the German guide above which Google will sorta translate for you.


OVERDRIVE
Joined: May 2005
Posts: 8,233
Likes: 127
From: San Francisco
All the activity has gone to another thread: https://www.northamericanmotoring.co...ls-fitted.html

Thread Starter
|
2nd Gear
Joined: Apr 2011
Posts: 70
Likes: 0
From: Boston, MA
Finally had time installed, gonna post it after the rain outside . ugh..
Impression - Match the stock HID color
1 - Full LED circle only in DRL mode
2 - If head lights on only top half circle on
3 - If Fog light on then top half circle and both fog LED on
Impression - Match the stock HID color
1 - Full LED circle only in DRL mode
2 - If head lights on only top half circle on
3 - If Fog light on then top half circle and both fog LED on
6th Gear
Joined: Jul 2008
Posts: 1,733
Likes: 1
From: Chandler, AZ
Looking forward to getting a pair!


4th Gear
Joined: Jun 2013
Posts: 519
Likes: 13
From: Charlottesville, VA
I really would like to know how easy it was to install these awesome lights? Did you find installation instructions for these lights? Was there new wiring or was it plug and play. I assume the instructions were not in box.I found the MSRPof �399.00 from the Genuine Mini UK accessories catalog. The exchange rate is terrible to US$620!
6th Gear
Joined: Jul 2008
Posts: 1,733
Likes: 1
From: Chandler, AZ
I really would like to know how easy it was to install these awesome lights? Did you find installation instructions for these lights? Was there new wiring or was it plug and play. I assume the instructions were not in box.I found the MSRPof �399.00 from the Genuine Mini UK accessories catalog. The exchange rate is terrible to US$620!
No Instructions included. New wiring and control module.
Thread Starter
|
2nd Gear
Joined: Apr 2011
Posts: 70
Likes: 0
From: Boston, MA
I really would like to know how easy it was to install these awesome lights? Did you find installation instructions for these lights? Was there new wiring or was it plug and play. I assume the instructions were not in box.I found the MSRPof �399.00 from the Genuine Mini UK accessories catalog. The exchange rate is terrible to US$620!
4th Gear
Joined: Jun 2013
Posts: 519
Likes: 13
From: Charlottesville, VA
Good to hear! They are only [SIZE=3][FONT=Calibri]�297.01including VAT($460) at minigenuineparts.co.uk.[/FONT][/SIZE]
[SIZE=3][FONT=Calibri][/FONT][/SIZE]
[FONT=Times New Roman][SIZE=3][/SIZE][/FONT]
[SIZE=3][FONT=Calibri][/FONT][/SIZE]
[FONT=Times New Roman][SIZE=3][/SIZE][/FONT]
6th Gear
Joined: Jul 2008
Posts: 1,733
Likes: 1
From: Chandler, AZ
That's where I got mine. DHL will also bill you for duties for about $15. Keep in mind, it's more time consuming than it sounds. You either have to pull the front bumper or headlights just to remove old units if you have a HT. also battery cover, installation of module etc...
4th Gear
Joined: Jun 2013
Posts: 519
Likes: 13
From: Charlottesville, VA
I received the instructions to install these. Seems fairly straight forward. The only question I have is that after running the single blue wire through the rubber grommet into the interior of the car. It says to connect BL (blue wire), to the cable from Pin 12 of plug X14261, SW (black) 51-pin socket housing, of the footwell module. OK, how do I know which of the 51 wires is Pin 12?
OVERDRIVE
Joined: May 2005
Posts: 8,233
Likes: 127
From: San Francisco
Connectors normally have tiny numbers molded into the plastic. The pins might be individually numbered. If the pins are spaced too close for individual numbers, only the first and last pins in each row are numbered, and the pin number is counted sequentially going down the row. The numbers may be on the side of the connectors rather than the top.
Anyway, I Googled X14261 images and this was a result:

It would be the 12th pin from the right in the bottom row. Check the markings on the connector to confirm.
Anyway, I Googled X14261 images and this was a result:
It would be the 12th pin from the right in the bottom row. Check the markings on the connector to confirm.
4th Gear
Joined: Jul 2009
Posts: 560
Likes: 6
From: (Old) England
Yes, the end pins are numbered so you can work out which is pin 12. The bit nobody mentions is that you need to release the multi-pin plug from a housing that locks it to the module.
This photo from 'Caveman Daves' excellent guide to fitting the DRLs shows the plug slid halfway out of the housing (with the grey over-centre locking lever):
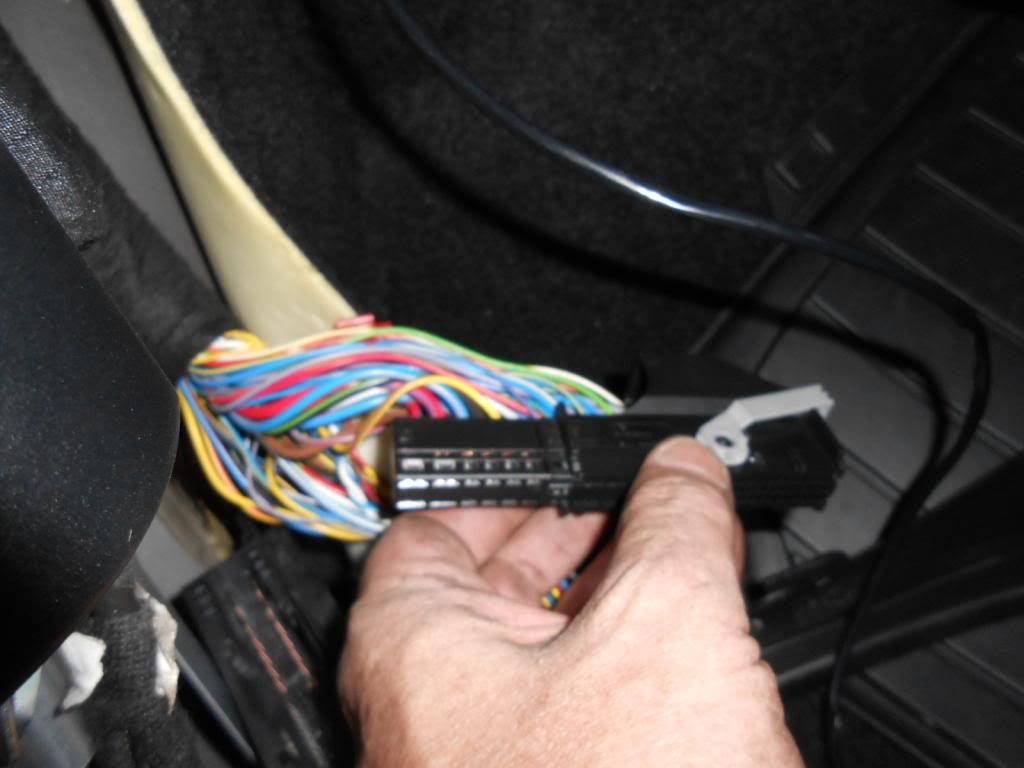
While the plug is still in the housing, you can't see the pin numbers, or indeed which wire goes to pin 12! That had me worried at that point.
Some British installers have reported that they do not have a blue wire in that pin, but I'm not sure if that means they were looking at the wrong plug or the wrong pin, or if they really are different wiring colours.
If this doesn't sound easy, that's because this wasn't intended as a owner-fitted accessory - it's only really meant for Mini dealer installation, hence the lack of a single installation guide.
This photo from 'Caveman Daves' excellent guide to fitting the DRLs shows the plug slid halfway out of the housing (with the grey over-centre locking lever):
While the plug is still in the housing, you can't see the pin numbers, or indeed which wire goes to pin 12! That had me worried at that point.
Some British installers have reported that they do not have a blue wire in that pin, but I'm not sure if that means they were looking at the wrong plug or the wrong pin, or if they really are different wiring colours.
If this doesn't sound easy, that's because this wasn't intended as a owner-fitted accessory - it's only really meant for Mini dealer installation, hence the lack of a single installation guide.
4th Gear
Joined: Jun 2013
Posts: 519
Likes: 13
From: Charlottesville, VA
These posts have been extremely helpful! Thanks. I ordered the LED lights along with extra plastic pop rivets. (BLIND COMPRESSION RIVET #51118222901 $0.99; EXPANDING RIVET51770382696 $2.63;EXPANDING RIVET #: 51717002953 $0.99;20mm Expanding Fastener#51471911992 $0.99). I assume I be able to reuse compression rivets, but not the expanding ones.
6th Gear
Joined: Jul 2008
Posts: 1,733
Likes: 1
From: Chandler, AZ
These posts have been extremely helpful! Thanks. I ordered the LED lights along with extra plastic pop rivets. (BLIND COMPRESSION RIVET #51118222901 $0.99; EXPANDING RIVET51770382696 $2.63;EXPANDING RIVET #: 51717002953 $0.99;20mm Expanding Fastener#51471911992 $0.99). I assume I be able to reuse compression rivets, but not the expanding ones.