
Interior/Exterior New Cranven Speed Black Powder-coated Shift Well Cover


New Cranven Speed Black Powder-coated Shift Well Cover
I called and ordered their SSK and well cover the other day, and was given the option to get the new black powder-coated well cover. I'm glad I called and ordered because it's not on the site yet. I got the first one 
I really like it. I think it matches the interior texture really well. It even looks good with the factory shifter IMO (you'd have to get the right size gromet for the factory shifter though). I'm using my bosses garage on Mon. put the SSK in...


I really like it. I think it matches the interior texture really well. It even looks good with the factory shifter IMO (you'd have to get the right size gromet for the factory shifter though). I'm using my bosses garage on Mon. put the SSK in...
Last edited by 09MellowJCW; Mar 12, 2010 at 10:47 AM.


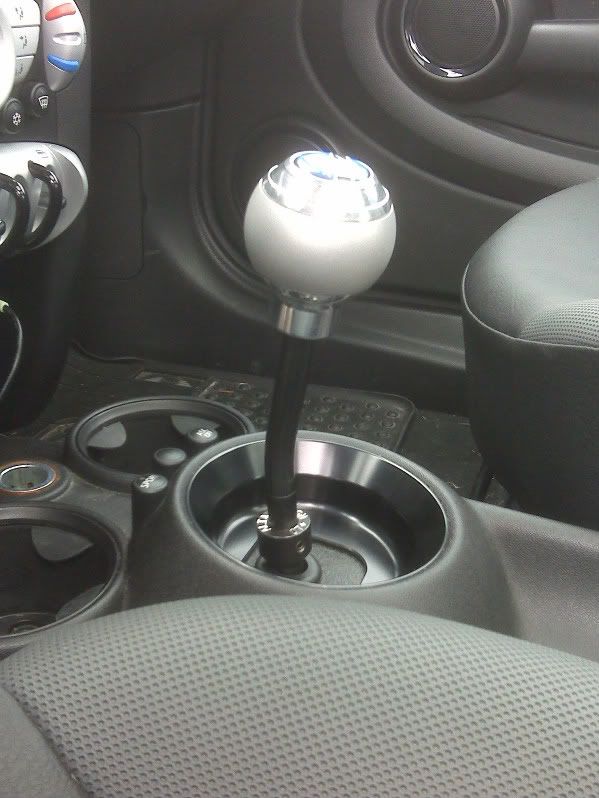
It'll look great once the SSK is installed. I did the same thing the OP did- put the well cover on and then put the SSK in a few weeks later. I hated how the cover looked but now that I see what it looks like with the SSK, I would never go back. I get compliments on it all the time. (Sorry for the crappy pic)


Trending Topics
Yeah, once I got the SSK in I realized just how ugly that stock lever was 
I really like the looks of yours with the JCW ****. I always liked the FEEL of a round shift **** though. All what you're used to I guess. I actually got my **** right at the dealer, so I got to feel it before I bought it. I was sold as soon as I did. It looks better in person. My pictures don't so it any justice.
I really like the looks of yours with the JCW ****. I always liked the FEEL of a round shift **** though. All what you're used to I guess. I actually got my **** right at the dealer, so I got to feel it before I bought it. I was sold as soon as I did. It looks better in person. My pictures don't so it any justice.
I'll have little to no knowledge of working on cars, and the whole thing (well cover + SSK) took about 3 hours. If I knew what I was doing and I had a lift or something I bet it would have taken 30 or 40 minutes. The well cover only took about 10 minutes but the instructions for the SSK sucked so it took me a while. There are a lot of parts around the shifter that are a little difficult to get off.
It's tricky. You have to have patients for this kind of thing.
First you have to get under the car and pull off the exhaust from the DP back (one nut on the exhaust clamp,four rubber hangers, and six bolts on the plate about mid car). You could probably just leave it hanging it the back, but if you've gone that for you might as well just get it out of the way IMO.
Next you have to take off the section of heat shield directly below the shifter box, and the dust shield on the bottom of the shifter box (eight nuts on the heat shield, and six clips on the dust cover). The tabs are a pain to get to. After a little trial and error I ended up using the pointy end of a flat file.
Then comes the tricky part. Getting the bushings off the bottom of the shifter assembly. Once again, after some trial and error... I got the little one with a medium sized crow's foot. The bigger one was a pain. It moves around, and the shift box is plastic. It takes a LOT of force to get it off. Plastic and a LOT of force don't mix. I ended up holding it against the side of the box with a bar and popping it off with a bigger crows foot.
The rest isn't too bad, and even better, it's done topside
You have to pull the center console out to get to three clips that hold the shifter assembly in place, as well as a metal clip on the side of the bushings.
The three clips are a little tough because you have to hold them all in at the same time and pull the shifter out with your fourth hand! The directions actually say to do this step first, but take my word for it, you'll just pop it back into place trying to get the linkage apart on the bottom, and have to do it all over again...
Next you get a tub of white lithium grease, grease all the bushings, and put it all back together.
In all, including donut and bathroom brakes, it took me just shy of four hours. Although, now that I've done it once, I think I could knock at least three minutes off my time
First you have to get under the car and pull off the exhaust from the DP back (one nut on the exhaust clamp,four rubber hangers, and six bolts on the plate about mid car). You could probably just leave it hanging it the back, but if you've gone that for you might as well just get it out of the way IMO.
Next you have to take off the section of heat shield directly below the shifter box, and the dust shield on the bottom of the shifter box (eight nuts on the heat shield, and six clips on the dust cover). The tabs are a pain to get to. After a little trial and error I ended up using the pointy end of a flat file.
Then comes the tricky part. Getting the bushings off the bottom of the shifter assembly. Once again, after some trial and error... I got the little one with a medium sized crow's foot. The bigger one was a pain. It moves around, and the shift box is plastic. It takes a LOT of force to get it off. Plastic and a LOT of force don't mix. I ended up holding it against the side of the box with a bar and popping it off with a bigger crows foot.
The rest isn't too bad, and even better, it's done topside
You have to pull the center console out to get to three clips that hold the shifter assembly in place, as well as a metal clip on the side of the bushings.
The three clips are a little tough because you have to hold them all in at the same time and pull the shifter out with your fourth hand!
The directions actually say to do this step first, but take my word for it, you'll just pop it back into place trying to get the linkage apart on the bottom, and have to do it all over again... Next you get a tub of white lithium grease, grease all the bushings, and put it all back together.
In all, including donut and bathroom brakes, it took me just shy of four hours. Although, now that I've done it once, I think I could knock at least three minutes off my time


Banned
Joined: Jul 2008
Posts: 636
Likes: 1
The stock one isn't bad. The JCW **** is nice, but its a different feel being a pistol grip. Takes some getting used to. Then I went SSK and put on the m7 ****. The m7 **** is definitely noticeably smaller, but having smaller hands it fits me well. With my armrest down, and the ssk lowered (how i like it), it is a bit harder to shift cuz of the angle and the smaller ball. If I have the armrest up, its much better as you can get your elbow down to have a good line for shifting. Unfortunately my gf likes the armrest down, but when shes in the car I'm not driving how I normally do anyways, so its not a big deal for everyday driving.

Thread
Thread Starter
Forum
Replies
Last Post
igzekyativ
MINIs & Minis for Sale
34
Jul 16, 2020 12:54 PM