
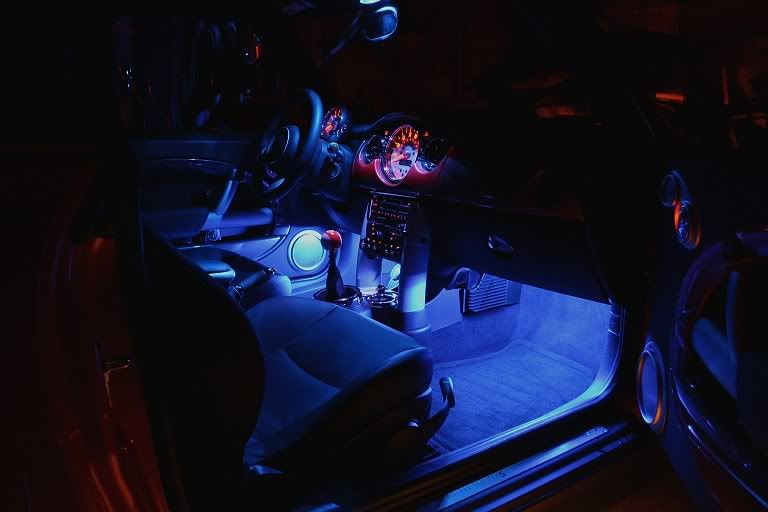
Interior/Exterior LED underlight steps


6th Gear
Joined: Aug 2007
Posts: 1,798
Likes: 11
From: CT
There are no how to's on this, anything you do is going to be on your own accord. The good news though is that things like these arent particularly hard, its all 12v, and the amperage is low enough that you dont have to worry about running relays if the source your getting the power from is beefy enough. If you havent found out already, www.oznium.com is the place to go to get the LEDs to do this. I have used their LEDs in my hood scoop and they have been going strong for about a year and a half now.


Thread Starter
|
2nd Gear
Joined: Jan 2009
Posts: 143
Likes: 0
i need a step by step because i know nothing about wiring. And im to stubborn to take it to a mechanic because it a MINI what fun is it if you dont do it yourself..
Mayb il get a friend to help! I see that no one ever done this to their mini except one orange convertible i saw with blue lights under on this forum.
Mayb il get a friend to help! I see that no one ever done this to their mini except one orange convertible i saw with blue lights under on this forum.

try finding Imagox, I believe that is his user name on here. He did a ton of stuff with lighting on his MINI, in the grilles, under the car, etc. He has some good write ups too around here, and he's helped me before with some minor stuff. I'll look around and see if I can find anything.

Trending Topics


6th Gear
Joined: Aug 2007
Posts: 1,798
Likes: 11
From: CT
https://www.northamericanmotoring.co...57-imagox.html
There you go. Might I suggest you pick up a book on a book on basic wiring, an hours reading will make what you are doing a lot easier.
If you tell me exactly what you wan to do I could help walk you through it.
There you go. Might I suggest you pick up a book on a book on basic wiring, an hours reading will make what you are doing a lot easier.
If you tell me exactly what you wan to do I could help walk you through it.

4th Gear
Joined: Dec 2008
Posts: 525
Likes: 1
There are more pics and some discussion here...
https://www.northamericanmotoring.co...od-clinic.html
https://www.northamericanmotoring.co...od-clinic.html


6th Gear
Joined: Jun 2006
Posts: 5,692
Likes: 2
A couple of people have been asking me for LED help again, so I'll post some additional pics. I thought I had a install thread for my LEDs but I can't find it...
Wiring aside (a good book on DC wiring or car stereo wiring will be a good start), here's the process for the PHYSICAL strip installation on a 1st Gen MINI (2002-2006). For the R56 forward, the battery terminal may be in a different place, and I'm not sure about the side skirts.
Note that I do not warranty this installation and you must proceed at your own risk. If anything here seems beyond your comfort level, have a trained stereo or underbody glow installer do the work.
Tools/Supplies needed:
Before you do anything, I'd test the LED strips to make sure they work - I've never had one bad out of the box, but if one is bad then you really really REALLY want to find out BEFORE you get them on the car - nothing will **** you off more than getting all the way to the point where you flip your switch only to have 3 of your 4 Strips light up, believe me.
To test LEDs, I use a PC power supply rigged up to use as a test device. Any PC power supply will do (your geek friend that wprks on PCs probably has a few lying around in boxes - just ask him/her), or you can order one HERE. PC repair places often have a big box of perfectly good, used power supplies for like $5-$10. To use a PC power supply out of a computer takes a small modification and about 2 minutes of time - instructions are on the linked page in the sentence before last. I used 'Gator clips on my modded power supply so I could connect the Strips to the power supply and flip the switch.
If you happen to get a bad strip (they're mass produced and fauls can happen) then just email Phil at Oznium - he's wonderful and will do a "no questions asked" replacement.
Physical Installation of LED strips:
1. Jack the car up on jack stands - use 4 stands, one per jack point. To make jacking easier, lay a 2X4 along the side rail between the jack points and jack the entire side from the center of the board. This way, you can put one stand in front and one in the rear at the same time, which is a huge time-saver. When the car is up on the stands, push it HARD to make sure that it won't fall off - it shouldn't move AT ALL. Remember SAFETY FIRST and NEVER, NEVER, EVER crawl under a car sitting on just a jack!!!!
2. For a MINI you'll need two 3' sections and 2 6' sections of Beefy Strip. Plan to install the side strips (the long ones) with the wires facing TOWARDS THE ENGINE - I'll explain why in the wiring section.
3. FOR SIDES AND FRONT - use chalk and a tape measure to make marks every 6". I used the plastic side rail shrouding and it held great. Here's where I made my marks so I could wrap the zip-tie through two holes:

3. Using a 1/4" drill bit, drill the holes. Use a piece of scrap steel or thick aluminum between the plastic rail and the bottom steel of the car (just pull the plastic down and slide it inside) so you don't mar the rustproofing or (worse) hole the underbody or nick a fuel line when the drill goes through. Note that I drilled TWO holes, one inboard and one outboard - this will let me slip the zip-tie across the Beefy Strip for maximum hold.

4. Zip-tie the beefy Strips to the plastic. Note how I put the clamp end INBOARD to hide it visually. The 6' strips are a bit longer than the lengh of the side of the car - I zip-tied the extra bit to the angled stiffener strut that runs just fore of the rear wheel with no issues even after months of hard driving.

5. When you're sure that everything's secure, snip off the remainder ends of the zip-ties and move to the front. For the front, I put the LEDs just BEHIND the little air-dam lip that hangs down - that way the air dam plastic takes the hit if you bottom out in a driveway and not the LEDS. Doing this in no way diminishes the glow, don't worry. use the same chalk-mark/drill/zip-tie process as the sides:

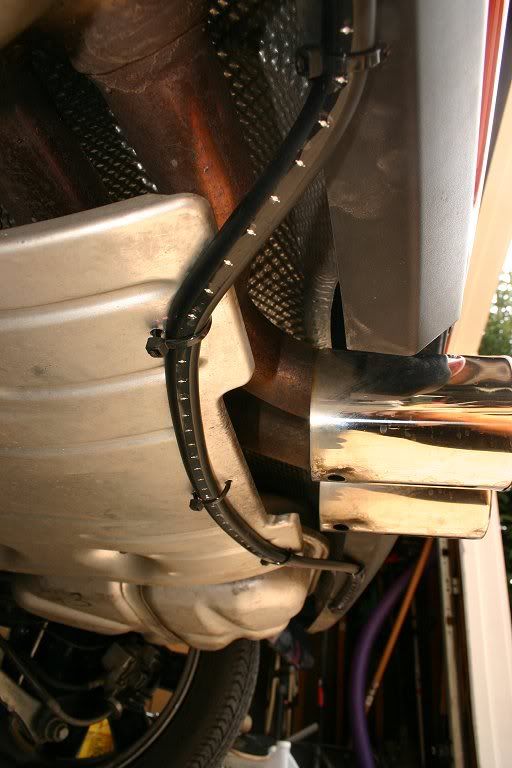
6. FOR THE REAR: The rear is very cramped with no place to really stealth the LEDS. Plus the hot exhaust is back there. Here's how I did it and the LEDs showed just a little bit (you can see them in my photos). When I do this again, I'll get a peice of 90-degree black plastic "L" channel and make baffles, but this will get you lit and running without the LEDs showing TOO much. I drilled my zip-tie holes along the bottom edge of the rear valence (this is the stock valence - Aero-kit owners migt find something different). Make the holes as far back as possible to move the LEDs as far under the car as you can. To go across the exhaust heat sheild, bend the LED strips as illustrated. The heat sheild does get warm, but even after doing lots of stop-and-go driving in the summer, the sheild should not get hot enough to melt the LEDS - mine never did anyway:
WIRING:
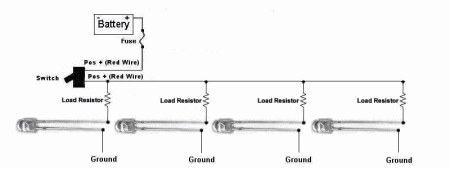
I wired my LEDS in PARALLEL as opposed to in series - this was because if I wired in series I'd lose ALL the LEDS if one failed. Replacing only one strip in the event of a road hazard hit would be easier this way as well. if you don'tknow what I mean about wiring, see THIS THREAD on Oznium for basic wiring diagrams. NOTE: If you're scared of wiring (many are) then you can just do the steps above to physically install the accessories and then have a car stereo or car underbody installer do the actual wiring. There's no shame in calling in a pro if you're less than certain you can do the electrical part.
For this install, I used the diagram below, substituting a Beefy Strip for each individual LED. Note also that "load resistors" are not needed with Beefy Strips - they are built into the strip itself and are fully self-contained:
WIRING STEPS:
1. DISCONNECT THE BATTERY - remove the negative battery terminal from the battery (located in the boot on most 1st Gen MINIs) and push it aside so that it does not make accidental re-connection with the battery. This assures that you won't fry your electrical system. I cannot stress this step enough - never do ANYTHING to a car's electrical system until you disconnect the battery - you have been warned!
2. Check your wire lenghts- the Beefy Strips have fairly long leads, and if you did as I instructed and installed the strips with the wire ends toward the front then you probably won't even need to add extra wire on the side Strips or the front Strip. If you do need to add wire, you can crimp on extra wire using butt-caps - use red on the positive lead and black on the ground. When using caps, cover the butt-caps with TWO layers of heat-shrink material to keep water out. Cut the heat-shrink tubing to be at least 1" longer then the cap on either end. You'll definitely need to crimp-on extra wire for the rear Strips - you can tuck them inside the plastic side rail, threading them through the zip-ties holding the beefy Strips to hold them in place.
3. When you get to the front of the car, run your black/red wires up inside the plastic wheel shroud (so they won't get hit by anything the wheels kick up) and up towards the front fender(s). You won't have to drill the fenders - you can pull them down and slip the wires through (illustrated below). You may want to use a double-layer of heat-shrink over the wires where they pass through this "pinch point" to keep the wires from rubbing and eventually fraying - I did. Once the wires are through the fender peice, zip-tie them to the existing wire loom (there's another one just like it on the driver's side) - be sure to give yourself about an inch of slack between the pass-through point and the zip-tie to account for everyday driving movement (not shown):
(NOTE: in the pic above, the wires are the stock Beefy Strip wiring and not the red/black crimped-on wires from the rear - those were threaded through after this photo was taken using the same path. You can also see above the side wiring pass-through where the stock wiring (black electrical tape-wrapped wire) goes into the engine bay - note this as you'll need to use the one on the driver's side for your ground wires. You'll end up with 4 sets of wires, 2 sides and a front/rear all told)
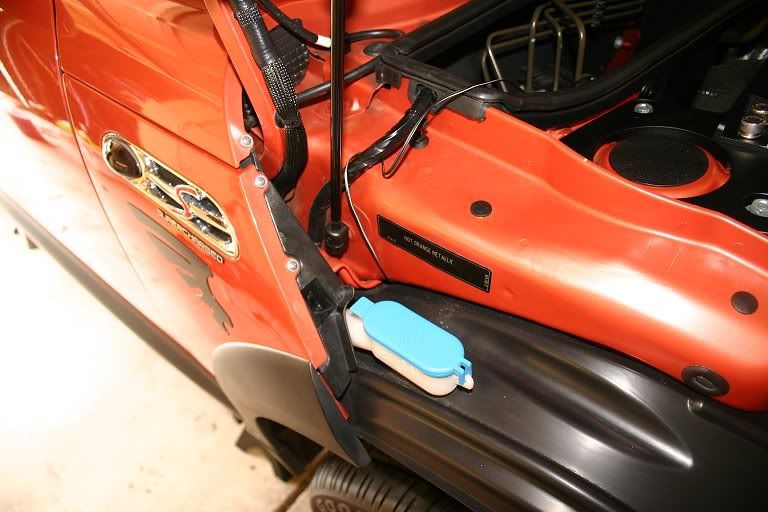
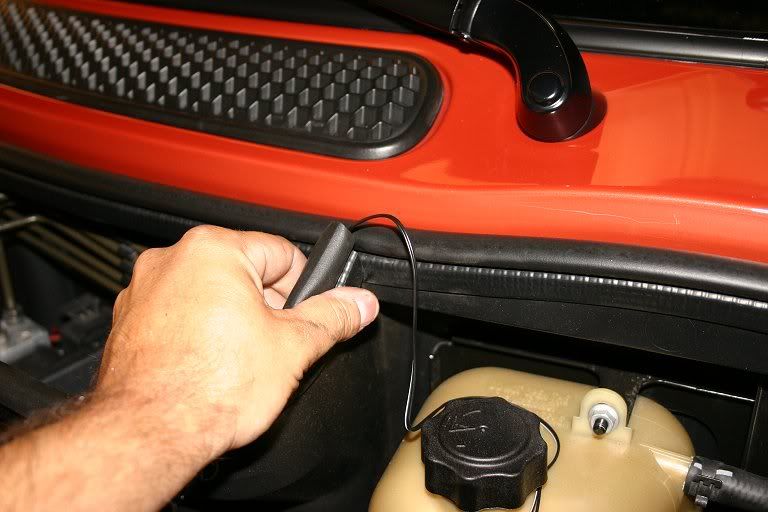
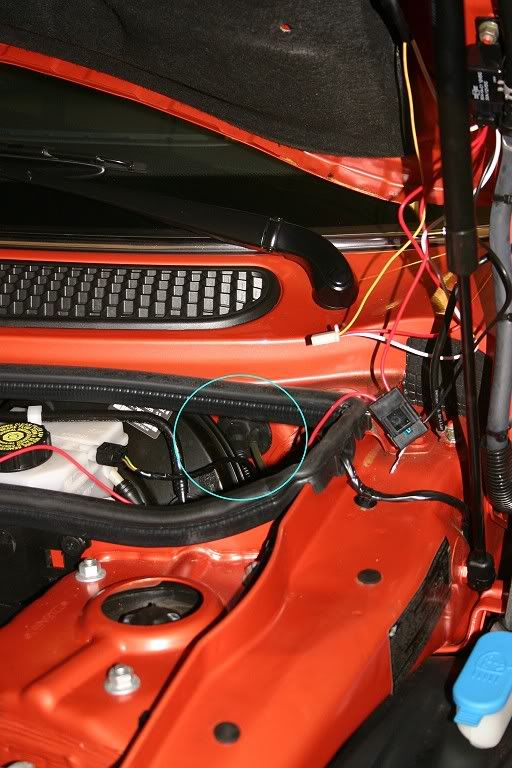
4. Run all your red wires towards the positive battery terminal just beside the air box. Run all your black wires towards the bonnet support on the driver's side - there's a nut there that's a grounding point. You can use the rubber sealent stripping on top of the air box dam and near the bonnet seal to stealth the wires - just pull it off, stuff the wires into the strip using a spoon or chop-stick (not a screwdriver, which can tear the wiring cover) and replace with the wires safely stowed inside:
5. Using the white electrical tape and Sharpie, put a little tape flag on each set of red and black wires (L. side, R. side, frint, rear) - this will help you if you ever need to replace a single Strip in the event of an accident.
6. Connect all positive wires into one bundle and crimp on a butt-cap with all 4 wire leads inside.
7. SWITCH WIRING: Run your switch wiring through the firewall pass-through and into the cabin. Inscructions on how many wires you need and where they connect to the switch should be included with the switch - non-illuminating switches use only 2 red wires (power/accessory) and light-up switches use 3 - 2 red and a black (power/accessory/ground). Oznium's switches come pre-installed with crimped-on terminal plugs, making them very convenient to wire.
If you don't know where the cabin pass-through is, it's right here:
Just push the wires through then open the knee bolster on the driver's side and look UP towards the dash - you'll see your wires poking through. Pull enough slack to reach to wherever you want to install the switch and connect the leads to the switch (instructions should be included with your switch).
8. FOR THE POSITIVE LEADS: Crimp on a ring-terminal to one end of your fuse holder. YOU MUST MUST MUST USE A FUSE NO EXCEPTIONS - this will spare your car from a fire in case of a short. You can tuck the fuse holder on the driver's side space next to the air box.
9. Using a butt-cap, connect the red POWER switch lead to the other end of the fuse holder -this insures that current flows from the terminal then through the fuse before it goes ANYWHERE, (especially the switch your finger will be touching). You may want to nsulate the butt-cap with heat-shrink to keep out moisture.
10. Connect the other switch lead (ACCESSORY) to the butt-cap attached to your 4 positive Strip leads. This ACCESSORY wire receives current when the switch is flipped to the "on" position.
OPTIONAL: You can cover the 4 Beefy Strip positive wires with a bit of split-loom wiring cover, available at any Radio Shack. This will visually stealth the bright red wires and insulate them from physical harm to boot.
11. FOR THE GROUND WIRES: Look for a hat nut with a thick black wire attached to it just aft of the driver's side bonnet support - this is your grounding point. Remove the hat nut.
12. Run all your black Strip wires to this grounding nut - there's a pass-through in the plastic shrouding under the rubber weather stripping.
13. For the cleanest-looking install, Gather all 4 black wires just inside the driver's side pass-through and crimp on a butt-cap. If your switch is illuminated and requires a ground, add this black wire to the bundle. Attach a length of 16-gauge wire (black) to the other end, then run that through the pass-through on the driver's side plastic wall. Then crimp on a ring terminal to the other end of that single 16gauge wire. Slip the ring terminal onto the post and replace the nut. This serves as a shared grounding point for all 4 LED Strips as well as your illuminated switch (if yours lights up).
CONCLUSION:
So, now, in theory, you should have a complete electrical path: DC current goes from the positive battery terminal in the boot, up to the bonnet and the positive accessory terminal beside the air box. From there, it goes into your ring terminal attached to the thumb screw/post, then through the fuse and from there into the cabin and the POWER wire in your switch. From the switch, current passes back into the engine bay along the ACCESSORY wire and into the 4 red positive LED wires and into the accessories. From the strips, it goes through the ground (black) wires and to the grounding point, then back to the battery through the car body steel. This is a circuit.
All you need now is juice. Assuming you made good, solid crimps and insulated everything with heat-shrink tubing, you should have no shorts. Have a helper re-connect the battery ground lead, watching carefully for smoke or any noise. In theory, if you have something accidentally grouding the fuse should pop instantly, but better safe than sorry. If all is OK (it should be) have your helper switch on the LEDs - they should light up. If they don't check your fuse - if it's broken then something is grouding. Disconnect the ground on the batterey and start tracing wires, looking for any place where wires are touching metal. If the fuse is intact, you have a wire loose - if only one Strip doesn't light then check just that one - if all 4 refuse to light then you need to check the bundled connections under the bonnet.
Note that since you're hooking to the accessory terminal under the bonnet (which is "always on") the LEDs will light even with the key out of the ignition. This is good if you want to park your car at a night car show or event and leave the glow on with the doors safely locked and the key in your pocket. Never fear: LEDs are very low-power devices - 18 feet of strips only draw <3A of power, so even if you leave them on for hours your car should start right up, assumiung the battery is good.
This was an overview, I know, so if anyone has any SPECIFIC questions then please let me know.
Happy wiring!!
EDIT: For engine lighting, you can use Beefy Strips or their much cheaper LED Flex Strips (4.7' are only $7 and they're 100% waterproof!) or even Cold Cathodes - all are DC and all follow these same basic installation steps (the fuse you end up using will be different - contact me to calculate the required fuse - specs are on Oznium's site). I used to use cathodes everywhere, as they were lots cheaper than neon, but then LEDs came out and proved to be far superior - the LEDs won't break like cathodes and LEDs don't need a transformer - wich needs to be hidden - like cathodes do.
On Nano (my orange MINI) I put one strip in the supercharger scoop, so that it would light up and a second strip attached to the underside of my M7 Strut Tower Bar - just attach the LEDs with silicone caulk and use bullet-type connectors in case you ever need to pull off the bar. For the front lighting, I used a pair of blue cold cathodes - I attached them together with blocks of closed-cell foam (children's tub blocks) and silicone, then zip-tied them to the inside of the front bumper plate. Doing it again, I'll use Flex Strips - much easier to deal with and totally waterproof. PM me if you need more details, but really all you need to do is order up some Flex Strips and study the car for a while - many possible installation areas are no doubt possible that I never explored. Just e sure to keep the LED's a few inches from any heat source - the silicone coating on the LEDs won't melt, but highh temps will eventually cause the LEDs inside to fail eventually.
Wiring aside (a good book on DC wiring or car stereo wiring will be a good start), here's the process for the PHYSICAL strip installation on a 1st Gen MINI (2002-2006). For the R56 forward, the battery terminal may be in a different place, and I'm not sure about the side skirts.
Note that I do not warranty this installation and you must proceed at your own risk. If anything here seems beyond your comfort level, have a trained stereo or underbody glow installer do the work.
Tools/Supplies needed:
- 2 3' Oznium.com "Beefy Strips"
- 2 6' Beefy Strips
- 1 5A blade fuse and waterproof fuse holder
- A switch, like THIS ONE or THIS ONE.
- Wire: at least 16-gauge, insulated (1 spool red, 1 spool black).
- Wire Strippers/Crimpers
- Brush-on electrical tape or (better) heat-shrink tubing and heat gun/hair dryer
- Zip-ties (at least 40) - 1/4" heavy black
- Drill w/ 1/4" bit
- Piece of scrap metal (steel or aluminum)
- Crimp-on ring terminals (at least 2)
- Crimp-on butt-caps (sized for your wire)
- White electrical tape (for making labels) and a Sharpie
- Floor jack (2-ton minimum)
- 4 Jack stands (IMPORTANT)
- 1 2X4, cut to fit between the front and rear jack points
Before you do anything, I'd test the LED strips to make sure they work - I've never had one bad out of the box, but if one is bad then you really really REALLY want to find out BEFORE you get them on the car - nothing will **** you off more than getting all the way to the point where you flip your switch only to have 3 of your 4 Strips light up, believe me.
To test LEDs, I use a PC power supply rigged up to use as a test device. Any PC power supply will do (your geek friend that wprks on PCs probably has a few lying around in boxes - just ask him/her), or you can order one HERE. PC repair places often have a big box of perfectly good, used power supplies for like $5-$10. To use a PC power supply out of a computer takes a small modification and about 2 minutes of time - instructions are on the linked page in the sentence before last. I used 'Gator clips on my modded power supply so I could connect the Strips to the power supply and flip the switch.
If you happen to get a bad strip (they're mass produced and fauls can happen) then just email Phil at Oznium - he's wonderful and will do a "no questions asked" replacement.
Physical Installation of LED strips:
1. Jack the car up on jack stands - use 4 stands, one per jack point. To make jacking easier, lay a 2X4 along the side rail between the jack points and jack the entire side from the center of the board. This way, you can put one stand in front and one in the rear at the same time, which is a huge time-saver. When the car is up on the stands, push it HARD to make sure that it won't fall off - it shouldn't move AT ALL. Remember SAFETY FIRST and NEVER, NEVER, EVER crawl under a car sitting on just a jack!!!!
2. For a MINI you'll need two 3' sections and 2 6' sections of Beefy Strip. Plan to install the side strips (the long ones) with the wires facing TOWARDS THE ENGINE - I'll explain why in the wiring section.
3. FOR SIDES AND FRONT - use chalk and a tape measure to make marks every 6". I used the plastic side rail shrouding and it held great. Here's where I made my marks so I could wrap the zip-tie through two holes:
3. Using a 1/4" drill bit, drill the holes. Use a piece of scrap steel or thick aluminum between the plastic rail and the bottom steel of the car (just pull the plastic down and slide it inside) so you don't mar the rustproofing or (worse) hole the underbody or nick a fuel line when the drill goes through. Note that I drilled TWO holes, one inboard and one outboard - this will let me slip the zip-tie across the Beefy Strip for maximum hold.
4. Zip-tie the beefy Strips to the plastic. Note how I put the clamp end INBOARD to hide it visually. The 6' strips are a bit longer than the lengh of the side of the car - I zip-tied the extra bit to the angled stiffener strut that runs just fore of the rear wheel with no issues even after months of hard driving.
5. When you're sure that everything's secure, snip off the remainder ends of the zip-ties and move to the front. For the front, I put the LEDs just BEHIND the little air-dam lip that hangs down - that way the air dam plastic takes the hit if you bottom out in a driveway and not the LEDS. Doing this in no way diminishes the glow, don't worry. use the same chalk-mark/drill/zip-tie process as the sides:
6. FOR THE REAR: The rear is very cramped with no place to really stealth the LEDS. Plus the hot exhaust is back there. Here's how I did it and the LEDs showed just a little bit (you can see them in my photos). When I do this again, I'll get a peice of 90-degree black plastic "L" channel and make baffles, but this will get you lit and running without the LEDs showing TOO much. I drilled my zip-tie holes along the bottom edge of the rear valence (this is the stock valence - Aero-kit owners migt find something different). Make the holes as far back as possible to move the LEDs as far under the car as you can. To go across the exhaust heat sheild, bend the LED strips as illustrated. The heat sheild does get warm, but even after doing lots of stop-and-go driving in the summer, the sheild should not get hot enough to melt the LEDS - mine never did anyway:
WIRING:
I wired my LEDS in PARALLEL as opposed to in series - this was because if I wired in series I'd lose ALL the LEDS if one failed. Replacing only one strip in the event of a road hazard hit would be easier this way as well. if you don'tknow what I mean about wiring, see THIS THREAD on Oznium for basic wiring diagrams. NOTE: If you're scared of wiring (many are) then you can just do the steps above to physically install the accessories and then have a car stereo or car underbody installer do the actual wiring. There's no shame in calling in a pro if you're less than certain you can do the electrical part.
For this install, I used the diagram below, substituting a Beefy Strip for each individual LED. Note also that "load resistors" are not needed with Beefy Strips - they are built into the strip itself and are fully self-contained:
WIRING STEPS:
1. DISCONNECT THE BATTERY - remove the negative battery terminal from the battery (located in the boot on most 1st Gen MINIs) and push it aside so that it does not make accidental re-connection with the battery. This assures that you won't fry your electrical system. I cannot stress this step enough - never do ANYTHING to a car's electrical system until you disconnect the battery - you have been warned!
2. Check your wire lenghts- the Beefy Strips have fairly long leads, and if you did as I instructed and installed the strips with the wire ends toward the front then you probably won't even need to add extra wire on the side Strips or the front Strip. If you do need to add wire, you can crimp on extra wire using butt-caps - use red on the positive lead and black on the ground. When using caps, cover the butt-caps with TWO layers of heat-shrink material to keep water out. Cut the heat-shrink tubing to be at least 1" longer then the cap on either end. You'll definitely need to crimp-on extra wire for the rear Strips - you can tuck them inside the plastic side rail, threading them through the zip-ties holding the beefy Strips to hold them in place.
3. When you get to the front of the car, run your black/red wires up inside the plastic wheel shroud (so they won't get hit by anything the wheels kick up) and up towards the front fender(s). You won't have to drill the fenders - you can pull them down and slip the wires through (illustrated below). You may want to use a double-layer of heat-shrink over the wires where they pass through this "pinch point" to keep the wires from rubbing and eventually fraying - I did. Once the wires are through the fender peice, zip-tie them to the existing wire loom (there's another one just like it on the driver's side) - be sure to give yourself about an inch of slack between the pass-through point and the zip-tie to account for everyday driving movement (not shown):
(NOTE: in the pic above, the wires are the stock Beefy Strip wiring and not the red/black crimped-on wires from the rear - those were threaded through after this photo was taken using the same path. You can also see above the side wiring pass-through where the stock wiring (black electrical tape-wrapped wire) goes into the engine bay - note this as you'll need to use the one on the driver's side for your ground wires. You'll end up with 4 sets of wires, 2 sides and a front/rear all told)
4. Run all your red wires towards the positive battery terminal just beside the air box. Run all your black wires towards the bonnet support on the driver's side - there's a nut there that's a grounding point. You can use the rubber sealent stripping on top of the air box dam and near the bonnet seal to stealth the wires - just pull it off, stuff the wires into the strip using a spoon or chop-stick (not a screwdriver, which can tear the wiring cover) and replace with the wires safely stowed inside:
5. Using the white electrical tape and Sharpie, put a little tape flag on each set of red and black wires (L. side, R. side, frint, rear) - this will help you if you ever need to replace a single Strip in the event of an accident.
6. Connect all positive wires into one bundle and crimp on a butt-cap with all 4 wire leads inside.
7. SWITCH WIRING: Run your switch wiring through the firewall pass-through and into the cabin. Inscructions on how many wires you need and where they connect to the switch should be included with the switch - non-illuminating switches use only 2 red wires (power/accessory) and light-up switches use 3 - 2 red and a black (power/accessory/ground). Oznium's switches come pre-installed with crimped-on terminal plugs, making them very convenient to wire.
If you don't know where the cabin pass-through is, it's right here:
Just push the wires through then open the knee bolster on the driver's side and look UP towards the dash - you'll see your wires poking through. Pull enough slack to reach to wherever you want to install the switch and connect the leads to the switch (instructions should be included with your switch).
8. FOR THE POSITIVE LEADS: Crimp on a ring-terminal to one end of your fuse holder. YOU MUST MUST MUST USE A FUSE NO EXCEPTIONS - this will spare your car from a fire in case of a short. You can tuck the fuse holder on the driver's side space next to the air box.
9. Using a butt-cap, connect the red POWER switch lead to the other end of the fuse holder -this insures that current flows from the terminal then through the fuse before it goes ANYWHERE, (especially the switch your finger will be touching). You may want to nsulate the butt-cap with heat-shrink to keep out moisture.
10. Connect the other switch lead (ACCESSORY) to the butt-cap attached to your 4 positive Strip leads. This ACCESSORY wire receives current when the switch is flipped to the "on" position.
OPTIONAL: You can cover the 4 Beefy Strip positive wires with a bit of split-loom wiring cover, available at any Radio Shack. This will visually stealth the bright red wires and insulate them from physical harm to boot.
11. FOR THE GROUND WIRES: Look for a hat nut with a thick black wire attached to it just aft of the driver's side bonnet support - this is your grounding point. Remove the hat nut.
12. Run all your black Strip wires to this grounding nut - there's a pass-through in the plastic shrouding under the rubber weather stripping.
13. For the cleanest-looking install, Gather all 4 black wires just inside the driver's side pass-through and crimp on a butt-cap. If your switch is illuminated and requires a ground, add this black wire to the bundle. Attach a length of 16-gauge wire (black) to the other end, then run that through the pass-through on the driver's side plastic wall. Then crimp on a ring terminal to the other end of that single 16gauge wire. Slip the ring terminal onto the post and replace the nut. This serves as a shared grounding point for all 4 LED Strips as well as your illuminated switch (if yours lights up).
CONCLUSION:
So, now, in theory, you should have a complete electrical path: DC current goes from the positive battery terminal in the boot, up to the bonnet and the positive accessory terminal beside the air box. From there, it goes into your ring terminal attached to the thumb screw/post, then through the fuse and from there into the cabin and the POWER wire in your switch. From the switch, current passes back into the engine bay along the ACCESSORY wire and into the 4 red positive LED wires and into the accessories. From the strips, it goes through the ground (black) wires and to the grounding point, then back to the battery through the car body steel. This is a circuit.
All you need now is juice. Assuming you made good, solid crimps and insulated everything with heat-shrink tubing, you should have no shorts. Have a helper re-connect the battery ground lead, watching carefully for smoke or any noise. In theory, if you have something accidentally grouding the fuse should pop instantly, but better safe than sorry. If all is OK (it should be) have your helper switch on the LEDs - they should light up. If they don't check your fuse - if it's broken then something is grouding. Disconnect the ground on the batterey and start tracing wires, looking for any place where wires are touching metal. If the fuse is intact, you have a wire loose - if only one Strip doesn't light then check just that one - if all 4 refuse to light then you need to check the bundled connections under the bonnet.
Note that since you're hooking to the accessory terminal under the bonnet (which is "always on") the LEDs will light even with the key out of the ignition. This is good if you want to park your car at a night car show or event and leave the glow on with the doors safely locked and the key in your pocket. Never fear: LEDs are very low-power devices - 18 feet of strips only draw <3A of power, so even if you leave them on for hours your car should start right up, assumiung the battery is good.
This was an overview, I know, so if anyone has any SPECIFIC questions then please let me know.
Happy wiring!!
EDIT: For engine lighting, you can use Beefy Strips or their much cheaper LED Flex Strips (4.7' are only $7 and they're 100% waterproof!) or even Cold Cathodes - all are DC and all follow these same basic installation steps (the fuse you end up using will be different - contact me to calculate the required fuse - specs are on Oznium's site). I used to use cathodes everywhere, as they were lots cheaper than neon, but then LEDs came out and proved to be far superior - the LEDs won't break like cathodes and LEDs don't need a transformer - wich needs to be hidden - like cathodes do.
On Nano (my orange MINI) I put one strip in the supercharger scoop, so that it would light up and a second strip attached to the underside of my M7 Strut Tower Bar - just attach the LEDs with silicone caulk and use bullet-type connectors in case you ever need to pull off the bar. For the front lighting, I used a pair of blue cold cathodes - I attached them together with blocks of closed-cell foam (children's tub blocks) and silicone, then zip-tied them to the inside of the front bumper plate. Doing it again, I'll use Flex Strips - much easier to deal with and totally waterproof. PM me if you need more details, but really all you need to do is order up some Flex Strips and study the car for a while - many possible installation areas are no doubt possible that I never explored. Just e sure to keep the LED's a few inches from any heat source - the silicone coating on the LEDs won't melt, but highh temps will eventually cause the LEDs inside to fail eventually.
Last edited by ImagoX; Jan 13, 2009 at 12:12 PM.
6th Gear
Joined: Aug 2007
Posts: 1,798
Likes: 11
From: CT
And in case it wasnt obvious, you shouldn't be driving around with this stuff all on while on a public street, cops do not like it. Not trying to kill your fun (heck I have LEDs myself) just keeping you informed.
Imagox, I archived your post on my computer as posts that epic deserved to be saved, good write up. I would have figured securing the Beefy strips would have been more complicated, I suppose one should never underestimate the power of the zip-tie.
Imagox, I archived your post on my computer as posts that epic deserved to be saved, good write up. I would have figured securing the Beefy strips would have been more complicated, I suppose one should never underestimate the power of the zip-tie.
6th Gear
Joined: Jun 2006
Posts: 5,692
Likes: 2
And in case it wasnt obvious, you shouldn't be driving around with this stuff all on while on a public street, cops do not like it. Not trying to kill your fun (heck I have LEDs myself) just keeping you informed.
Imagox, I archived your post on my computer as posts that epic deserved to be saved, good write up. I would have figured securing the Beefy strips would have been more complicated, I suppose one should never underestimate the power of the zip-tie.
Imagox, I archived your post on my computer as posts that epic deserved to be saved, good write up. I would have figured securing the Beefy strips would have been more complicated, I suppose one should never underestimate the power of the zip-tie.
Oznium's LED Beefy Strips weigh like a pound or two tops and are totally waterproof (they'll run underwater). Flex Strips are even lighter.As for colored lights on cars on the street - YES YOU ARE 100% CORRECT. The only legal colors of lights are white/amber on the front, amber on the sides and Red (with a white license plate lamp) on the rear. Service vehicles can display flashing amber hazard lights, and Fire/EMT can use red flashers on top, of course. ANY other colors, particularly blue (which is limited to police in the US) are a serious no-no and running them is simply an invitation to a very large ticket, if not a mandatory court date (depending on your state). Every colored lighting accessory I've ever seen has been labled "For offroad use only" for this very reason. Just parking in a parking lot is generally considered as acceptable "off road" use, even though generally you are technically on a legal "roadway". Really the best rule is:
"Is my car in motion or even simply running? If yes, turn off all my colored lights. Period." You generally can't go wrong with that policy.
If anyone ever has any questions about a partucular setup's legality, Oznium actually has a specific forum dedicated to legal issues HERE - be forewarned however that lots of non-lawyers post there, but in general the better posters will link back to on-line State documents from the DMV. There are general legal resources on that sight as well, at the top in a Sticky thread.
Happy... um... "glowing"!


2nd Gear
Joined: Jun 2010
Posts: 138
Likes: 0
MAN! I have a silver and black mini as well and i was wanting to do purple! looks great. i went with the super white. but i'm really jelly of your purp.

Thread
Thread Starter
Forum
Replies
Last Post
vetsvette
MINI Parts for Sale
3
Oct 20, 2015 07:42 AM
ECSTuning
Vendor Announcements
0
Oct 1, 2015 12:13 PM
ECSTuning
Interior/Exterior Products
0
Sep 30, 2015 11:39 AM
ECSTuning
Vendor Announcements
0
Sep 29, 2015 12:11 PM