
Interior/Exterior Show us your rally lights!


5th Gear
Joined: Feb 2008
Posts: 687
Likes: 19
From: Melbourne Australia
Hella Black Lightning rusting connections
Having been happily recommending the Hella Black Lightning lights, I'm now striking a problem with, of all things, rust!
The connectors where the wiring plugs onto the back of the globe are rusting badly, and every week or two one light or the other goes out. Also, after some recent wild weather, the interior of the lamps was fogging up. Had I known, I could have used some sealant or something, but it's too late now. So I couldn't recommend them for use in wet climates.
I'm still happy with their wide spread-beam and reasonable distance. They do seem to chew through bulbs fairly quickly (although I drive on some rough roads which may not help). The bulbs (old-style H2) are fiddly to extract too.
One thing I will give Hella credit for, though, is that spare parts are readily available for the lights - you don't have to buy whole replacement units. I've already replaced the lens on another car (my son ran the light into a rock ) and so I'm off to order 2 new globe connectors.
The connectors where the wiring plugs onto the back of the globe are rusting badly, and every week or two one light or the other goes out. Also, after some recent wild weather, the interior of the lamps was fogging up. Had I known, I could have used some sealant or something, but it's too late now. So I couldn't recommend them for use in wet climates.
I'm still happy with their wide spread-beam and reasonable distance. They do seem to chew through bulbs fairly quickly (although I drive on some rough roads which may not help). The bulbs (old-style H2) are fiddly to extract too.
One thing I will give Hella credit for, though, is that spare parts are readily available for the lights - you don't have to buy whole replacement units. I've already replaced the lens on another car (my son ran the light into a rock
) and so I'm off to order 2 new globe connectors.


3rd Gear
Joined: Aug 2008
Posts: 162
Likes: 9
From: Evansville, IN
Hella 500 on Outmotoring Brackets
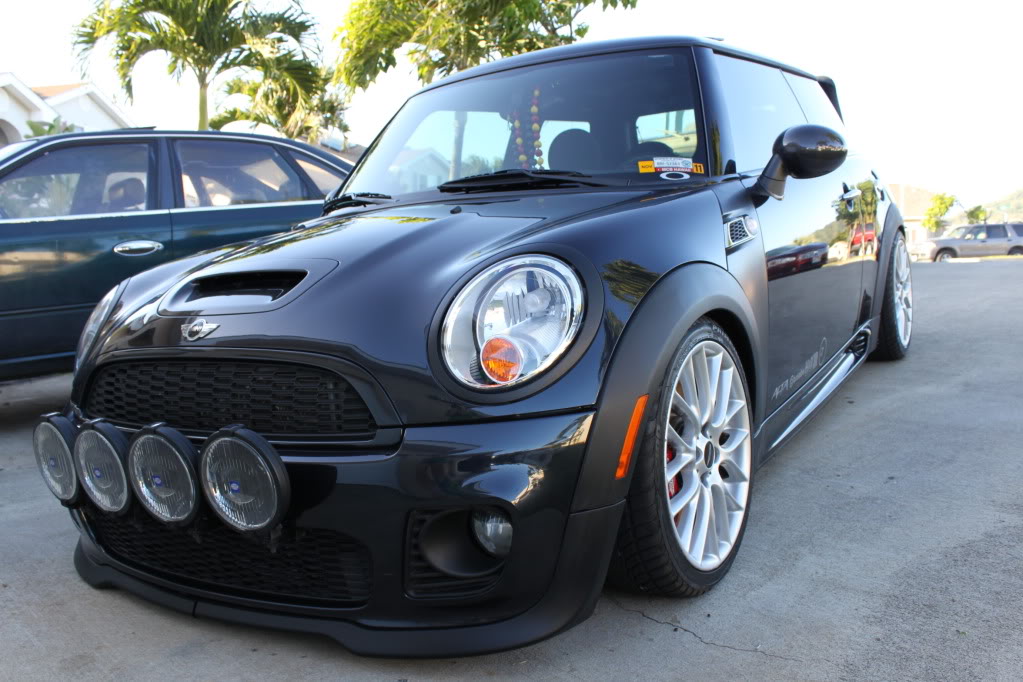
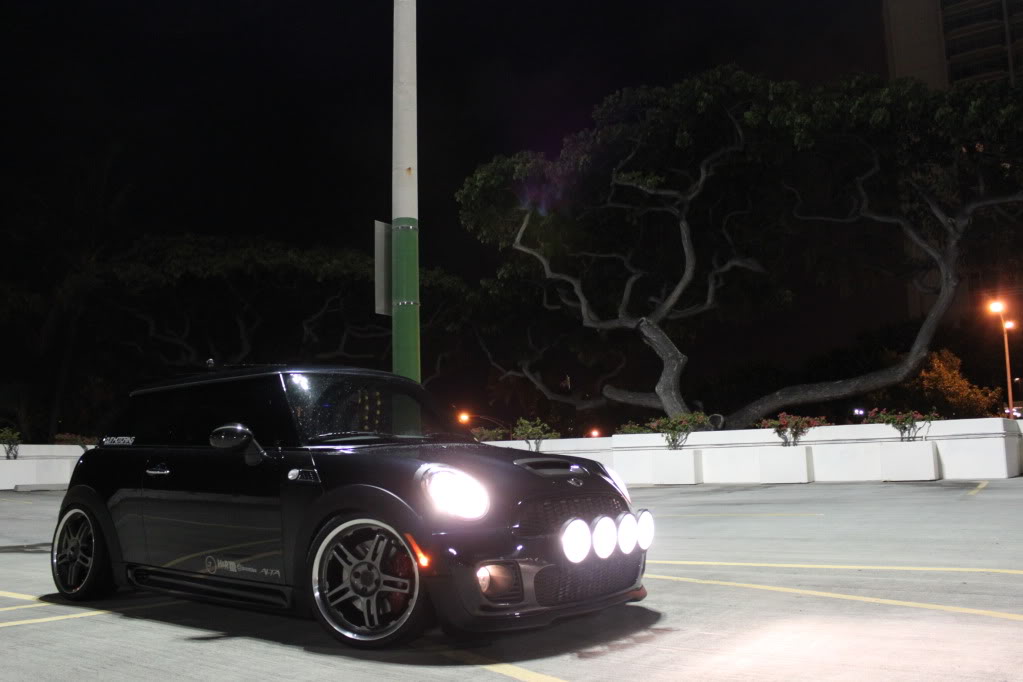
Four Hella 500 FF (two fog and two driving lights) on Outmotoring brackets. It took three evenings after work to get them on. This included cleaning the oil out of my intercooler  They are not wired yet.
http://www.flickr.com/photos/cnorrick/5552510083/
They are not wired yet. http://www.flickr.com/photos/cnorrick/5552510083/


Nice looking MINI. Those lights look great on there. I can only run 2 of them due to the fact that I live in a front plate state. When you wire those up are you going to run 2 sets of harness' with 2 switches so you can run 2 at a time if you wish?


3rd Gear
Joined: Aug 2008
Posts: 162
Likes: 9
From: Evansville, IN
Crashton, that exactly what I'm going to do. Full independent control with two switches & two relays. I bought the same size switches that came with the lights but are black with a small amber LED off ebay. I didn't like the full clear green lighted stock switch. They will go on that knee bolster panel that the MINI driving light switch goes in.
I thought I would get fancy and have an additional "auto/manual" switch that I could engage to allow the fogs to go on with dims and driving lights on with hi-beams but I decided I've put enough work in. Manual control will be just fine.
I thought I would get fancy and have an additional "auto/manual" switch that I could engage to allow the fogs to go on with dims and driving lights on with hi-beams but I decided I've put enough work in. Manual control will be just fine.
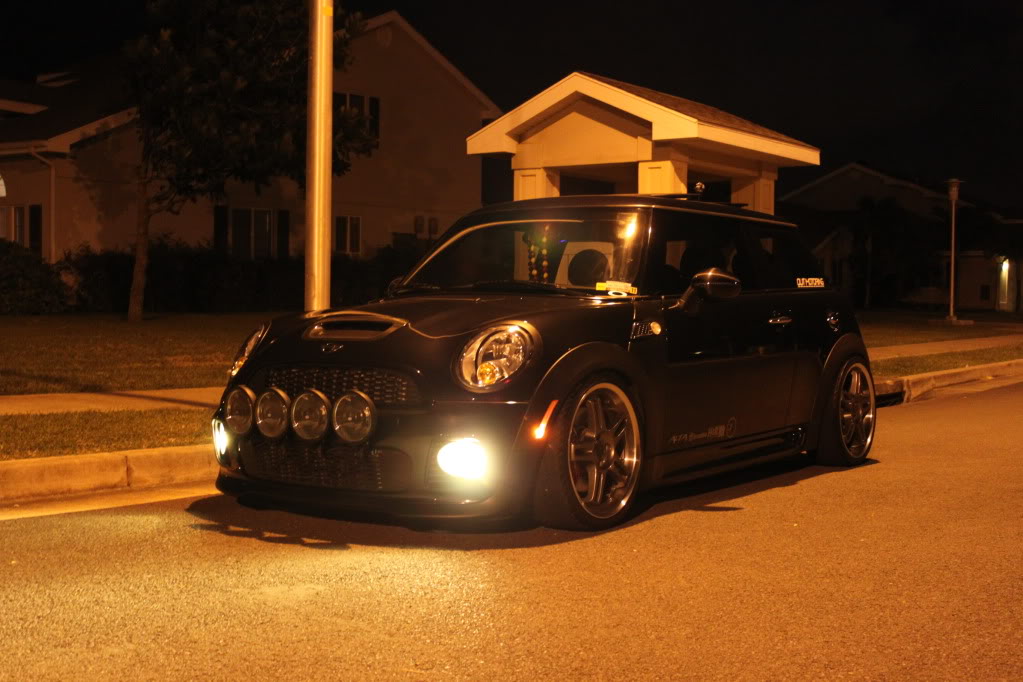
TheCheatOSX I didn't care for the supplied Hella switch either. I also went with an led lit one. Mine can be controlled with the highbeam switch. I'm glad I did that, but wiring it was a pain.
3rd Gear
Joined: Aug 2008
Posts: 162
Likes: 9
From: Evansville, IN
So do they only come on with highbeam and switch turned on or did you get a three position switch?
I did not use a 3 way switch. The switch controls whether they come on & off with the high beams. My fear was I would blind other drivers if I had to switch them off independently. Now a flick of the highbeam switch is all it takes.
5th Gear
Joined: Feb 2008
Posts: 687
Likes: 19
From: Melbourne Australia
I've used the excellent bracket (2011 model) from VIP Custom Parts in Arizona, which mounts the same as the OEM light brackets. I bought a 2011 factory-cut grille to do the thing properly (meant I had two useless OEM brackets  ). I used 2x Hella 500FF lights on the outside and 2x Hella 500 on the inside. According to the lighting diagrams, the 500FFs have a bit more spread and a bit less distance, so they're angled out as spread beams. Added 100W globes to all. It's all just wired to the high beam (legal in this state), using the Hella wiring kit that's basically a double-adaptor on the back of the H4 headlight globe. I had a friendly Mini specialist fit it all and he reckoned it all just went together simply.
The lighting is spectacular, with massive spread. Lovely.
With the exchange rates as they are, it was cheaper for my to buy the 500s in the USA and ship them to Australian than to buy them locally. The 500FFs aren't sold here, so it was good to be able to get them too.
I have Hella 1000s on OutMotoring brackets in front of the bumper on my Cooper, but this time I preferred to be able to park anywhere without the lights being so exposed to park-by-ear drivers, so took the chance of having the lights in front of the grille but out of harm's way. In the suburbs, the temp gauge is showing perhaps 3-4 degrees higher at times, and the fan might be on a bit more, but I've had no problems so far on long, enthusiastic runs. I'm thinking I might take the grill out of the bonnet scoop though before next summer.

). I used 2x Hella 500FF lights on the outside and 2x Hella 500 on the inside. According to the lighting diagrams, the 500FFs have a bit more spread and a bit less distance, so they're angled out as spread beams. Added 100W globes to all. It's all just wired to the high beam (legal in this state), using the Hella wiring kit that's basically a double-adaptor on the back of the H4 headlight globe. I had a friendly Mini specialist fit it all and he reckoned it all just went together simply.The lighting is spectacular, with massive spread. Lovely.
With the exchange rates as they are, it was cheaper for my to buy the 500s in the USA and ship them to Australian than to buy them locally.
The 500FFs aren't sold here, so it was good to be able to get them too.I have Hella 1000s on OutMotoring brackets in front of the bumper on my Cooper, but this time I preferred to be able to park anywhere without the lights being so exposed to park-by-ear drivers, so took the chance of having the lights in front of the grille but out of harm's way. In the suburbs, the temp gauge is showing perhaps 3-4 degrees higher at times, and the fan might be on a bit more, but I've had no problems so far on long, enthusiastic runs. I'm thinking I might take the grill out of the bonnet scoop though before next summer.

5th Gear
Joined: Oct 2008
Posts: 752
Likes: 1
From: Emmitsburg, MD
Very nice, I have the same bracket. Just a thought, I moved to two outside lights over to the outside most holes where the bracket attaches to the mounting points coming through the grill. This allows more air flow, as the outside corners of the grill are blocked anyway. There is a picture in my gallery.
Jim
Jim
5th Gear
Joined: Feb 2008
Posts: 687
Likes: 19
From: Melbourne Australia
Very nice, I have the same bracket. Just a thought, I moved to two outside lights over to the outside most holes where the bracket attaches to the mounting points coming through the grill. This allows more air flow, as the outside corners of the grill are blocked anyway. There is a picture in my gallery.
Jim
Jim
5th Gear
Joined: Oct 2008
Posts: 752
Likes: 1
From: Emmitsburg, MD
Thanks for the suggestions. Actually, Van sent me a photo of what looks to be your car when I was arranging to buy the bracket. I prefer the lights evenly spaced on my car, and the bolts are pretty neatly done anyway - but your arrangement works very well on your car because of the stripes down the bonnet, which the 2 central lights sort of line up with. I have your arrangement in mind as a backup if I end up with cooling problems next (Southern hemisphere) summer.
Jim
3rd Gear
Joined: Aug 2008
Posts: 162
Likes: 9
From: Evansville, IN
http://www.flickr.com/photos/cnorrick/5585641978/
I got mine wired up yesterday. I finally decided to do the extra wiring and go with a three-way switch to have Auto and Manual (bush) modes. In Auto, the Hella Fogs (outer set) come on with the stock fogs and the Hella Driving lights (inner set) come on with brights. You can have a disco dance floor by switching the brights on and off since the fogs kick off with brights and the driving lights kick on
All wiring was run on the passenger side, which seemed easiest to me. Quick overview: Remove the upper right (passenger) cowl that covers the battery via one plastic nut and one screw. Remove the rubber weather stripping that seals the two pieces together and that panel will come right out. No windshield wiper removal required! Remove the battery and you have plenty of access to the firewall breach port and plenty of room to mount the relays in there.
For Auto mode, Tap the yellow/blue stripe wire (brights) coming off the wiring harness on the back of the headlight. Tap the yellow wire off the back of the fog lights. Access it through the lower cap in the wheel well. I jacked up that side to get more room.
For manual mode, I added an " " to Fuse F3 (30A Headlight Washer Pump, I don't have one). I put the on the left side of the shifter housing. Two torx screws in the cup holders allow it to push up to run wires. The boot trim ring just pops out for room to pull the wires. A Unibit makes a nice clean round hole for the switches. Be careful of all the plastic shifting components in there .
.
The switches:
http://www.flickr.com/photos/cnorrick/5585148857/
Running two sets of lights involves a lot of wires so label everything; relays, fuse holders, wire ends. etc and you'll be good to go. Relay energizing wire goes to center switch posts, headlight brights & fog wires go on one end of each switch respectively, power from fuse box goes on the other side.
Kick them all on and SET FIRE TO THE NIGHT!
I got mine wired up yesterday. I finally decided to do the extra wiring and go with a three-way switch to have Auto and Manual (bush) modes. In Auto, the Hella Fogs (outer set) come on with the stock fogs and the Hella Driving lights (inner set) come on with brights. You can have a disco dance floor by switching the brights on and off since the fogs kick off with brights and the driving lights kick on
All wiring was run on the passenger side, which seemed easiest to me. Quick overview: Remove the upper right (passenger) cowl that covers the battery via one plastic nut and one screw. Remove the rubber weather stripping that seals the two pieces together and that panel will come right out. No windshield wiper removal required! Remove the battery and you have plenty of access to the firewall breach port and plenty of room to mount the relays in there.
For Auto mode, Tap the yellow/blue stripe wire (brights) coming off the wiring harness on the back of the headlight. Tap the yellow wire off the back of the fog lights. Access it through the lower cap in the wheel well. I jacked up that side to get more room.
For manual mode, I added an " " to Fuse F3 (30A Headlight Washer Pump, I don't have one). I put the on the left side of the shifter housing. Two torx screws in the cup holders allow it to push up to run wires. The boot trim ring just pops out for room to pull the wires. A Unibit makes a nice clean round hole for the switches. Be careful of all the plastic shifting components in there
. The switches:
http://www.flickr.com/photos/cnorrick/5585148857/
Running two sets of lights involves a lot of wires so label everything; relays, fuse holders, wire ends. etc and you'll be good to go. Relay energizing wire goes to center switch posts, headlight brights & fog wires go on one end of each switch respectively, power from fuse box goes on the other side.
Kick them all on and SET FIRE TO THE NIGHT!


Attachment 52645
Attachment 52646
Attachment 52647
Installed Bosch driving and fog lamps. Independently switched and relayed.
Made the brackets myself out of brass. Found a way to use the two holes the dealer made for the license plate holder .
Attachment 52646
Attachment 52647
Installed Bosch driving and fog lamps. Independently switched and relayed.
Made the brackets myself out of brass. Found a way to use the two holes the dealer made for the license plate holder
.What kind of mount did you use for the yellow lights? Did you fabricate that yourself also?