
Interior/Exterior A-Pillar Exterior Trim Piece


Thread Starter
|
3rd Gear
Joined: Dec 2002
Posts: 192
Likes: 0
A-Pillar Exterior Trim Piece
The black A-Pillar exterior cover/trim piece jettisoned itself from the passenger side of my 2003 MCS somewhere on the commute home yesterday.
I ordered a replacement and it's on the way.
Has anybody had to replace this piece? I am looking for some tips on the installation. Any pictures of an A-Pillar w/o the cover? What I see on my car is two green plastic clips at the top and bottom of the pillar, a couple of holes between the green clips that appear as though green clips might should be there, four screws in the gap between the weather-stripping and bare metal pillar (with some plastic remnants from the cover, I believe), and the remnants of double-sided tape.
I am afraid to remove the driver's-side cover, as the sound of imminent breakage started w/just a little effort.
Any help/advice would be greatly appreciated.
Len

If I remember properly, there were screws that held on the a-pillar cover, maybe 3 or 4? They may have been located under the weather stripping of your door, but without my car near me right now, i can't run out and check. when you get your new trim piece, you will need to remove all of the leftover clips that were left on when your fist cover blew off, they come already attached the new cover. Don't re-use them, just use the new ones that come on the cover. It will just snap into place with the new one, and then you need to screw it in around where it meets the window (not windshield, but side up and down window.)
When I installed mine, i didn't use any double-sided tape, and they still haven't decided to fly off, however, if you want to feel more comfortable, you can always use double-sided tape again.
hope this helps
-Chase
When I installed mine, i didn't use any double-sided tape, and they still haven't decided to fly off, however, if you want to feel more comfortable, you can always use double-sided tape again.
hope this helps
-Chase

4th Gear
Joined: Mar 2006
Posts: 359
Likes: 2
First...after cursing for a little while looking at the cracked A pillar cover, you must remove it
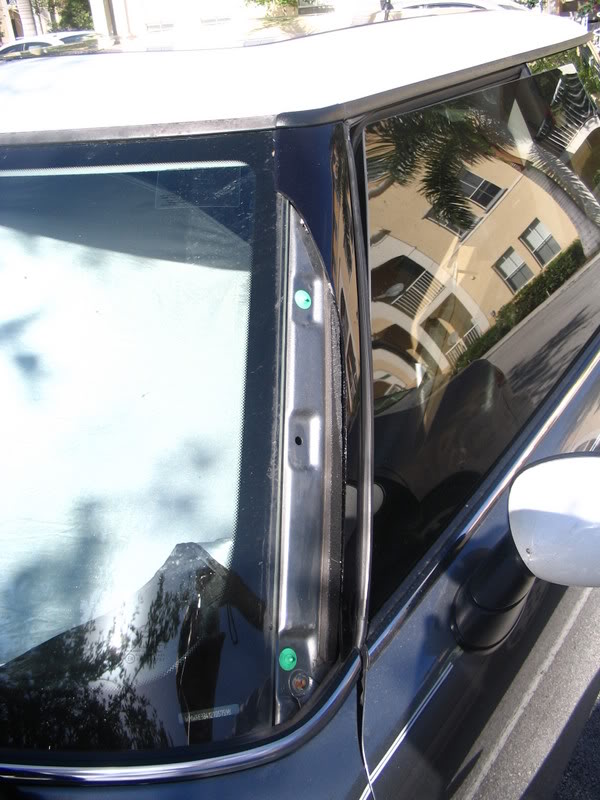
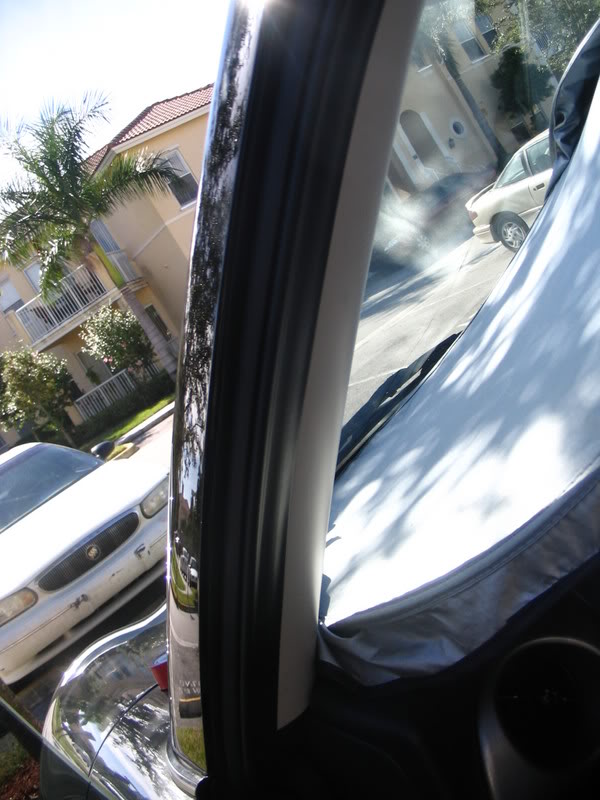
This is easily done by pulling back the rubber door seal (at the level of the dashboard.

...this will reveal 4 phillips head screws which attach the pillar cover to the A pillar.
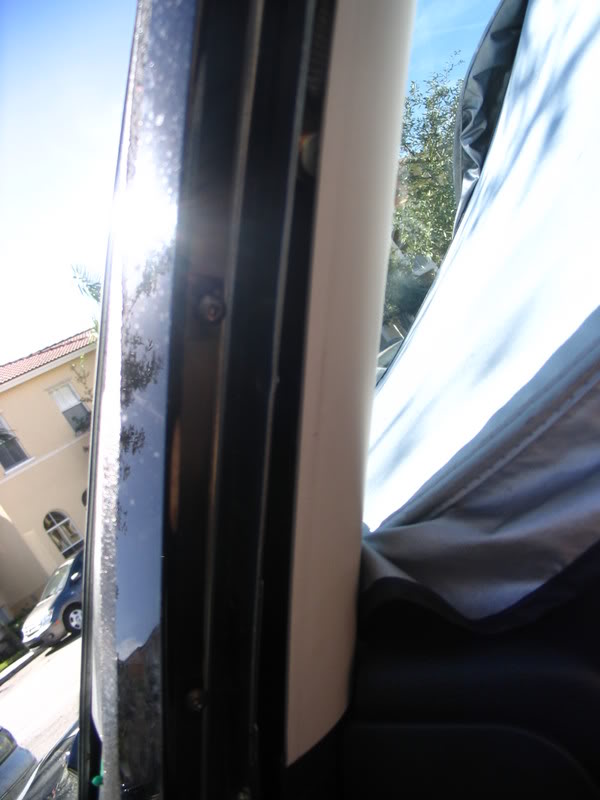
Remove the screws, and the cover should come right off..
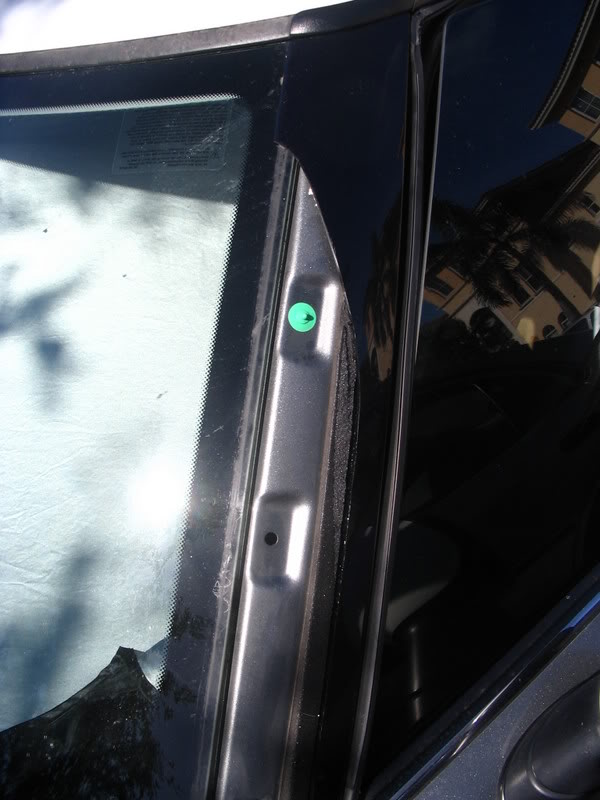
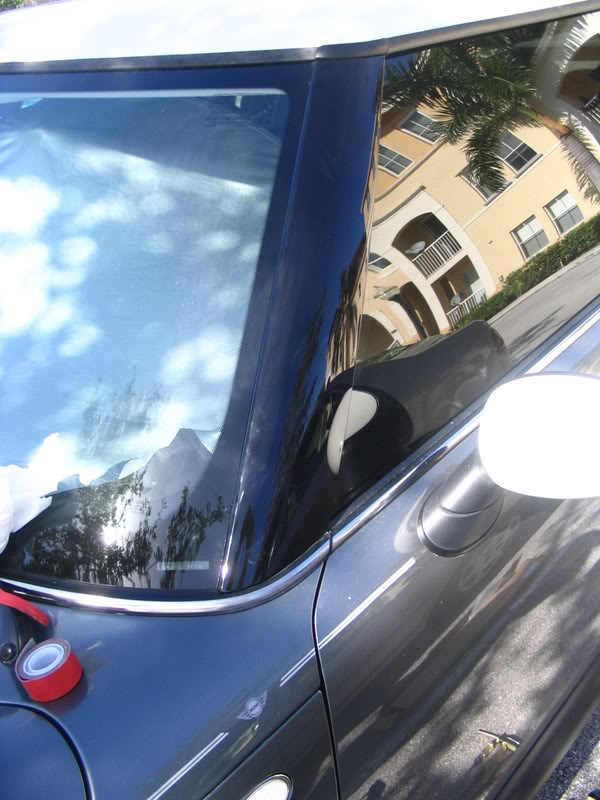
You will also need to remove the old plastic clips still attached to the A pillar (they are the green clips in the first and second pics) (I cut them out and pulled them with needle nose pliers)
Clean the area with a wet cloth and remove old foam strip (double sided sticky foam just behind clip holes See pic) You may reuse the foam if it is still attached, I had some leftover from another job, it was the right thickness so I cut it to size...(sometimes they don't include it with the part)
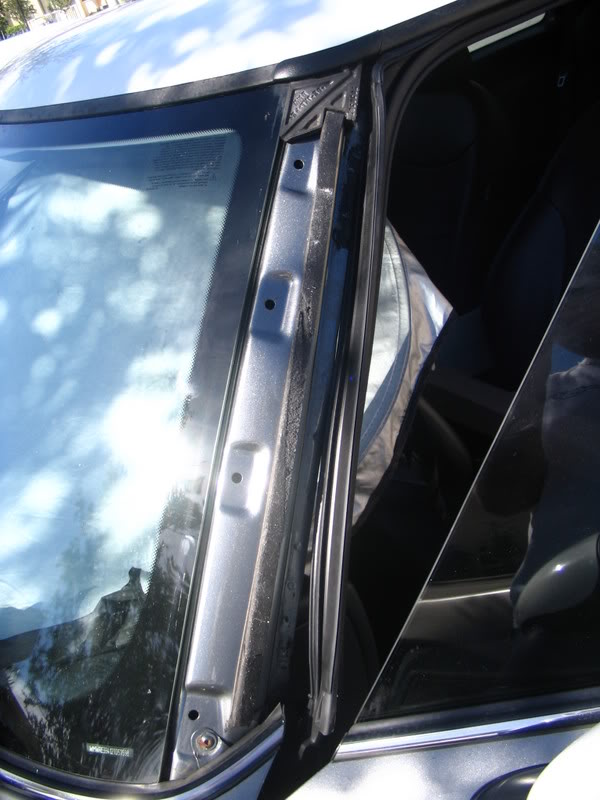
After that, it is just a matter of placing the pressure clips (white clips in picture) and pressing them into the holes.
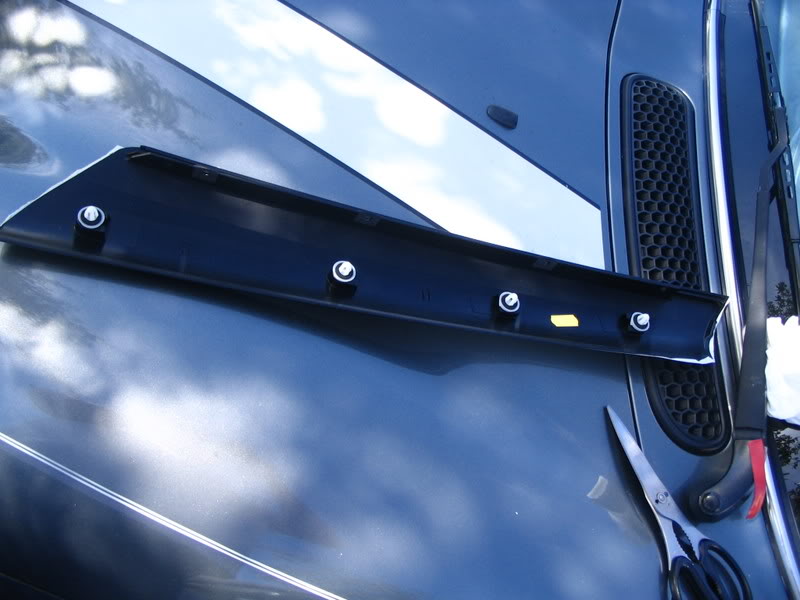
Voila, you are done..
be careful when reinstalling rubber door seal....it is a little tricky to reinstall correctly...(check it by closing your door ensuring it is seated correctly)
Hope this helps...
This is easily done by pulling back the rubber door seal (at the level of the dashboard.
...this will reveal 4 phillips head screws which attach the pillar cover to the A pillar.
Remove the screws, and the cover should come right off..
You will also need to remove the old plastic clips still attached to the A pillar (they are the green clips in the first and second pics) (I cut them out and pulled them with needle nose pliers)
Clean the area with a wet cloth and remove old foam strip (double sided sticky foam just behind clip holes See pic) You may reuse the foam if it is still attached, I had some leftover from another job, it was the right thickness so I cut it to size...(sometimes they don't include it with the part)
After that, it is just a matter of placing the pressure clips (white clips in picture) and pressing them into the holes.
Voila, you are done..
be careful when reinstalling rubber door seal....it is a little tricky to reinstall correctly...(check it by closing your door ensuring it is seated correctly)
Hope this helps...
Thread Starter
|
3rd Gear
Joined: Dec 2002
Posts: 192
Likes: 0
okraD La:
Thank you for the awesome write-up and pictures! Sorry for the delay in responding, been out of town on a family vacation and away from computers/internet. I will be replacing the cover this afternoon, and appreciate you taking the time to offer help.
Len
Thank you for the awesome write-up and pictures! Sorry for the delay in responding, been out of town on a family vacation and away from computers/internet. I will be replacing the cover this afternoon, and appreciate you taking the time to offer help.
Len


2nd Gear
Joined: Mar 2008
Posts: 91
Likes: 0
From: Tuscon, AZ
Nice little bit of tech info. I am wanting to have mine covered in carbon and was wondering how to get them off.
Trending Topics
Thread Starter
|
3rd Gear
Joined: Dec 2002
Posts: 192
Likes: 0
With the help of the advice from Chase and okraD, the cover went on yesterday w/o any significant issues (although one of the two remaining old plastic clips d/n want to go w/o a bit of a struggle). A pretty simple procedure once you understand the attachment points.
minirob2: I may be stating the obvious to you after okraD's write-up, but make sure you remove the door seal, unscrew the cover, then pop the cover out at the clip points, otherwise the cover may break at the screw hole attachment points which are just pretty thin plastic.
Len
minirob2: I may be stating the obvious to you after okraD's write-up, but make sure you remove the door seal, unscrew the cover, then pop the cover out at the clip points, otherwise the cover may break at the screw hole attachment points which are just pretty thin plastic.
Len
2nd Gear
Joined: Mar 2008
Posts: 91
Likes: 0
From: Tuscon, AZ
I did a little research on this and found that you are not suppose to reuse the covers, rather buy new ones or else there is a greater chance of coming off while driving. Maybe the clips are only good for one install and not made to come out of the holes. Does anyone know if this is the case? I don't want to have mine wrapped in carbon and then lose them some day.
With the help of the advice from Chase and okraD, the cover went on yesterday w/o any significant issues (although one of the two remaining old plastic clips d/n want to go w/o a bit of a struggle). A pretty simple procedure once you understand the attachment points.
minirob2: I may be stating the obvious to you after okraD's write-up, but make sure you remove the door seal, unscrew the cover, then pop the cover out at the clip points, otherwise the cover may break at the screw hole attachment points which are just pretty thin plastic.
Len
minirob2: I may be stating the obvious to you after okraD's write-up, but make sure you remove the door seal, unscrew the cover, then pop the cover out at the clip points, otherwise the cover may break at the screw hole attachment points which are just pretty thin plastic.
Len
Thread Starter
|
3rd Gear
Joined: Dec 2002
Posts: 192
Likes: 0
minirob2:
I paid $35.00 for one side, pretty cheap overall. I had a windshield replaced a couple of years ago and the original covers were re-installed, and I believe therein was my problem. While it took a couple of years for the cover to jettison itself, I believe the passenger side was never re-installed properly (two guys replaced the windshield, one apparently was sloppier than the other). So... while I believe they can be re-installed, they d/n seem ideally suited to re-installation. New covers may be a relatively modest and worthwhile investment for you to consider for your particular application.
Len
2nd Gear
Joined: Mar 2008
Posts: 91
Likes: 0
From: Tuscon, AZ
minirob2:
I paid $35.00 for one side, pretty cheap overall. I had a windshield replaced a couple of years ago and the original covers were re-installed, and I believe therein was my problem. While it took a couple of years for the cover to jettison itself, I believe the passenger side was never re-installed properly (two guys replaced the windshield, one apparently was sloppier than the other). So... while I believe they can be re-installed, they d/n seem ideally suited to re-installation. New covers may be a relatively modest and worthwhile investment for you to consider for your particular application.
Len
I paid $35.00 for one side, pretty cheap overall. I had a windshield replaced a couple of years ago and the original covers were re-installed, and I believe therein was my problem. While it took a couple of years for the cover to jettison itself, I believe the passenger side was never re-installed properly (two guys replaced the windshield, one apparently was sloppier than the other). So... while I believe they can be re-installed, they d/n seem ideally suited to re-installation. New covers may be a relatively modest and worthwhile investment for you to consider for your particular application.
Len
Thanks, I appreciate that, and think new parts are a good idea.

Neutral
Joined: May 2008
Posts: 4
Likes: 0
My pillar flew off ... WOW
Has anyone else had their Pillar Trim fly off??
Cause I was hauling on the turnpike and the thing just flies right off, snapped right off of the screws.
Gotta buy a new OEM Pillar from the Dealer this week.
Cause I was hauling on the turnpike and the thing just flies right off, snapped right off of the screws.
Gotta buy a new OEM Pillar from the Dealer this week.


2nd Gear
Joined: Jun 2006
Posts: 78
Likes: 2
From: NorCal
It happens, especially if you ve had a windshield replaced.

5th Gear
Joined: Dec 2006
Posts: 915
Likes: 0
From: bay area
this seems to happen with regularity, especially if your windshield had been replaced. happened to me once when i was driving up to the bay area in the middle of the night. heard a strange splat sound and when i arrived the trim is gone. it was quite a pain for me to replace, tho, 'cuz the plastic retainers on the naked a-pillar was nearly impossible to pry off. oh and i got my parts from morristown pretty cheap


Got my replacement pillar cover and foam insert from Classic Mini... Install was easy. I used some rubbing alcohol to get all the old sticky stuff off. I ran the tip of a strong knife right through the middle of the old inserts to pop them out no problem. Instead of using the 3 tiny sticky pads that come on the new foam piece, I picked up some double-sided duct tape and cut it to shape of the foam piece.
okraD La - How did your replacement work out? My foam peice looks so different; it is a big peice that fills almost all of the area under the cover vs that single strip on your mini. Also, the foam piece sits between the glass and the pillar cover on the front edge; so there is nothing between the glass and pillar cover on yours? Is there any rattling or wind noise from that?
I almost think my foam piece was too big because the cover sits out a few mm more than the one on the other side. Seems to work fine though without wind noise.

Coordinator :: Eastern Iowa MINIs
Joined: Dec 2006
Posts: 5,520
Likes: 4
From: Decorah, IA
I did a little research on this and found that you are not suppose to reuse the covers, rather buy new ones or else there is a greater chance of coming off while driving. Maybe the clips are only good for one install and not made to come out of the holes. Does anyone know if this is the case? I don't want to have mine wrapped in carbon and then lose them some day.
If the pressure clips are all new parts, is there anything to be gained by replacing the whole pillar cover itself?
Hmmm...anticipating that I will probably need to have the windshield replaced at some point, I was thinking about being proactive and ordering eight new plastic clips for the pillars just to have on hand. I figured it would be insurance against some uninformed glass installer trying to re-use or cover up broken clips.
If the pressure clips are all new parts, is there anything to be gained by replacing the whole pillar cover itself?
If the pressure clips are all new parts, is there anything to be gained by replacing the whole pillar cover itself?
-Chase

1st Gear
Joined: Dec 2010
Posts: 12
Likes: 0
From: Eatonton ga
First...after cursing for a little while looking at the cracked A pillar cover, you must remove it


This is easily done by pulling back the rubber door seal (at the level of the dashboard.

...this will reveal 4 phillips head screws which attach the pillar cover to the A pillar.

Remove the screws, and the cover should come right off..
You will also need to remove the old plastic clips still attached to the A pillar (they are the green clips in the first and second pics) (I cut them out and pulled them with needle nose pliers)
Clean the area with a wet cloth and remove old foam strip (double sided sticky foam just behind clip holes See pic) You may reuse the foam if it is still attached, I had some leftover from another job, it was the right thickness so I cut it to size...(sometimes they don't include it with the part)

After that, it is just a matter of placing the pressure clips (white clips in picture) and pressing them into the holes.

Voila, you are done..


be careful when reinstalling rubber door seal....it is a little tricky to reinstall correctly...(check it by closing your door ensuring it is seated correctly)
Hope this helps...
This is easily done by pulling back the rubber door seal (at the level of the dashboard.
...this will reveal 4 phillips head screws which attach the pillar cover to the A pillar.
Remove the screws, and the cover should come right off..
You will also need to remove the old plastic clips still attached to the A pillar (they are the green clips in the first and second pics) (I cut them out and pulled them with needle nose pliers)
Clean the area with a wet cloth and remove old foam strip (double sided sticky foam just behind clip holes See pic) You may reuse the foam if it is still attached, I had some leftover from another job, it was the right thickness so I cut it to size...(sometimes they don't include it with the part)
After that, it is just a matter of placing the pressure clips (white clips in picture) and pressing them into the holes.
Voila, you are done..
be careful when reinstalling rubber door seal....it is a little tricky to reinstall correctly...(check it by closing your door ensuring it is seated correctly)
Hope this helps...
