
How To HOW TO: Install GP2 Belly Pan Kit


HOW TO: Install GP2 Belly Pan Kit
This install was performed on a 2012 R58 JCW and may not be 100% accurate to your car model.
Parts Needed:
MINI GP2 JCW Belly Pan Kit (x1)
Part #51757330566KT
Est. Retail Price $250 (as of 10/01/2013)
Body Securing Clip (x3)
Part #51717195796 (BMW or MINI)
Est. Retail Price $1.50 per clip.
Body Nut (x1)
Part #07131502288 (Can use any Body Nut, eg. from auto parts store)
Est. Retail Price $2.25 per nut.
Hex Bolt (x2)
Part #07146986088 (Can use any bolt compatible with body nut)
Est. Retail Price $0.85 per bolt.
Body Nut (x1)
Part #64500630991 (Need to verify)
Est. Retail Price $2.00 per nut.
Time to Install: (10 minutes once car is on jack stands, lift, or ramps)
Tools Needed:
Phillips Head Screwdriver
Rubber Mallet
Metric Socket for hex bolt or small adjustable wrench. (Optional)
---------------------------------------------------------------------
So I did this quick install today on my R58 JCW. I already have the stock underbody panels and have installed the GP2 rear diffuser as well. This was the final piece I needed.
It's fairly straight-forward, but I will break it down to what I had to deal with and what is involved.
Out of the Box:
So out of the box, my GP Belly Pan came with speed screws and holding washers in all but 2 of the mounting points on the pan. These are all 1-turn speed screws that attach into (mostly) already existing body nuts on the underside of your car. I had no other hardware included in my kit. I know some kits will come with all the hardware you need, but I needed to source some parts locally from my MINI and BWM dealers.
Step 1: Lift the front of the car.
I used ramps, but use what you have. DO NOT USE A JACK ALONE! Please use common sense and use jack stands, ramps, or a lift. This is a quick and easy install, but you will need to apply some force during the install, and anything that could shift your car off a jack could be fatal.
Step 2: Remove the skid trim on the passenger side near the oil pan. It is held on by 3 phillips speed screws.


Step 3: Install Body Securing Clips (x3)
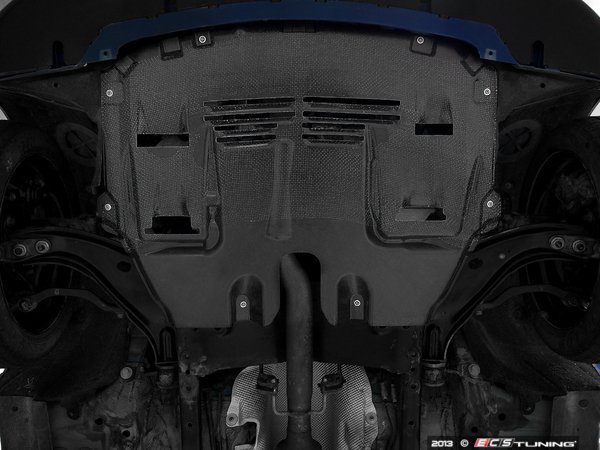
Take a look at the image below:

The green are where the factory skid piece you just took off attached.
The pink is not on the manufactured piece.
The blue is where a body nut will be installed.
The red is where the body securing clips need to be installed.
The clips "lock" into the frame through little square cut-outs. The furthest back green point is a factory installed clip. See the picture below.

You can see how the flat extended edges are on the outside and the receiving hole fits up inside the body. So to install these, you just fit it in at an angle to get the extended part of the clip inside, then I just used a soft rubber mallet to "pop" it into place. It does take some force (more than my thumb or the handle of my screwdriver, and the mallet worked great for me. See install shot below.
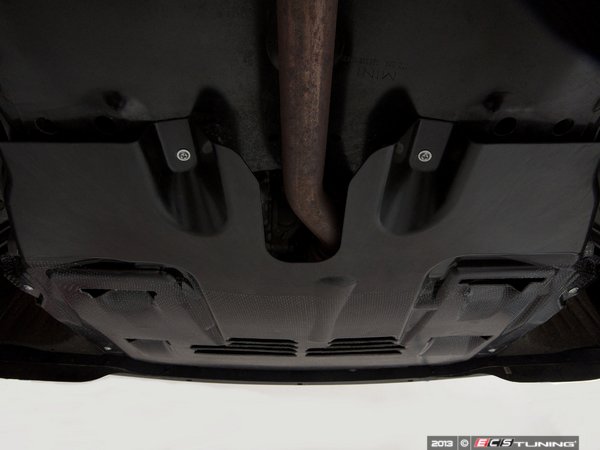
Body opening.

Clip placement.

Picture of what the clips look like.

Step 4: Install Body Nuts
In the blue circle points on the drawing, I needed to come up with a receiver for one speed screw (to the right) and one body bolt (in the front). I had a body nut and bolt already, so I used that for the front point. This probably really should be a speed scre for easy removal when having to do oil changes, but I opted to just use a bolt instead because I liked it was at least one connection point that wasn't a speed screw. I used the smaller body nut (same one that is already on the car on the passenger side) for the far right point (blue on photo). The speed screw for that point is already on the belly pan.
Step 5: Install Belly Pan
Up to this point, you can secure all but 1 point. All of the installed speed screws will now have a receiver in the body and you can just secure them. The body bolt (or speed screw if you went that way) for the front drivers side (blue) can be secured as well.
The last point is the front passenger side screw which my kit did not have. I just stole a speed screw and holding washer off the factory skid trim piece I first removed and secured that last point.
Step 6: Check connections and lower the car.
You're Done!
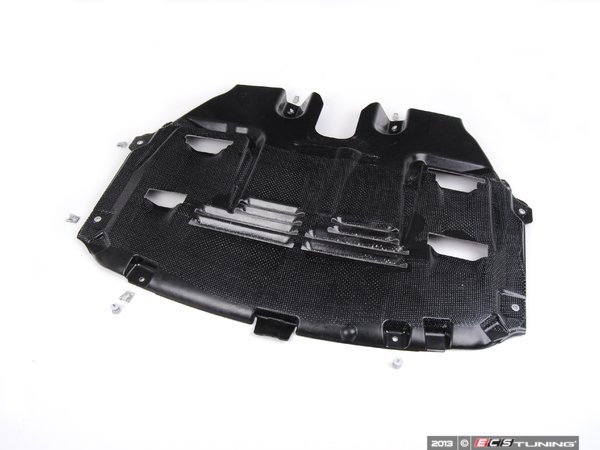
What the kit/pan actually looks like.

Hope this helps!
-Z
Parts Needed:
MINI GP2 JCW Belly Pan Kit (x1)
Part #51757330566KT
Est. Retail Price $250 (as of 10/01/2013)
Body Securing Clip (x3)
Part #51717195796 (BMW or MINI)
Est. Retail Price $1.50 per clip.
Body Nut (x1)
Part #07131502288 (Can use any Body Nut, eg. from auto parts store)
Est. Retail Price $2.25 per nut.
Hex Bolt (x2)
Part #07146986088 (Can use any bolt compatible with body nut)
Est. Retail Price $0.85 per bolt.
Body Nut (x1)
Part #64500630991 (Need to verify)
Est. Retail Price $2.00 per nut.
Time to Install: (10 minutes once car is on jack stands, lift, or ramps)
Tools Needed:
Phillips Head Screwdriver
Rubber Mallet
Metric Socket for hex bolt or small adjustable wrench. (Optional)
---------------------------------------------------------------------
So I did this quick install today on my R58 JCW. I already have the stock underbody panels and have installed the GP2 rear diffuser as well. This was the final piece I needed.
It's fairly straight-forward, but I will break it down to what I had to deal with and what is involved.
Out of the Box:
So out of the box, my GP Belly Pan came with speed screws and holding washers in all but 2 of the mounting points on the pan. These are all 1-turn speed screws that attach into (mostly) already existing body nuts on the underside of your car. I had no other hardware included in my kit. I know some kits will come with all the hardware you need, but I needed to source some parts locally from my MINI and BWM dealers.
Step 1: Lift the front of the car.
I used ramps, but use what you have. DO NOT USE A JACK ALONE! Please use common sense and use jack stands, ramps, or a lift. This is a quick and easy install, but you will need to apply some force during the install, and anything that could shift your car off a jack could be fatal.
Step 2: Remove the skid trim on the passenger side near the oil pan. It is held on by 3 phillips speed screws.
Step 3: Install Body Securing Clips (x3)
Take a look at the image below:
The green are where the factory skid piece you just took off attached.
The pink is not on the manufactured piece.
The blue is where a body nut will be installed.
The red is where the body securing clips need to be installed.
The clips "lock" into the frame through little square cut-outs. The furthest back green point is a factory installed clip. See the picture below.
You can see how the flat extended edges are on the outside and the receiving hole fits up inside the body. So to install these, you just fit it in at an angle to get the extended part of the clip inside, then I just used a soft rubber mallet to "pop" it into place. It does take some force (more than my thumb or the handle of my screwdriver, and the mallet worked great for me. See install shot below.
Body opening.
Clip placement.
Picture of what the clips look like.
Step 4: Install Body Nuts
In the blue circle points on the drawing, I needed to come up with a receiver for one speed screw (to the right) and one body bolt (in the front). I had a body nut and bolt already, so I used that for the front point. This probably really should be a speed scre for easy removal when having to do oil changes, but I opted to just use a bolt instead because I liked it was at least one connection point that wasn't a speed screw. I used the smaller body nut (same one that is already on the car on the passenger side) for the far right point (blue on photo). The speed screw for that point is already on the belly pan.
Step 5: Install Belly Pan
Up to this point, you can secure all but 1 point. All of the installed speed screws will now have a receiver in the body and you can just secure them. The body bolt (or speed screw if you went that way) for the front drivers side (blue) can be secured as well.
The last point is the front passenger side screw which my kit did not have. I just stole a speed screw and holding washer off the factory skid trim piece I first removed and secured that last point.
Step 6: Check connections and lower the car.
You're Done!
What the kit/pan actually looks like.
Hope this helps!
-Z

Moderator


Joined: May 2012
Posts: 1,788
Likes: 345
From: San Francisco Bay Area
You beat me to it. Nice writeup! 
I just installed my belly pan last week. For a 2012 R56S (R56LCI), I needed:
2x 07146981767 (blue squares)
3x 51717195796 (red squares)
These are #6 and #7 on the diagram here: http://realoem.com/bmw/showparts.do?...77&hg=51&fg=80 (the clips at the locations in green squares).
I had to move two of the speed screws from the stock cover over to the belly pan. Really fast and easy install. The bottom trim on the front bumper doesn't come as far back on the R56S as it does in the JCW or GP so there's a small gap between the rear of the bumper and the front of the belly pan.
Last edited by squawSkiBum; Oct 8, 2013 at 10:57 PM.
Just to clarify on the images I attached. The photo I used to markup the points is actually the R60 belly pan. Other than it looking slightly different than the R56 kit, the attachment points are basically in the same places, so I used it for reference. The R60 pan does have that center point I believe, but not on the R56.

Actually you don't need all that hardware. If you look at the triangular plastic cover you remove on the passenger side you can simply remove two of the screws from it, and take the body clip that went on the fender liner furthest back and put it on the driver side. Then you only need the 3 clips that went in subframe and your good to go.
We have the belly pan kit with or without the hardware available.
We have the belly pan kit with or without the hardware available.

On my R58, I was not able to reuse any body clips.
Of the 3 screws you remove from the passenger side cover, 2 of the were into smaller clips and one was into a body clip (shown in the 4th image of my post). All 3 of them get re-used when installing the belly pan. I had to come up with the 3 body clips for the other side, one small clip for the furthest drivers side point (blue square all the way to the right) and another clip (I used a body bolt/nut) for the front drivers side connection point. The only thing I reused off the stock panel that was removed was one speed screw.
Of the 3 screws you remove from the passenger side cover, 2 of the were into smaller clips and one was into a body clip (shown in the 4th image of my post). All 3 of them get re-used when installing the belly pan. I had to come up with the 3 body clips for the other side, one small clip for the furthest drivers side point (blue square all the way to the right) and another clip (I used a body bolt/nut) for the front drivers side connection point. The only thing I reused off the stock panel that was removed was one speed screw.
Moderator
Joined: May 2012
Posts: 1,788
Likes: 345
From: San Francisco Bay Area
Actually you don't need all that hardware. If you look at the triangular plastic cover you remove on the passenger side you can simply remove two of the screws from it, and take the body clip that went on the fender liner furthest back and put it on the driver side. Then you only need the 3 clips that went in subframe and your good to go.
We have the belly pan kit with or without the hardware available.
We have the belly pan kit with or without the hardware available.

4th Gear
Joined: May 2013
Posts: 314
Likes: 0
Trending Topics

5th Gear
Joined: Jul 2012
Posts: 777
Likes: 1
From: Richardson, TX
It has been awhile since I did mine but there is a slot on the left rear near where the pan touches the case. I took a file and it didn't take much to move enough material that it wasn't an issue, at least for me.
4th Gear
Joined: May 2013
Posts: 314
Likes: 0
Thanks. Should be an easy fix.
Thanks for the write up on this. I just did this on my 2007 R56. Simply added the clips where required and transferred two screws from the old tiny panel. Odd that my 2007 R56 was already set up to have this piece installed but MINI chose to not equip the MINI with it from the factory. Oh well, with the other aerodynamics work I've accomplished this last piece ties it all together. MOTOR ON!!!!
Yes a dremel tool can trim the one vent in the belly pan that touches the trans pan. We actually tried and you can install it without trimming it, but it's going to wear on the pan, so we went ahead and cut it.
Just to clarify on the images I attached. The photo I used to markup the points is actually the R60 belly pan. Other than it looking slightly different than the R56 kit, the attachment points are basically in the same places, so I used it for reference. The R60 pan does have that center point I believe, but not on the R56.
Nice write up.
That pic above (and right below) is from the R60 : But it can work as a reference for the r56. Similar set up.
You can use the R56 underbelly as a reference here:
OR Here

From the little side splash pan ( passenger side ) you just reuse the clips and then the new pan come with the speed screws and plastic washers installed ( ours also comes with all that hardware and clips so you then have 8 points of contact, which is good so its sealed correctly to the bottom ). The front center portion where there is no screw is the tab that inserts into the bottom section of the core support like a little line up piece.
We were the first ones to bring this to you and if you have any question let me know. We have pics of it on the automatic and manual transmission. Also some close ups.
If you have an Automatic Transmission MINI we have more info here.
https://www.northamericanmotoring.co...ml#post3839779
Here is the GP 2 Belly Pan kit w/ hardware if you need it. We have it in stock ready to ship.
51757330566KT
http://www.ecstuning.com/Search/SiteSearch/51757330566KT/ES2642513/
Zcast , nice write up.
__________________

MINI Guru/ MINI Owner Since 2004 | NEW Lifetime Part Replacement | Local Pickup
Milltek | Genuine MINI | Forge Motorsport | NM Engineering | ECS Performance | M7 Speed
Customer Service Hours: 8am-8pm EST|Sales Team Hours: 8am-11pm | SAT 10am-7pm 800.924.5172
MINI Guru/ MINI Owner Since 2004 | NEW Lifetime Part Replacement | Local Pickup
Milltek | Genuine MINI | Forge Motorsport | NM Engineering | ECS Performance | M7 Speed
Customer Service Hours: 8am-8pm EST|Sales Team Hours: 8am-11pm | SAT 10am-7pm 800.924.5172
Last edited by ECSTuning; Nov 12, 2013 at 06:17 AM.
4th Gear
Joined: May 2013
Posts: 314
Likes: 0
5th Gear
Joined: Jul 2012
Posts: 777
Likes: 1
From: Richardson, TX
I checked mine the other night and saw that there was a pretty good rub going on, so I got out the dremel. I dropped it partially down and using the cutoff wheel I removed somewhere around 1/4" with the contour of the slot. Surprising how tough that stuff is!
4th Gear
Joined: May 2013
Posts: 314
Likes: 0
I ended up taking at least 1/4' off. Took several iterations to get it to just clear. I used a rasp/file and taped it off using blue painters tape to keep it straight.
Last edited by cactusjk; Nov 22, 2013 at 07:15 PM. Reason: update
You can see here but its at an angle, so it looks like there is less room due to the angle.
There is more room, the stock exhaust I believe is ~ 2.25" so a gain of .75" should clear the pan at that corner where it turns and goes from the mid section pipe to under the pan at 45 degrees, that's the closest point on the pan ( trouble spot if any ) that I could see. The bulge in the JCW GP2 pan give the flex-pipe right behind the down-pipe some more room. We have not tested any aftermarket exhaust with this pan. There might be some other guys who have installed it with bigger exhausts that can post up on here.
Thanks and hope that helps.
__________________
MINI Guru/ MINI Owner Since 2004 | NEW Lifetime Part Replacement | Local Pickup
Milltek | Genuine MINI | Forge Motorsport | NM Engineering | ECS Performance | M7 Speed
Customer Service Hours: 8am-8pm EST|Sales Team Hours: 8am-11pm | SAT 10am-7pm 800.924.5172
MINI Guru/ MINI Owner Since 2004 | NEW Lifetime Part Replacement | Local Pickup
Milltek | Genuine MINI | Forge Motorsport | NM Engineering | ECS Performance | M7 Speed
Customer Service Hours: 8am-8pm EST|Sales Team Hours: 8am-11pm | SAT 10am-7pm 800.924.5172
5th Gear
Joined: Jan 2013
Posts: 750
Likes: 2
From: Orange County, NY
You can see here but its at an angle, so it looks like there is less room due to the angle.
There is more room, the stock exhaust I believe is ~ 2.25" so a gain of .75" should clear the pan at that corner where it turns and goes from the mid section pipe to under the pan at 45 degrees, that's the closest point on the pan ( trouble spot if any ) that I could see. The bulge in the JCW GP2 pan give the flex-pipe right behind the down-pipe some more room. We have not tested any aftermarket exhaust with this pan. There might be some other guys who have installed it with bigger exhausts that can post up on here.
Thanks and hope that helps.
There is more room, the stock exhaust I believe is ~ 2.25" so a gain of .75" should clear the pan at that corner where it turns and goes from the mid section pipe to under the pan at 45 degrees, that's the closest point on the pan ( trouble spot if any ) that I could see. The bulge in the JCW GP2 pan give the flex-pipe right behind the down-pipe some more room. We have not tested any aftermarket exhaust with this pan. There might be some other guys who have installed it with bigger exhausts that can post up on here.
Thanks and hope that helps.
You are welcome. 
Let us know how it goes.
Let us know how it goes.
__________________
MINI Guru/ MINI Owner Since 2004 | NEW Lifetime Part Replacement | Local Pickup
Milltek | Genuine MINI | Forge Motorsport | NM Engineering | ECS Performance | M7 Speed
Customer Service Hours: 8am-8pm EST|Sales Team Hours: 8am-11pm | SAT 10am-7pm 800.924.5172
MINI Guru/ MINI Owner Since 2004 | NEW Lifetime Part Replacement | Local Pickup
Milltek | Genuine MINI | Forge Motorsport | NM Engineering | ECS Performance | M7 Speed
Customer Service Hours: 8am-8pm EST|Sales Team Hours: 8am-11pm | SAT 10am-7pm 800.924.5172

--Matt

2nd Gear
Joined: Jul 2015
Posts: 51
Likes: 2
Thanks to zcast for this write up. The install only took about 10 minutes. It took longer to get the MINI on and off the lift. Took it out on a blustery afternoon today and it may just be the placebo affect but it seemed to stick to the road a little better and the wind noise minimized. I would buy again.
Thanks to ECS for including all the hardware, it would have been a pain to source on my own.
Thanks to ECS for including all the hardware, it would have been a pain to source on my own.
__________________
MINI Guru/ MINI Owner Since 2004 | NEW Lifetime Part Replacement | Local Pickup
Milltek | Genuine MINI | Forge Motorsport | NM Engineering | ECS Performance | M7 Speed
Customer Service Hours: 8am-8pm EST|Sales Team Hours: 8am-11pm | SAT 10am-7pm 800.924.5172
MINI Guru/ MINI Owner Since 2004 | NEW Lifetime Part Replacement | Local Pickup
Milltek | Genuine MINI | Forge Motorsport | NM Engineering | ECS Performance | M7 Speed
Customer Service Hours: 8am-8pm EST|Sales Team Hours: 8am-11pm | SAT 10am-7pm 800.924.5172

Thread
Thread Starter
Forum
Replies
Last Post
squawSkiBum
MINI Parts for Sale
15
Oct 2, 2015 09:21 AM
ECSTuning
Drivetrain Products
0
Aug 19, 2015 08:28 AM
ECSTuning
Vendor Classifieds
0
Aug 19, 2015 08:27 AM