
How To Electrical :: Radar Detector Hardwiring (12v Line) Above the Rearview Mirror...


just finally hardwired mine last night. Very easy with the help of everyones comments on this post. There hardest part was getting into the wiring bundle... that cloth/tape is thick!


2nd Gear
Joined: Jun 2011
Posts: 65
Likes: 0
From: NYC
Here are two shots from my setup. Using the remote display and an add-a-circuit, combined with running it up the A pillar, and grounding it on the glovebox screw. V1 is mounted behind the rearview mirror, phone line running just under the headliner.
It's not the same as the console above, but it's just as easy, if not easier this way.


It's not the same as the console above, but it's just as easy, if not easier this way.

1st Gear
Joined: Aug 2011
Posts: 19
Likes: 0
From: San Francisco, CA
I just installed my radar detector in my countryman. It took a bit of figuring out but you CANNOT use the purple cable. If you want to install on a r60, use the yellow cable on the right side. Also, there is no available spot to ground the wire into existing holes. You will need to screw into the paint or run a wire down the a-pillar to the glove box.

3rd Gear
Joined: Jul 2007
Posts: 240
Likes: 1
From: west 'burbs of Chicago
used this thread to hardwire a GPS charger
Great thread; I used this info to wire a GPS charger into my headliner.
Same +12v and GND wires as everyone else is using are wired to a cigarette-lighter-socket hidden up in the headliner, and a nice-looking switch from RadioShack (275-0648, $3 each) is there to turn the socket off when not in use.
The Garmin GPS charger is already fused, and I installed a duplicate switch in the grey plastic switchbox-cover for appearances/future gadget. The back of the switchbox-cover only required a bit of gentle modding with a Dremel-tool to accomodate the switches, which are shallow enough to still fit with the stock switchbox behind it.

3rd Gear
Joined: Sep 2011
Posts: 163
Likes: 0
Okay, I am about to start cracking my head into my desk if I can't figure this out.
I have a 09 JCW Mini S with Convenience/Sunroof BUT
Purple/Grey going to the red in my phone cable and Green to the small hole on the left side.
No power still to my Escort x50 8500
Any ideas? I am about to start going wire crazy =/
I have a 09 JCW Mini S with Convenience/Sunroof BUT
Purple/Grey going to the red in my phone cable and Green to the small hole on the left side.
No power still to my Escort x50 8500
Any ideas? I am about to start going wire crazy =/
I just installed my radar detector in my countryman. It took a bit of figuring out but you CANNOT use the purple cable. If you want to install on a r60, use the yellow cable on the right side. Also, there is no available spot to ground the wire into existing holes. You will need to screw into the paint or run a wire down the a-pillar to the glove box.
Thank you!! I was about to whip out the multimeter and waste several hours after finding out that the purple wire is a no-no on the Countryman. Now to find out which Yellow wire he's talking about.

Here's the picture of the Countryman wiring: (Terrible picture - replaced with new photos below)
Last edited by Theta; Oct 3, 2011 at 01:27 AM.
PLEASE SEE POST #365 FOR WRAP-UP ON R60 / COUNTRYMAN S!
Very discouraged... I just wrote about 5 paragraphs of info on a failed R60 install (and the forum dumped it all upon posting), so I'll just post this pic instead.
I still can't get my V1 working on this '12v' wire... I'm hoping someone will know if I'm on the wrong wire or something. I'm getting 11.5v when accessory power is on, but the detector isn't powering on.
The wiring is okay - direct wire adapters are okay. Ground is proper to the body. I'm getting 11.5v all the way to the V1, but the V1 doesn't turn on. V1 powers on correctly from the cig lighter adapter in ACC and ON, of course.
Checked everything I can think of. Any ideas? Sorry for being brief, but I just can't type all of that out again.
Last edited by Theta; Oct 3, 2011 at 01:27 AM.
PLEASE SEE POST #365 FOR WRAP-UP ON R60 / COUNTRYMAN S!
After uploading those last two photos, I guess I'll clarify and type that information out. After all, I can't crack this nut by myself.
So, I broke out the multimeter and full tool set yesterday, and spent 8 hours over 2 days taking it all apart, measuring the wires, etc. I posted the picture of the voltages in case it helps others.
I need to give a big warning to you Countryman owners... You will get the airbag failure message/light/OK screen, etc. if you turn on the ACC while you have the plastic shroud disconnected from the wiring harnesses. I wish I would have known that, but someone has to be the guinea pig I guess... Guess I'll have to fix that in another thread.
Here's the breakdown of what I've figured out so far:
1) The previous R60 owner posted to "not use the purple wire", so I didn't test that any further. Note that it does pass 12v in ACC and ON.
2) I have two remote-wiring kits from V1 that I've tried. Tried different cords, etc. It's not a wiring problem, as I'm getting 11.5v on the phone cable, itself. So, 11.5v is getting to the V1, but it's not powering on.
3) Ground is solid and directly to the body - tested continuity and confirmed it's a true body ground. Feel free to use it for your roof ground.
4) The V1 will power up just fine from the cig lighter adapter, so it's functioning fine.
So... is there an issue with drawing too much power from that wire?
Should I use the purple 12v wire instead?
Completely at a loss for ideas, and unfortunately can't get this figured out alone. My wife is laughing because it's such a simple mod, and usually takes about 10 minutes on my cars. She's got me this time.
Last edited by Theta; Oct 3, 2011 at 12:33 AM.

Can you try a different detector? Or perhaps another direct wire to test?
I realize your said your ground is good but can you try another ground location. The shorter the distance the better. What about the fuse in the wire?
I realize your said your ground is good but can you try another ground location. The shorter the distance the better. What about the fuse in the wire?
PLEASE SEE POST #365 FOR WRAP-UP ON R60 / COUNTRYMAN S!
All good points!
Tried another body ground, but no luck. This particular ground I've used is only 4 inches away, and is a large bolt into the roof. Continuity with all body grounds is 100%.
Direct wire test (bare wire leads wired to yellow wire) yields 11.5v - same as to the hard-wire cable when hooked up.
Grabbed an old Escort X50 to test with, same deal as the V1.
Last edited by Theta; Oct 3, 2011 at 12:33 AM.
PLEASE SEE POST #365 FOR WRAP-UP ON R60 / COUNTRYMAN S!
New info after working today again on it.
1) There are large spiders in Missouri that apparently like to crawl into cozy garages and try to crawl up the legs of unsuspecting Mini owners while they're working on their Mini...
2) I used a fuse tap at the passenger kick panel to test the actual hard-wire 'kits'. Fired up just fine after wiring into a 12v light fuse, and using a body ground.
3) Then tried what I'd done before - wired directly into that yellow wire, which is putting out roughly 11.25v on ACC. Grounded at the same place as the fuse tap test. No power.
So, does the V1 require more start-up power than that wire can muster? Still trying to find out why I can't use the purple wire... for all I know it's an airbag wire...
Maybe I need to hold my leg up in the air while chanting to get it to work.
Hopefully this can get figured out by tomorrow, as it's not even drivable right now.
Last edited by Theta; Oct 3, 2011 at 12:33 AM.
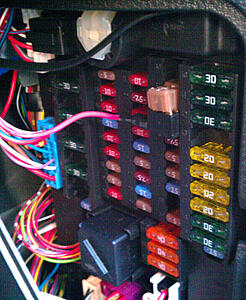
Okay, after a rough weekend of clogging up the board with these posts, I've decided to write up this quick tutorial on the R60 according to my Countryman S R60 ALL4.
In this next picture, you'll see the voltages on the white connector. Both the yellow cable and the purple next to it carry around 11-11.5v. The current and voltage supplied is not sufficient to power a V1 or X50. Bottom line, don't even mess with it - I wasted an entire weekend debugging this.

Here are the do's and dont's of grounding. Remember, do not tap that yellow wire or the purple wire. The ground shown is a proper body ground, and is a full chassis-continuity ground. It takes about 5 turns of a ratchet to loosen it enough to put a spade plug or bare wire under the nut.

Here is where I pulled power from after wasting so much time on those damned 11.5v wires... I ran an 18ga wire down the headliner, A-pillar, and down through the plastic kick panel to the passenger lower fuse panel. No wire is showing anywhere, and there is no hint of wire rattle, etc. I chose to use #44, which is the seat heater fuse. I used a piggyback fuse adapter with a 7.5A fuse for the seat heaters, and a 1A fuse for my V1. With this fuse, the detector only turns on in "ON" position. It turns back off as soon as vehicle is switched off / key out. No delay.

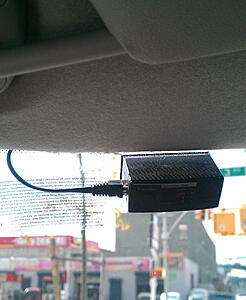
And finally, here's how it looks. Sorry for the crummy iPhone 4 pic - it was late and in the cold garage... I used the visor adapter after bending the hell out of it (bent the front lip flat, and squished the "arch" of the clip.

That's about it. It's nothing groundbreaking, but I'm hoping to save some of you Countryman owners some time. I wish I had my weekend back.
On the bright side, I have a working, good-looking V1 mounted up now.
In this next picture, you'll see the voltages on the white connector. Both the yellow cable and the purple next to it carry around 11-11.5v. The current and voltage supplied is not sufficient to power a V1 or X50. Bottom line, don't even mess with it - I wasted an entire weekend debugging this.
Here are the do's and dont's of grounding. Remember, do not tap that yellow wire or the purple wire. The ground shown is a proper body ground, and is a full chassis-continuity ground. It takes about 5 turns of a ratchet to loosen it enough to put a spade plug or bare wire under the nut.
Here is where I pulled power from after wasting so much time on those damned 11.5v wires... I ran an 18ga wire down the headliner, A-pillar, and down through the plastic kick panel to the passenger lower fuse panel. No wire is showing anywhere, and there is no hint of wire rattle, etc. I chose to use #44, which is the seat heater fuse. I used a piggyback fuse adapter with a 7.5A fuse for the seat heaters, and a 1A fuse for my V1. With this fuse, the detector only turns on in "ON" position. It turns back off as soon as vehicle is switched off / key out. No delay.
And finally, here's how it looks. Sorry for the crummy iPhone 4 pic - it was late and in the cold garage... I used the visor adapter after bending the hell out of it (bent the front lip flat, and squished the "arch" of the clip.
That's about it. It's nothing groundbreaking, but I'm hoping to save some of you Countryman owners some time. I wish I had my weekend back.
On the bright side, I have a working, good-looking V1 mounted up now.

4th Gear
Joined: Jun 2011
Posts: 316
Likes: 1
From: Mobile, AL
Thanks for the write-up and idea! Really saved me from putting my radar detector is a horrible and annoying place! Just installed it (to the right of my mirror since it didn't fit behind). It is still quite visible so I consider it perfect!
One note is that I was able to tap into the purple/blue for +12v and a brown wire for ground which worked for me. My radar detector is only on when the key is in!
Thanks again!
Morgan
One note is that I was able to tap into the purple/blue for +12v and a brown wire for ground which worked for me. My radar detector is only on when the key is in!
Thanks again!
Morgan
1st Gear
Joined: Aug 2011
Posts: 19
Likes: 0
From: San Francisco, CA
Whatver I did screwed up my passenger air bag light because now it is permenantly on, unless someone sits on the seat. Also, my radar detector flashes "needs service" every once in awhile. I have a passport 8500x
for the airbag light - if you know someone coding minis they can reset it for you - do a search for NCS Expert.
as for the 8500 x50, you need a tune up. I'll copy/paste from the forum:
The service required message almost always means that the detector encountered critical error/s during a regular self calibration routine. Most detectors use an analog tuning scheme for proper calibration similar to an old radio where you turn the **** to the station you desire. The problem is that over time the detector needs re-calibrated which can only be done at the factory. Our modern detectors, like your X50s, use patented digital self tuning to keep it calibrated and operating at peak performance. Should the detector not be able to properly calibrate itself then it will keep trying until it can (and displays the "self cal" message). If it fails enough times then it displays service required.
I assure you that we do not put a timer in our products to display an error based on time. All detectors naturally drift out of tune over time, none will perform like new forever. Other detectors simply lose performance or quit detecting altogether without notifying you that something is wrong with it. Our calibration circuits normally can compensate but they cannot always compensate enough.
I recommend sending it in when you see the error message. The detector is trying to tell you that it is sick.
__________________
Listen to what Larry says and send it in! Also you can have them put the TSR on it while it's in there. Your unit will look and perform like new after the repair and have the worn case and lenses replaced.
If you don't have the $60 to send it in then try this:
Turn car off and take key out (crucial to do). Hold down the three buttons on the 8500 x50 (yes there is a mute button on the front of the unit along with the two buttons up top that you know are there). Turn car on - let go of all 3 buttons simultaneously. It will reset the detector but keep in mind all errors are still stored.
3rd Gear
Joined: Sep 2011
Posts: 163
Likes: 0
Finally figured it out in the fuse box, the 12V switch is the number 44 in my MCS JCW R56 2009. Just run your phone cable down to there and tap into the 44 fuse and then ground to the bolt on the side access of the dash. Then boom it is only on when "Acc" or "Engine On" so this is great for amplifiers or radars.
1st Gear
Joined: Aug 2011
Posts: 19
Likes: 0
From: San Francisco, CA
for the airbag light - if you know someone coding minis they can reset it for you - do a search for NCS Expert.
as for the 8500 x50, you need a tune up. I'll copy/paste from the forum:
The service required message almost always means that the detector encountered critical error/s during a regular self calibration routine. Most detectors use an analog tuning scheme for proper calibration similar to an old radio where you turn the **** to the station you desire. The problem is that over time the detector needs re-calibrated which can only be done at the factory. Our modern detectors, like your X50s, use patented digital self tuning to keep it calibrated and operating at peak performance. Should the detector not be able to properly calibrate itself then it will keep trying until it can (and displays the "self cal" message). If it fails enough times then it displays service required.
I assure you that we do not put a timer in our products to display an error based on time. All detectors naturally drift out of tune over time, none will perform like new forever. Other detectors simply lose performance or quit detecting altogether without notifying you that something is wrong with it. Our calibration circuits normally can compensate but they cannot always compensate enough.
I recommend sending it in when you see the error message. The detector is trying to tell you that it is sick.
__________________
Listen to what Larry says and send it in! Also you can have them put the TSR on it while it's in there. Your unit will look and perform like new after the repair and have the worn case and lenses replaced.
If you don't have the $60 to send it in then try this:
Turn car off and take key out (crucial to do). Hold down the three buttons on the 8500 x50 (yes there is a mute button on the front of the unit along with the two buttons up top that you know are there). Turn car on - let go of all 3 buttons simultaneously. It will reset the detector but keep in mind all errors are still stored.
as for the 8500 x50, you need a tune up. I'll copy/paste from the forum:
The service required message almost always means that the detector encountered critical error/s during a regular self calibration routine. Most detectors use an analog tuning scheme for proper calibration similar to an old radio where you turn the **** to the station you desire. The problem is that over time the detector needs re-calibrated which can only be done at the factory. Our modern detectors, like your X50s, use patented digital self tuning to keep it calibrated and operating at peak performance. Should the detector not be able to properly calibrate itself then it will keep trying until it can (and displays the "self cal" message). If it fails enough times then it displays service required.
I assure you that we do not put a timer in our products to display an error based on time. All detectors naturally drift out of tune over time, none will perform like new forever. Other detectors simply lose performance or quit detecting altogether without notifying you that something is wrong with it. Our calibration circuits normally can compensate but they cannot always compensate enough.
I recommend sending it in when you see the error message. The detector is trying to tell you that it is sick.
__________________
Listen to what Larry says and send it in! Also you can have them put the TSR on it while it's in there. Your unit will look and perform like new after the repair and have the worn case and lenses replaced.
If you don't have the $60 to send it in then try this:
Turn car off and take key out (crucial to do). Hold down the three buttons on the 8500 x50 (yes there is a mute button on the front of the unit along with the two buttons up top that you know are there). Turn car on - let go of all 3 buttons simultaneously. It will reset the detector but keep in mind all errors are still stored.
2nd Gear
Joined: Apr 2010
Posts: 58
Likes: 0
Selling my setup....https://www.northamericanmotoring.co...?product=21376
Email me at crxteamhonda@aol.com
Email me at crxteamhonda@aol.com
Last edited by ALSCRX; Oct 26, 2011 at 01:41 PM.
4th Gear
Joined: Jun 2011
Posts: 316
Likes: 1
From: Mobile, AL
Decided to move my detector from behind the mirror (right hand side) to the left between my light in sight and the mirror itself. There was never really enough room for my Passport directly behind the mirror itself which is where I originally wanted it. The location is quite ideal, its out of my field of view during normal driving and I can still mostly use my visor which also adds as a nice feature in the hopefully never to happen event that I get pulled over (easily put the detector out of view).
I originally used the suction cup mount but later made it much more solid by using foam double sided tape to hold it on directly to the windshield. To get it off I'll need to use a razor blade carefully but its quite secure which was my goal. I didn't like seeing it bouncing all over the place like it was before.
Here's a quick picture to show you!
 I've been thinking about an alternative to the suction cups but not sure i want to go double sided tape yet. Does sound like a good solution though.
4th Gear
Joined: Jun 2011
Posts: 316
Likes: 1
From: Mobile, AL
My only regret was not being able to find black double sided tape (the tape I could find was white). However it really is solid which is exactly what I wanted. My few drives after doing this really solidified how much better of a solution this was for my detector.