When you click on links to various merchants on this site and make a purchase, this can result in this site earning a commission. Affiliate programs and affiliations include, but are not limited to, the eBay Partner Network.
Got a good deal from dealership during Thanksgiving. Dealer asking almost $700 for the installation and programming, I decided to install it by myself to save some money and then bring the car to the dealership for the programming.
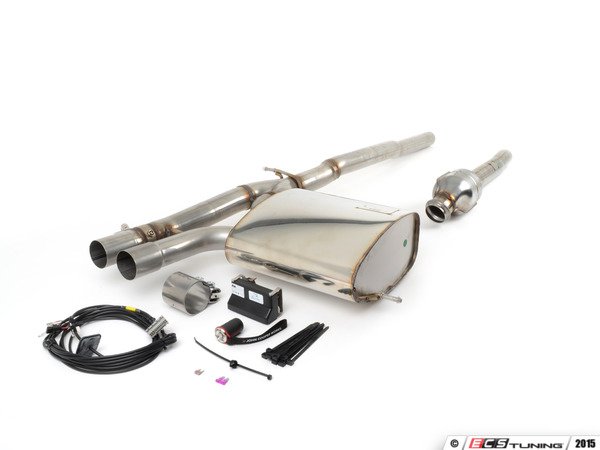
This is a very straightforward process, as long as you have proper tools and worked on cars before, you can do this. I cannot find any write up for DIY, so I decided to post some pics for people who might want to install it at home.
Part 1: Wiring Remove trunk covers
Tailgate silencer receiver unit
Ground cable
I didn't remove the side cover, use plastic pry bar to push the line behind the cover. Remove door sill cover & push the line underneath the carpet. Pull the fuse box out, behind the glove box. You have to pull the whole box out, because the wire come with the kit has to plug in from the back of the fuse box. Green circle connects to F74. There are blue tabs to hold the wires, I have no clue how to take it out, so I use rasp to shape it to the right size that I can barely push the wire in (The blue tab is to secure the wire, so you want to file the tab right amount, then push the wire hard with a screwdriver). See comment below #2 from J_L, how to remove the blue tab. cut the zip ties to move the harness on the side to give some room for the black wire to connect to F59. After both wires are done, plug the 2 fuses that come with the kit.
Part 2: Exhaust removal & installation After removing 2 plates, I started from the back. There are 2 rubber hangers. This is the one on the passenger side. This is on the driver side. Move to the front, disconnect the clamp. This is how clamp looks. For me, I spent the most time to put the new downpipe in, not sure what is the best way to do this...
The remote control has already paired with the valve. After connecting everything, start the car, double-click remote control, the valve will open or close.
I think overall it took me about 4 hrs for the installation.
---------------------------------------------------------------------------------------
Just came back from the dealership. One thing I noticed was changed is hp in driving excitement, changed from 200 to 240. torque remains 240.
About the fuse box wiring... I was confused at first too, but cracked the code eventually. You want to remove those blue things, which are a long strip, which fit like a key to lock all the wires in place. To get to the ones you need, first remove that little "side-car" fuse box, which is on the far right in your pic. Push some tabs or something, and it should slide out. Then you'll see the blue tabs for the keys. Use a screwdriver to pry, or needle-nose pliers to pull them out. Then you just stick the wires in the right hole, and add the fuse to the other side.
Would help if I had pics, I'm sure, but I think you'll get it when the fuse box is sitting in front of you. HTH!
Thanks J_L, good to know how to remove the blue tabs. Add in my post to refer to your comment. It looks simple to remove, I tried one and broke the end tab, then tried to use a screwdriver to push it out but didn't work. Anyhow, the way I did can still secure the wire, so I will leave like that.
Used this write-up yesterday for my install. Thank you for this!
One note on my install (2019 model built in late 2018).... there was already a wire and a fuse in F59. I decided (not really the proper way to do this) to tap the outgoing wire (solid green) that was in this spot to connect the black wire. Its working properly. But I plan to email my local dealer to get more information on why I already had a wire there and some detail on what I need to do to wire this properly.
I also used this for my installation, great write up. Thank you @GT350 for the fantastic work. I currently don't have the remote paired to my car yet. (It didn't do it out of the box, but I'll have more time to troubleshoot and then take it in for programming.
Hello, I'm new to Minis, having just traded in my Abarth 124 Spider with Record Monza exhaust. The exhaust used a simple spring controlled flap that routed exhaust past the muffler, so the harder the engine worked, the more the exhaust would by-pass the muffler. Simple and made the exhaust loud when you wanted and less so when you didn't, very nice for our quiet neighborhood and cruising along. I'm looking at the JCW exhaust system, as I do miss the exhaust sound on my '21 S, but it looks a lot more involved with electronics and such. How does the JCW exhaust system work exactly? Thank you in advance.
Seagas, The valve is controlled from a bluetooth button that you can move around. The actual valve draws power from the car's electronic system. Hope that helps!
I was looking at JCW Pro but end up with Remus instead. In addition to being cheaper, Remus offer variable valve position as well as Bluetooth module that can vary the valve opening based on engine speed.
I know its a old thread, but in interest of making peoples life easier,
to thread it from Boot to the door sill just lifted out the rear seat bottom (just puck up on the front edge it pops off and you can slide out over the seatbelt clips) then you could slide it under the rear trim and cleanly put the extra cable loop just in front of the wheel well, this also let me then push it up under the panel (the trim can be pulled around the seatbelt anchor so you can slide it up further - the 85+ weather helps with panel flex)) and have some play both backwards in the boot and some forward in the sill area and through the kick to the fuse but it won't get pinched or show outside in the boot. And the Part about the Removing the sidecar (yes it is clips on the front) and pulling the blue strip out will make your fuse life easier for sure... still have to get it on a lift to to the actual exhaust swap but the threading is way easier on ground and with some warmth to move the trim with flex
I have to ask, does anyone else have difficulty with the consistency of the bluetooth remote? I absolutely hate how it takes a million tries sometimes to get it to open and close. I'm highly considering hard wiring the valve instead. I have NO clue about electrical so it'll be a huge undertaking for myself.