
Electrical Seat position sensor


Thread Starter
|
1st Gear
Joined: Jul 2013
Posts: 17
Likes: 0
Seat position sensor
2009 Cooper
Recently I started getting the airbag error on the dash. The two warnings on the speedo and the large airbag symbol where the speed displays on the tach. I read the codes with inpa and then cleared them. The code is for the seat position sensor. I can't tell what is wrong with the sensor but sometimes while driving the code will clear spontaneously and the speed will return to the big window in the tach and it will be as though nothing ever happened. At least for a a few miles before the warning lamps return.
I'm not a fan of throwing money at an issue without testing so I need help determining if the sensor is bad or maybe the magnet isn't in the right position. I'm not sure where the magnet is on the rail as I can't really see much under the seat.
Any help is welcome. I didn't see much in the search. I feel like I may be on of the few with this problem if it is indeed the problem.
thanks


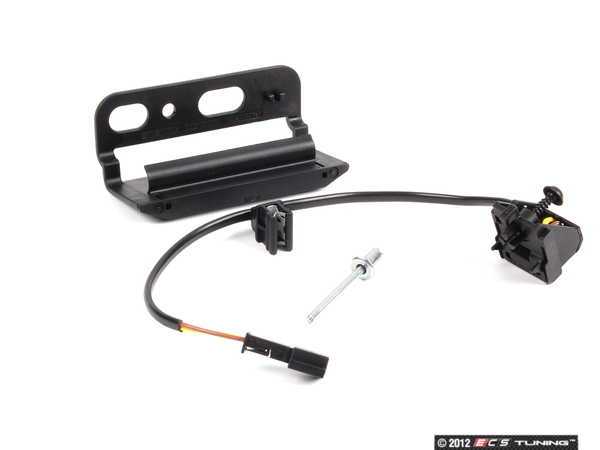
Here is the sensor. I would inspect the sensor first to see if there is any damage or maybe is popped out of place.
Seat Position Sensor Part # 52102752671
http://www.ecstuning.com/Search/SiteSearch/52102752671/
Thread on the position sensor:
https://www.northamericanmotoring.co...g-light-4.html
Thanks
Seat Position Sensor Part # 52102752671
http://www.ecstuning.com/Search/SiteSearch/52102752671/
Thread on the position sensor:
https://www.northamericanmotoring.co...g-light-4.html
Thanks
__________________

MINI Guru/ MINI Owner Since 2004 | NEW Lifetime Part Replacement | Local Pickup
Milltek | Genuine MINI | Forge Motorsport | NM Engineering | ECS Performance | M7 Speed
Customer Service Hours: 8am-8pm EST|Sales Team Hours: 8am-11pm | SAT 10am-7pm 800.924.5172
MINI Guru/ MINI Owner Since 2004 | NEW Lifetime Part Replacement | Local Pickup
Milltek | Genuine MINI | Forge Motorsport | NM Engineering | ECS Performance | M7 Speed
Customer Service Hours: 8am-8pm EST|Sales Team Hours: 8am-11pm | SAT 10am-7pm 800.924.5172
Don' t think there is a true way to test it. I guess one could use a voltmeter and test for ohm change or current change as it slides.
__________________
MINI Guru/ MINI Owner Since 2004 | NEW Lifetime Part Replacement | Local Pickup
Milltek | Genuine MINI | Forge Motorsport | NM Engineering | ECS Performance | M7 Speed
Customer Service Hours: 8am-8pm EST|Sales Team Hours: 8am-11pm | SAT 10am-7pm 800.924.5172
MINI Guru/ MINI Owner Since 2004 | NEW Lifetime Part Replacement | Local Pickup
Milltek | Genuine MINI | Forge Motorsport | NM Engineering | ECS Performance | M7 Speed
Customer Service Hours: 8am-8pm EST|Sales Team Hours: 8am-11pm | SAT 10am-7pm 800.924.5172
Thread Starter
|
1st Gear
Joined: Jul 2013
Posts: 17
Likes: 0
*update* It was my seat position sensor. The wire was frayed and broken. On occasion they would touch and the airbag warning lights would turn off then one bump later they were back. The solution to trim the wires and solder or tape them together or replace the sensor. I went with replacement considering this is a cheap part with great repercussions if it fails again.
I bought the sensor kit from ECS and it was pretty easy to put on though I had two issues during installation. One, the rivet included to secure the magnet to the seat rail was steel whereas the original is aluminum. My rivet gun didn't want to pop the rivet stem off so I had to dremel it off. It could be an issue with my handheld rivet gun. The second is the sensor is held to the rail by a allen keyed screw which due to the tight nature of the seat rail mad my allen wrenches all but impossible to use because they were too long for the given space. To remedy this I cut 1/2" off of allen wrench and the installation went smoothly.
I didn't remove the seat from the car only unbolted it and tipped it backwards in to the passenger area. All in all it took about 1.5 hours because I had never done it before and had no idea how to position the seats to ease in unbolting them. I do now though. I have pictures and I could put up a walk through if anyone's interested.
Glad you got it fixed and that was the issue. Post up some of those pics.
__________________
MINI Guru/ MINI Owner Since 2004 | NEW Lifetime Part Replacement | Local Pickup
Milltek | Genuine MINI | Forge Motorsport | NM Engineering | ECS Performance | M7 Speed
Customer Service Hours: 8am-8pm EST|Sales Team Hours: 8am-11pm | SAT 10am-7pm 800.924.5172
MINI Guru/ MINI Owner Since 2004 | NEW Lifetime Part Replacement | Local Pickup
Milltek | Genuine MINI | Forge Motorsport | NM Engineering | ECS Performance | M7 Speed
Customer Service Hours: 8am-8pm EST|Sales Team Hours: 8am-11pm | SAT 10am-7pm 800.924.5172
Thread Starter
|
1st Gear
Joined: Jul 2013
Posts: 17
Likes: 0
Trending Topics
Great. 
__________________
MINI Guru/ MINI Owner Since 2004 | NEW Lifetime Part Replacement | Local Pickup
Milltek | Genuine MINI | Forge Motorsport | NM Engineering | ECS Performance | M7 Speed
Customer Service Hours: 8am-8pm EST|Sales Team Hours: 8am-11pm | SAT 10am-7pm 800.924.5172
MINI Guru/ MINI Owner Since 2004 | NEW Lifetime Part Replacement | Local Pickup
Milltek | Genuine MINI | Forge Motorsport | NM Engineering | ECS Performance | M7 Speed
Customer Service Hours: 8am-8pm EST|Sales Team Hours: 8am-11pm | SAT 10am-7pm 800.924.5172
Found it.
Seat Position Sensor replacement : DIY
https://www.northamericanmotoring.co...nsor-swap.html
Great job Zel
Seat Position Sensor replacement : DIY
https://www.northamericanmotoring.co...nsor-swap.html
Great job Zel
__________________
MINI Guru/ MINI Owner Since 2004 | NEW Lifetime Part Replacement | Local Pickup
Milltek | Genuine MINI | Forge Motorsport | NM Engineering | ECS Performance | M7 Speed
Customer Service Hours: 8am-8pm EST|Sales Team Hours: 8am-11pm | SAT 10am-7pm 800.924.5172
MINI Guru/ MINI Owner Since 2004 | NEW Lifetime Part Replacement | Local Pickup
Milltek | Genuine MINI | Forge Motorsport | NM Engineering | ECS Performance | M7 Speed
Customer Service Hours: 8am-8pm EST|Sales Team Hours: 8am-11pm | SAT 10am-7pm 800.924.5172
Yea looks good with the pics.
__________________
MINI Guru/ MINI Owner Since 2004 | NEW Lifetime Part Replacement | Local Pickup
Milltek | Genuine MINI | Forge Motorsport | NM Engineering | ECS Performance | M7 Speed
Customer Service Hours: 8am-8pm EST|Sales Team Hours: 8am-11pm | SAT 10am-7pm 800.924.5172
MINI Guru/ MINI Owner Since 2004 | NEW Lifetime Part Replacement | Local Pickup
Milltek | Genuine MINI | Forge Motorsport | NM Engineering | ECS Performance | M7 Speed
Customer Service Hours: 8am-8pm EST|Sales Team Hours: 8am-11pm | SAT 10am-7pm 800.924.5172

Thread
Thread Starter
Forum
Replies
Last Post
igzekyativ
MINIs & Minis for Sale
34
Jul 16, 2020 12:54 PM
DWooderson
1st Gen Countryman (R60) Talk (2010-2015)
3
Aug 10, 2015 09:12 AM