
Drivetrain Brake pad replacement tip for the rear caliper


Thread Starter
|
Temporarily Banned
Joined: Oct 2002
Posts: 3,382
Likes: 2
From: Denver
We discovered a very trick way to replace the rear pads on the MINI, so I thought I'd share. I'll put it in the how-to also.
The rear caliper piston on the MINI requires turning at the same time you push it in order to compress it. This is a difficult task to accomplish - at least it used to be!
You take a C-Clamp with a swivel foot on the end, and place the swivel foot on the piston. When you tighten the clamp, it will turn the piston at the same time it compresses it - just the trick!

Let me know if you have any other questions.
Randy
720-841-1002
The rear caliper piston on the MINI requires turning at the same time you push it in order to compress it. This is a difficult task to accomplish - at least it used to be!
You take a C-Clamp with a swivel foot on the end, and place the swivel foot on the piston. When you tighten the clamp, it will turn the piston at the same time it compresses it - just the trick!
Let me know if you have any other questions.
Randy
720-841-1002
 Is this common on newer cars? What is the purpose of this? Are the front like this too?

Banned
Joined: Mar 2003
Posts: 2,859
Likes: 0
From: Plymouth, MN
My 1988 VW Quantum Syncro Wagon also needed the rear calipers
turned while pressing them in.
I also used a C clamp and it worked there as well.
This design is used so that the rear brakes can be applied
with the emergency brake lever without requiring an
extra small caliper and two more brake pads like on some
other cars with 4-wheel disk brakes.
Pretty cool if you ask me.

3rd Gear
Joined: Apr 2002
Posts: 254
Likes: 0
From: Southern California
>>This design is used so that the rear brakes can be applied
>>with the emergency brake lever without requiring an
>>extra small caliper and two more brake pads like on some
>>other cars with 4-wheel disk brakes.
>>
That makes sense! Thanks!
>>with the emergency brake lever without requiring an
>>extra small caliper and two more brake pads like on some
>>other cars with 4-wheel disk brakes.
>>
That makes sense! Thanks!

4th Gear
Joined: Oct 2002
Posts: 587
Likes: 0
FWIW, you can buy the tool (or borrow one for free from Autozone) to retract the pistons. I know VWs and BMWs all do this sort of thing. It was new to me until I helped a friend with a VW vanagon change her pads.
FWIW Part 2, most of the pistons will either have two holes, or a hex-shaped hole for the tool to insert into. I *finally* figured out what that cube-shaped thing was in pep boys.
Jeff
FWIW Part 2, most of the pistons will either have two holes, or a hex-shaped hole for the tool to insert into. I *finally* figured out what that cube-shaped thing was in pep boys.
Jeff
Trending Topics

4th Gear
Joined: Feb 2003
Posts: 413
Likes: 0
From: Dublin, NH
Something like this? 
Would this be helpful or should I just use a c-clamp? I'm planning on painting my calipers and the only thing I am worried about is getting the rear caliper back together again. Is it hard to do?
-Chris
Would this be helpful or should I just use a c-clamp? I'm planning on painting my calipers and the only thing I am worried about is getting the rear caliper back together again. Is it hard to do?
-Chris
4th Gear
Joined: Oct 2002
Posts: 587
Likes: 0
The only thing that I'm not sure of is if the piston is actually threaded (and must be turned at a certain rate as you push it in) or if it's just rotate as you keep pressure on it.
I haven't actually had to do 'em yet. Oh, and yes--that's the tool that was always a head-scratcher in the part store.
Jeff
I haven't actually had to do 'em yet. Oh, and yes--that's the tool that was always a head-scratcher in the part store.
Jeff
4th Gear
Joined: Feb 2003
Posts: 413
Likes: 0
From: Dublin, NH
The 3" c-clamp will not work. You need a really BIG c-clamp to get this to work. I grabbed one that I had but it was still too small (bigger than 3" but I'm not sure of the exact size). I ended up just grabbing a pair of needlenosed pliers and sticking it in two opposing holes and turning and pushing. Took a little effort but really wasn't bad. No worse than the effort needed to get the bracket bolts off.
To give you a better idea of what it looks like, it's a disc with 4 holes in a square pattern with the holes being at the four corners. If you really want to ensure that you'd get it back on I'd get that cube looking part. I'm not 100% sure it fits but it looks like it does. I saw one at my local hardware/tool store for about $12. I didn't get it because I wasn't sure what it looked like but if I was going to do it again, for $12 I'd get it. But in a pinch the needlenosed pliers work well.
Also the HOWTO's are located as a sticky thread at the top of the "Performance Modifications" thread. The brakes are suprisingly easy. I painted my calipers and the hardest part was cleaning the brake dust off! bleah... nasty stuff
-Chris
_________________

1st Gear
Joined: Apr 2003
Posts: 23
Likes: 0
From: Beaverton, OR
The special square tool I bought does not have pegs that match up to the piston's holes. Needlenose pliers turn the piston but I can't get it to retract. Which direction should it turn - does it matter? Piston has actually pushed itself out another 1/4" now so I can't even get the stock pads back in. I'm off to the hardware store to buy an 8" C-Clamp. I trust that I can torque it down hard and it WILL turn? I tried using my 3" clamp, at an angle, and the piston didn't turn.
Oh, and since I ripped the piston dust boot (!@#$!), any tips on R/R? It doesn't seem to easily peel off so I'm wondering if it's glued on.
This was supposed to be an easy project...
Oh, and since I ripped the piston dust boot (!@#$!), any tips on R/R? It doesn't seem to easily peel off so I'm wondering if it's glued on.
This was supposed to be an easy project...

3rd Gear
Joined: Aug 2003
Posts: 172
Likes: 0
From: Oklahoma
Has anyone tried retracting the piston while the brake line is removed? I am getting ready to paint my calipers and install stainless steel lines. I am not changing pads so I really should only have to retract the pistons a small amount to facilitate reinstallation.

2nd Gear
Joined: Nov 2006
Posts: 111
Likes: 0
BMW's do this? That's news to me, as I've had 4 (I guess doing the brakes on my GF's makes 5 for brake jobs) and none of them required the pistons to be rotated to retract. They all had a 2cd set of parking brake shoes on the inside of the rotor, so this wasn't needed.
Also, I have previously bought 2 tools for this job (I also had a Turbo Mitsu that required this) and neither one will fit the Mini's piston. FYI, for those that have asked, it's only the rear piston that requires this, the fronts just push in.
Needle nose pliers will also work, as has been mentioned. Just push in slightly while turning clockwise IIRC. Removing the brake line won't help.
FWIW, you can buy the tool (or borrow one for free from Autozone) to retract the pistons. I know VWs and BMWs all do this sort of thing. It was new to me until I helped a friend with a VW vanagon change her pads.
FWIW Part 2, most of the pistons will either have two holes, or a hex-shaped hole for the tool to insert into. I *finally* figured out what that cube-shaped thing was in pep boys.
Jeff
FWIW Part 2, most of the pistons will either have two holes, or a hex-shaped hole for the tool to insert into. I *finally* figured out what that cube-shaped thing was in pep boys.
Jeff

I was riding home and noticed a light illuminated on the speedometer, you know the one, it's yellow with a black circle with semi circles on each side.
Well after consulting the car manual one of my brake wear sensors was activated. I repleaced the front pads 1 month ago so I assmed it was the rear's. After inspection of the front and rear brakes, my assumptions were correct, the rears need to be replaced.
Purchased OEM pads and wear sensor and noticed something different on the inner pads for each side has additional hardware that I did not see when replacing the front pads. So I was very cautious when disassembling the calipers and replaced the pads, everything fit pretty well, I could freely spin the wheel with very little resistance. I replaced the wear sensor and properly reseated the connector and neatly secured the senor cable in place. Well when I started the car the yellow warning light is still illuminated, I read the Hayes manual that has no mention of having to reset or if the warning was cleard when replacing the senor...did I miss something?? I thought the senor connector is keyed and can only be connected when the keys match?
Also I can hear an intermittent brake rub sound comming from the rear and the rear rotors are hotter than the front one after a 25 mile trip, are their any special alignments required and what is the additional hardware for on the inner pads?
I'm going to reinspect the pads tonight after work to see if anything unusual can be observed.
Your rear pads are not quite installed correctly. 
Here is what you need....
https://www.northamericanmotoring.com/forums/showthread.php?p=2537161#post2537161
I've never had a my brake light come on, but I'm sure someone here can tell you how to shut it off.
Here is what you need....
https://www.northamericanmotoring.com/forums/showthread.php?p=2537161#post2537161
I've never had a my brake light come on, but I'm sure someone here can tell you how to shut it off.
Your rear pads are not quite installed correctly.
Here is what you need....
https://www.northamericanmotoring.com/forums/showthread.php?p=2537161#post2537161
I've never had a my brake light come on, but I'm sure someone here can tell you how to shut it off.
Here is what you need....
https://www.northamericanmotoring.com/forums/showthread.php?p=2537161#post2537161
I've never had a my brake light come on, but I'm sure someone here can tell you how to shut it off.
Wow...thanks. I'll check it out tonight. Still not quite sure about how the clip attaches to the cailper, maybe when I have it off in front of me it will make sense.
Thanks again this helps me out.

4th Gear
Joined: Feb 2008
Posts: 304
Likes: 1
From: Nashvegas
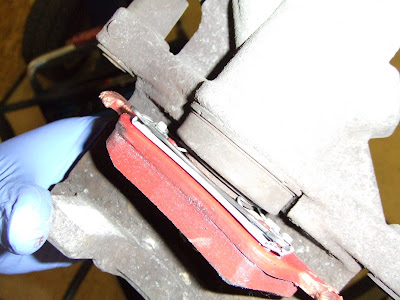
I had the same problem and fixed it yesterday. There are 3 retaining wires on the brake pad - 2 short "side" wires and a 3rd, longer, what I call "bottom" wire. The clip onto the piston.
All you have to do is get the left side wire to catch on the caliper piston. Then pull the brake pad to the left to create some more space between the two short wires (they are setup as springs so they have some give to them). With a flat screwdriver, you should be able to catch the right wire and clip it over the lip of the piston.
Now take the screwdriver and force the bottom wire over the lip of the piston and you are done.
Now all of this has to be done while holding the caliper still, holding the brake pad in place, and manipulating the screwdriver. Wish I had about 4 hands a couple of times, but I got it done rather quickly on both sides.
No more squealing.
Not sure about the sensor though - if you wore through the old one, you do have to replace the sensor wire with a new one. That is detailed in the "How To's" that are found here:
https://www.northamericanmotoring.co...ead.php?t=5338
Look for the "Rear Brake" how to by Octane Guy.
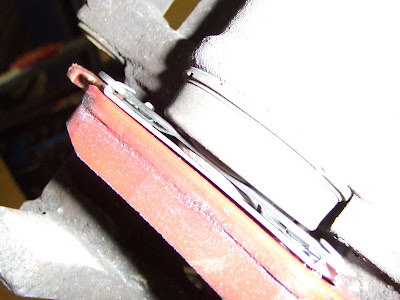
If I read your description correctly the 3 spring should be placed outside the pistion perimiter? When looking at the image provided by AutoXCooper in the link you provided the the long spring that is in theimage is incorrectly positioned, is this correct? Looking at the image in the link the long spring is between the inner pad and the piston.
The tension of the three springs is what holds the inner pad in place....
The tension of the three springs is what holds the inner pad in place....
4th Gear
Joined: Feb 2008
Posts: 304
Likes: 1
From: Nashvegas
They bled my brakes the other day and swapped my calipers to the proper side (long embarrassing story), and charged me $350 in parts and labor.