
Suspension BC coilovers installed (how-to & feedback)


3rd Gear
Joined: Oct 2006
Posts: 239
Likes: 0
Hi,
Can you share the symptoms of this thing wearing out? I means beside noise, what else? Did it affecting the car handling, steering feel?
Thank you so much.
Can you share the symptoms of this thing wearing out? I means beside noise, what else? Did it affecting the car handling, steering feel?
Thank you so much.


I must have read through this thread 2 or 3 times in the past 2 weeks and found a lot of helpful info in here so thank you all 
I know this is the BC thread but I just installed a set of Megans this past Saturday and wanted to note something that seems to have been updated since many of the posts in this thread that mention them.... the Megans go stupid low now, they adjusted a bracket in the rear to mount to the body rather than the threaded area and must have done some other things b/c it is now very low in the back. I set mine about 4 threads from bottom when I installed and had to go back and double it on both sides (I'm now about 24" ground to fender in the rear).
Also, if the OP is still around it would be extremely helpful if you could update your original post since none of the images are showing up (it might be my work computer but I'm pretty sure they didn't show up at home either). I didn't install my rear adjustment cables b/c I was a bit hesitant about drilling a hole in the body without some images to guide me (I may revisit that at a later point though).
So thank you all again for this helpful thread.

Thread Starter
|
6th Gear
Joined: Nov 2003
Posts: 2,349
Likes: 2
From: Concord, California
hi from the "OP"
I was a vendor a while back and that gave me a bunch more photo room. I will dump those that are not needed and the photos should show up ... or i will re post .
Thanks
I was a vendor a while back and that gave me a bunch more photo room. I will dump those that are not needed and the photos should show up ... or i will re post .
Thanks
3rd Gear
Joined: Mar 2011
Posts: 206
Likes: 1
From: Nashville, TN
Should be able to host on a picture website and use the URL to post the pictures.
I had the same issue and decided not to cut, I instead guessed at a setting (I think I went 7 clicks from soft, figure 7 was a lucky #), I then removed the adjustment cables and installed them without cutting into the rear. It would have been nice to have the adjustment capabilities but I guess if I really want to I can just pull the coilover down from the top, wasn't too hard to install the rears.
1st Gear
Joined: Oct 2011
Posts: 26
Likes: 0
I actually went ahead and installed the rear ***** they arent too bad. You have to take out the entire rear interior though which is a *****. Once youve done that move the wiring harness well out of the way. I know this because I accidentally drilled into it, causing lots of sparks and I almost lit myslef on fire... haha. Then just drill straight up. Heres what it looks like without the interior panels in.
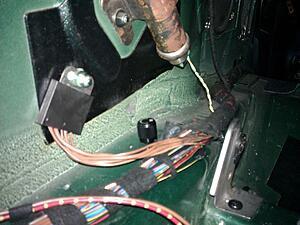
When you put the interior back in its easy to get at because of those two little doors in the trunk. The ones that allow you to reach the rear tail lights.

When you put the interior back in its easy to get at because of those two little doors in the trunk. The ones that allow you to reach the rear tail lights.

6th Gear
Joined: Mar 2004
Posts: 1,235
Likes: 2
From: Ventura Co. Calif.
About six inches. Thats when the jack blocks will be sitting on the ground.

2nd Gear
Joined: Jul 2012
Posts: 83
Likes: 0
I have a set of BC coilovers on my MCS. Their apparent quality is very impressive. Out of the box, their construction and assembly look top-shelf. Playing with the damping adjustment **** clearly demonstrates a wide range of damping capability to suit a wide range of springs rates and setup preference. The pillowball front and rear mounts are very sturdy and precise feeling. I was impressed to see the upper spring perch is mounted with a ball bearing, reducing spring bind over damper excursion.
For the install, I set them up so I have 2/3rds travel as extension and 1/3rd travel as compression [including bump stop compression]. As part of the install, I fabricated a front-drop spindle, relocated front pick-up points and steering rack, and an R56 rear trailing arm [among other goodies].
I wasn't impressed with the 8kg/mm front and rear springs the BC's came with. I replaced them with a set of Swift 2.5" ID coilover springs; 7kg/mm front and 5kg/mm rear. With my corner weights of about 800 front and 460 rear, these spring rates allowed the droop vs. compression travel I was looking for.
Driving impressions, even out of the box, were very positive. You can feel the quality damping curves; very similar feeling to my roomates' Evo IX; firm but never harsh. After swapping the stock springs for the Swift springs, the level of quality and feel went up dramatically. The car has a ride quality that is without excuse; the handling balance is superb, and NVH is only marginally more than stock, despite the full spherical setup. I'm currently running my dampers at 10 from full-soft in front and 11 from full-soft in rear. This gives the car a firm enough rear damper curve to give awesome transient response without it feeling unbalanced or having a rear-biased harshness.
I highly recommend these coilovers provided you're willing to spring [pun, ha!] for a set of Swift springs. I got mine from Evasive Motorsport [an Evo tuner] in Cali, just down the street from Swift NA.
Coilover setup:
Front:
Spring: 7kg/mm 6" free-length Swift spring with zero preload
Damper position: 10 clicks from full-soft
Length: 1/4" from full short, with 3/8" spindle drop
Ride height: 12.0" [stock was 14.0"]
Rear:
Spring: 5kg/mm 7" free-length Swift spring with zero preload
Damper position: 11 clicks from full-soft
Length: Full short, with ABS and brake line bracket moved to the top of the lower shock mount to allow for full-short length.
Ride Height: 11.6" [stock was 13.5"]
Here's a side profile shot: Tires are 205/40-16 [22.5" diameter], hence having wheel gap

If you're interested, my whole suspension thread is HERE.
Cheers,
Ryan
For the install, I set them up so I have 2/3rds travel as extension and 1/3rd travel as compression [including bump stop compression]. As part of the install, I fabricated a front-drop spindle, relocated front pick-up points and steering rack, and an R56 rear trailing arm [among other goodies].
I wasn't impressed with the 8kg/mm front and rear springs the BC's came with. I replaced them with a set of Swift 2.5" ID coilover springs; 7kg/mm front and 5kg/mm rear. With my corner weights of about 800 front and 460 rear, these spring rates allowed the droop vs. compression travel I was looking for.
Driving impressions, even out of the box, were very positive. You can feel the quality damping curves; very similar feeling to my roomates' Evo IX; firm but never harsh. After swapping the stock springs for the Swift springs, the level of quality and feel went up dramatically. The car has a ride quality that is without excuse; the handling balance is superb, and NVH is only marginally more than stock, despite the full spherical setup. I'm currently running my dampers at 10 from full-soft in front and 11 from full-soft in rear. This gives the car a firm enough rear damper curve to give awesome transient response without it feeling unbalanced or having a rear-biased harshness.
I highly recommend these coilovers provided you're willing to spring [pun, ha!] for a set of Swift springs. I got mine from Evasive Motorsport [an Evo tuner] in Cali, just down the street from Swift NA.
Coilover setup:
Front:
Spring: 7kg/mm 6" free-length Swift spring with zero preload
Damper position: 10 clicks from full-soft
Length: 1/4" from full short, with 3/8" spindle drop
Ride height: 12.0" [stock was 14.0"]
Rear:
Spring: 5kg/mm 7" free-length Swift spring with zero preload
Damper position: 11 clicks from full-soft
Length: Full short, with ABS and brake line bracket moved to the top of the lower shock mount to allow for full-short length.
Ride Height: 11.6" [stock was 13.5"]
Here's a side profile shot: Tires are 205/40-16 [22.5" diameter], hence having wheel gap
If you're interested, my whole suspension thread is HERE.
Cheers,
Ryan

4th Gear
Joined: Aug 2009
Posts: 308
Likes: 0
From: Maryland
Does anybody have the directions to Installing BC Coilovers, pics and directions, from COR BLMY? Since he is no longer a vendor on here NAM ripped his pics. He was the one that started this thread a way back in 2007, but I need directions for Saturday, who can help me out?
Thread Starter
|
6th Gear
Joined: Nov 2003
Posts: 2,349
Likes: 2
From: Concord, California
@speedracer0212,
Just sent you a message . If you PM me your email I will send you: PRE install set up / Install write up and photos / how to adjust.
I will try to host pics and re submit the photos for all as well .
WyvernMotorsports still in biz ans still selling BCs and our other stuff
Just sent you a message . If you PM me your email I will send you: PRE install set up / Install write up and photos / how to adjust.
I will try to host pics and re submit the photos for all as well .
WyvernMotorsports still in biz ans still selling BCs and our other stuff
4th Gear
Joined: Aug 2009
Posts: 308
Likes: 0
From: Maryland
So I used the DIY instructions from COR BLMY and the BC Coilovers are installed. The DIY was a great write up; clean, cut, and precise. I spent 7 hours on Saturday installing the COs. I spent Sunday afternoon adjusting ride height. Unfortunately, come Monday, I still did not have the R56 ready and so I drove my mom's car to work. After work, me and a friend had to remove the COs and re-adjust preload for all four corners, so we just decided to adjust ride height as well. I was an idiot and didn't adjust ride height in all four corners off the car. (Make sure you set preload and ride height off the car.) I had some trouble, but that was because I was not thinking about it clearly and all I was thinking about was how it is going to look and how I can't wait to get them on the car. I will say that if you have the $$$ you can get it professionally done, however its not completely necessary and somewhat of a waste of money, unless you don't have the time. I can say that $1000 for an install at an import shop for 4 hours is actually reasonable., but your better off doing it yourself and saving the money. Just make sure you adjust everything off the car, as it will be easier. You can easily adjust ride height when installed on the car, however preload is too difficult on the car.
, but your better off doing it yourself and saving the money. Just make sure you adjust everything off the car, as it will be easier. You can easily adjust ride height when installed on the car, however preload is too difficult on the car.
Last edited by SpeedRacer0212; Sep 12, 2012 at 08:09 PM.
Thread Starter
|
6th Gear
Joined: Nov 2003
Posts: 2,349
Likes: 2
From: Concord, California
speed ,,,
sorry you seem to be having so much trouble.
Did you set the preload OFF the car before install ? And lock that ?
Once installed . that preload should NOT be touched .
Ride height simply is the bottom of the unit screwing in or out of the bottom housing.
As I said when you contacted me, and sent my install , and reposted the photos ,,, that if you had questions that I was happy to help.
Last edited by COR BLMY; Sep 12, 2012 at 09:29 PM.
4th Gear
Joined: Aug 2009
Posts: 308
Likes: 0
From: Maryland
So I finished up everything Monday night. Unfortunately, I had to remove the COs, reset the preload and readjust the height. What my mistake was, was that I was moving the upper locking ring at the same time on the rears when I was trying to adjust height, and I was basically moving the preload setting. So I just started all over. Regardless, it is easier to adjust height in the front than it is in the rear.
Now everything is set. I did set up my suspension to be lower in the rear than in the front, because I did not want to be hitting possible objects on the road, even though most people say that you should have the front lower and rear higher, but to each their own. Even for the height that it is at now in the front I had to remove the rubber lower lip or fasica on the underside of the car. Went to the MINI dealer to get an alignment, and now my car is spec or aligned like a JCW GP Spec 2 suspension setup. I do like the setup and I have been adjusting the dampers to a stiffer setting as I continue to drive. I am at a 17 at all four corners,until I fill set with the stiff or soft ride I will keep the panels off the car, however it annoying hearing road noise.
Per your help that you would have provided, I do appreciate your willingness to help, but it not like you would have responded immediate, since I was working on it all day for the past three days.
Just to let you know how everything is, I sometimes receive a clank in the right rear during slow and high speeds depending on what I hit in the road, but I can't quite make out what it is. I have notice that if I am pulling in and out of my driveway diagonally, very slowly I get that metal clank, do you think you know what this is? Everything is torque to spec, but I think I am going to just lift her back up in the rear and recheck everything. I am also going to jackup the right rear wheel and see if the endlink is touching something or my right rear wheel is just hitting inner upper fender. What do you guys think?
P.S. I did use the provided front endlinks that came with the system, but I reused the stock rear endlinks. I am guessing if the endlink is touching something when compressed would have to get the adjustable ones.
Last edited by SpeedRacer0212; Sep 12, 2012 at 06:55 AM. Reason: Endlinks possibly hititing.
Thread Starter
|
6th Gear
Joined: Nov 2003
Posts: 2,349
Likes: 2
From: Concord, California
Good job, sounds like you are getting things in hand and set up.
A couple of hints and some input ... if I may.
"What my mistake was, was that I was moving the upper locking ring at the same time on the rears when I was trying to adjust height"
*Use a paint pen or modelers paint and put a stripe on the preload nuts. (the first 2 under the spring)
ALWAYS keep an eye on that when adjusting rideheight, they should always remain locked ... that way you won't accidently adjust the preload.
Also when adjusting rideheight . keep an eye on the boot and make sure it is free floating and not twisting ... it will rip
"I did set up my suspension to be lower in the rear than in the front ... but to each their own"
*It is "OK to take a bit of RAKE out but ... more to this than ... "to each their own"
This does affect the setup and geometry. Care to share a photo ?
"I have been adjusting the dampers to a stiffer setting as I continue to drive. I am at a 17 at all four corners"
*After installing MANY and driving ... I promise you that for road use ... think softer. I set at 6 0r 8 up from sofest as a start and base point.
The impulse is to go harder ... Yes, for track or Auto-X .. but still then I have discovered that too hard up front starts putting in understeer & too hard in the rear can put in oversteer, (it is always a crompromise and a balancing act, with MANY variables)
"Per your help that you would have provided, I do appreciate your willingness to help, but it not like you would have responded immediate, since I was working on it all day for the past three days."
*Promise ... you could have tried, think I have been fairly helpful so far . not being the one who you purchased from.
"clank"
*Check clearances. I don't suspect the endlinks . there is a lot of room and the STD ones will just push you antiroll bar off of parallel, not optimum , but will work and should clear.
Did you do rear control arms at the same time?
If so that is where I have found many a clank
Last edited by COR BLMY; Sep 12, 2012 at 05:21 PM.
4th Gear
Joined: Aug 2009
Posts: 308
Likes: 0
From: Maryland
At this time I currently do not have a pic to show you, I will upload one tomorrow showing the difference in the front to the rear. Its not that much higher IMHO, but I figured I would ask to see what you had to say.
I did install LCAs. I installed H-Sport Lower Control Arms. Where would it be hitting, and how can this be fixed- raising her up in the rear?
I did install LCAs. I installed H-Sport Lower Control Arms. Where would it be hitting, and how can this be fixed- raising her up in the rear?


Thread Starter
|
6th Gear
Joined: Nov 2003
Posts: 2,349
Likes: 2
From: Concord, California
Looks nice.
You say the front is higher than the rear . Are you saying that because of the wheel gaps ? The arches are not the same, as the fronts have to turn.
The rake angle is seen at the sill, it looks like in respect to rake that you still have a angle down to the front from rear ... thats good/
You say the front is higher than the rear . Are you saying that because of the wheel gaps ? The arches are not the same, as the fronts have to turn.
The rake angle is seen at the sill, it looks like in respect to rake that you still have a angle down to the front from rear ... thats good/
4th Gear
Joined: Aug 2009
Posts: 308
Likes: 0
From: Maryland
I just notice, that the front arches actually are different then the rear arches. Uh, well this is good. Yea, I am happy with how low it is, and I kinda want to lower the front some more, but I will leave it as it for awhile. Yes, it is still clearly on a downward slope from rear to front.
So you see my LCA, what could possible be clanking. And why does the rear feel like it is being pull underneath me when I go over bigger than normal bumps or cracks in the road. I want to say, it is like this because the seats are not in the back and it is light in the rear.
So you see my LCA, what could possible be clanking. And why does the rear feel like it is being pull underneath me when I go over bigger than normal bumps or cracks in the road. I want to say, it is like this because the seats are not in the back and it is light in the rear.

4th Gear


Joined: Jun 2010
Posts: 333
Likes: 7
Just installed these coilovers. First impressions positive - ride quality much improved over stock shocks + Eibach springs, but ride is harsher than before. Do not mind too much, though.
Left rears at 12 clicks from soft, and didn't drill holes- too much hassle and I'll never change them anyway. The installation manual is incomprehensible - is it difficult to adjust ride height by myself? I went about1" lower than my Eibachs - which were already around 1.8" lower than stock - I'm thinking I should come up an inch or so. My mechanic wants to charge me an hour of labour. Can I do it myself or do I need a lift?
Left rears at 12 clicks from soft, and didn't drill holes- too much hassle and I'll never change them anyway. The installation manual is incomprehensible - is it difficult to adjust ride height by myself? I went about1" lower than my Eibachs - which were already around 1.8" lower than stock - I'm thinking I should come up an inch or so. My mechanic wants to charge me an hour of labour. Can I do it myself or do I need a lift?
4th Gear
Joined: Aug 2009
Posts: 308
Likes: 0
From: Maryland
I am leaving my setup like it is for another month and then I am getting an import shop to adjust preload and ride height. Mine looks alright, however I don't really trust myself with the preload and I want to go lower on the height in all four corners anyway. I also don't feel like messing with it again, since in my personal experience I had a tough time. They are going to charge me $118.50 to adjust preload and ride height on the car. They specialize in Soobie, Mitsubishi, and Mazda, but they sell and install BC Racing Coilovers and said that they could adjust both preload and ride height on the car. Plus I trust them as they have mounted and balanced my tires and installed my resonator delete pipe. It is annoying and tedious to adjust ride height with jack stands.
For $100 bucks and 1.5 hrs of your time I'd say let the pros do the work, they have a lift.
to adjust preload and ride height on the car. They specialize in Soobie, Mitsubishi, and Mazda, but they sell and install BC Racing Coilovers and said that they could adjust both preload and ride height on the car. Plus I trust them as they have mounted and balanced my tires and installed my resonator delete pipe. It is annoying and tedious to adjust ride height with jack stands.For $100
bucks and 1.5 hrs of your time I'd say let the pros do the work, they have a lift.