
Suspension Non Violent Mushroom Repair


Thread Starter
|
2nd Gear
Joined: Mar 2004
Posts: 97
Likes: 0
From: North Platte, Nebraska
Non Violent Mushroom Repair
I hit a hole, right side at about 40 mph. Getting off at an exit in West Virginia. Felt like  . All I was concerned about was the 17" S-lite. Transfered rubber, about 4 inches onto white rim. Everything else seemed fine. No pulling. Got back home and I dont know why, Found horror stories about the mushrooming here. Went and checked mine.
  . So I checked all of the posts here. I was going to do it. I came up with this softer way with a slug, homemade plate, long bolt, nut and some spacers. It was too easy. No rough play with hammers, till setup was installed. Then controlled square hits with a block of wood relaxed all surfaces flat as Nebraska. Check out these Pic's here. P.S. Sorry pic's are not in order.
  http://www.flickr.com/photos/mini05s/
. All I was concerned about was the 17" S-lite. Transfered rubber, about 4 inches onto white rim. Everything else seemed fine. No pulling. Got back home and I dont know why, Found horror stories about the mushrooming here. Went and checked mine. . So I checked all of the posts here. I was going to do it. I came up with this softer way with a slug, homemade plate, long bolt, nut and some spacers. It was too easy. No rough play with hammers, till setup was installed. Then controlled square hits with a block of wood relaxed all surfaces flat as Nebraska. Check out these Pic's here. P.S. Sorry pic's are not in order. http://www.flickr.com/photos/mini05s/

Thread Starter
|
2nd Gear
Joined: Mar 2004
Posts: 97
Likes: 0
From: North Platte, Nebraska
I ordered a new one from my dealer. The studs angled outward. Rubber OK. I believe if this piece is the only part to go, a guy should be happy compaired to knocking his tower up. I'm disappointed with this prospect.


Coordinator :: ClubMINI.ph
Joined: Aug 2003
Posts: 246
Likes: 0
From: Philippines
Great solution. I've been looking for way to repair the shock tower without the banging!! One question though, ow hard was it to torque the bolt down to get it flat against the plate?
John
I've been looking for way to repair the shock tower without the banging!! One question though, ow hard was it to torque the bolt down to get it flat against the plate? John
Thread Starter
|
2nd Gear
Joined: Mar 2004
Posts: 97
Likes: 0
From: North Platte, Nebraska
It was too easy. 5/8 coarse bolt with oil. Like squishing a grape.  I wish it was harder. It would have made you thought it was substancial. Anti-climatic. But satisfying.
I wish it was harder. It would have made you thought it was substancial. Anti-climatic. But satisfying.
Coordinator :: ClubMINI.ph
Joined: Aug 2003
Posts: 246
Likes: 0
From: Philippines
Trending Topics

6th Gear
Joined: Mar 2005
Posts: 2,384
Likes: 0
From: LI, NY
ricky,
From the pictures and captions, I sort of get the gist of what you did, but I am not clear on a number of the details. How much of the assembly was taken apart? What was home-made? I'm afraid the only picture I completely understand is the first one. I like to do things myself, but tbe first time I make an attempt I need a bit of clear guidance. I thank you muchly if you're up to a description of each picture.
From the pictures and captions, I sort of get the gist of what you did, but I am not clear on a number of the details. How much of the assembly was taken apart? What was home-made? I'm afraid the only picture I completely understand is the first one. I like to do things myself, but tbe first time I make an attempt I need a bit of clear guidance. I thank you muchly if you're up to a description of each picture.

6th Gear
Joined: Jul 2004
Posts: 2,072
Likes: 4
Funny, I was thinking about something like what ricky did...
Without taking anything away from ricky (he thought about it and posted first), the basic concept in body repair is to have an anvil-like surface behind the sheetmetal to absorb the force from a hammer that is pounding the dent out of sheetmetal. The problem with the traditional approach is that there is no precise control over how much force gets applied. Being able to use a bolt and nut gives almost total control over the application of force.
Explanation of ricky's photos:
1. Finish. This is kind of self-explanatory.
2. Setup. This is a shot of the clamp that ricky fabricated. The anvil piece appears to be cut from a 1/4" piece of sheet steel.
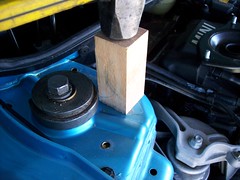
3. Hammer and wood block. Is used to flatten any mushrooming of the sheetmetal that is not pressed back from the center. Use of wood avoids thinning of the sheetmetal.
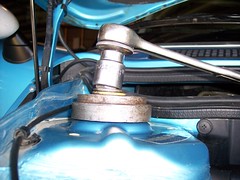
4. Top side with adapter. Shows the top piece bolted to the anvil ready for tightening.
5. Plate in position. View from underneath showing how to position the anvil.
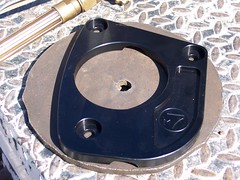
6. Making underside plate. Shows how ricky used the M7 strut plate as a pattern of sorts for the anvil.
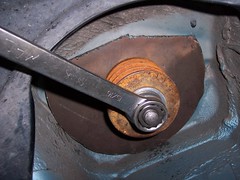
7.Mushroom Tower with slug. View of the mushroomed strut tower with the top piece in place for fitment purposes.
One thought - you might want to use a washer to center the slug part while clamping down on the tower sheetmetal.
The idea is a really good one. It avoids the risk of overdoing the hammering back in place. Thanks to ricky for sharing.
Explanation of ricky's photos:
1. Finish. This is kind of self-explanatory.
2. Setup. This is a shot of the clamp that ricky fabricated. The anvil piece appears to be cut from a 1/4" piece of sheet steel.
3. Hammer and wood block. Is used to flatten any mushrooming of the sheetmetal that is not pressed back from the center. Use of wood avoids thinning of the sheetmetal.
4. Top side with adapter. Shows the top piece bolted to the anvil ready for tightening.
5. Plate in position. View from underneath showing how to position the anvil.
6. Making underside plate. Shows how ricky used the M7 strut plate as a pattern of sorts for the anvil.
7.Mushroom Tower with slug. View of the mushroomed strut tower with the top piece in place for fitment purposes.
One thought - you might want to use a washer to center the slug part while clamping down on the tower sheetmetal.
The idea is a really good one. It avoids the risk of overdoing the hammering back in place. Thanks to ricky for sharing.
6th Gear
Joined: Mar 2005
Posts: 2,384
Likes: 0
From: LI, NY
And here it is with the photos for easy viewing:
Without taking anything away from ricky (he thought about it and posted first), the basic concept in body repair is to have an anvil-like surface behind the sheetmetal to absorb the force from a hammer that is pounding the dent out of sheetmetal. The problem with the traditional approach is that there is no precise control over how much force gets applied. Being able to use a bolt and nut gives almost total control over the application of force.
Explanation of ricky's photos:
1. Finish. This is kind of self-explanatory.

2. Setup. This is a shot of the clamp that ricky fabricated. The anvil piece appears to be cut from a 1/4" piece of sheet steel.

3. Hammer and wood block. Is used to flatten any mushrooming of the sheetmetal that is not pressed back from the center. Use of wood avoids thinning of the sheetmetal.
4. Top side with adapter. Shows the top piece bolted to the anvil ready for tightening.
5. Plate in position. View from underneath showing how to position the anvil.
6. Making underside plate. Shows how ricky used the M7 strut plate as a pattern of sorts for the anvil.
7.Mushroom Tower with slug. View of the mushroomed strut tower with the top piece in place for fitment purposes.

One thought - you might want to use a washer to center the slug part while clamping down on the tower sheetmetal.
The idea is a really good one. It avoids the risk of overdoing the hammering back in place. Thanks to ricky for sharing.
Without taking anything away from ricky (he thought about it and posted first), the basic concept in body repair is to have an anvil-like surface behind the sheetmetal to absorb the force from a hammer that is pounding the dent out of sheetmetal. The problem with the traditional approach is that there is no precise control over how much force gets applied. Being able to use a bolt and nut gives almost total control over the application of force.
Explanation of ricky's photos:
1. Finish. This is kind of self-explanatory.
2. Setup. This is a shot of the clamp that ricky fabricated. The anvil piece appears to be cut from a 1/4" piece of sheet steel.
3. Hammer and wood block. Is used to flatten any mushrooming of the sheetmetal that is not pressed back from the center. Use of wood avoids thinning of the sheetmetal.
4. Top side with adapter. Shows the top piece bolted to the anvil ready for tightening.
5. Plate in position. View from underneath showing how to position the anvil.
6. Making underside plate. Shows how ricky used the M7 strut plate as a pattern of sorts for the anvil.
7.Mushroom Tower with slug. View of the mushroomed strut tower with the top piece in place for fitment purposes.
One thought - you might want to use a washer to center the slug part while clamping down on the tower sheetmetal.
The idea is a really good one. It avoids the risk of overdoing the hammering back in place. Thanks to ricky for sharing.

Thread Starter
|
2nd Gear
Joined: Mar 2004
Posts: 97
Likes: 0
From: North Platte, Nebraska
I forgot. The M7 plate is much to big for a pattern. Best is to use a piece of thin cardboard with a scizzors. Lay down on the ground and look up underneath. Cut to fit. There are some angles on the corners of strut tower to be aware of. Mark the stud holes on cardboard for guiding your pattern.

6th Gear
Joined: Aug 2003
Posts: 1,344
Likes: 0
From: Uniontown, PA
Originally Posted by gelstudios
Any thoughts on loaning your "tool" to other members? :-)

It is something that every Mini owner doesn't need but, I'd bet a lot of the local Mini Clubs will get one to loan out to their members. Especially if reasonably priced.

Thread Starter
|
2nd Gear
Joined: Mar 2004
Posts: 97
Likes: 0
From: North Platte, Nebraska
Wish I could. I heard this one time and it fits here. " I have the inclination, the maturity, and the wherewithal. Unfortunately, I dont have the time. 
Anybody enterprising out there is welcome to do it. Two machined pieces. With a 5/8 bolt and nut.
Anybody enterprising out there is welcome to do it. Two machined pieces. With a 5/8 bolt and nut.
6th Gear
Joined: Aug 2003
Posts: 1,344
Likes: 0
From: Uniontown, PA
Originally Posted by ricky
Wish I could. I heard this one time and it fits here. " I have the inclination, the maturity, and the wherewithal. Unfortunately, I dont have the time.
Anybody enterprising out there is welcome to do it. Two machined pieces. With a 5/8 bolt and nut.
Anybody enterprising out there is welcome to do it. Two machined pieces. With a 5/8 bolt and nut.
Thread Starter
|
2nd Gear
Joined: Mar 2004
Posts: 97
Likes: 0
From: North Platte, Nebraska
The top piece was an old sleeve installer I had on my service truck, from where I dont know. It just happened to fit perfectly thru the diameter and over the rolled up portion of strut tower. As easy as it pulls back down with bolt, I think anything round, slightly bigger than hole, strong enough not to flex and with a hole drilled in center for bolt, would be fine. Knowing a mechanic with a torch,  ,or gas ax, and has dudads laying around is a big help.
,or gas ax, and has dudads laying around is a big help.


Thread Starter
|
2nd Gear
Joined: Mar 2004
Posts: 97
Likes: 0
From: North Platte, Nebraska
I've been thinking about this for awhile now. I think it would work. Maybe for some it would be easier to access wood tools. Say cut out a piece of 3/4 oak or some other hard wood for the bottom and top. Drill a hole through and use a half inch bolt, nut and some washers. Oak is strong and would not flex.


Neutral
Joined: Oct 2005
Posts: 8
Likes: 0
From: San Mateo, CA
Erik's tool works great
I mushroomed my strut tower supports pretty good when I hit a major pothole and bent the strut. I made a cardboard template and gave it to a local welding shop to fabricate the tool. Everything squished back into place perfectly. I then installed the M7 reinforcement plates and replaced the bent strut.